________________________________________________________________________________
EVO STAR 60-800
45
INSTALLING THE REMOTE PANEL WITH E.P.O.
CAUTION! : FOLLOW THE INSTRUCTIONS VERY CAREFULLY. ANY MISTAKE WILL
CAUSE AN OUTPUT VOLTAGE DROP.
To carry out the installation of a remote panel with E.P.O., you must first carry out all installation procedures for the
normal remote panel, as in paragraph 6.4.1 then check the actual efficiency of the remote panel by checking that the
leds respect the colours on the control panel.
After doing so please carry out the following instructions:
Make sure that the U.P.S. is off and that all the switches are off (if the U.P.S. is already operative please proceed to by-
pass setting chapter 5)
Unscrew the set screws from the second access panel of the U.P.S. and remove it.
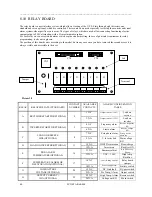
Using cutting nippers cut the jumper as shown on the relay board (picture 18)
Turn on the “Reserve switch” disconnecting switch, the message “UPS Off” will appear on the display and all the
synoptic leds will turn red except for led “H” which will be green; wait till led “A” (picture 17) starts flashing
Turn on the “Main switch” disconnecting switch, led “B”(picture 17) will turn green
Press the
button for about two seconds, the message “Starting up procedure started”, and if the procedure has been
carried out correctly led “C” (picture 17) and led “E” will turn green in sequence and the message “UPS alarmed” will
appear on the display
Press keys F6+F3 with the arrows F7-F8 select “Level of EPO”, press F6 to confirm, select “Stop completed” and press
F6.Press F3 to go back to the main menu
Press the E.P.O. switch on the remote panel and check that the emergency button actually works (leds C, E, F picture
17) chapter 6.1 must turn red and the message (Emergency EPO block) will appear
Reset the switch
Continue the starting procedure (chapter 4) (if already operative restore functioning from U.P.S by-pass following the
instructions in paragraph 5)


