background image

 
________________________________________________________________________________ 

EVO STAR 60-800 


23

CAUTION! : THE U.P.S. AUTONOMY DEPENDS ON THE STATE OF THE BATTERIES; A 

CORRECT AND PROGRAMMED MAINTENANCE IS 
FUNDAMENTAL TO AVOID A BAD CONDITION OF THE 
BATTERIES FROM HAMPERING U.P.S. FUNCTIONING WHEN 
NECESSARY.


NOTE: WHEN BATTERIES ARE CONNECTED DON’T CLOSE BATTERY SWITCH IF UPS 

IS OFF 


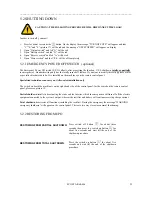
4.7 MECANICAL OPERATIONS 


4.7.1 OPEN FRONT PANEL 


Open the lock with supplied key 

In model of power 120KVA -800KVA open door where the control panel is mounted 


4.7.3 REMOVE SECONDARY DOOR 


Open front panel 


Remove screws on sides 


Remove ground wire fix on secondary door (remember to connect it before closing secondary door) 


4.7.4 REMOVE ROOF 


Remove the four screws on roof 


Lift roof  


Remove ground wire fix under roof (remember to connect it before closing roof) 


4.7.1 

REMOVE SIDE DOORS  


Remove the four screws on side door 


Lift door 


Remove the four screws on roof 


Remove ground wire fix on door (remember to connect it before closing door) 


Summary of Contents for EVO STAR

Page 1: ...EVO STAR Uninterruptible Power Supply EVO STAR 60 800 KVA Installation and User Manual...

Page 2: ...____________________________ EVO STAR 60 800 1 Copyright 2007 TECNOWARE s r l All rights reserved All trademark are property of their respective owners TECNOWARE s r l www service tecnoware com This m...

Page 3: ...R UP TO 150 KVA 17 POWER OVER 150 KVA 17 4 CONNECTING THE U P S TO THE MAINS SUPPLY 18 4 1 COMPATIBILITY WITH THE POWER SUPPLY 18 4 2 INDIRECT POWER SUPPLY 18 4 2 1 TRANSFORMER 18 4 2 2 GENERATOR 18 4...

Page 4: ...7 1 2 3 BATTERY TEST 31 7 1 3 FUNCTIONING MODE CONFIGURATION 32 7 1 3 1 BATTERY CHARGE MODE 32 7 1 3 2 FORCING ON INVERTER MODE 32 7 1 4 SYSTEM AUTONOMY 32 7 1 5 BUZZER 32 7 1 6 STRUCTURE MENU 33 33...

Page 5: ...48 13 1 SNMP 48 13 2 ISTALLATION 48 14 OUTPUT FREQUENCY 48 15 BATTERIES 49 15 1 EXTERNAL BATTERY CABINETS 50 15 1 1 DESCRIPTION OF THE MAX 32 BATTERIES CABINET UP TO 44Ah 51 15 1 2 DESCRIPTION OF THE...

Page 6: ...complete information on installation operating and preventative maintenance of the UPS and Battery Cabinet Illustrations showing the function of all operator controls instruments alarms and indicatin...

Page 7: ...bber gloves when working on damaged batteries Never remove the doors and protection covers while the equipment is operative When working on the UPS you must remove any metallic objects you may be wear...

Page 8: ...the source of contact Call immediately for an ambulance and if necessary for the help of a technician specialised in electrical equipment PEOPLE WHO HAVE COME INTO CONTACT WITH CORROSIVE LIQUIDS Ask i...

Page 9: ...Specifies the serial number of the product 7 Specifies weight In the picture you can see the identity sticker placed on the packaging of the battery 1 Specifies the battery cabinet model 2 Specifies t...

Page 10: ...kaged It must not be exposed to the inclemency of the weather and the room shouldn t be too humid humidity below 90 non condensing nor should the UPS be exposed to sources of heat room temperature sho...

Page 11: ...ordinary maintenance When choosing the rooms please remember that the equipment must not be exposed to the inclemency of the weather to corrosive substances to excessive humidity humidity below 90 non...

Page 12: ...is a continuous controlled voltage available to charge or maintain battery efficiency cross fuse 6 b and battery switch 8 and to the inverter input 10 This step is to generate a three phase voltage st...

Page 13: ...ilter give us a very stable three phase voltage with a harmonic distortion lower than one unit The controlling logic of the inverter also controls output current intensity limiting it to a value which...

Page 14: ...th the internal circuits with a minimum risk of contact with voltaged elements 3 1 5 PART LAYOUT It is important to be familiar with the parts that are necessary during the connection procedures befor...

Page 15: ...________________________________________________________________________________ EVO STAR 60 800 14 U P S from 120 to 150 KVA FF F F F F F F A B C D E F Picture 3 5...

Page 16: ..._____________________ EVO STAR 60 800 15 Battery connection Mains switch Reserve switch Output switch Battery fuses Battery switch Spare fuses Neutral bar Rectifier fuses Relay board RS 232 By pass sw...

Page 17: ...power is not within the set parameters The type of fuse which is used guarantee quick intervention and therefore are a guarantee also for optimum protection of the internal devices Furthermore there i...

Page 18: ...source back up supply generator U V W Main input U1 V1 W1 N1 Reserve input U2 V2 W2 N2 Output D C Battery pole input D negative pole C positive pole In 100KVA device terminal D and C are double in 120...

Page 19: ...load which generates harmonic frequency currents multiples of the 50 60 Hz In function of the line impedance these create a harmonic voltage distortion This latter value total harmonic voltage distort...

Page 20: ...he supporting feet 2 Shutdown all breakers 3 Verify the integrity of the by pass breaker lock out 4 Make sure there is no voltage on the mains supply 5 Unscrew the second access panel setscrews and re...

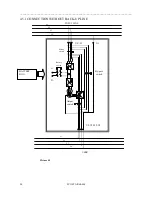
Page 21: ...______________________________________ EVO STAR 60 800 20 4 5 1 CONNECTION WITHOUT BACK UP LINE INPUT LINE L1 L2 L3 LN U V W Mains switch By pass switch Output switch N1 C D U2 V2 W2 N2 USER L1 L2 L3...

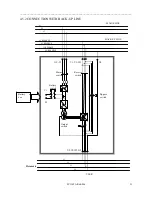
Page 22: ..._ EVO STAR 60 800 21 4 5 2 CONNECTION WITH BACK UP LINE Picture 4 4 MAINS LINE L1 L2 L3 U V W Mains switch By pass switch Output switch N1 C D U2 V2 W2 N2 USER L1 L2 L3 LN Battery switch Battery box L...

Page 23: ...ponding battery breaker placed on the U P S is off then shut down the battery switch on the cabinet 11 Using a multimeter verify the correct polarity on the U P S battery terminals 12 Close the second...

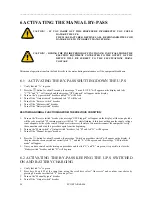
Page 24: ...4 7 1 OPEN FRONT PANEL Open the lock with supplied key In model of power 120KVA 800KVA open door where the control panel is mounted 4 7 3 REMOVE SECONDARY DOOR Open front panel Remove screws on sides...

Page 25: ...tch on procedure started will appear if the steps of procedure have been followed correctly led C and led E will become green and the message UPS in alarm mode will appear 7 Once you have carried out...

Page 26: ...hnician to do It is installed on the machine or on the remote control panel Specialised technicians can carry out After sales installation only The switch on board the machine is on the right hand sid...

Page 27: ...MAL FUNCTIONING FROM THE PREVIOUS CONDITION 1 Turn on the Reserve switch breaker the message UPS Stopped will appear on the display all the synoptic leds will be red except led H remain green wait til...

Page 28: ...R 60 800 27 RESTORING NORMAL FUNCTIONING FROM THE PREVIOUS CONDITION 1 Make sure the led F is yellow 2 Turn on the Output switch breaker 3 Turn off the Manual by pass breaker 4 Press keys F6 and F2 at...

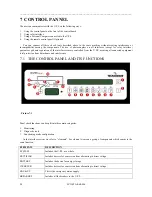
Page 29: ...paration of the interfaces remote controlled from the U P S assuring all connected equipment total protection from disturbance and interference 7 1 THE CONTROL PANEL AND ITS FUNCTIONS Panel check func...

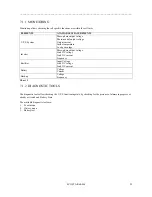
Page 30: ...Output current Inside temperature Load percentage Inverter Phase phase output voltage Link DC voltage Link DC current Frequency Rectifier Input Voltage Link DC voltage Link DC current Battery Voltage...

Page 31: ...shing Output current over the nominal value green Manual by pass open H By pass red Manual by pass closed Chart 2 7 1 2 2 EVENT AND HISTORY MENUS The EVENT menu allows viewing of all the alarms in pro...

Page 32: ...ed Error in frequency synchronism Anomaly IV6 Frequency error Frequency error Anomaly IV7 Current 125 Output Current 125 Anomaly IV8 Current 150 Output Current 150 Anomaly IV9 High current Output Curr...

Page 33: ...iagram 1a b These keys activate the starting procedure which consists of the starting of the rectifier only This makes it possible to charge the batteries through the terminal contacts C and D This fu...

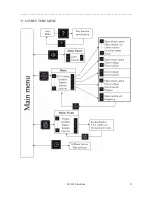
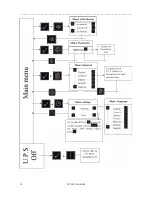
Page 34: ...________________________________________________________________________________ EVO STAR 60 800 33 7 1 6 STRUCTURE MENU...

Page 35: ...________________________________________________________________________________ EVO STAR 60 800 34...

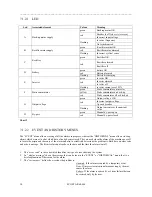
Page 36: ...6 key Relay programming or press F3 key to escape In the secondary menus you can select a relay F7 F8 keys press F6 key to confirm or F3 to escape In relay menu there are all the alarms possible for r...

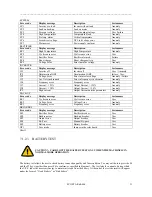
Page 37: ...L7 HITEM If air flow is too hot probe turn on and temperature alarm is set Probe turns on at 90 C Temperature alarm will turn off UPS and load supply is transferred to back up line red DL8 DESAT One o...

Page 38: ...ated A 8V supply voltage Verde DL2 Isolated A 15V supply voltage Verde DL3 Isolated B 8V supply voltage Verde DL4 Isolated B 15V supply voltage Verde 8 5 FUSES BOARD REPLACING THE FUSES CAUTION ALL CO...

Page 39: ...d and fans The positioning of boards on device is as in picture 8 2 on CN1 enters AC voltage to measure from CN2 comes out a signal proportional to this voltage CN3 supplies voltage to A04 CN4 supplie...

Page 40: ...you can find them by flat and wire on which they are positioned Position Wire Flat Jumper Description 1 13 FC3 Jp1 Positioned on wire from DClink to battery switch it is used to read Dc current from D...

Page 41: ...TED STATE STANDARD CONTACT NUMBER AVAILABLE CONTACTS ALARM CONFIGURATION TABLE 1 N C Output current 150 Load on reserve A RECTIFIER STARTED OPTIONAL 2 3 N A Output current 125 Load on inverter 4 N C F...

Page 42: ...m You can verify the state of the relays with the led s picture 18 which are placed above each relay 8 11 RECTIFIER FILTER This board is a RC filter on DC voltage generated from rectifier 8 12 BATTERY...

Page 43: ...hermore it is possible to supply it with an E P O switch chapter 4 2 1 This device is composed of two main parts one interface board inside the machine and an actual synoptic which should be installed...

Page 44: ...an interface board picture 20 present only if requested before purchase Its position varies according to the different models but it is always viewable and accessible by the user If there is a board...

Page 45: ...pin13 pin2 pin14 pin1 Close the U P S second access by fastening the screws Continue the starting procedure if already operative restore functioning from U P S by pass following the relative instructi...

Page 46: ...board picture 18 Turn on the Reserve switch disconnecting switch the message UPS Off will appear on the display and all the synoptic leds will turn red except for led H which will be green wait till l...

Page 47: ...tatic bypass as soon as epo contact is close Load is not supplied EPO is useful in emergency situations for example fire to disconnect load from supply line 11 1 EPO TYPE 11 1 1 EPO ON CONTROL PANEL I...

Page 48: ...ia world wide web to make a remote monitoring and management Connect U P S in LAN WAN with usually Ethernet connection able as optional interface or RS232 is possible monitoring UPS as any other wire...

Page 49: ...ltage break down anomalies that took place during working time or in progress it is possible to send e_mails system shut down etc 13 2 ISTALLATION Kit Mini NetAgent It is suggested a extension wire to...

Page 50: ...e type of battery used and above all on their capacity Battery capacity is expressed in ampere hour from this parameter you can work out system autonomy This expresses the amount of current delivered...

Page 51: ...ossible to put several batteries in parallel picture 26 The cabinet code indicates the type of cabinet and also the number of batteries housed in it With these last two parameters you can establish to...

Page 52: ...cess this area you must remove the four fastening screws in the corners of the roof Apart from the materials listed in picture 28 there are also the battery jumpers To connect to the U P S we suggest...

Page 53: ...acity In the 2nd 3rd and 4th planes there are 8 battery elements and in the 1st and the last one there are 4 battery elements In the 5th plane there is the battery breaker and the protection fuse whil...

Page 54: ...g 1250 1400 1800 2100 Protection degree IP 21 Cable entrance Front MECHANICAL DATA Code FGCEVOST400TT FGCEVOST500TT FGCEVOST600TT FGCEVOST800TT Size kVA 400 500 600 800 Dimensions mm 2800x800x1800 300...

Page 55: ...idge IGBT with pwm control Nominal output voltage 380 400 415Vac trifase N PE Transformer Standard Wave type Sinusoidal Output voltage tolerance Static stability 1 Load variation 0 100 0 8 static stab...

Page 56: ...800 55 Static bypass Configuration Dual input Voltage windows 10 of nominal system voltage adjustable Overload on bypass 125 continuous 200 for 5 minute 1000 for cycle Manual bypass switch Standard S...

Page 57: ...ltage but it is not possible to work on terminal breakers for example for remove system without disconnecting load External breaker box is a system of three breaker that can turn off mains line for U...

Page 58: ...lled bridge made with SCR In this configuration input current has a typical wave as in picture B1 This solution has a THD of 30 usually because there are fifth and seventh harmonic The problems for th...

Page 59: ...is case voltage and frequency on output are dependent of variations of input Ups only supplies battery U P S will be actived only in case of input black out This configuration is recommended only for...

Page 60: ...TECNOWARE S r l www service tecnoware com...

Reviews: