background image

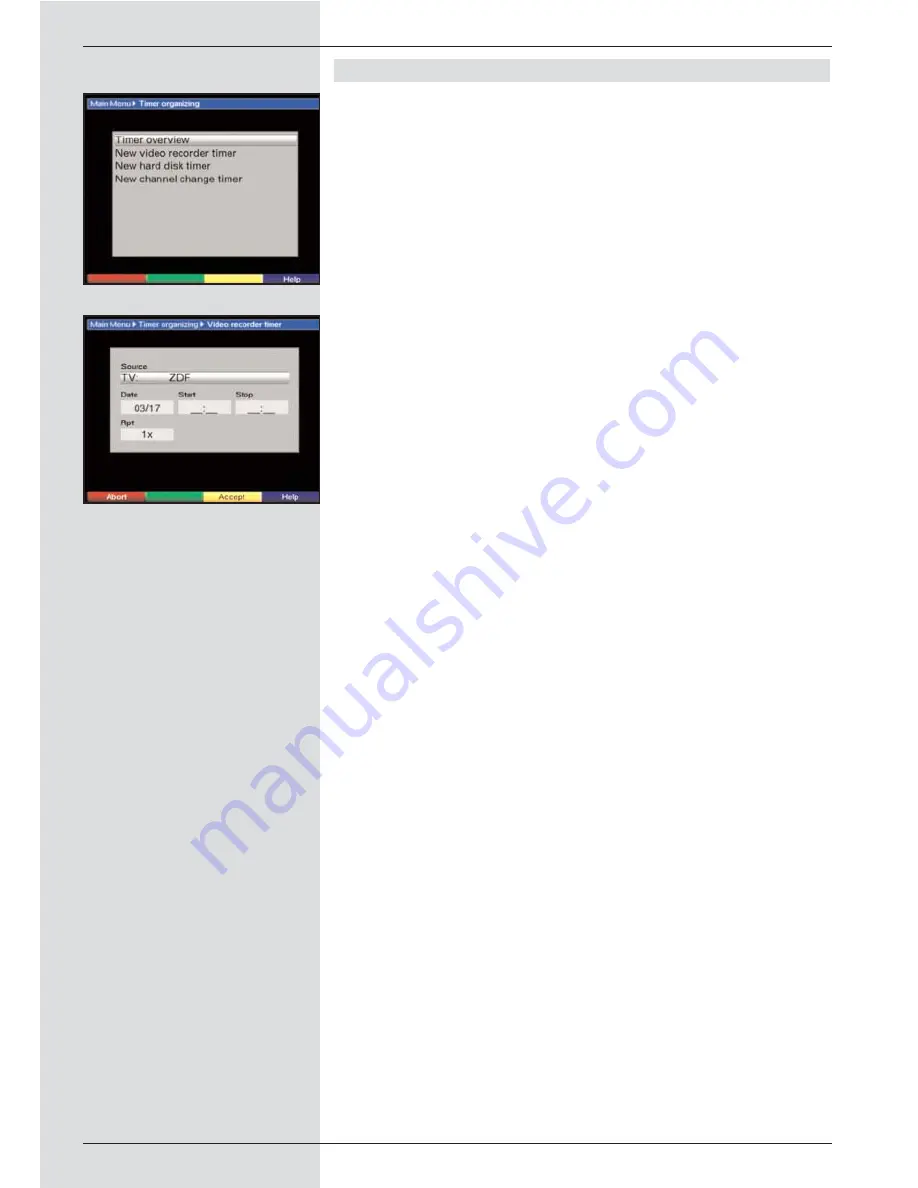
Manual timer programming

>

Press the 

Menu

key to call up the 

Main Menu

.

>

Use the 

up/down arrow keys

to mark the line 

Timer

organizing

.

>

Confirm by pressing 

OK

.

The sub-menu 

Timer organizing

will be displayed.

(Fig. 8-1)

>

Use the 

up/down arrow keys

to select the type of

timer you wish to programme.

>

Press 

OK

. A new window will be displayed, allowing

you to enter the programming data for a new timer
event. (Fig. 8-2)

To prgramme an event proceed as follows:

Source

>

Use the 

arrow keys

to mark the column 

Source

.

>

Press

OK

.

>

A selection window will be displayed. Use the

up/down arrow keys

to select the desired source 

(TV or Radio).

>

Confirm by pressing

OK

Depending on the previous setting, either the TV or
the radio programme list will now be displayed. 

>

Use the 

arrow keys

to mark the desired programme.

>

Use the 

up/down arrow keys

to move the marker

around the list one line at a time. 

>

Use the

left/right arrow keys

to move back-ward or

forward in the list one page at a time. 

>

Press 

OK 

to accept the selected programme into the

timer. 

Date

>

Use the 

arrow keys

to mark the column 

Date

.

>

Use the 

numeric keys 

to enter the date (4 digit form)

of the timer event.

Start

>

Use t

he arrow keys

to mark the column 

Start

.

>

In this line, use the 

numeric keys

to enter the starting

time for the timer.

Stop

>

Repeat the steps as set out under “Start” to enter the
stop, or ending time (except for programme change
timer).

Repeat

>

Use the 

arrow keys

to mark the column 

Rpt

.

>

Press 

OK.

A selection window will be opened, showing various
suggestions for repeats.

1x

Timer on once 

T

Daily repeat

1 W

Repeat once a week

1-5

Repeat only on workdays

6-7

Repeat only on weekends

>

Use the 

up/down arrow keys

to select the desired

32

(Fig. 8-1)

(Fig. 8-2)

Summary of Contents for DigiCorder T1

Page 1: ...e reception of free to air and encrypted programmes broadcast via satellite e g VIACCESS IRDETO SECA etc DVB T Programmes With integrated Premiere decoding system and PCMCIA interface for installing a...

Page 2: ...urs 18 6 2 2 Country 18 6 2 3 Remote control code 18 6 2 4 5 V antenna feed 18 6 2 5 Standby clock 18 6 3 Audio video settings 18 6 3 1 Picture format 18 6 3 2 Language audio signal 18 6 3 3 Language...

Page 3: ...39 Timeshift function 42 7 15 2 Playback 43 7 15 2 1 Play back hard drive recordings 43 7 15 2 2 Pause freeze frame 44 7 15 2 3 Fast forward and revers 44 7 15 2 4 End Playback 44 7 15 3 Managing the...

Page 4: ...te position 68 9 5 1 Updating the software 62 9 5 2 Copying settings 62 9 6 Reference position 68 10 Technical terms 69 11 Technical data 71 12 Trouble shooting guide 75 13 Annexure 77 Index 79 4 Your...

Page 5: ...keys 0 AV OK Volume Info Arrow key right Arrow key left Arrow key up Arrow key down Remote control option In order to operate 2 TechniSat receivers with identical coding television sets as well as an...

Page 6: ...the CI module Please note the manufacturer s instructions for both the CI module and card Insert the appropriate smart card into the corresponding CI module Now insert the CI module carefully in the s...

Page 7: ...The range of functions of your receiver is continually being expanded and these changes are available to you via soft ware updates This may mean that new operating steps are added which are not yet i...

Page 8: ...to be made when operating a rotating antenna Technical terms used in the operating manual are explained in Chapter 10 Technical data is set out in Chapter 11 A brief troubleshooting guide can be foun...

Page 9: ...oth even surface and do not place any objects on top of the unit Ventilation slots located in the hou sing are essential to conduct heat from the interior of the unit Do not place any burning objects...

Page 10: ...c Connect the antenna output of the DVB T receiver with the antenna input of the television set d Connect the video recorder with the VCR Scart socket of the DVB receiver e Connect the S Video output...

Page 11: ...set Proceed as follows b Connect the receiver Scart socket TV with the Scart socket on the television set using a Scart cable If your television set provides the appropriate facility it will switch au...

Page 12: ...uld be connected to the mains power supply only after all the cable connections to the other system components have been made This will help to avoid serious damage to the digital receiver or to other...

Page 13: ...structions given on the screen Operating language Press OK to move to the selection window for the operating menu language Fig 5 2 Use the up down arrow keys to select the desired operating language C...

Page 14: ...rmal operation 6 Settings You have now connected your digital receiver and commen ced operating it You can if you wish still optimize the set tings of the digital receiver in accordance with your pref...

Page 15: ...line you must decide whether your receiver should be allocated the remote control option SAT1 or SAT2 To make the selection press the SAT1 resp SAT2 key and the OK key simultaneously Press the Back k...

Page 16: ...the picture format for your television set 6 3 2 Language Audio signal In this line use the left right arrow keys to select your preferred language This function will automatically select the preferre...

Page 17: ...al sound can also be selected manually Please also note Point 7 5 1 of the operating manual 6 3 7 UHF output channel To set a suitable UHF channel proceed as follows On your television set select a fr...

Page 18: ...he unit or on the remote control Press the same key again either on the unit or on the remote control to switch the receiver off The receiver is now in standby mode If this feature has been activated...

Page 19: ...he finding of programmes your receiver is equipped with several programme lists You have the choice of selecting your Favourites list see Point 8 1 or you can use the alphabetically sorted Total list...

Page 20: ...tion of encrypted programmes Your receiver is equipped with a Common Interface This enables you to receive encrypted programmes To do this you must first insert a CI module together with a valid smart...

Page 21: ...ice of starting times this will be indicated on screen Fig 7 8 To select one of the starting times available press the key Option A window will be displayed indicating the starting times available Fig...

Page 22: ...programme will automatically be presented in this format If you have not activated the function Dolby Digital AC3 you can set the unit to AC3 mode manually as follows Press the Language Select key Whe...

Page 23: ...will display information related to the following programme Press the Info key again to close the additional win dow 7 10 Transponder information Press OK to call up the navigator Use the arrow keys...

Page 24: ...on key to display the teletext group indicated in the blue field Mixed mode Press the teletext key again to switch to mixed mode simultaneous display of teletext information and TV picture Press this...

Page 25: ...l This can only take place when your unit is in standby mode The downloading procedure is indicated by the message Load SFI in the display If your receiver is in operating mode at this time the downlo...

Page 26: ...s to move the marker one page at a time paging You can now utilise the SFI functions Point 7 14 3 Press the yellow function key to move to the SFI table Next See Point 7 14 5 or press the TV Radio key...

Page 27: ...gthy texts by means of the arrow keys Press Back to revert to the previous table 7 14 7 2 SFI timer programming The electronic programme guide SFI can be utilised to facili tate easy programming of ti...

Page 28: ...enu to open a selection window Use the up down arrow keys to mark the line Programmes Confirm by pressing OK The current day s overview of the selected programme will be displayed Fig 7 19 Now use the...

Page 29: ...t of a specific day press the appropriate numeric key 7 14 8 Exiting from SFI Press either the Menu key or TV Radio o revert to normal operation 8 Hard drive operation Your PVR receiver PVR Personal V...

Page 30: ...ing on the hard drive or No if you do not wish to save the programme Option 2 If you have to interrupt viewing a programme e g because of a phone call or the like you can press the yellow function key...

Page 31: ...tched on by means of the hard drive timer this will be indicated by PVR Timer being shown on the display Most of the remote control functions are disabled in order to prevent an accidental premature i...

Page 32: ...rrow keys to mark the desired programme Use the up down arrow keys to move the marker around the list one line at a time Use the left right arrow keys to move back ward or forward in the list one page...

Page 33: ...ting timer setting use the up down arrow keys to mark the timer event you wish to change Press the yellow function key Change to go to the settings of the marked timer Proceed to make the changes as s...

Page 34: ...ne ous recording and playback This means that you can now enjoy timeshift television Thus you can view the beginning of a recording and decide to skip certain parts such as advertising At the same tim...

Page 35: ...use Freeze frame To pause during the playback of a recording freeze frame press the yellow function key while the unit is in Play mode The message Pause will appear Press the yellow function key again...

Page 36: ...n arrow keys to mark the desired pro gramme 8 3 1 1 Delete To delete the selected recording press the red func tion key Delete Confirm the following message by pressing OK to actually delete the recor...

Page 37: ...e will now be chec ked the result will be displayed on screen Formating the hard drive When the hard drive is formatted the data system is repla ced This may become necessary if checking the hard driv...

Page 38: ...mark the line Manage TV lists if you wish to work on the TV list or Manage Radio lists if you wish to work on the Radio list Confirm by pressing OK The programme list management will be displayed allo...

Page 39: ...9 4 Use the up down arrow keys to mark the line Add Confirm by pressing OK Use the up down arrow keys to mark a programme that you wish to include in the list Press the yellow function key Add to add...

Page 40: ...mes To sort the order of programmes in the Favourites list accor ding to your preferences call up the programme list manage ment as described in Point 8 1 1 You will find yourself in the Favourites li...

Page 41: ...be displayed Use the up down arrow keys to mark the line Programme guide Confirm by pressing OK The menu Programme guide will be displayed Fig 9 7 Use the up down arrow keys to move the marker around...

Page 42: ...m mes included in the electronic programme guide Programmes In this display mode a table shows the current day s pro gramme of a single channel Genres If you are interested in particular types or cate...

Page 43: ...gure the menu Parental control proceed as follows Press Menu to display the Main Menu Use the up down arrow keys to mark the line Settings Confirm by pressing OK The sub menu Settings will be displaye...

Page 44: ...have completed changing the unit PIN code in this manner you will automatically be taken back to the Parental Control menu Note Do not forget your unit PIN code If you should forget it please consult...

Page 45: ...user enters a specific range of frequencies to be scanned for programmes 2 Channel scan When performing a channel scan the user enters a specific range of channels to be scanned for programmes Press t...

Page 46: ...key PID Search to enter the PCR audio and video PID Fig 9 19 Then use the arrow keys up down to mark the lines PCR PID Audio PID and Video PID and use the numeric keys to enter the appropriate data 9...

Page 47: ...f you have performed the delete function you must then start a programme scan and must copy the desired programmes from the Total list to the Favourites list Use the Menu key to call up the Main Menu...

Page 48: ...es have changed these may be cor rected as described under Point 8 3 4 manual programme scan The current transponder data may be obtained from your specialist retailer In the normal course of events y...

Page 49: ...now be transmitted to the receiving receiver Please not any messages displayed on screen 9 6 System configuration This menu item will show you the specific unit data e g cur rent software version Use...

Page 50: ...et They are processed in the DVB T recei ver so that audio and video signals AV are made available at the receiver outputs which are passed on to the television set in a form the TV set can use Freque...

Page 51: ...ver occasionally 11 Technical data DVB T tuner Input frequency range 47 230 MHz 470 860 MHz Frequency range tuner input to tuner output 50 860 MHz Tuner input IEC socket Input output impedance 75 Ohms...

Page 52: ...el Y 1 Vs s 0 3 dB into 75 Ohms Output level C 1 Vs s 0 3 dB into 75 Ohm Output level RED 0 7 Vs s 0 1Vp p into 75 Ohms Output level GREEN 0 7 Vs s 0 1Vp p into 75 Ohms Output level BLUE 0 7 Vs s 0 1V...

Page 53: ...red in the Total list SFI data SFI preview maximum 7 days in advance Timer Events maximum 124 events one year in advance Remote control system RC 5 Subsystem address 8 SAT 1 10 SAT 2 Modulation freque...

Page 54: ...e connection Check all cable connections Antenna incorrectly adjusted Adjust antenna No reception when using an active antenna Antenna feed 5V not switched on Switch on antenna feed as per Point 6 2 4...

Page 55: ...ype Genre 36 Geo positioning 63 Unit PIN 54 Infobox 26 Age restrictions 53 Parental control 45 Volume control 27 LNC 70 LOF 70 Manual scan 57 Modulator 70 MPEG1 69 MPEG2 69 Multifeed 27 Navigator 24 P...

Page 56: ...27 Symbol rate 23 System configuration 61 Timer recording 39 Timeshift 37 38 42 Transponder 71 Transponderfrequency 22 Transponder information 29 Scanning for transponders 56 Switching mode TV Radio 2...

Page 57: ...57...

Page 58: ...remerhaven 8 6 53 6 C Chemnitz 12 9 50 8 Cottbus 14 3 51 8 D Daun 6 8 50 2 Dippach 10 1 51 0 Dortmund 7 5 51 5 Dresden 13 7 51 1 Duisburg 6 8 51 4 D sseldorf 6 8 51 2 E Eisenach 10 3 51 0 Emden 7 2 53...

Page 59: ...3 M Magdeburg 11 6 52 1 Mainz 8 3 50 0 Mannheim 8 5 49 5 M nchen 11 6 48 1 N Neubrandenburg 13 3 53 6 Neum nster 10 0 54 1 N rnberg 11 1 49 5 O Oberhausen 6 9 51 5 Oldenburg Holsn 10 9 54 3 Oldenburg...

Page 60: ...ramme slot 234 When entering programme numnbers with more than one digit you have approx 3 seconds time after pressing a key to complete the entry If you wish to enter a number with only one or two di...

Page 61: ...61 DigiCorder T1...

Reviews: