30
Netra ft 1800 Installation Guide • February 1999
▼
To Replace a Module
1. Slide the module into its slot but not fully home.
A module will not fit into a slot designed for a different class of module.
2. When the lever engages with the chassis, raise it to push the module fully home.
3. Move the slide in the lever into the engaged position.
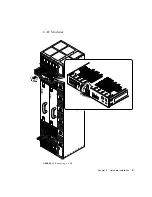
Replacing an RMM
RMM modules have a slide with an actuator microswitch on an ejector handle. The
slide controls the electrical connection to the motherboard. When the slide is closed
(to the right), the electrical connection is engaged; when it is open (to the left), the
electrical connection is disengaged. The handle is lifted to disengage the module
physically, and lowered to engage it.
▼
To Remove the RMM
1. Slide the latch in the handle of the RMM to the left (towards the ‘unlocked’
symbol).
2. Lift the handle.
3. Slide the RMM out of its slot.
Summary of Contents for Netra ft 1800
Page 6: ...vi Netra ft 1800 Installation Guide February 1999 ...
Page 10: ...x Netra ft 1800 Installation Guide February 1999 ...
Page 40: ...26 Netra ft 1800 Installation Guide February 1999 FIGURE 2 12 Removing a CPUset Module ...
Page 41: ...Chapter 2 Hardware Installation 27 CAF Modules FIGURE 2 13 Removing a CAF ...
Page 43: ...Chapter 2 Hardware Installation 29 PSU Modules FIGURE 2 15 Removing a Power Supply ...
Page 45: ...Chapter 2 Hardware Installation 31 FIGURE 2 16 Removing an RMM Module ...
Page 56: ...42 Netra ft 1800 Installation Guide February 1999 ...


