2-16. MB-1210 Board
Preparation
1.
Remove the outside panel assembly. (Refer to
2.
Remove the bracket (WA) assembly. (Refer to
“2-6. Wi-Fi Module/SD-58 Board”
)
3.
Remove the RE-326 board. (Refer to
)
4.
Remove the AU-360 board. (Refer to
5.
Remove the inside panel assembly. (Refer to
“2-3-1. Inside Panel Assembly”
)
6.
Remove the front assembly. (Refer to
7.
Remove the DC fan (30 square). (Refer to
8.
Remove the DCP-67 board. (Refer to
9.
Remove the HPR-53 board. (Refer to
10. Remove the DPR-362 board. (Refer to
)
11. Remove the EC-82 board. (Refer to
12. Remove the duct box assembly. (Refer to
)
13. Remove the IO board assembly . (Refer to
“2-14. IO-275 Board, DIF-232 Board”
)
14. Remove the connector box assembly. (Refer to
“2-15-1. Connector Box Assembly”
Procedure
1.
Disconnect the harnesses and flexible flat cable.
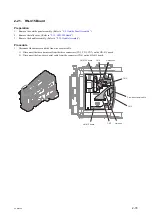
1) Disconnect the five harnesses from the five connectors (CN5, CN10, CN12, CN14, CN19) on the MB-1210
board.
2) Disconnect the flexible flat cable from the connector (CN4) on the MB-1210 board.
CN14
CN4
CN12
CN5
CN10
MB-1210 board
Harnesses
Harnesses
Harness
Flexible flat cable
CN19
PXW-X500
2-66
Summary of Contents for PXW-X500
Page 1: ...SOLID STATE MEMORY CAMCORDER PXW X500 SERVICE MANUAL 1st Edition ...
Page 4: ......
Page 8: ......
Page 10: ......
Page 54: ......
Page 87: ...3 Remove the tape AS Tape AS PXW X500 2 33 ...
Page 109: ...4 Install the removed parts by reversing the steps of removal PXW X500 2 55 ...
Page 158: ......
Page 183: ......
Page 184: ...PXW X500 SY PXW X500 CN J E 9 878 582 01 Sony Corporation Printed in Japan 2014 11 08 2014 ...


