background image

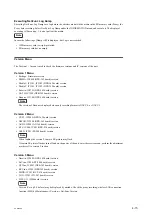
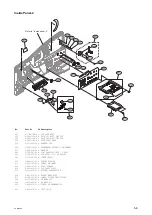
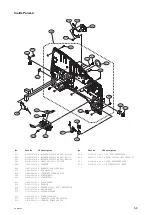
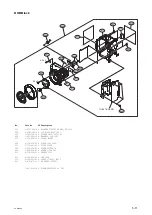
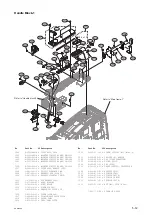
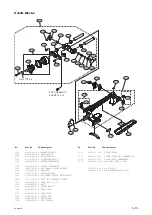
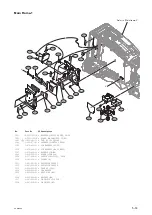
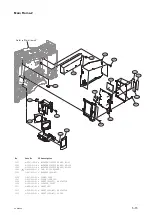
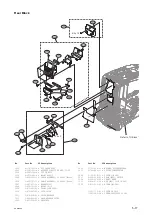
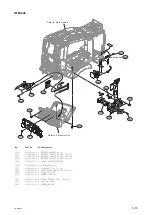
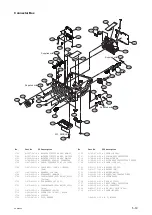
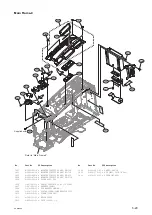
Handle Block-1

Refer to “Handle block-2”

Refer to “Main frame-1”

1031

1001

1018

1016

1004

1010

1016

1025

1016

1017

1031

1023

1014

1030

1029

1027

1019

1013

1016

1006

1028

1005

1008

1021

1014

1014

1003

1020

1009

1016

1012

1016

1022

1024

1020

1011

1016

1002

1026

1031

1007

1015

B2.6 x 10

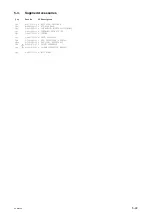
No.

  Part No.

SP Description

1001

  A-1106-989-A s COVER ASSY, SHOE

1002

  A-2054-864-A s MOUNTED CIRCUIT BOARD, SW-1652

1003

  A-2054-865-A s MOUNTED CIRCUIT BOARD, SW-1653

1004

  A-2054-870-A s MOUNTED CIRCUIT BOARD, LED-529

1005

  A-2057-509-A s MOUNTED CIRCUIT BOARD, CN-3723

1006

  A-2059-048-A s MOUNTED CIRCUIT BOARD, GP-1019

1007

  X-2541-837-4 s COVER ASSY, HANDLE (TOP)

1008

  1-893-019-11 s FP-2231 FLEXIBLE PWB

1009

  1-967-028-11 s HARNESS, SUB (LIGHT)

1010

  1-967-783-11 s HARNESS (COAXIAL CABLE)

1011

  1-970-443-11 s SUB HARNESS (GPS)

1012

  3-337-402-01 o BAND, BINDING

1013

  3-742-004-01 s RING, NYLON

1014

  3-742-074-13 s SCREW (+B 3X8)

1015

  3-805-990-01 s HANDLE TOP COVER LID

1016

  3-855-938-01 s SCREW [+PSW 2x5]

1017

  3-868-631-01 s CUSHION,DROP PROTECTION

1018

  3-870-241-02 s COVER, LAMP

1019

  3-870-243-02 s SEAL, LAMP COVER

No.

  Part No.

SP Description

1020

  3-965-077-02 s SCREW, SPECIAL (M2) [M2x2.4]

1021

  4-000-665-01 s SEALING (B), HANDLE

1022

  4-168-996-01 s CAP (LIGHT CONNECTOR)

1023

  4-168-998-02 s COVER, TALLY

1024

  4-264-451-01 s CAP (USB2)

1025

  4-545-528-01 s SHEET (LED529), PROTECTION

1026

  4-545-545-01 s BRACKET (GPS)

1027

  4-549-673-01 s CUSHION (TAC)

1028

  4-549-672-01 s CUSHION (HTC A)

1029

  4-549-674-01 s CUSHION (H MID)

1030

  4-549-937-01 s CUSHION (HTC B)

1031

  4-654-273-02 s ACE (M2), LOCK [B 2x5]


  7-621-775-50 s SCREW +B 2.6X10

PXW-X500

5-12

Summary of Contents for PXW-X500

Page 1: ...SOLID STATE MEMORY CAMCORDER PXW X500 SERVICE MANUAL 1st Edition ...

Page 2: ...ur von qualifiziertem Fachpersonal ausgeführt werden Um die Gefahr eines elektrischen Schlages Feuergefahr und Verletzungen zu vermeiden sind bei Wartungsarbeiten strikt die Angaben in der Anleitung zu befolgen Andere als die angegeben Wartungsarbeiten dürfen nur von Personen ausgeführt werden die eine spezielle Befähigung dazu besitzen AVERTISSEMENT Ce manual est destiné uniquement aux personnes ...

Page 3: ...folgen 注意 指定以外の電池に交換すると 破裂する危険があり ます 必ず指定の電池に交換してください 使用済みの電池は 国または地域の法令に従って 処理してください FÖRSIKTIGHET Fara för explosion vid felaktigt placerat batteri Byt endast mot samma eller likvärdig typ av batteri enligt tillverkarens rekommendationer När du kasserar batteriet ska du följa rådande lagar för regionen eller landet PAS PÅ Fare for eksplosion hvis batteriet ikke udskiftes korrekt Udskift kun med e...

Page 4: ......

Page 5: ...Replacing Lithium Battery 1 28 1 9 Fixtures Measuring Equipment List 1 30 1 9 1 Fixtures 1 30 1 9 2 Measuring Equipment 1 30 1 10 Circuit Protection Parts 1 31 1 10 1 Fuse 1 31 1 10 2 Circuit Protection Element 1 31 1 11 Lead free Solder 1 32 1 12 Firmware Upgrade 1 33 1 12 1 Upgrade Firmware for Camcorder 1 33 1 12 2 Upgrade of Proxy Recording Wireless LAN Connection Function 1 35 1 13 Electrical...

Page 6: ...7 Board 2 39 2 10 HPR 53 Board 2 41 2 11 DPR 362 Board 2 45 2 12 EC 82 Board 2 49 2 13 DC Fan 40 Square 2 52 2 14 IO 275 Board DIF 232 Board 2 56 2 15 Connector Box Section 2 59 2 15 1 Connector Box Assembly 2 59 2 15 2 SW 1632 Board AXM 52 Board 2 62 2 16 MB 1210 Board 2 66 2 17 GP 1019 Board CN 3723 Board 2 69 2 18 SW 1652 Board 2 70 2 19 LED 529 Board 2 72 2 20 Handle Assembly 2 76 2 21 HN 415 ...

Page 7: ...o Display the Service Menu 4 4 4 3 Description of SERVICE Menu 4 5 4 3 1 SERVICE Menu 4 5 5 Spare Parts 5 1 Note on Repair Parts 5 1 5 2 Exploded Views 5 2 5 3 Supplied Accessories 5 22 6 Diagrams Overall 6 1 Frame Wiring 6 2 PXW X500 3 ...

Page 8: ......

Page 9: ...ation Guide Supplied with the unit This manual is necessary for application and operation of the unit Factory Service Manual This manual describes the information items that premise the service based on the components parts Trademarks Trademarks and registered trademarks used in this manual are as follows SxS is the registered trademarks or trademarks of the Sony Corporation Other system names and...

Page 10: ......

Page 11: ...WM SD 58 CI 50 SW 1652 CN 3736 CN 3723 GP 1019 SE 1155 DET 50 DET 60 LED 529 KY 736 IF 1209 FP 208 HP 171 SW 1650 ENC 162 SW 1651 TG 287 EC 82 RM 246 AXM 52 MB 1210 HPR 53 DPR 362 DCP 67 AU 360 IO 275 DIF 232 RX 136 SW 1632 CN 3738 CN 3737 PA 422 PA 423 PA 424 HN 415 SW 1653 RM 246 PXW X500 1 1 ...

Page 12: ...k are output through the connector CN201 to the DCP 67 board The analog video signals are converted to 14 bit digital video RGB signals by the A D converter IC106 IC107 IC108 IC115 IC116 and IC117 Then the converted digital RGB signals are output to the camera signal preprocessor IC IC300 This board also mounts an optical filter interface circuit In the camera signal preprocessor IC300 the main li...

Page 13: ... interface A large volume of video data is transmitted through this interface The XAVC codec BEAUNE IC1100 is connected to the media processor DIABLO IC2900 with the PCI Express interface Compressed video data and control signals are transmitted bi directionally through this PCI Express interface The MPEG2 video codec NATH IC1500 performs real time MPEG2 video encoding and decoding for HD video si...

Page 14: ...through the GMON IC2301 The auxiliary data from the video signal processor ROSETTA IC0100 is also input to the media processor DIABLO IC2900 The media processor DIABLO IC2900 processes these input signals stores them in a file and then writes the file data to the SxS memory card on the EC 82 board through the fine wire coaxial cable connected to the connector CN5201 This media processor operates r...

Page 15: ...put signal is transferred to the connector J500 and the equalizer IC501 and is then converted to parallel signals in the ETCx IC100 Then the parallel signals are divided into audio data and synchronization signal The audio data is output to the FPGA AUDX IC801 AU 360 board and the synchronization signal is output to the FPGA GMON IC2301 DPR 362 board The video data is converted to 5 Gbps high spee...

Page 16: ... used for Power On Rec Information of the keys on the top panel is sent through the MB 1210 board to the JKLX IC503 on the FP 208 board SD card control for SETUP The EMMA IC4200 reads and writes SD card data through the SD card slot CN7 on the MB 1210 board This SD card slot is also used for upgrading the main unit Power control When power is connected the boot signal is transferred from the RE 32...

Page 17: ...he RE 326 board through the MB 1210 board to control fan speed The EMMA IC4200 also detects the fan rotation speed and sends the detection result to the EX VINE IC404 on the FP 208 board Two fans are installed and are connected through the connectors CN8 and CN13 on the MB 1210 board TALLY control The REAR TALLY LED 529 board is connected to the BOTTOM TALLY AXM 52 board in series through the MB 1...

Page 18: ...age switching front MIC input level and front MIC 48 V voltage input signal selection and head room level adjustment AD DA conversion using AUDIO CODEC SP HP amplification DC DC converter for MIC 48 V voltage In addition this board mounts an FPGA IC801 and a DSP IC1000 The DSP provides many functions including AGC Wind Filter monitor potentiometer and monitor switching control The FPGA IC801 has s...

Page 19: ... by IC0100 on the DPR 362 board with the I C interface FPGA installation function Audio process AES EBU input decode ASRC control Input audio selector GPIO Wireless control Fetching status data of switches on the AXM 52 board Analog circuit control Analog digital wireless SIO UART control Wireless interface DIAG support function DSP control DSP Parallel Interface DSP functions Delay Digital potent...

Page 20: ...cessing including level adjustment by the circuit IC0100 to DSP IC1000 on the DPR 362 board and the processed signals are input to the D A converter IC600 IC601 in units of two channels The D A output signal from IC600 is input to the final stage amplifier IC421 IC422 is transferred to the MB 1210 board and is then output from the 5 pin output XLR connector CN103 on the AXM 52 board The D A output...

Page 21: ... 60dBu 80dBu 100dBu 120dBu LINE OUTPUT 0dBu HP OUTPUT DAC LINE OUTPUT MAX LINE OUTPUT MAX 4dB HP SP amp AK4213 4dBu 0dBu 3dBu FULL SCALE 0dBFS HR 12dB HR 20dB HEADROOM ADC LINE MIC MIC LINE INPUT 4dBu 0dBu 3dBu LINE INPUT MAX 24dBu REF LEVEL 7dBu 20dBFS HR 12dB HR 16dB HR 18dB HR 20dB LINK HEADROOM 30dBu 40dBu 50dBu 60dBu 70dBu 20dBu 0dBu 20dBu 40dBu 60dBu 80dBu 100dBu 120dBu 10dBu 0dBFS 20dBFS 40...

Page 22: ...ate When the power control microcomputer recognizes power switch ON the UNREG power in supplied to the power circuits and each output is activated by the signal from the power control microcomputer The normal value of the input power UNREG is within a range of approx 10 5 to 17 V Switching battery and EXT DC There are two types of input power battery power and EXT DC power These input voltages are...

Page 23: ...s CN 3723 board GPS signals from the GPS module GP 1019 board are sent through the relay CN 3723 board to the connector CN51 HN 415 board Signals from the CN 3723 board are sent from the connector CN4 to the connector CN0400 on the DPR 362 board through the fine wire coaxial harness DPR 362 board The following signals are sent from the application processor EMMA IC4200 to the connector CN0400 Seri...

Page 24: ...ion data is sent to and received from the video signal processor ROSETTA IC0100 DPR 362 board through the ETCx IC100 Furthermore 700 protocol communication data is directly input to and output from the FPGA GMON IC2301 DPR 362 board through the connector CN100 CI 50 Board The 50 pin interface connector CN4 on the CI 50 board is connected to the connector on the CA to send and receive main line vid...

Page 25: ...Inc 33710 or equiva lent MIC IN XLR 5P Male 1 508 370 11 REMOTE Round Type 8P Male 1 766 848 11 USB2 0 Host Wireless USB cable commercially available on market USB 3 0 Host Storage USB 2 0 Device PC USB 2 0 Device Maintenance VF LCD rectangular 26 pin Connection cable of the optional viewfinder CBK VF02 VF HDVF round 20 pin Connect the cable of the optional viewfinder HDVF 20A 200 WIRELESS RECEIVE...

Page 26: ...AUDIO IN CH 1 CH 2 1 2 3 External View 0 dBu 0 775 V rms XLR 3 pin Female No Signal I O Specifications 1 MIC LINE G 70 dBu 60 dBu 50 dBu 40 dBu 30 dBu 3 dBu 0 dBu 4 dBu High impedance Balanced 2 MIC LINE X IN 3 MIC LINE Y IN 5 DC IN 1 2 3 4 External View XLR 4 pin Male No Signal I O Specifications 1 GND GND for DC 2 No connection 3 No connection 4 DC IN IN 11 to 17 V dc input PXW X500 1 16 ...

Page 27: ...IDEO OUT BNC type 1 0 V p p 75 Ω unbalanced 8 HD SD SDI OUT1 OUT2 BNC type SDI 0 8 V p p 75 Ω 270 Mbps 1 5 Gbps 3 Gbps 9 TC OUT BNC type 1 0 V p p 75 Ω 10 EARPHONE 22 dBu Volume Center reference level output 32 ohms loaded 11 DC OUT 12 V 1 2 3 4 External View DIN 4 pin Female No Signal I O Specification 1 UNREG GND GND for power 2 No connection 3 No connection 4 UNREG 12 V OUT 11 to 17 V dc output...

Page 28: ...IO CH 2 Y OUT Input Output Signals 13 USB2 0 Host Wireless USB Series A 4 pin Signal standard USB standard Ver 2 0 External View 1 4 No Signal I O 1 USB VBUS OUT 2 DATA I O 3 DATA I O 4 GND 14 USB2 0 Device PC USB Series B 4 pin Signal standard USB standard Ver 2 0 External View 1 4 2 3 No Signal I O 1 USB DEV VBUS IN 2 DATA I O 3 DATA I O 4 GND 15 EXT 50 pin Female PXW X500 1 18 ...

Page 29: ...ND GND 13 GND GND 14 GND GND 15 GND GND 16 CA_VD IN Genlock V 17 CDA0 IN start stop synchronization bit rate 843 75 kbps 2 0 8bitLSB First 18 CA_HD IN Genlock H 19 CDA2 IN Reserve Pull Down Hi 2 5 V Low GND 20 3 3V_OUT OUT For Power Save 21 3 3V_OUT OUT For Power Save 22 GND GND 23 GND GND 24 GND RX_IN_C1 GND 25 GND RX_IN_C2 GND 26 TX_OUT_H OUT HD SDI OUT SDI 0 8 V p p 75 ohms 270 Mbps 1 5 Gbps 27...

Page 30: ... CA_3 3V IN For Power Save 48 GND GND 49 GND RX_IN_C3 GND 50 RX_IN_H IN HD SDI IN SDI 0 8 V p p 75 ohms 270 Mbps 1 5 Gbps 16 USB3 0 Host Storage USB Series A 9 pin Signal standard USB standard Ver 3 0 External View 1 4 9 5 No Signal I O 1 VBUS 5V OUT 2 D I O 3 D I O 4 GND GND 5 STDA_SSRX IN 6 STDA_SSRX IN 7 GND_DRAIN GND 8 STDA_SSTX OUT 9 STDA_SSTX OUT 17 BATT IN 1 2 3 4 5 External View 5 pin Male...

Page 31: ... X IN SERIAL DATA IN 4 RX RCP DATA Y IN SERIAL DATA IN 5 VIDEO G GND for VIDEO 6 UNREG 12 V OUT 11 V to 17 V 7 UNREG GND GND for UNREG 8 VIDEO X OUT 1 0 Vp p Zo 75 Ω 19 LENS External View 12 pin Female 12 11 4 6 7 3 2 8 9 1 10 5 No Signal I O Specifications 1 RET SW IN ON 0 V OFF OPEN 2 VTR TRIG IN ON 0 V OFF OPEN 3 LENS GND GND for LENS 4 AUTO 5 V OUT AUTO 5 V MANU 0 V or OPEN 5 IRIS CONT OUT 3 4...

Page 32: ...1 WIRELESS RECEIVER D sub 15 pin Female External View 1 8 9 15 No Signal I O Specifications 1 GND IN GND for AUDIO IN 2 AUDIO CH1 IN IN WIRELESS RECEIVER AUDIO CH1 IN 3 AUDIO CH2 IN IN WIRELESS RECEIVER AUDIO CH2 IN 4 DC 7 V OUT OUT 7 V 5 GND GND 6 SCLK OUT 64 FS 7 WRR855 DET I O 8 GND GND 9 WRR CLK IN WRR SERIAL CLOCK 10 CS OUT WRR SELECT 11 WRR DI OUT WRR SERIAL IN 12 WRR DO IN WRR SERIAL OUT 13...

Page 33: ...CK OUT TMDS clock signal output 11 TMDS CLOCKSHIELD GND for TMDS clock 12 TMDS CLOCK OUT TMDS clock signal output 13 CEC N C 14 RESERVED N C No connection 15 SCL OUT Serial data clock signal output 16 SDA OUT Serial data signal input output 17 DDC CECGND GND 18 5 V POWER OUT 5 V dc output 19 HPD IN Hot plug detect signal input 23 VF HDVF Round 20 pin External View No Signal I O Specifications 1 SD...

Page 34: ...G OUT 11 V to 17 V 24 VF LCD External View Rectangular 26 pin 1 13 14 26 No Signal I O 1 SHIELD GND 2 LVDS 1 OUT 3 LVDS 2 OUT 4 LVDS 3 OUT 5 LVDS CLK OUT 6 LVDS 4 OUT 7 LVDS 5 OUT 8 VF ON IN 9 SDAT I O 10 UNREG 11 V to 17 V OUT 11 UNREG 11 V to 17 V OUT 12 GND 13 GND 14 GND 15 LVDS 1 OUT 16 LVDS 2 OUT 17 LVDS 3 OUT 18 LVDS CLK OUT 19 LVDS 4 OUT 20 LVDS 5 OUT 21 SDI OUT 22 SCLK OUT 23 UNREG 11 V to...

Page 35: ...when UREG voltage lowers below 10 5 V or rises above 18 6 V and the camera unit is shut down Unlit D111 EXT_DC operation indica tor Lit while the unit is operating with EXT_DC power not lit with BATT power D113 Shut Down indicator Blinks at 1 Hz intervals when a shutdown signal is generated due to abnormal load then the camera unit is shut down Unlit S107 PLD forced ON switch When this switch is t...

Page 36: ... following board is replaced upgrade the firmware version alone Refer to 1 12 2 Upgrade of Proxy Recording Wireless LAN Connection Function Board Name Ref No WM U11 Adjusted values are stored in the following boards and parts The values need to be readjusted when they are replaced Board Name Ref No TG 287 1 IC008 DPR 362 IC703 The same data are stored in the IC008 on the TG 287 board IC2002 IC3101...

Page 37: ...D numbers This number is called the CCD block number indicating the type of the CCD block and serial number The label indicating the CCD block number is attached inside of each CCD unit Example OOB xxxxx Serial number of the CCD unit Type of the CCD block PXW X500 PXW X500 1 27 ...

Page 38: ...Lithium Battery CR2032 type For internal clock Replacing procedure Note In replacing ensure that the battery is installed with and poles connected to the correct terminals Improper connection may cause an explosion or leakage of fluid resulting in injury or damage to surrounding properties 1 Loosen the four screws with stopper and remove the inside panel Screws with stopper Screws with stopper Ins...

Page 39: ...4 Set the date and time of the internal clock Refer to the operating instructions PXW X500 1 29 ...

Page 40: ...screw J 6325 400 A Torque driver 3 kgf cm 0 3N m For tightening screw J 6252 510 A Torque driver 6 kgf cm 0 6N m For tightening screw J 6252 520 A Torque driver 10 kgf cm 1 0N m For tightening screw 7 600 002 52 ThreeBond TB 1401B For preventing screw from being loosened Commercially available Loctite 408 Instant adhesives Commercially available BOX driver Width across 4 mm For tightening hexagona...

Page 41: ... Ref No Name Part No RE 326 F100 F101 Fuse 15 A 65 V 1 576 566 21 1 10 2 Circuit Protection Element This unit is equipped with positive characteristic thermistors power thermistors as circuit protection elements The positive characteristic thermistor limits the electric current flowing through the circuit as the internal resistance increases when an excessive current flows or when the ambient temp...

Page 42: ...inted with the lead free mark due to their particular size LEAD FREE MARK Note The lead free solder melts at a temperature about 40 C higher than the ordinary solder therefore it is recommended to use the soldering iron having a temperature regulator The ordinary soldering iron can be used but the iron tip has to be applied to the solder joint for a slightly longer time The printed pattern copper ...

Page 43: ... folder of the SD memory card Note Do not copy the data other than the package file for upgrading to the SD memory card 2 Turn off the power of the unit remove the AC adapter or the battery pack 3 Remove connection devices of the unit USB wireless LAN module IFU WLH3 SDI HDMI microphone viewfinder lens and etc and media which is inserted to SxS card slot 4 Install the AC adapter to the unit and co...

Page 44: ...e menu Tip Refer to the operating instructions for displaying and operation of Maintenance menu 6 If the upgrade is not performed check the preparation and the procedures and perform the upgrade again Error remedy method Upgrade has stopped If the package file for upgrade generates abnormal the message Version Upgrade NG Cannot Read Power Off is displayed Restart the camcorder copy the correct pac...

Page 45: ...ecording wireless LAN connection function in the package file compressed for upgrade to the just under the root directory of SD memory card Note Do not copy the data other than the package file for upgrading to the SD memory card 2 Turn off the power of the unite and remove AC adapter or the battery pack 3 Remove connection devices of the unit USB wireless LAN module IFU WLH3 SDI HDMI microphone v...

Page 46: ...s displayed on the viewfinder or LCD monitor XX YY ZZ Elapsed time with each stage progress status with each stage Aim of activating required time for upgrade is approximately five minutes 6 The message for upgrade completion Version Upgrade OK Turn Power Off is displayed turn off and on the power of the unit 7 Confirm the current Net Func Version Number at the version of Maintenance menu Tip Refe...

Page 47: ...1 13 Electrical Adjustment When making electrical adjustment contact your local Sony Sales Office Service Center PXW X500 1 37 ...

Page 48: ...Contact surface Isolation surface Type A Type B Type C Type D Disconnecting 1 Turn off the power 2 Slide or lift up the portion A in the direction of the arrow to unlock and pull out the flexible card wire Connecting 1 Slide or lift up the portion A in the direction of the arrow and securely insert the flexible card wire into the deep end of the connector 2 Return the portion A to its original pos...

Page 49: ...re coaxial cable Hold the connector to disconnect Do not attempt to disconnect by pulling the cable OK NG Disconnecting 1 Hold the connector and disconnect the fine wire coaxial cable horizontally or vertically Connecting 1 Hold the connector and connect the fine wire coaxial cable horizontally or vertically while matching the polarity marks PXW X500 1 39 ...

Page 50: ... 1 15 2 Notes on Replacement of the Battery Terminal The battery connector in this unit is consumable parts Replace every about 5 years If the terminal of connector is deformed or bends due to vibrations or shock or if the surface of the terminal corrodes due to long term outside use or other similar use the unit may malfunction Replace the battery terminal immediately if the terminal is deformed ...

Page 51: ... as necessary 2 Cap USB2 4 264 451 01 3 Headphone Jack Cover 4 168 991 01 4 Drop Protection Cover XLR 4 545 527 01 5 Rubber Foot 3 723 097 01 6 Shoulder Pad Assembly A 1752 736 B 7 Cap Light Connector 4 168 996 01 8 Lens Mount Holder 3 796 982 03 9 Connector Cap 4 169 085 02 10 Cover NON DONGLE 4 545 572 01 11 Suspension Collar 3 654 615 02 12 Grip 4 168 997 02 13 Battery Connector A 1968 119 A Co...

Page 52: ...ery about 3 years or check for deformation and deterioration abraded or damaged or lost from time to time Replace it as necessary 1 16 EC 82 board A 2052 066 A Replace every 5 years 17 CN 3722 board A 2057 508 A Replace every 5 years 18 Bayonet Ling 3 790 043 11 Replace every 5 years 1 When the part is replaced apply the instant adhesive Loctite 408 or equivalent to the whole area of the flange fr...

Page 53: ...talling Procedure 1 Open the cover NO DONGLE 2 Remove the two screws and the two washers from the main body Cover NO DONGLE W3 Small W3 Small B3 x 8 B3 x 8 3 Install the guard 4 Install the two washers and tighten the two screws W3 Small W3 Small B3 x 8 B3 x 8 Guard PXW X500 1 43 ...

Page 54: ......

Page 55: ... wire When connecting flexible card wires connect them firmly referring to 1 14 1 Disconnecting Connecting Flexible Card Wire Type A to D Disconnecting Fine wire coaxial cable When connecting fine wire coaxial cables connect them firmly referring to 1 14 2 Disconnecting Connecting Fine Wire Coaxial Cable PXW X500 2 1 ...

Page 56: ...N m M2 0 2 0 01 N m M2 6 0 53 0 07 N m M3 0 8 0 12 N m Tip When using the torque driver with the notation of cN m interpret it as follows Example 0 8 N m 80 cN m Since small screws are used in the unit they may fall into the unit when they are removed and installed To prevent screws from falling it is recommended that the bit of each torque driver be magnetized to a degree that prevents screws fro...

Page 57: ...de panel assembly Screws with drop safe Screws with drop safe BNC cap Outside panel assembly Cover NO DONGLE 2 Disconnect the fine wire coaxial cable from the connector CN001 on the CN 3722 board and then remove the outside panel assembly Fine wire coaxial cable Fine wire coaxial cable Outside panel assembly CN001 CN 3722 board 3 Install the removed parts by reversing the steps of removal PXW X500...

Page 58: ...onnectors CN20 CN21 CN22 on the MB 1210 board 2 Disconnect the fine wire coaxial cable from the connector CN0300 on the DPR 362 board 3 Release the FP insulating sheet from the hook on the main frame and remove the inside panel assembly Hook FP insulating sheet CN20 MB 1210 board CN21 MB 1210 board CN0300 DPR 362 board CN22 MB 1210 board Inside panel assembly Fine wire coaxial cable Flexible flat ...

Page 59: ...sembly Refer to 2 3 1 Inside Panel Assembly Procedure 1 Disconnect the three flexible flat cables from the three connectors CN601 CN602 CN603 on the FP 208 board Flexible flat cables 25 core CN601 FP 208 board CN602 FP 208 board CN603 FP 208 board PXW X500 2 5 ...

Page 60: ...wire coaxial cable from the five notches of the FP insulating sheet 2 Remove the tape AS Fine wire coaxial cable Notch Notch Notch FP insulating sheet Notch Notch Tape AS 3 Remove the three screws to detach the FP insulating sheet PSW2 x 5 FP insulating sheet PXW X500 2 6 ...

Page 61: ...peaker Harnesses Harness Harness FP 208 board HP 171 board CN101 CN606 CN605 CN604 CN202 SW 1650 board ENC 162 board 5 Remove the knobs 1 Remove the two VR knobs 2 Open the switch door R assembly 3 Remove the two VR knobs 2 4 Remove the two VR knobs S VR knobs VR knobs 2 VR knobs S Switch door R assembly PXW X500 2 7 ...

Page 62: ...SW cover filter holder LED lens filter SW cover filter SW cover arrow holder LED lens sub clip and SW cover arrow that were pressed by the FP 208 board assembly PSW2 x 5 PSW2 x 5 SW cover assign holder LED lens assign SW cover assign SW cover arrow holder SW cover arrow LED lens sub clip FP 208 board assembly SW cover filter holder SW cover filter LED lens filter PXW X500 2 8 ...

Page 63: ...n rubbers SW Drop protection rubbers SW Drop protection rubber SW Drop protection rubber SW SW knob C SW knobs C SW knobs C Audio volume cushions Audio volume cushions SW knob B Drop protection rubbers SW SW knobs A SW knob A Lithiumbattery Note When installing the lithium battery not to mistake the orientation of the lithium battery 8 Install the removed parts by reversing the steps of removal PX...

Page 64: ...edure 1 Release the fixing of the fine wire coaxial cable and the harness 1 Release the fine wire coaxial cable from the five notches of the FP insulating sheet 2 Remove the tape AS Fine wire coaxial cable Harness Fine wire coaxial cable Notch Notch Notch FP insulating sheet Notch Notch Tape AS PXW X500 2 10 ...

Page 65: ... harness cover 3 Release the fine wire coaxial cable and the harness from the hole of the LCD harness cover 4 Remove the hinge blind plate and helical torsion spring LCD harness cover Harness LCD harness clamp Claw LCD harness cover Hinge blind plate Helical torsion spring P2 x 4 P2 x 4 Fine wire coaxial cable PXW X500 2 11 ...

Page 66: ...o screws to detach the LCD lock assembly LCD panel POPUP and spring LCD assembly Spring LCD panel POPUP LCD lock assembly P2 x 4 4 Remove the four screws and remove the inside pad L P 3 x 8 Inside pad L PXW X500 2 12 ...

Page 67: ...e the inside R pad 1 Turn the LCD assembly as shown in the figure 2 Remove the two screws PSW2 x 5 and the two screws P3 x 8 and remove the inside R pad P3 x 8 Inside R pad LCD assembly PSW2 x 5 PXW X500 2 13 ...

Page 68: ...6 Remove the three screws to detach the LCD assembly LCD assembly PSW2 x 5 7 Install the removed parts by reversing the steps of removal PXW X500 2 14 ...

Page 69: ...1 Inside Panel Assembly 2 Remove the LCD assembly Refer to 2 3 3 LCD Assembly Procedure 1 Remove the four screws to detach the LCD cover P2 x 4 P2 x 4 LCD cover 2 Remove the two screws P2 x 4 and the two screws P1 7 x 2 5 and remove the shield LCD P2 x 4 P1 7 x 2 5 Shield LCD PXW X500 2 15 ...

Page 70: ...assembly Locking compound application area Locking compound P2 x 4 A P2 x 4 P2 x 4 3 5 inch LCD assembly Note When installing the two screws A apply locking compound about rice grain quantity to them 4 Turn the hinge assembly and remove the two screws Hinge assembly P1 7 x 2 5 PXW X500 2 16 ...

Page 71: ...Hinge cover front Hinge cover rear Hinge harness protection sheet Claw LCD hinge harness protector P1 7 x 2 5 Claws Note When installing the hinge harness protection sheet install it to inside between the switch DET 50 board and LCD hinge harness protector Rotating shaft of the hinge assembly Rotating part of the hinge assembly Switch DET 50 board Hinge harness protection sheet LCD hinge harness p...

Page 72: ...ine wire coaxial cable from the hinge assembly remove the 3 5 inch LCD assembly 3 5 inch LCD assembly Fine wire coaxial cable Hinge assembly 7 Install the removed parts by reversing the steps of removal PXW X500 2 18 ...

Page 73: ...on 1 Remove the inside panel assembly Refer to 2 3 1 Inside Panel Assembly 2 Remove the LCD assembly Refer to 2 3 3 LCD Assembly Procedure 1 Turn the hinge assembly and remove the two screws Hinge assembly P1 7 x 2 5 PXW X500 2 19 ...

Page 74: ...Hinge cover front Hinge cover rear Hinge harness protection sheet Claw LCD hinge harness protector P1 7 x 2 5 Claws Note When installing the hinge harness protection sheet install it to inside between the switch DET 50 board and LCD hinge harness protector Rotating shaft of the hinge assembly Rotating part of the hinge assembly Switch DET 50 board Hinge harness protection sheet LCD hinge harness p...

Page 75: ...rd 3 Remove the screw and remove the DET 50 board and the LCD hinge SW holder 4 Release the three claws and remove the DET 50 board from the LCD hinge SW holder LCD hinge SW holder Claws Claw DET 50 board P1 7 x 2 5 Harness A part of the hinge assembly 4 Install the removed parts by reversing the steps of removal PXW X500 2 21 ...

Page 76: ...Panel Assembly 2 Remove the inside panel assembly Refer to 2 3 1 Inside Panel Assembly Procedure 1 Remove the seven screws to detach the front separator Front separator PSW2 x 5 PSW2 x 5 a b PSW2 x 5 PSW2 x 5 Note When installing the front separator tighten the screws in order of a b and others PXW X500 2 22 ...

Page 77: ...rom the connector CN011 on the TG 287 board 3 Disconnect the harness from the connector CN002 on the TG 287 board TG 287 board Tape AS Fine wire coaxial cable CN011 CN002 Tape AS Harness Harness Note When installing the tape AS fixing the harness as shown in the figure 3 Remove the four screws B3 x 8 B3 x 8 PXW X500 2 23 ...

Page 78: ...sses from the clamper 3 Disconnect the two harnesses from the two connectors CN6 CN9 on the MB 1210 board and remove the front assembly CN6 MB 1210 board Front assembly CN9 MB 1210 board Clamper Harness 5 Install the removed parts by reversing the steps of removal PXW X500 2 24 ...

Page 79: ...nt Assembly Removing Procedure 1 Remove the CCD block assembly 1 Remove the set screw and remove the filter knob from the knob shaft 2 Remove the mount lever 3 Remove the four hexagon socket head bolts and four spring washers and remove the CCD block assembly and the shield finger LM Note Do not directly touch shield finger LM Be careful not to get hurt with the edges when handling them Shield fin...

Page 80: ...ign the four screw holes of the shield finger LM with the four screw holes of the front panel Note Do not directly touch shield finger LM Be careful not to get hurt with the edges when handling them Front panel Front panel Shield finger LM Shield finger LM Screw holes Screw holes Screw holes Hole Projection Screw holes Projection Back view PXW X500 2 26 ...

Page 81: ...the optical axis does not tilt misaligned due to a play If a picture on the monitor screen tilts loosen the screws of the CCD block and adjust the installation so that the picture becomes horizontal SW3 SW3 SW3 HEXAGON M3 x 8 HEXAGON M3 x 8 A B C D HEXAGON M3 x 8 Locking compound application area Locking compound CCD block assembly Knob shaft Mount lever 4 Turn the knob shaft and set the filter ID...

Page 82: ...5 Set the filter knob at a position where a number 2 faces up and secure it with a set screw Set screw Filter knob Top view PXW X500 2 28 ...

Page 83: ...sembly Refer to 2 3 1 Inside Panel Assembly 3 Remove the front assembly Refer to 2 4 1 Front Assembly Procedure 1 Remove the FM shield MF FM shield MF FM shield MF Main frame Fan holder CCD Note When installing the FM shield MF press the lower edge of the FM shield MF against the main frame in the direction of the arrow PXW X500 2 29 ...

Page 84: ...8 on the MB 1210 board 2 Remove the screw 3 Release the two claws and remove the DC fan 30 square DC fan 30 square assembly Claw CN8 MB 1210 board Claw PSW2 x 5 Note When installing the harness arrange the harnesses as shown in the figure Harness Harness CN8 MB 1210 board PXW X500 2 30 ...

Page 85: ... fan 30 square Label Harness Fan holders Fan holder Harness Note Pay attention to the following when installing the fan holder CCD Pay attention to the position of label of the DC fan 30 square Align the notch of the fan holder CCD with the harness of the DC fan 30 square Fold the harness by the FM shield CCD FAN 4 Install the removed parts by reversing the steps of removal PXW X500 2 31 ...

Page 86: ...le and the harness 1 Disconnect the harness from the connector CN301 on the RE 326 board 2 Remove the tape AS and release the fine wire coaxial cable and the harness CN301 RE 326 board Tape AS Harness Fine wire coaxial cable 2 Remove the heat sink WA 1 Remove the three screws 2 Remove the heat sink WA while releasing the boss from the hole Boss Heat sink WA PSW2 x 5 PXW X500 2 32 ...

Page 87: ...3 Remove the tape AS Tape AS PXW X500 2 33 ...

Page 88: ...odule and remove the Wi Fi module 4 Disconnect the harness from the connector CN9 on the Wi Fi module 5 Remove the radiation sheets C and D Harness Fine wire coaxial cables Fine wire coaxial cable WiFi module PSW2 x 5 CN14 CN9 CN12 CN11 Mark position Fine wire coaxial cable Mark Radiation sheet D Radiation sheet C Note When connecting the fine wire coaxial cable connect the fine wire coaxial cable...

Page 89: ...move the four screws 4 Release the fine wire coaxial cable from the clamper and remove the bracket WA assembly SD 58 board Tape AS Tape AS WRR case Harness Bracket WA assembly Clamper Fine wire coaxial cable Harness WRR case PSW2 x 5 CN003 Note When installing the tape AS arrange the harness as shown in the figure PXW X500 2 35 ...

Page 90: ...A Clamper PSW2 x 5 Fine wire coaxial cable Mark position Fine wire coaxial cable Mark Note Pay attention to the following when connecting the fine wire coaxial cable Connect the connector portion which is not marked of one of the two to the connector CN001 on the SD 58 board When the fine wire coaxial cable is replaced mark at the connector portion of one of the two 7 Install the removed parts by ...

Page 91: ...nectors CN100 CN101 CN800 on the RE 326 board RE 326 board Cushion LIGHT Cushion LIGHT Wall of the main frame Wall of the main frame Harness Notch Harnesses Harness CN101 CN100 CN800 2 Remove the four screws and disconnect the RE 326 board from the connector CN1 on the MB 1210 board RE 326 board PSW2 x 5 PSW2 x 5 a d c b PSW2 x 5 PSW2 x 5 CN300 CN1 MB 1210 board Note When installing the RE 326 boa...

Page 92: ...RE 326 board Refer to 2 7 RE 326 Board Procedure 1 Remove the four screws and disconnect the AU 360 board from the connector CN2 on the MB 1210 board AU 360 board CN2 MB 1210 board CN101 PSW2 x 5 PSW2 x 5 PSW2 x 5 PSW2 x 5 a b c d Note When installing the AU 360 board tighten the screws in the order of a to d 2 Install the removed parts by reversing the steps of removal PXW X500 2 38 ...

Page 93: ... Refer to 2 3 1 Inside Panel Assembly Procedure 1 Remove the seven screws to detach the front separator Front separator PSW2 x 5 PSW2 x 5 a b PSW2 x 5 PSW2 x 5 Note When installing the front separator tighten the screws in the order of a b and others PXW X500 2 39 ...

Page 94: ...le from the connector CN201 on the DCP 67 board Harness DCP 67 board Fine wire coaxial cable CN201 CN200 3 Remove the DCP 67 board 1 Disconnect the DCP 67 board from the connector CN100 on the DPR 362 board 2 Remove the radiation sheet DCP 67 board CN0100 DPR 362 board Radiation sheet CN700 4 Install the removed parts by reversing the steps of removal PXW X500 2 40 ...

Page 95: ...screws to detach the heat sink HPR A Heat sink HPR A Heat sink HPR A Radiation sheet G Radiation sheet B Radiation sheet 490615 PSW2 x 5 PSW2 x 5 Note In the case of dropping of the radiation sheet G the radiation sheet B and the radiation sheet 490615 attach their parts to the heat sink HPR A as shown in the figure PXW X500 2 41 ...

Page 96: ...connect the two coaxial cables from the two connectors CN CA SDI IN CN EXT Video on the HPR 53 board HPR 53 board Clamper Fine wire coaxial cable Coaxial cable Red Coaxial cable Black Coaxial cables Gray Yellow Tape AS CN101 CN CA SDI IN CN EXT Video Note When connecting the coaxial cables connect the coaxial cables to correct connectors Note When installing the tape AS fix the coaxial cables as s...

Page 97: ...3 Remove the four screws and disconnect the HPR 53 board from the connector CN6800 on the DPR 362 board HPR 53 board CN6800 DPR 362 board CN100 PSW2 x 5 PXW X500 2 43 ...

Page 98: ...when installing the heat sink HPR B Pay attention to the installing position of the screws Tighten the screws in the order of a to b Note In the case of dropping the two radiation sheets E attach their sheets at the location as shown in the following figure DPR 362 board Two radiation sheets L 5 Install the removed parts by reversing the steps of removal PXW X500 2 44 ...

Page 99: ...e coaxial cables 1 Release the fine wire coaxial cable from the clamper 2 Disconnect the four fine wire coaxial cables from the four connectors CN2302 CN5201 CN5202 CN5400 on the DPR 362 board 3 Disconnect the three coaxial cables from the three connectors CN SDI1 CN SDI2 CN SDI3 on the DPR 362 board Fine wire coaxial cable Fine wire coaxial cables Clamper Coaxial cable White Coaxial cable Gray Co...

Page 100: ...amper Outside side RE 326 board RE 326 board Clamper Fine wire coaxial cable Fine wire coaxial cable Note When fixing the fine wire coaxial cable to the clamper pass the fine wire coaxial cable into the clamper and draw out it to outside PXW X500 2 46 ...

Page 101: ...wo screws and the two hexagonal supports and disconnect the DPR 362 board assembly from the connector CN3 on the MB 1210 board MB 1210 board DPR 362 board assembly Hexagonal supports PSW2 x 5 CN5200 CN3 PXW X500 2 47 ...

Page 102: ... PSW2 x 5 d PSW2 x 5 a PSW2 x 5 b PSW2 x 5 c Note Pay attention to the following when installing the heat sink DPR B Tighten the screws in the order of a to d In the case of dropping the radiation sheet the radiation sheet C radiation sheet 081015 and the radiation sheets L attach their sheets at the location as shown in the following figure DPR 362 board Radiation sheet 081015 Radiation sheets L ...

Page 103: ...ssembly Refer to 2 6 Wi Fi Module SD 58 Board 3 Remove the inside panel assembly Refer to 2 3 1 Inside Panel Assembly 4 Remove the heat sink HPR A Refer to 2 10 HPR 53 Board Procedure 1 Remove the two screws and disconnect the harness from the connector CN200 on the EC 82 board CN200 EC 82 board Harness PSW2 x 5 PXW X500 2 49 ...

Page 104: ... 1 Remove the screw and draw the EC 82 board assembly 2 Disconnect the fine wire coaxial cable from the connector CN100 on the EC 82 board CN100 EC 82 board EC 82 board assembly Hole Boss Fine wire coaxial cable PSW2 x 5 PXW X500 2 50 ...

Page 105: ...66 bracket Harness PSW2 x 5 b PSW2 x 5 c PSW2 x 5 d PSW2 x 5 a Note Pay attention to the following when installing the radiation plate EC Tighten the screws in the order of a to d In the case of dropping the two radiation sheets 4535t1 attach their sheets at the location as shown in the following figure EC 82 board Radiation sheet 4535t1 4 Install the removed parts by reversing the steps of remova...

Page 106: ... 53 Board 6 Remove the DPR 362 board Refer to 2 11 DPR 362 Board 7 Remove the EC 82 board Refer to 2 12 EC 82 Board Procedure 1 Release the fine wire coaxial cable from the clamper and disconnect the harness 1 Remove the tape AS 2 Release the fine wire coaxial cable from the clamper 3 Disconnect the harness from the connector CN13 on the MB 1210 board Fine wire coaxial cable CN13 MB 1210 board Har...

Page 107: ...2 Remove the two screws and draw the duct box assembly PSW2 x 5 PSW2 x 5 Duct box assembly PXW X500 2 53 ...

Page 108: ...ow molding Fan cushion JMC Joint cushion Duct B DC fan 40 Square Note Confirm the corner of the fan cushion JMC in two places looks from the hole of duct A as shown in the figure Confirm the direction of the label of DC fan 40 square and the position of the arrow molding Confirm the position of the arrow molding on the fan cushion JMC Duct A Fan cushion JMC Fan cushion JMC Hole Hole PXW X500 2 54 ...

Page 109: ...4 Install the removed parts by reversing the steps of removal PXW X500 2 55 ...

Page 110: ... Assembly 2 Remove the inside panel assembly Refer to 2 3 1 Inside Panel Assembly Procedure 1 Remove the screw to detach the connector cap Connector cap Special screw 2 Remove the four screws and draw the connector box assembly in the direction of the arrow Connector box assembly B3 x 8 B3 x 8 PXW X500 2 56 ...

Page 111: ...e coaxial cable from the connector CN001 on the IO 275 board and remove the IO board assembly CN001 DIF 232 board CN5 IO 275 board IO board assembly Harness Fine wire coaxial cable PSW2 x 5 4 Remove the harness guard CN BOX IO 275 board DIF 232 board Harness guard CN BOX Harness guard CN BOX Note When installing the harness guard CN BOX install it as shown in the figure PXW X500 2 57 ...

Page 112: ...nd shield form 10x5 from the IO 275 board DIF 232 board IO 275 board HDMI bracket Cushion HDMI Shield form 10 x 5 Shield form 10 x 5 Shield form 10 x 5 Adhesive bond Adhesive bond P1 7 x 4 Note When installing the shield form 10x5 apply the adhesive bond at the locations as shown in the figure 6 Install the removed parts by reversing the steps of removal PXW X500 2 58 ...

Page 113: ...d Refer to 2 11 DPR 362 Board 7 Remove the EC 82 board Refer to 2 12 EC 82 Board 8 Remove the duct box assembly Refer to 2 13 DC Fan 40 Square Procedure 1 Disconnect the harnesses 1 Disconnect the two harnesses from the two connectors CN100 CN101 on the RE 326 board 2 Remove the Tape 50 CN101 RE 326 board CN100 RE 326 board Tape 50 Harnesses Note When installing the tape 50 install it at the locat...

Page 114: ... flat cable from the connector CN11 on the MB 1210 board MB 1210 board Harness from the DC OUT Harness Flexible flat cable Fine wire coaxial cable CN17 CN11 CN16 Note When connecting the harnesses and flexible flat cable arrange the fine wire coaxial cable as shown in the figure 3 Remove the screw to detach the connector cap Connector cap Special screw PXW X500 2 60 ...

Page 115: ...he connector box assembly 2 Disconnect the harness from the connector CN23 on the MB 1210 board and remove the connector box assembly CN23 MB 1210 board Harness B3 x 8 B3 x 8 Connector box assembly 5 Install the removed parts by reversing the steps of removal PXW X500 2 61 ...

Page 116: ... DCP 67 Board 5 Remove the HPR 53 board Refer to 2 10 HPR 53 Board 6 Remove the DPR 362 board Refer to 2 11 DPR 362 Board 7 Remove the EC 82 board Refer to 2 12 EC 82 Board 8 Remove the duct box assembly Refer to 2 13 DC Fan 40 Square 9 Remove the connector box assembly Refer to 2 15 1 Connector Box Assembly Procedure 1 Remove the tape 50 and the three tapes AS and release the DC IN harness and th...

Page 117: ...rd assembly SW 1632 board assembly B2 x 5 Harness CN104 AMX 52 board 3 Remove the SW 1632 board 1 Disconnect the harness from the connector CN302 on the SW 1632 board 2 Remove the two drop protection toggle cushions 3 Remove the two screws to detach the bracket SW Harness CN302 PSW2 5 SW 1632 board Drop protection toggle cushions Bracket SW PXW X500 2 63 ...

Page 118: ... arrow B while pushing the it in the direction of arrow A to remove the lever Cross section view of the connector Connectors Levers Lever A B 5 Remove the six screws to detach the AXM 52 board assembly P2 6 x 5 AXM 52 board assembly PXW X500 2 64 ...

Page 119: ...3 Remove the protection sheet AXM 4 Remove the two drop protection cushions and the two slide SW knobs from the two switches on the AXM 52 board Drop protection cushion Drop protection cushion Slide SW knob Switches Harness Flexible flat cable Slide SW knob AXM 52 board CN106 CN107 Protection sheet AXM 7 Install the removed parts by reversing the steps of removal PXW X500 2 65 ...

Page 120: ... 9 Remove the HPR 53 board Refer to 2 10 HPR 53 Board 10 Remove the DPR 362 board Refer to 2 11 DPR 362 Board 11 Remove the EC 82 board Refer to 2 12 EC 82 Board 12 Remove the duct box assembly Refer to 2 13 DC Fan 40 Square 13 Remove the IO board assembly Refer to 2 14 IO 275 Board DIF 232 Board 14 Remove the connector box assembly Refer to 2 15 1 Connector Box Assembly Procedure 1 Disconnect the...

Page 121: ...n the two screws with drop safe and remove the shoulder pad assembly 2 Remove the screw to detach the bottom cover Screws with drop safe PSW2 x 5 Shoulder pad assembly Bottom cover 3 Remove the seven screws Bottom view PSW2 x 5 MB 1210 board PSW2 x 5 PXW X500 2 67 ...

Page 122: ...PSW2 x 5 Escutcheon MB SD PSW2 x 5 5 Remove the MB 1210 board 1 Disconnect the harness from the connector CN18 on the MB 1210 board 2 Remove the two screws to detach the MB bracket front 3 Remove the two screws to detach the MB bracket A MB 1210 board MB bracket A Harness MB bracket front CN18 PSW2 x 5 PSW2 x 5 PSW2 x 5 6 Install the removed parts by reversing the steps of removal PXW X500 2 68 ...

Page 123: ...the connector on the GP 1019 board 2 Remove the screw to detach the GP 1019 board 3 Disconnect the harness from the connector CN005 on the CN 3723 board 4 Disconnect the flexible board the connector CN001 on the CN 3723 board 5 Remove the screw to detach the CN 3723 board GP 1019 board CN 3723 board CN001 CN005 Flexible board Harness PSW2 x 5 PSW2 x 5 3 Install the removed parts by reversing the s...

Page 124: ...dle top cover assembly Handle top cover assembly B2 x 5 2 Remove the handle sealing B and disconnect the harness 1 Remove the handle sealing B 2 Disconnect the harness from the connector CN005 on the CN 3723 board CN 3723 board CN005 Handle sealing B Harness PXW X500 2 70 ...

Page 125: ... Disconnect the harness from the connector CN1 on the SE 1652 board 2 Remove the two screws to detach the SE 1652 board SW 1652 board Harness CN1 PSW2 x 5 4 Install the removed parts by reversing the steps of removal PXW X500 2 71 ...

Page 126: ...2 19 LED 529 Board Procedure 1 Remove the ornamental plate USB 1 Open the cap USB2 2 Remove the two screws to detach the ornamental plate USB B2 x 5 Ornamental plate USB Cap USB2 PXW X500 2 72 ...

Page 127: ... tally cover 1 Loosen the screw with drop safe and remove the shoe cover assembly 2 Remove the screw 3 Remove the tally cover while avoiding the switch B2 x 5 Screws with drop safe Shoe cover assembly Hole Tally cover Switch PXW X500 2 73 ...

Page 128: ...Release the boss and pull up the LED 529 board assembly 3 Disconnect the fine wire coaxial cable from the connector CN001 on the LED 529 board and remove the LED 529 board assembly B2 x 5 Fine wire coaxial cable Boss CN001 LED 529 board assembly PXW X500 2 74 ...

Page 129: ...92 PSW2 x 5 PSW2 x 5 Shield USB Shield USB Shield form 10X10X20 Shield form 10X10X20 Protection sheet LED529 LED 529 board Bracket LED 492 Drop protection cushion Switch Switch Drop protection cushion Sticking standard 3 4mm Note Install the drop protection cushion to the toggle switch as shown in the figure Note Install the shield form 10X10X20 to the shield USB as shown in the figure 5 Install t...

Page 130: ... 1 Disconnect the fine wire coaxial cable from the connector CN001 on the LED 492 board CN001 LED 492 board assembly Fine wire coaxial cable 2 Disconnect the harness A 1 Disconnect the harness A from the connector CN800 on the RE 326 board 2 Release the harness A from the notch of the cushion Light Harness A Notch of the cushion Light CN800 RE 326 board PXW X500 2 76 ...

Page 131: ...connectors CN5 CN6 CN51 on the HN 415 board 4 Draw out the harness A from space between the HN 415 board and the main frame and remove the handle assembly B3 x 8 B3 x 8 B3 x 8 B3 x 8 Handle assembly Harness A Harnesses Main frame HN 415 board CN6 CN5 CN51 4 Install the removed parts by reversing the steps of removal PXW X500 2 77 ...

Page 132: ...sembly Refer to 2 20 Handle Assembly Procedure 1 Disconnect the harnesses and the fine wire coaxial cable 1 Disconnect the three harnesses from the three connectors CN2 CN3 CN7 on the HN 415 board 2 Disconnect the fine wire coaxial cable from the connector CN4 on the HN 415 board Harness Harnesses CN7 CN4 CN3 CN2 HN 415 board CN 3736 board Fine wire coaxial cable PXW X500 2 78 ...

Page 133: ...rews PSW2 x 5 to detach the HN 415 board the VF GND plate and the VFGN_B cushion 3 Remove the VF GND plate and the VFGN_B cushion from the HN 415 board HN 415 board Attached screws VF GND plate VFGN_B cushion Connector cap PSW2 x 5 3 Install the removed parts by reversing the steps of removal PXW X500 2 79 ...

Page 134: ...ach the cover NO DONGLE 2 Open the KEY SW door 3 Remove the seven screws to detach the top cover assembly and the KEY SW cover B2 x 5 B2 x 5 Cover NO DONGLE Top cover assembly KEY SW cover KEY SW door Special screw 2 Remove the KY 736 board 1 Pull up the KY 736 board from the two bosses 2 Disconnect the harness from the connector CN1 on the KY 736 board and remove the KY 736 board KY 736 board CN1...

Page 135: ... the screw with drop safe to detach the 50P cover assembly 2 Disconnect the coaxial cable white from the connector CN SDI3 on the DPR 362 board 3 Remove the four screws B2 x5 4 Draw out the two coaxial cables and the fine wire coaxial cable and remove the 50P CN assembly Coaxial cable White DPR 362 board B2 x 5 CN SDI3 50P cover assembly Screws with drop safe 50P CN assembly Fine wire coaxial cabl...

Page 136: ...bles from the two connectors CN1 CN2 on the CI 50 board 3 Remove the two screws to detach the CI 50 board and the protection packing 4 Remove the shield form 5X1 and the two cushions CI from the CI 50 board B2 6 x 6 50P CN bracket Protection packing CI 50 board CN2 Shield forms 5X1 Coaxial cable White Coaxial cable Black Cushion CI Fine wire coaxial cable CN1 CN3 Note When connecting the coaxial c...

Page 137: ...tected the following error codes are displayed 91 XXX E 3 digit CPU device code in which abnormality is detected 2 digit CPU and IC code of partner units 1 digit Abnormal symptom code CPU Device Code in which Abnormality is Detected 3 digit Sub Code 3 digit Sub Code Description 1 EMMA Application processor IC4200 DPR 362 board 2 DIABLO Media processor IC2900 DPR 362 board 3 ROSETTA Video signal pr...

Page 138: ...ard 5 GMON Monitor FPGA IC2301 DPR 362 board 6 ETC Interface FPGA IC100 HPR 53 board 7 Audio block 8 ADV7320 Digital video encoder IC0403 or IC2700 DPR 362 board 9 MN864716 HDMI encoder IC001 DIF 232 board A Lens interface B EXT interface C GMON 700P Monitor FPGA IC2301 DPR 362 board D ETC EQ DRIVE Interface FPGA IC100 HPR 53 board E Imager block F ETC Interface FPGA IC100 HPR 53 board Abnormal Sy...

Page 139: ...IC4200 DPR 362 board 2 DIABLO Media processor IC2900 DPR 362 board 3 ROSETTA Video signal processor IC0100 DPR 362 board Abnormal Symptom Code Last Two Digits Sub Code Last Two Digits Sub Code Description 01 Error of reference frame pulse 02 Communication error of RTC Real Time Clock IC4600 DPR 362 board 03 Communication error of reference clock generator IC2002 DPR 362 board 04 Interrupt signal V...

Page 140: ...oard media interface error 05 BEAUNE IC1100 DPR 362 board fatal error 06 BEAUNE IC1100 DPR 362 board internal operation error 07 BEAUNE IC1100 DPR 362 board error warning 08 NATH IC1500 DPR 362 board error caution 09 NATH IC1500 DPR 362 board error exception 0A VBS error in LVCMOS communication path DIABLO to NATH 0B VBS error in LVCMOS communication NATH to DIABLO 11 Image sensor block internal e...

Page 141: ...3 4 Main Code A0 When errors of the system of the software originating are detected the following error codes are displayed A0 000 E PXW X500 3 5 ...

Page 142: ...3 5 Main Code 01 When Diablo and Curie IC1000 HPR 53 board interface is abnormal the following error codes are displayed E01 035 PXW X500 3 6 ...

Page 143: ...annel CCD registration H direction B CCD V Regi 0 100 to 0 1 0 002 step 0 00 Adjusts B channel CCD registration V direction White Shading Channel Select Red Green Blue Red Adjust white shading Select a channel The H Saw H Para V Saw and V Para values change to the current values of the selected channel White H Saw 99 to 99 0 White shading H Saw correction amount adjustment White H Para 99 to 99 0 ...

Page 144: ...address of the RPN correction point indicator cur sor Cursor V Position 1 to 1094 547 Displays and move the vertical address of the RPN correction point indicator cur sor Cursor Next Moves the RPN correction point indica tor cursor to the next RPN point Cursor Prev Moves the RPN correction point indica tor cursor to the previous RPN point Record Execute Cancel Cancel Registers the RPN Delete Execu...

Page 145: ...ersion 2 VUP3 xx xx Display only Display only Displays the device VUP3 version GMON xx xx Display only Display only Displays the device GMON version AUDI xx xx Display only Display only Displays the device AUDI version ETC xx xx Display only Display only Displays the device ETC version JKLX xx xx Display only Display only Displays the device JKLX version Version 3 Darwin xx xx Display only Display...

Page 146: ... and the unit returns to the normal shooting mode 4 2 2 Service Menu Service menu types Menu name Description SERVICE Parameter adjustment operation about RPN correction display of unit information 4 2 3 How to Display the Service Menu 1 Set the MENU ON OFF switch to ON to display the menu mode screen Refer to 4 2 1 Basic Menu Operation 2 Set the cursor at the Hours Meter item of the Maintenance m...

Page 147: ...t when one of carrier leak is bigger about G ch B ch or R ch and execute Adjusts automatically so that the carrier leak becomes minimum R G B VSUB The R VSUB G VSUB and B VSUB submenus are used to set the V substrate voltage value of the R G and B CCDs Usually set the V substrate voltage to the voltage specified for each CCD image pickup device R B CCD Regi The R CCD Regi and B CCD Regi submenus a...

Page 148: ...rm monitor to the CHROMA mode 5 Measuring equipment Waveform monitor Adjusting point Make the following adjustments with the menu MENU SERVICE PAGE CCD adjustment ITEM R CCD GAIN ITEM B CCD GAIN Specification Adjust the CCD gain alternately to minimize carrier leak C C C Settings after adjustment Make the following settings with the menu MENU PAINT PAGE Switch Status ITEM Gamma On ITEM Detail On W...

Page 149: ...Saw H Para V Saw and V Para setup values are changed to the current setup values of the channel selected by the Channel Sel menu The changes are reflected on the H Saw H Para V Saw and V Para setup values White H Saw The H Saw menu enables the horizontal Saw white shading correction linear increase and decrease level White H Para The H Para menu enables the horizontal Parabola white shading correc...

Page 150: ...values are changed to the current setup values of the channel selected by the Channel Select menu The changes are reflected on the H Saw H Para V Saw and V Para setup values Black H Saw The H Saw menu enables the horizontal Saw black shading correction linear increase and decrease level Black H Para The H Para menu enables the horizontal Parabola black shading correction black level correction at ...

Page 151: ...en Reset White Shad is selected Execute and Cancel appear When Execute is selected the auto white shading result is reset to the default value Auto Black Shading When Auto Black Shading is selected Execute and Cancel appear When Execute is selected auto black shading is executed When the CANCEL PRST ESCAPE switch is set to CANCEL while auto black shading is in execution the auto black shading is s...

Page 152: ...djust R Flare G Flare and B Flare until the black levels on both sides of the center white in all of the R G and B channels to a unity level Align black level all channels to that of the channel having the lowest black level B Notes The flare adjustment can be performed only when there is a correct grayscale chart When there is no correct grayscale chart adjust the values of R Flare G Flare and B ...

Page 153: ... Slow Quick in operation menu Rec Function is On Setting of Output Format in operation menu Input Output is Including 1280 x 720P Including 720x486i Including 720x480i Including 720x576i Note When APR is executed during the cross hairs cursor displayed APR is failed and not corrected Hide the cross hairs cursor and execute Channel Setting The Channel menu enables selection of the channel Rch or G ...

Page 154: ...the descending order of the addresses during the manual registration of RPN If multiple RPN positions have the same address in the descending order of the Cursor V Position the RPN cursor moves in the descending order of the Cursor H Position Executing Record The Record menu enables the manual registration of RPN When Record menu is selected the Execute and Cancel appear Selecting Execute starts t...

Page 155: ...egistrations of peripheral small RPNs and execute re registration Correction OK Knee Adjustment Weaken Blue Knee Station effective Blue Fringe is made inconspicuous Blue Fringe is the most made inconspicuous at 4 VCO Adjustment The VCO Adjustment menu allows adjustment of VCO frequency Clock Out Select Set the Clock Out Select to ON master clock signal can be output to VIDEO OUT connector Clock Fr...

Page 156: ...reset Executing appears When a message Factory Preset Power Off On appears after execution of Factory Preset turn on the power again Password Reset When the software key in software option is installed in case input password of this time became missing All installed software key password is reset to 0000 INFORMATION Menu The Information menu is used to display the information and status of the uni...

Page 157: ...62 board version Beaune IC1100 DPR 362 board version Note The version of Beaune is displayed when only recording format is XAVC L or XAVC I Version 2 Menu VUP3 IC2200 DPR 362 board version GMON IC2500 DPR 362 board version AUDI IC800 AU 360 board version ETC IC800 IC801 HPR 53 board version JKLX IC503 FP 208 board version Note When loading the version 2 camera EE picture may flash If camera EE pic...

Page 158: ......

Page 159: ...rts common ality and improvement 3 Stock of Parts Parts marked with o at SP Supply Code column of the spare parts list may not be stocked Therefore the delivery date will be delayed 4 Harness Harnesses with no part number are not registered as spare parts 1 安全重要部品 警告 印のついた部品は安全性を維持するために重 要な部品です したがって 交換する時は必ず 指定の部品を使ってください 2 部品の共通化 ソニーから供給する補修用部品は セットに使われ ているものと異なることがあります これは部品の共通化 改良等によるものです 3 部品...

Page 160: ...iption 1 A 2061 139 A s PLATE WRR ASSY BLIND 2 3 294 192 02 s P M2 6X10 3 3 742 004 01 s RING NYLON 4 3 742 074 13 s SCREW B 3X8 5 3 855 938 01 s SCREW PSW 2x5 6 3 965 077 02 s SCREW SPECIAL M2 M2x2 4 7 4 265 547 01 s GASKET UA 8 4 545 523 01 s SEPARATOR FRONT 9 4 545 572 01 s COVER NO DONGLE 10 4 549 570 01 s SHEET 70X40 MG09 11 4 446 014 01 s TAPE AS 2040 PXW X500 5 2 ...

Page 161: ...ARD CN 3722 102 X 2590 311 1 s ESCUTCHEON EC ASSY 103 3 855 938 01 s SCREW PSW 2x5 104 3 870 153 11 s SHEET 4 5X30 ADHESIVE 105 3 965 077 02 s SCREW SPECIAL M2 M2x2 4 106 4 168 993 01 s CAP BNC 107 4 281 496 01 s GASKET PRISM BLOCK 110 4 545 569 01 s PLATE SLOT SHIELD 112 4 549 831 01 s SPACER ESCUTCHEON 113 4 558 874 01 s STOPPER OPEN 2 PXW X500 5 3 ...

Page 162: ...UB ASSY OUTSIDE 202 A 2061 160 A s LID ASSY SLOT 203 3 080 206 21 s SCREW TAPPING P2 204 3 223 464 01 s SPACER SLIDER 205 3 603 680 02 s STAINLESS SCREW B3X12 206 3 657 841 31 s SPACER 2X2 5 207 3 855 938 01 s SCREW PSW 2x5 208 4 545 566 01 s SHEET USB WP 209 4 562 622 01 s SHEET S WP 210 4 562 623 01 s SHEET L WP PXW X500 5 4 ...

Page 163: ...2 3 855 938 01 s SCREW PSW 2x5 303 3 868 599 01 s CLAMP HARNESS LCD 304 3 868 991 11 s SHEEL HARNESS LCD 305 3 870 138 11 s SHEET HARNESS DROP PROTECTION 306 3 870 139 01 s SPRING HELICAL TORSION 307 4 264 413 01 s PLATE BLIND HING 308 4 264 414 11 s PAD INSIDE R 309 4 264 430 01 s PAD L INSIDE 310 4 446 014 01 s TAPE AS 2040 311 4 545 555 01 s INSULATING SHEET FP 7 685 146 11 s SCREW P 3X8 TYPE2 ...

Page 164: ... 52 s ORNAMENTAL PLATE 3 SW CAMERA 407 3 680 219 03 s KNOB VR 408 3 703 357 03 s PIN PARALLEL DIA 1 6X6 409 3 703 575 01 s PIN DIA 1 2 PARALLEL 410 3 719 381 02 s SCREW M2X4 411 3 869 457 01 s SPRING TORSION 412 3 879 092 01 s SHEET SW PANEL 413 3 969 387 01 s FOOT RUBBER 414 4 264 412 01 s LCD PANEL POPUP 415 4 264 416 01 s SPRING COMPRESSION 416 4 467 510 01 s HINGE MENU DOOR 417 4 468 152 01 s ...

Page 165: ... Description 501 A 2058 611 A s MOUNTED CIRCUIT BOARD FP 208 502 1 528 174 72 s BATTERY LITHIUM CR2032 TYPE 503 3 796 995 01 s DROP PROTECTION SW 504 3 796 996 03 s KNOB A SW 505 3 797 016 11 s CUSHION VOLUME AUDIO 506 3 855 938 01 s SCREW PSW 2x5 507 4 472 863 01 s KNOB B SWITCH 508 4 472 864 01 s KNOB C SWITCH PXW X500 5 7 ...

Page 166: ... 01 s NUT M6X0 5 608 3 603 680 02 s STAINLESS SCREW B3X12 609 3 629 446 04 s SLEEVE ENC2 610 3 629 447 03 o SLEEVE ENC1 611 3 647 917 02 s PLATE EARTH 612 3 692 111 02 s KNOB RE 613 3 724 758 02 s RUBBER PUSH DROP PROTECTION 614 3 797 073 01 s RES SW PUSE 615 3 797 084 01 s HOLDER SPEAKER 616 3 855 938 01 s SCREW PSW 2x5 617 3 868 597 11 s SHEET SP DROP PROTECTION 618 3 870 098 11 s CUSHION POWER ...

Page 167: ... s SUB HARNESS DET 708 3 056 233 21 s SCREW M2 LOCK ACE P2 P2x4 709 3 060 694 11 s COVER REAR HINGE 710 3 719 381 02 s SCREW M2X4 711 3 870 082 01 s LCD HINGE SW HOLDER 712 3 870 088 01 s PROTECTOR LCD HINGE HARNESS 713 3 964 010 32 s SCREW M2 0 PART NO P2 MAIN P2x2 5 714 3 989 735 11 s SCREW M1 7 LOCK ACE P2 P 1 7x2 5 715 4 264 420 01 s COVER LCD 716 4 264 422 01 s FRONT COVER HINGE 717 4 300 095...

Page 168: ... 3 710 054 01 s KNOB FILTER 812 3 742 066 11 o SPRING SHUTTER 813 3 742 067 06 s LID SHUTTER 814 3 796 965 01 s BRACKET SHUTTER 815 3 796 982 03 s HOLDER LENS MOUNT 816 3 797 080 01 s DROP PROTECTION MIC VR 817 3 854 361 01 s GUARD VOLUME FRONT 818 3 854 362 01 s HOLDER GUARD 819 3 854 363 01 s SLIDER 820 3 855 938 01 s SCREW PSW 2x5 821 3 879 494 02 s FINGER LM SHIELD 822 3 965 077 02 s SCREW SPE...

Page 169: ...SY RP 903 1 788 765 21 s FILTER UNIT OPTICAL 904 1 967 049 11 s HARNESS SUB SE 905 3 678 629 04 s LEVER MOUNT 906 3 729 076 11 s SCREW B 2X4 907 3 776 897 02 s GUIDE PLATE 908 3 854 378 01 s PLATE FILTER ID 909 3 855 938 01 s SCREW PSW 2x5 910 4 119 228 01 s GASKET VF 911 4 264 432 01 s CHB CASE 912 4 549 569 01 s SHEET 70X60 MG10 913 4 478 477 01 s MG SHEET 30X30 7 627 452 18 s SCREW PRECISION K ...

Page 170: ... 028 11 s HARNESS SUB LIGHT 1010 1 967 783 11 s HARNESS COAXIAL CABLE 1011 1 970 443 11 s SUB HARNESS GPS 1012 3 337 402 01 o BAND BINDING 1013 3 742 004 01 s RING NYLON 1014 3 742 074 13 s SCREW B 3X8 1015 3 805 990 01 s HANDLE TOP COVER LID 1016 3 855 938 01 s SCREW PSW 2x5 1017 3 868 631 01 s CUSHION DROP PROTECTION 1018 3 870 241 02 s COVER LAMP 1019 3 870 243 02 s SEAL LAMP COVER No Part No S...

Page 171: ...LT M4X8 HEXAGON HOLE 1108 3 679 684 01 o REST ARM 1109 3 679 702 01 o CUSION STOPPER 1110 3 701 507 01 s SET SCREW DOUBLE POINT M3X5 1111 3 711 765 01 s BOLT M3 HEXAGON SOCKET 1112 3 895 622 01 s RING DIA 5 O 1113 4 168 997 02 s GRIP 1114 4 446 005 12 s GASKET MAIN L 1115 4 549 633 01 s KNOB LOCK 1116 4 558 057 01 s SHOE SLIDE 1117 4 558 058 01 s LEVER LOCK 1118 4 558 190 01 s LOCK SCREW 1119 4 55...

Page 172: ...3 577 61 s HARNESS COAXIAL CABLE 1205 1 970 442 11 s SUB HARNESS EC SD 1206 1 970 444 11 s SUB HARNESS WA_POWER2 1207 1 970 445 11 s HARNESS CN WA 1208 3 855 938 01 s SCREW PSW 2x5 1209 4 137 926 01 s SADDLE LES 0505 EDGE 1210 4 284 134 11 s GASKET B 1211 4 427 951 02 s RADIATION SHEET C 1212 4 427 952 02 s RADIATION SHEET D 1213 4 446 014 01 s TAPE AS 2040 1214 4 458 849 01 s FAN HOLDER 1215 4 54...

Page 173: ...s MOUNTED CIRCUIT BOARD RE 326 1303 A 2061 111 A s MOUNTED CIRCUIT BOARD AU 360 1304 1 855 024 11 s FAN DC 40 SQUARE 1305 1 967 037 11 s HARNESS DPR EC 1306 3 257 200 01 s CLAMP CORD 1307 3 855 938 01 s SCREW PSW 2x5 1308 4 165 223 01 o SHEET 4535T1 RADIATION 1310 4 468 131 01 s CUSHION JOINT 1311 4 468 147 01 s SHEET EC 1312 4 545 551 01 s SHEET SXS MF RADIATION 1313 4 545 552 01 s SHEET SXS MF S...

Page 174: ... 1405 1 970 445 11 s HARNESS CN WA 1406 3 855 938 01 s SCREW PSW 2x5 1407 4 137 926 01 s SADDLE LES 0505 EDGE 1408 4 427 950 02 s RADIATION SHEET B 1409 4 427 951 02 s RADIATION SHEET C 1410 4 427 952 02 s RADIATION SHEET D 1411 4 427 955 02 s RADIATION_SHEET_G 1412 4 446 014 01 s TAPE AS 2040 1413 4 545 521 01 s HEAT SINK HPR B 1414 4 545 526 01 s SPACER BSB 2005_5E 1415 4 545 529 01 s SHEET HPR ...

Page 175: ...SSEMBLY COAXIAL Black 1507 1 967 537 11 s HARNESS CI 1508 3 616 721 02 o MOUNT 2 V 1509 3 671 893 01 s CLAMP LOW TYPE 1510 3 679 687 02 s LOCK SLIDE 1511 3 679 688 03 s LEVER RELEASE 1512 3 680 952 02 o KNOB RELEASE LEVER 1513 3 697 119 03 s RETAINER No Part No SP Description 1514 3 701 436 21 s WASHER POLYEHTHYLENE 1515 3 704 964 01 s SPRING COMPRESSION 1516 3 742 074 13 s SCREW B 3X8 1517 4 129 ...

Page 176: ...275 1603 A 2058 420 A s MOUNTED CIRCUIT BOARD CN 3738 1604 A 2063 286 A s MOUNTED CIRCUIT BOARD DIF 232 1605 1 500 082 11 o CLAMP SLEEVE FERRITE 1606 1 970 440 11 s SUB HARNESS IO 1607 2 635 562 31 s SCREW M1 7 P 1 7x4 1608 3 694 181 03 s TYPE1 AROCK PRECISION P2 6X5 1609 3 742 074 13 s SCREW B 3X8 1610 3 855 938 01 s SCREW PSW 2x5 1611 3 965 077 02 s SCREW SPECIAL M2 M2x2 4 1612 4 545 527 01 s CA...

Page 177: ...970 439 11 s COAXIALCABLE DPR HD SDI_OUT1 Yellow 1710 1 970 441 11 s SUB HARNESS DC OUT 1711 1 970 449 11 s COAXIALCABLE DPR HD SDI_OUT2 Blue 1712 1 970 499 11 s SUBHARNESS DC IN 1713 3 364 941 01 s SCREW B 2 6X5 NYLOK 1714 3 626 781 03 s STOPPER 1715 3 723 097 01 o FOOT RUBBER No Part No SP Description 1716 3 742 074 13 s SCREW B 3X8 1717 3 796 985 02 s CUSHION DROP PROTECTION 1718 3 796 986 02 s...

Page 178: ... BOARD HN 415 1804 A 2054 872 A s MOUNTED CIRCUIT BOARD CN 3736 1805 A 2061 152 A s COVER ASSY TOP 1806 1 837 297 11 s CABLE FLEXIBLE FLAT 30 CORE 1807 1 967 683 11 s HARNESS HDMI 1808 1 970 446 11 s SUB HARNESS MB HN 1809 3 234 710 01 o SPRING OPEN COMPRESSION COIL 1810 3 855 938 01 s SCREW PSW 2x5 1811 4 169 111 01 s KEYSW COVER 1812 4 488 383 01 s TAPE 13X50 C No Part No SP Description 1813 4 5...

Page 179: ...72 02 s SCREW K 4X8 1906 3 796 946 03 s TAPE A 1907 3 855 938 01 s SCREW PSW 2x5 1908 4 000 497 02 s FOAM ILI SHIELD 1909 4 138 678 01 s CLAMP CABLE 1910 4 168 987 02 s COVER BOTTOM 1911 4 169 108 21 s TUBE DRAIN 1912 4 169 108 31 s TUBE DRAIN 1913 4 169 114 03 s MESH BOTTOM 1915 4 446 014 01 s TAPE AS 2040 No Part No SP Description 1916 4 468 127 01 s CUSHION LIGHT 1917 4 468 137 02 s FOAM 10X6 S...

Page 180: ...3 11 s LAN MODULE WIRELESS IFU WLM3 1pc 3 080 203 31 s SCREW M2 LOCK ACE P2 1pc 3 688 754 11 s SPRING 1pc 3 688 755 13 s SHOE ACCESSORY 1pc 3 704 295 01 o BAG PROTECTION 550X500 2pcs 4 279 469 01 s CAP USB WATERPROOF 1pc 4 545 573 01 s GUIDE OPERATION 1pc 4 545 574 01 s CD ROM OPERATION MANUAL 1pc 4 559 711 01 s WIFI GUARD PXW X500 5 22 ...

Page 181: ... DC OUT DC FAN 30 40 SQUARE SW_UNREG FP 208 2 2 IC404 EX VINE IC302 KEY VINE IC503 JKLX CPLD DET 50 SW 1650 ENC 162 KY 736 SW 1651 S1 6 EN1 ROTALY SW IF 1209 IC101 FPGA COLOR LCD FRONT SW 5 6 MB VR_F_MIC SW_SHUTER_A B SW_AUTO_B W_A B SW_REC_START EMMA _SDA SCL_0 SW SW SW LIGHT SW LCD REVERSE SW S1 SW LED S1 6 D1 3 IC5002 DARWIN IC4200 EMMA IC2900 DIABLO POWER SW DWN PWRSW0_X USI0_DI DO POWER_SAVE ...

Page 182: ...NESS SPEAKER HARNESS AXM DET MODULE WIFI HARNESS EC REAR TALLY TALLY ON OFF CABLE ASSEMBLY COAXIAL CN100 CABLE ASSEMBLY COAXIAL 50P CABLE ASSEMBLY COAXIAL HDSDI COAXIALCABLE DPR HD SDI_OUT1 COAXIALCABLE DPR HD SDI_OUT2 FLEXIBLE FLAT CABLE FLEXIBLE FLAT CABLE HARNESS RM HARNESS KY HARNESS IO TC IN TC OUT GENLOCK IN VIDEO OUT WIRELESS REMOTE CN1 CN1 CN2 CN1 J2602 CN1 CN2 CN4 J501 J500 J2600 J2601 CN...

Page 183: ......

Page 184: ...PXW X500 SY PXW X500 CN J E 9 878 582 01 Sony Corporation Printed in Japan 2014 11 08 2014 ...

Reviews: