background image

Chapter

 5

Operating Instructions

CLV 490 Bar Code Scanner

5-16

©

 SICK AG · Division Auto Ident · Germany · All rights reserved

8 009 993/O824/20-12-2004

Electrical installation

CLV with/without

heater on power pack

5.3.10

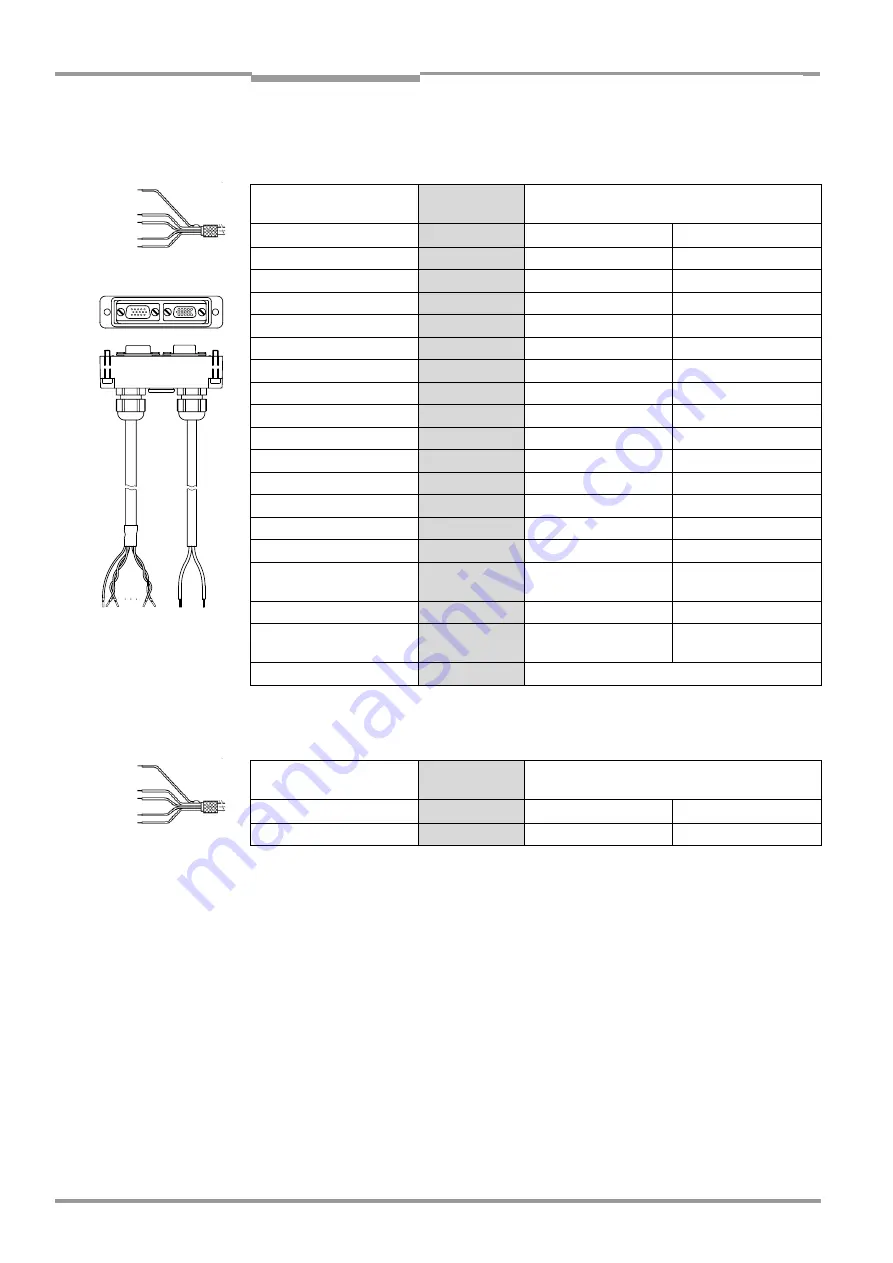
Cable no. 2 021 267 (connector cover)

Cable 1, open end (connection for data and function interfaces):


Cable 2, open end (connection for power supply):


The signals of the CAN interface (CAN H, CAN L, CAN2 H, CAN2 L) are not available.

Signal

Wire color

Connector cover
15-pin plug

15-pin socket

IN 1

white

2

Sensor

brown

3

Result 1

green

4

IN 0

yellow

6

IN 2

grey

7

Result 2

pink

8

INGND

blue

9

Result 3

red

10

IN 3

black

11

IN 4

violet

12

Result 4

grey-pink

15

RxD (RS 232), Aux

red-blue

2

TxD (RS 232), Aux

white-green

3

Term (RS 422/485)

brown-green

4

RD+ (RS 422/485), Host

white-yellow

6

RD– (RS 422/485), Host
RxD (RS 232), Host

yellow-brown

7

TD+ (RS 422/485), Host

white-grey

8

TD– (RS 422/485), Host
TxD (RS 232), Host

grey-brown

9

Shield

orange

Housing

Table 5-19: Wire colors of cable no. 2 021 267, cable 1 (connection for data and function interfaces)

Cable 2

Cable 1

Signal

Wire color

Connector cover
15-pin plug

15-pin socket

V

S

red

1

GND

black

5

Table 5-20: Wire colors of cable no. 2 021 267, cable 2 (connection for power supply)

Summary of Contents for CLV 490 Series

Page 1: ...Advanced Line CLV490 Bar Code Scanner OPERATING INS TR UCTIONS New Connectivity CDB420 and CDM490 ...

Page 2: ...are registered trademarks or trademarks of the Microsoft Corporation in the USA and other countries Latest manual version For the latest version of this manual PDF see www sick com Software Tool Function Version CLV 490 0010 0011 Firmware From V 3 5 O824 CLV 490 1010 1011 Firmware From V 3 5 O824 CLV 490 6010 6011 Firmware From V 3 5 O824 CLV 490 7010 7011 Firmware From V 3 5 O824 CLV 490 2010 201...

Page 3: ...ons Chapter 3 Product description Page 3 1 Chapter 6 2 Default settings Page 6 1 Chapter 6 5 Operating modes and outputing the reading result Page 6 39 Chapter 9 Technical data Page 9 1 Chapter 10 3 Installing and operating the external parameter memory connector co ver Page 10 34 Starting the device with the default settings Chapter 6 3 Quick start Page 6 3 Installing the CLV Setup program Chapte...

Page 4: ...ith oscillating mirror In the default setting the CLV deflects the scan line around the position CW 50 with a frequency of 1 Hz and an oscillating amplitude of max 20 40 CW 9 Switch on your PC and start WindowsTM minimum requirement Windows 95TM 10 Install the CLV Setup software and the online CLV Setup Help from the CD ROM Manuals Software on your PC 11 Connect the PC to the terminal interface of...

Page 5: ...uirements for stand alone configuration 3 2 3 1 4 Product features and functions overview 3 3 3 1 5 Design 3 5 3 2 Method of operation 3 6 3 2 1 Autofocus function 3 7 3 2 2 Event controlled dynamic focus control 3 8 3 2 3 Reading modes in stand alone configuration 3 8 3 2 4 Scan procedure variants 3 9 3 2 5 Additional components 3 10 3 3 Indicators and control elements 3 10 3 3 1 Control elements...

Page 6: ...r memory 5 15 5 3 10 Cable no 2 021 267 connector cover 5 16 5 4 Preparations for electrical installation 5 17 5 4 1 Requirements for the host interface 5 17 5 4 2 Supply voltage 5 17 5 4 3 Non SICK Power supply unit connections without the Connection Module 5 18 5 5 Electrical installation procedure 5 19 5 5 1 Individual steps 5 19 5 5 2 Tools 5 19 5 5 3 Connecting the supply voltage 5 19 5 5 4 C...

Page 7: ... cover 8 3 8 3 3 Messages for errors accessing the external parameter memory connector cover 8 5 8 4 ST error status in the reading result of a bar code 8 7 8 5 Troubleshooting 8 9 8 5 1 General malfunctions CLV not ready 8 9 8 5 2 Malfunctions in Reading mode reading trigger errors 8 10 8 5 3 Malfunctions in Reading mode result output errors 8 14 8 5 4 Malfunctions in Reading mode errors in the r...

Page 8: ... CLV Setup program 10 43 10 6 1 Preparations 10 43 10 6 2 Installing the software 10 43 10 6 3 Starting CLV Setup 10 46 10 6 4 User interface 10 48 10 6 5 Functions 10 49 10 6 6 Hot keys 10 49 10 6 7 Opening and closing tabs 10 50 10 6 8 Online help CLV Setup Help 10 50 10 6 9 Transferring parameter sets between CLV Setup and the CLV 10 51 10 6 10 Unknown parameters 10 51 10 6 11 Log file in the T...

Page 9: ...t from the external memory 10 74 10 13 Accessories 10 75 10 13 1 Mounting accessories 10 75 10 13 2 Connection modules 10 75 10 13 3 Extensions for connection modules 10 76 10 13 4 Cables external parameter memories in connector cover connector covers 10 77 10 13 5 Plug in connections 10 80 10 13 6 Reading pulse generators 10 80 10 13 7 Incremental encoder 10 81 10 14 Dimensioned drawings of the a...

Page 10: ...2 Table 4 1 Permissible reading angles between the scan line and bar code 4 5 Table 5 1 Connection Modules for the CLV 5 1 Table 5 2 Cables for connecting the CLV 5 2 Table 5 3 Pin assignment of the 15 pin D Sub HD Host Term plug 5 7 Table 5 4 Pin assignment of the 15 pin D Sub HD I O socket 5 7 Table 5 5 Pin assignment 15 pin D Sub HD plug of the cable no 2 027 046 no 2 030 023 5 8 Table 5 6 Pin ...

Page 11: ...Table 6 3 Reading distances for default settings 6 4 Table 6 4 Guide Configuring the reading area 6 11 Table 6 5 Guide Selecting the focus control mode 6 12 Table 6 6 Guide Configuring the autofocus function part 1 6 13 Table 6 7 Configuring the autofocus function part 2 6 15 Table 6 8 Guide Configuring focus position switchover 6 16 Table 6 9 Guide Configuring oscillating mirror functions 6 18 Ta...

Page 12: ...ifications of the CLV 490 0010 2010 6010 9 1 Table 9 2 Technical specifications of the CLV 490 1010 3010 7010 9 2 Table 9 3 Technical specifications of the CLV 490 0011 2011 6011 9 2 Table 9 4 Technical specifications of the CLV 490 1011 3011 7011 9 3 Table 10 1 Reading conditions for specification diagrams 10 1 Table 10 2 Overview of specification diagrams for the line scanner 10 2 Table 10 3 Ove...

Page 13: ...erminal interface 5 22 Fig 5 5 Connections of the Sensor switching input 5 23 Fig 5 6 Connections of the IN 0 to IN 4 switching inputs 5 24 Fig 5 7 Connections of the Result 1 to Result 4 switching outputs 5 27 Fig 6 1 Bar code pattern Code 39 module width 0 35 mm 11 8 mil Print ratio 2 1 6 4 Fig 6 2 Narrowing the reading space using limit values 6 10 Fig 6 3 Narrowing the autofocus range using li...

Page 14: ...s a function of the focus position at a resolution of 0 35 mm 13 8 mil and an aperture angle of α 40 10 10 Fig 10 9 CLV 490 1010 1011 Standard density Min and Max reading distance measured radially as a function of the focus position at a resolution of 0 35 mm 13 8 mil and an aperture angle of α 50 10 11 Fig 10 10 CLV 490 1010 1011 Standard density Min and Max reading distance measured radially as...

Page 15: ...solution of 0 5 mm 19 7 mil 10 31 Fig 10 30 Characteristics field CLV 490 7010 7011 Low density Scanning frequency as a function of the radial reading distance and resolution 10 32 Fig 10 31 CLV 490 7010 7011 Low density Deflection range as a function of radial reading distance deflection angle and tilt at a resolution of 0 5 mm 19 7 mil 10 33 Fig 10 32 External parameter memory installed on the C...

Page 16: ... default setting 10 68 Fig 10 56 Auxiliary input via the terminal interface of the CLV 10 69 Fig 10 57 CLV Setup auxiliary input via the Terminal Emulator 10 70 Fig 10 58 Dimensions of the angle bracket single No 2 013 824 10 81 Fig 10 59 Dimensions of the articulated bracket No 2 018 435 10 81 Fig 10 60 Front view of quick clamping device No 2 016 110 with angle braket No 2 013 824 10 81 Fig 10 6...

Page 17: ...mm 7 9 mil high density CLV 490 3011 resolution from 0 20 mm 7 9 mil high density with heater CLV 490 1010 resolution from 0 30 mm 11 8 mil standard density CLV 490 1011 resolution from 0 30 mm 11 8 mil standard density with heater CLV 490 7010 resolution from 0 40 mm 15 7 mil low density CLV 490 7011 resolution from 0 40 mm 15 7 mil low density with heater This document provides information on Mo...

Page 18: ...t you can access it quickly Warning Warnings are provided to prevent injury to operating personal or serious damage to the bar code scanner Always read warnings carefully and observe them at all times Note Indicates special features or characteristics Explanation Explanations provide background information on technical features Recommendation Recommendations help you carry out certain procedures m...

Page 19: ...he devices in the relevant application e g conveyor belt Knowledge of the hardware and software environment of the relevant application e g conveyor belt Basic understanding of Windows 95TM 98TM Windows NT4 0TM Windows 2000TM or Windows XPTM Ability to use an HTML browser e g Internet ExplorerTM Basic understanding of data transfer methods Basic understanding of bar code technology 2 2 Intended us...

Page 20: ...s Do not open the housing Opening the housing does not deactivate the laser diode Observe the laser protection specifications latest version Laser power The laser operates at a wave length of λ 650 nm visible red light The power output at the reading window is max 2 8 mW The emitted radiation is not dangerous to human skin The product is classified in laser class 2 laser class II in accordance wit...

Page 21: ...eactivates the laser diode in Reading mode Sensor input and Serial interface trigger mode if the reading interval has not ended after 10 minutes default setting However it does not end the reading interval In this case the CLV outputs the message Laser safety timeout on the terminal interface The reading interval must be terminated by resetting the trigger signal The laser diode is activated again...

Page 22: ...mum impact on the environment It does not contain any silicone based materials on the housing surface and therefore does not represent any problems for paint sprayers in paint shops for example 2 5 1 Power requirements The power requirements depend on the variants The line scanner has a typical power consumption of 11 W and max 16 W The line scanner with oscillating mirror has a typical power cons...

Page 23: ...erman printed edition Chapter 10 13 Accessories Page 10 75 contains an overview of the available mounting accessories bus connection modules external parameter memories cables connectors and incremental encoder as well as sensors for generating the reading pulse 3 1 2 Variants The CLV is currently available in the following variants Table 3 1 CLV variants Type red light Part no Scanning method Res...

Page 24: ...tionally 1 W CMF 400 Connection Module Fieldbus 18 to 30 V DC additionally 2 W 3 Fitting cables see Chapter 5 2 2 Prefabricated cables overview Page 5 2 4 With external clock pulse start stop supply via the Sensor switching input a suitable reading pulse sensor for signaling an object with a bar code e g a photoelectric reflex switch 5 With extended external clock pulse stop via the IN 4 switching...

Page 25: ... under CLV without heater 3 1 4 Product features and functions overview High performance laser scanner Line scanner front end reading window Scanner variant with oscillating mirror side reading window Resolution variants standard density high density low density Dynamic focus autofocus with distance measurement Alternatively dynamic focus control with external or internal trigger Reading range 500...

Page 26: ...g Tracking mode Internal object tracking for max 10 objetcs per reading interval Extended object tracking 20 objetcs in combination with OTS 400 Object Tracking System Electrical interfaces Serial host interface RS 422 485 or RS 232 with variable transfer rate and telegram structure Serial terminal interface RS 232 as auxiliary data interface with special diagnosis and statistics functions CAN int...

Page 27: ...end Drilled hole Ø 3 6 mm 14 in 6 mm 24 in deep Laser warning labels Blind hole thread M6 7 mm 28 in deep for securing the device Blind hole thread M4 10 mm 39 in deep for the connector cover Host Term connector 15 pin D Sub HD plug I O connector 15 pin D Sub HD socket LEDs status indicators Reading window Mark for count direction of the code position deflection direction of the laser beam Line sc...

Page 28: ...gger This opens an internal time window reading interval in the CLV In the default configuration this trigger is supplied by an external reading pulse sensor Alternative trigger sources include Free running mode or a command via the host interface for more complex applications object polling or OTS trigger The current operating status is indicated by four LEDs If the trigger is supplied externally...

Page 29: ... object which it recognizes by comparing the actual dis tance profile to the distance profile of the background Application with unobstructed view of the object restricted by other objects that protrude constantly into the reading plane One object with barcode s only is inside the reading field during one reading pulse Differential background and tracking if several objects with different distance...

Page 30: ...e case of the line scanner with oscillating mirror also the oscillating mirror reversal points The distance configurations are assigned to the switchover sequence by means of a programmable assignment table In combination with the OTS 400 Omni Tracking System Alternatively the object height information from the OTS 400 or any other CLV via the CAN bus The distance measurement of the autofocus func...

Page 31: ...reading process The end of the rea ding field is determined by the parametrized object release point in the CLV In this way the size of the reading field is clearly determined In order to track the transport of the objects in the reading field a regularly timed pulse is required This is generated by an external incremental encoder which regularly supplies a pulse at least every 10 mm 0 39 in of mo...

Page 32: ...r memory is located in a connector cover which when mounted covers the two electrical terminals on the CLV IP 65 The parameter memory saves you time when a CLV is replaced locally by providing a copy of the current parameter set In other words you do not have to configure the new device For information on applications and operating procedures see Chapter 10 3 Installing and operating the external ...

Page 33: ... CLV has loaded internal parameter set Start option START WITH COPY INTERN EXTERN Blinks constantly together with the Read Result LED1 CLV has loaded internal parameter set Read Result Green Start option START WITH COPY INTERN EXTERN Blinks constantly together with the Device Ready LED1 Reading mode Device Ready Green Lights up constantly Extinguishes with new operating mode function Sensor Green ...

Page 34: ... Blinks for approx 10 s together with the Read Result LED then lights up constantly CLV has loaded the parameter set from the external parameter memory with tolerated errors1 and starts reading mode straight away Lights up constantly CLV could not find an external parameter memory and loads the internal para meter set instead Blinks constantly together with the Read Result LED2 The external parame...

Page 35: ...s constantly active Read Result Green LED is linked to the Result 2 output and indicates the selected result status for the defined pulse duration of the output Lights up after a successful read Good Read Lights up if the match code comparison is active the bar code read matches the specified match code s and the corresponding result output is selected for the Result 2 output Data Yellow Flickers ...

Page 36: ...Chapter 3 Operating Instructions CLV 490 Bar Code Scanner 3 14 SICK AG Division Auto Ident Germany All rights reserved 8 009 993 O824 20 12 2004 Product description Notes ...

Page 37: ... 016 110 with securing material for the CLV or Alternatively if the bracket is supplied by the user Stable mounting device that allows the alignment of the CLV to be varied in the x and y axes The weight of the CLV line scanner is 1 5 kg 3 3 lb and 2 2 kg 4 84 lb as a line scanner with oscillating mirror 2 screws M6 for the CLV The screw length depends on the wall thickness of the bracket used Dep...

Page 38: ...ng location the distance between the CLV and the host and between the CLV and the bar code are extremely important Distance between the CLV and the host The CLV can be mounted at a maximum distance of 1 200 m 3 937 ft from the host with out a connection to the SICK network or a bus In practice however the distance depends on the physical configuration of the host interface and the data transfer ra...

Page 39: ...2 x mounting bracket single no 2 018 435 Quick clamping device no 2 016 110 The brackets are designed to support a variety of mounting positions and alignments in two planes Fig 4 3 shows two mounting examples The elongated holes in the mounting bracket no 2 013 824 and in the articulated bracket no 2 018 435 allow the CLV to be adjusted with a freedom of rotation of 15 The dimensions of the mount...

Page 40: ... shown as a function of the reading distance for various resolutions module widths depending on the CLV type in Chapter 10 2 Specification diagrams Page 10 1 Fig 4 5 shows the definition of the reading distance a radial measured from the reading window and of the aperture angle α each of the two scanning methods The useful aperture angle is typically 56 for the line scanner and max 50 for the line...

Page 41: ...CLV must be mounted in such a way that the emitted light is tilted slightly with respect to the vertical axis Fig 4 7 In the case of the line scanner with oscillating mirror the laser beam is emitted at an angle of 105 with respect to the housing as it passes through the neutral position CW 50 while oscillating The device can only be flush mounted with the conveyor belt with limited deflection ran...

Page 42: ...ection of the code position and code angle In the case of the line scanner the count direction of the code position is marked by a small triangle above the reading window By determining this data the device can separate identical bar codes code type code length and data content identical and assign the bar code data in the reading result to its position on the object Tip In the default setting the...

Page 43: ...Chapter 4 2 2 Required ac cessories Page 4 1 2 Place the object containing the bar code within the reading field of the CLV in the posi tion at which it is to be read with the conveyor belt switched off 3 Align the CLV with the bar code in accordance with the scanning method in such a way that with the line scanner the back of the device with the LEDs is almost parallel with the bar code surface w...

Page 44: ...onnect the CLV to the CDB 420 or CDM 490 Connection Module and switch on the power supply see Chapter 5 5 3 Connecting the supply voltage Page 5 19 After it has started the CLV confirms that the self test was successfuly and switches to reading mode Device Ready LED lights up 2 Connect the PC to the terminal interface of CLV To do so connect a 3 core RS 232 data cable null modem cable to the inter...

Page 45: ... angle of approx 105 see Fig 4 7 Page 4 5 12 If necessary position the scan line exactly at the direct center of the bar code See Chapter 4 3 3 Adjusting mode below 13 Move objects carrying bar codes into the CLV reading field manually under realistic conditions and check the reading result If the objects are aligned randomly or if the bar code is located at different positions angles ensure that ...

Page 46: ...6 44 2 Position the CLV in such a way that the center of the scan line indicated by the end of the scan line code position CP 50 is located at the center of the bar code or at the center of the field for all codes if several bar codes are used Show CP Limits The Show CP Limits operating mode allows you to test whether the desired effect was pro duced by narrowing the scan line s active evaluation ...

Page 47: ...rnal reading pulse sensor the sensor must be mounted in the vicinity of the CLV The Sensor switching input is selected as the default trigger source for this trigger type The default debounce time of the input is 30 ms Fig 4 10 shows two examples of where a photoelectric reflex switch can be mounted This depends on the distance a from the bar code to the front of the object Depending on the applic...

Page 48: ...nner with oscillating mirror In default setting the CLV deflects the scan line default setting about the fixed position CW 50 with a frequency of 1 Hz at a max angle of 20 40 CW 50 CW corresponds to an angle of emergence of 105 7 Move objects with bar codes into the CLV reading field manually under realistic condi tions and check whether the reading result and trigger pulse are correct 8 Repeat th...

Page 49: ...ns reading ranges can be implemented using the internal assignment table combinations Photoelectric reflex switches for example can be used to detect the object distance In the default setting all five IN 0 IN 4 switching inputs are selected for dynamic focus control 1 The depths of field of the CLV for the bar code resolution in question is shown in the graphs in Chapter 10 2 Specification diagra...

Page 50: ... realistic conditions To do so monitor the reading result in the Terminal Emulator as described in Chapter 4 4 2 Mounting the external reading pulse sensor Page 4 11 11 If the distance detection function operates correctly reset the decoder to the SMART STANDARD option and perform a permanently download to the CLV Note The CLV can switch between a maximum of 8 distance ranges for slow search runs ...

Page 51: ... interface CAN interface 1 and 2 terminal interface Six switching inputs external reading pulse and multifunctional inputs Four switching outputs for result status function for connecting to a PLC for example Power supply 5 2 1 Wire cross sections CLV without heater All connections must be wired with copper cables with a minimum wire diameter of 0 15 mm2 approx 26 AWG CLV Type Temperature range Co...

Page 52: ...lug and 15 pin socket Non Sick Power pack 1 x no 2 020 303 1 x no 2 020 264 or 3 m 3 84 ft 3 m 3 84 ft Connection cable with 15 pin socket open end Connection cable with 15 pin plug open end 1 x no 2 020 981 or 3 m 3 84 ft Connector cover IP 65 with parameter memory to two cables with open ends 1 x no 2 021 267 3 m 3 84 ft Connector cover IP 65 to two cables with open ends CLV with heater 35 to 35...

Page 53: ...ps in the CDB 420 are limited Fig 5 1 shows the connection principle of the CDB 420 The procedures for connecting and configuring the connection module are described in the CDB 420 Connection Module Operating Instructions order no 8 010 001 German English Note Diagrams showing you how to connect the CDB 420 Connection Module are also available in the CLV Connect PC program This software is availab...

Page 54: ... section of at least 0 75 mm2 approx 20 AWG with a maximum length of 10 m 32 8 ft Note To avoid strain on the power supply lines when connecting the CLV with heater to the CDB 420 please make sure to use the correct cable wire diameters for the incoming cables of the power supply to the CDB 420 and to use corresponding fuses Use only the screw ter minals 1 to 4 for connecting the power supply The ...

Page 55: ...tion of reading re sults and reading diagnosis data CMF 400 Bus Modules field bus gateways for connecting the CLV to Profibus DP DeviceNet or Ethernet TCP IP The CMP 490 Power Supply Module can not be used if the CMD 400 Display Module has always been built in or vice versa For detailed description of function and installation see the corresponding Fitting Operating Instructions see Chapter 10 15 ...

Page 56: ... sure to use the correct cable wire diameters for the incoming cables of the power supply to the CDM 490 and to use corresponding fuses Use only the screw ter minals 1 to 4 for connecting the power supply The input voltage connected to the screw terminals 1 and 2 is directly available on the screw terminal 3 and 4 for connecting the CLV 490 independent of the S1 switch Power Chapter 5 3 Connector ...

Page 57: ...nterface 2 IN OUT 14 Reserved 15 CAN L CAN interface 1 IN OUT Housing Shield 1 Pin 1 is jumpered with Pin 1 of the I O connection in the CLV Table 5 3 Pin assignment of the 15 pin D Sub HD Host Term plug 1 10 15 6 11 5 Pin Signal Function 11 VS Supply voltage 2 IN 1 Switching input trigger for focus control 3 Sensor Switching input external reading pulse 4 Result 1 Switching output variable functi...

Page 58: ...e signals IN 1 to IN 4 Result 3 to Result 4 and Term RS 422 485 are not avail able 5 6 11 10 15 1 Signal 15 pin plug Connector cover 15 pin plug 15 pin socket VS 1 1 RxD RS 232 Aux 2 2 TxD RS 232 Aux 3 3 IN 0 Sensor 2 4 6 GND 5 5 RD RS 422 485 Host 6 6 RD RS 422 485 Host RxD RS 232 Host 7 7 TD RS 422 485 Host 8 8 TD RS 422 485 Host TxD RS 232 Host 9 9 CAN H 10 10 CAN L 11 15 Result 1 12 4 Result 2...

Page 59: ...x 2 2 TxD RS 232 Aux 3 3 Term RS 422 485 4 4 GND 5 5 RD RS 422 485 Host 6 6 RD RS 422 485 Host RxD RS 232 Host 7 7 TD RS 422 485 Host 8 8 TD RS 422 485 Host TxD RS 232 Host 9 9 CAN H 10 10 Reserved 11 11 CAN2 H 12 12 CAN2 L 13 13 Reserved 14 14 CAN L 15 15 Shield Housing Housing Table 5 6 Pin assignment 15 pin D Sub HD plug of the cable no 2 020 307 1 10 15 6 11 5 Signal 15 pin socket Connector co...

Page 60: ... 1 Signal 15 pin plug Connector cover 15 pin plug 15 pin socket VS 1 RxD RS 232 Aux 2 2 TxD RS 232 Aux 3 3 IN 0 Sensor 2 4 6 GND 5 5 RD RS 422 485 Host 6 6 RD RS 422 485 Host RxD RS 232 Host 7 7 TD RS 422 485 Host 8 8 TD RS 422 485 Host TxD RS 232 Host 9 9 CAN H 10 10 CAN L 11 15 Result 1 12 4 Result 2 13 8 Sensor Sensor 1 14 3 INGND 15 9 Shield Housing Housing Table 5 8 Pin assignment 15 pin D Su...

Page 61: ... RS 232 Aux 3 3 Term RS 422 485 4 4 GND 5 RD RS 422 485 Host 6 6 RD RS 422 485 Host RxD RS 232 Host 7 7 TD RS 422 485 Host 8 8 TD RS 422 485 Host TxD RS 232 Host 9 9 CAN H 10 10 Reserved 11 11 CAN2 H 12 12 CAN2 L 13 13 Reserved 14 14 CAN L 15 15 Shield Housing Housing Table 5 10 Pin assignment 15 pin D Sub HD plug of the cable no 2 030 065 no 2 031 034 1 10 15 6 11 5 Signal 15 pin socket Connector...

Page 62: ...nt Germany All rights reserved 8 009 993 O824 20 12 2004 Electrical installation Open end power supply Signal Wire Ferrules Connector cover 15 pin plug 15 pin socket VS 1 red 1 1 GND 2 black 5 5 Shield 3 grey Housing Table 5 12 Pin assignment open end of the cable no 2 030 065 no 2 031 034 ...

Page 63: ...32 Aux 2 2 TxD RS 232 Aux 3 3 Term RS 422 485 4 4 GND 5 5 RD RS 422 485 Host 6 6 RD RS 422 485 Host RxD RS 232 Host 7 7 TD RS 422 485 Host 8 8 TD RS 422 485 Host TxD RS 232 Host 9 9 CAN H 10 10 Reserved 11 Reserved 12 Reserved 13 Reserved 14 CAN L 15 15 Shield Housing Housing Table 5 13 Pin assignment 15 pin D Sub HD plug of the cable no 2 027 543 1 10 15 6 11 5 Signal 15 pin socket Connector cove...

Page 64: ... 485 Host 6 green RD RS 422 485 Host RxD RS 232 Host 7 yellow TD RS 422 485 Host 8 grey TD RS 422 485 Host TxD RS 232 Host 9 black CAN H 10 grey pink Reserved 11 red blue CAN2 H 12 white green CAN2 L 13 brown green Reserved 14 white yellow CAN L 15 yellow brown Schirm Housing orange Table 5 15 Pin assignment 15 pin D Sub HD socket wire colors of cable no 2 020 303 5 6 11 10 15 1 Signal 15 pin plug...

Page 65: ...485 Host RxD RS 232 Host yellow 7 TD RS 422 485 Host grey 8 TD RS 422 485 Host TxD RS 232 Host black 9 CAN H grey pink 10 Reserved red blue 11 CAN2 H white green 12 CAN2 L brown green 13 Reserved white yellow 14 CAN L yellow brown 15 Shield orange Housing Table 5 17 Wire colors of cable no 2 020 981 cable 1 Host Term connection Cable 1 Cable 2 Signal Wire color Connector cover 15 pin plug VS red a...

Page 66: ...e 2 Sensor brown 3 Result 1 green 4 IN 0 yellow 6 IN 2 grey 7 Result 2 pink 8 INGND blue 9 Result 3 red 10 IN 3 black 11 IN 4 violet 12 Result 4 grey pink 15 RxD RS 232 Aux red blue 2 TxD RS 232 Aux white green 3 Term RS 422 485 brown green 4 RD RS 422 485 Host white yellow 6 RD RS 422 485 Host RxD RS 232 Host yellow brown 7 TD RS 422 485 Host white grey 8 TD RS 422 485 Host TxD RS 232 Host grey b...

Page 67: ... 250 V AC 50 to 60 Hz Power up delay The selected device number default 1 affects the power up delay of the device This is useful if a large number of CLVs e g in the SICK CAN Scanner Network are to be supplied from one power source Table 5 23 contains a list of the available intervals Interface type Transfer rate Distance from host RS 232 Up to 19 200 bd 38 400 to 57 600 bd Max 10 m 32 8 ft Max 3...

Page 68: ... providing the following voltage and power values For CLV without heater 18 to 30 V DC min 20 W continuous power output For CLV with heater 24 V DC 20 10 min 100 W The non Sick Power supply unit must provide the functional extra low voltage in accordance with IEC 364 4 41 The output circuit must be reliably electrically isolated from the input circuit To do so use a safety isolating transformer pu...

Page 69: ...he Host Term and I O connections on the CLV to the corresponding con nections on the CDM 490 Connection Module using two cables no 2 020 302 or no 2 021 815 and secure them tightly on both sides Connecting the CLV with connector cover connector cover with parameter memory 1 Connect the connector cover of the cable no 2 027 046 no 2 030 023 no 2 033 126 or no 2 033 127 to the Host Term and I O conn...

Page 70: ...ghtly into position 2 Connect the cable plug on the cable no 2 020 264 to the I O connection and screw it tightly into position 3 Connect the power supply to the red wire Pin 1 VS and blue wire Pin 5 GND on cable no 2 020 303 See also Table 5 15 Page 5 14 Connecting the CLV with connector cover connector cover with parameter memory 1 Connect the connector cover of the cable no 2 020 981 or no 2 02...

Page 71: ...lded cables EMC require ments Ensure that the maximum cable lengths are not exceeded see Table 5 21 Page 5 17 Default In the default setting the CLV communicates with the host via the host interface using the values shown in Table 5 24 Fig 5 3 Connecting the host interface RS 232 RS 422 9 pin D Sub connector at PC CAN Network Connection diagram for SICK CAN Scanner Network see CLV Connect program ...

Page 72: ...ip The communication parameters can be changed if necessary on the HOST INTERFACE tab To do so change the values under DATA FORMAT and INTERFACE PROTOCOL 5 5 5 Connecting the CAN interface Connecting the CAN Interface 1 and configuring the CLV to use the device in the SICK specific CAN Scanner Network or in a CANopen network see the Operating Instructions Application of the CAN interface no 8 009 ...

Page 73: ...the default setting of the CLV Fig 5 5 shows the connections for the Sensor switching in put Table 5 25 contains the characteristic data for this input Connect the reading pulse sensor as shown in Fig 5 5 Tip You can change the switching mode polarity debouncing response for first pulse after power up of the SENSOR switching input on the DEVICE CONFIGURATION tab in the CLV Setup program Click the ...

Page 74: ...o be used as a trigger source for the One Shot function of the oscil lating mirror Additional function IN 4 The input IN 4 can also be used as A trigger source for the One Shot function of the oscillating mirror An input for a belt increment signal in reading mode Tracking and or for separating bar codes of the same symbology with identical content A trigger source for the end of reading interval ...

Page 75: ... interval Default setting IN 3 and IN 4 dynamic focus control Switching mode Active when input energized high Properties Optodecoupled non interchangeable Can be connected to PNP output on a sensor Electrical values Low 30 V VI 2 V High 7 V VI 13 V Table 5 27 Characteristic data of the IN 0 to IN 4 switching inputs Switching inputs Content Assignment Table Distance Config 2 Logic state1 IN 4 to IN...

Page 76: ...e one shot IN 3 switches the focus position in combi nation with IN 0 to IN 2 Focus control1 Increment counter IN 4 receives increment signals IN 3 switches the focus position in combi nation with IN 0 to IN 2 Focus control1 End of reading interval IN 4 triggers the end of reading interval IN 3 switches the focus position in combi nation with IN 0 to IN 2 One shot Focus control1 IN 0 to IN 2 switc...

Page 77: ...20 Connection Module only the signals of the Result 1 and Result 2 switch ing outputs can be connected using the terminal strips Note If the Device Ready function is chosen the CLV outputs a static pulse in Reading mode Fig 5 7 Connections of the Result 1 to Result 4 switching outputs Output Result X CLV I O connection Pin Y Result 1 Pin 4 Result 2 Pin 8 Result 3 Pin 10 Result 4 Pin 15 Table 5 30 ...

Page 78: ...tively the Operating Instructions for the CDM 490 Connection Module no 8 010 005 German English Tip The output function pulse duration timer and polarity of the signals can be changed on the DEVICE CONFIGURATION tab in the CLV Setup program Click the RESULT OUTPUTS Parameter button Enter the values in the dialog box displayed Perform a download to the CLV Recommendation To check the switching func...

Page 79: ...re stored permanently both in the ROM of the CLV and in the CLV Setup database They can be loaded to the RAM of the CLV at any time and displayed in the tabs of the CLV Setup program Displaying and printing out a complete set of default settings in CLV Setup 1 To save the current settings in the parameter set Choose FILE and SAVE AS and enter a file name in the dialog box that appears CLV Setup sa...

Page 80: ...ng 20 to 30 ms Switching outputs Not inverted pulse duration 100 ms Status output function Result 1 Device Ready static Result 2 Good Read Result 3 No Read Result 4 Match 1 CLV arrangement Stand alone Read result output Host interface Device number 1 Start option Load the parameter set of the external parameter memory Host interface type RS 422 485 Protocol NAK start character STX stop character E...

Page 81: ... the Device Ready LED blinks for 10 s when the device starts up correctly and then lights up constantly If the external parameter memory in the connector cover is empty the CLV copies its parameter set to the external parameter memory Then the Device Ready LED lights up The CLV is ready for operation If a CMC 400 is available in the CDB 420 or CDM 490 the CLV cancels the function of the external p...

Page 82: ...witched off without the configuration data being lost as no changes have been made to the parameter set Fig 6 1 Bar code pattern Code 39 module width 0 35 mm 11 8 mil Print ratio 2 1 0 1 2 3 4 1 2 3 4 5 Device type Scanning method Reading distance CLV 490 all variants Line scanner approx 1 000 mm 39 4 in CLV 490 all variants Line scanner with oscillating mirror approx 1 000 mm 39 4 in Table 6 3 Re...

Page 83: ...le to modify the current parameter set of the CLV this first has to be loaded to CLV Setup from the CLV This procedure is referred to as an upload Upload from CLV in the CLV 490 menu or F3 key during which CLV Setup always loads a complete copy of the current CLV parameter set This parameter set remains unchanged until it is overwritten by CLV Setup With the help of the context menu right mouse bu...

Page 84: ... option The Device Ready LED lights up again The new parameter set is stored in the CLV either permanently or temporarily dependent of the selected option CLV with external parameter memory If the parameter set was downloaded and stored permanently CLV Setup opens a further dialog box for adjusting the parameter set in the external memory if the start option is set to START WITH EXTERNAL PARAMETER...

Page 85: ...ding trigger mode Laser timeout Output time of the Reading result referred to the start of the reading interval Scanner position parameters the position of the CLV in the area Tracking parameters Object polling parameters Output filter of the reading result host interface Physical arrangement for data output via the host interface stand alone master slave Functional assignment of the IN 3 and IN 4...

Page 86: ...rror string Test string function Output sequence and sort criteria for reading more than one bar code per reading pulse Format mask and its structure Output format of an external data string forwarded as reading result Auxiliary Interface This tab and further dialog boxes are used to change the following Operating mode of the terminal interface CAN Interface This tab and the further dialog windows...

Page 87: ...CLV Otherwise the general guidelines in the next chapter provide orientation during adaptation to the individual reading situation 6 4 4 Guide to parameterization menu Overview of parameterization steps a Configuring the reading area b Selecting the focus control mode c Configuring the focus control d Adjusting the optical read properties of the scanner e Optional configuring the oscillating mirro...

Page 88: ...a point of origin Fig 6 2 The scan angle range is max 30 for a line scanner and max 25 for a line scanner with oscillating mirror Reading space Sharp delimitation of the active reading area by defining the area through which the object must pass in the circle segment This produces a rectangular reading space with reference to a point of origin For use in conveyor systems where the conveyor belts a...

Page 89: ...eans of photoelectric switches and their assignment to parameterized distance configurations or by means of command strings via the serial data interface also with reference to distance configurations In timer mode search the CLV changes its focus position step by step according to the parameterized number and sequence of distance configurations The line scanner with oscillating mirror also uses s...

Page 90: ...reading mode Tracking internal tracking or reading mode OTS trigger not in Object polling mode one object only of start stop mode For more detailed information see also Chapter A2 Tracking mode controlled by Increment Page 6 28 Explanation Background teach in For autofocus modes Differential background and Differential background and tracking the CLV can also teach in the ambient background in its...

Page 91: ...d and tracking Define the scanner position referred to the conveyor belt see Table 6 4 Page 6 11 reading space scanner position Limit autofocus area Define limit values and or a rectangular autofocus area Optionally teach in the background Ö Limit values and autofocus space see 2 Configure autofocus AUTO FOCUS LIMITS tab Ö Teach in the background see 3 Teach in background optional See also overvie...

Page 92: ... 1 Maximum scanning height Z 2 Ö AUTOFOCUS OPTIMIZATION PARAMETERS button Ö DELAY OF FOCUS CHANGE section Timeout Hysteresis Ö DEPTH OF FIELD OPTIMIZATION section Offset at minimum Offset at maximum Ö Distance measurement section default setting active Source of distance information internal external Smooth filter active length 3 3 Teach in background optional For autofocus mode Differential backg...

Page 93: ...ect in the reading field during reading interval Only one object in the reading field during reading interval Serveral objects in the reading field during reading interval 1 Limitation values autofocus limitation 2 Limitation values scan angle limitation Oscillating mirror 3 Limitation values oscillating angle limitation 4 Limitation values autofocus space 5 Teach in background 6 Scanner position ...

Page 94: ... max scan angle Once mean value calculation has been carried out the distance profile is available after every 10th scan e g every 10 ms at a scanning frequency of 1 000 Hz The distance measurement is carried out inside the limits of 400 to 2 200 mm 15 8 to 86 7 in If an object is being conveyed the CLV determines with reading from above an average object profile according to the conveyor speed At...

Page 95: ... the laser diode for max 10 seconds The autofocus function requires active distance measurement although this is not a requirement for event controlled focus position switchover In this case however the CLV can output the actual code distance instead of the current focus position in the Code Info Separator block The CLV measures the code distance in the area between the start and stop character of...

Page 96: ...tively Distance Configurations Oscillating mirror amplitude CW 3 Choose Fixed Position mode or Ö OSCILLATING MIRROR tab Ö OSCILLATING MIRROR section Fixed Position Ö FIXED POSITION section Stationary Position CW 4 Choose One Shot mode Ö OSCILLATING MIRROR tab Ö OSCILLATING MIRROR section One Shot Ö ONE SHOT section Ö PHASE 1 Mirror Speed Start Position CW Distance Configuration no Ö PHASE 2 Mirror...

Page 97: ...ror deflects the scan line up to the maximum angle of deflection of 40 CW corresponds to 20 Fig 6 4 illustrates this mode when a bar code is read from above 2 Oscillating with Variable Amplitude mode The deflection range can be parameterized separately for each of the maximum of 8 distance configurations focus positions The minimum maximum values that can be set for the deflection range for fast a...

Page 98: ...be parameterized separately for each phase The end position of the one phase forms the start position of the other phase Fig 6 6 illustrates this mode with object tracking During the forward phase the front of the object that moves towards the oscillating mirror is swept once by the scan line from top to bottom in accordance with the conveyor speed Multiple focus position switchovers are not neces...

Page 99: ...G Division Auto Ident Germany All rights reserved 6 21 Operation Fig 6 6 One Shot Object tracking bar code read from front t1 t0 Conventionally required reading range Reduced reading range through One Shot function Line scanner Line scanner with oscillating mirror Reading range Reading range ...

Page 100: ...see Chapter h Parameterizing the evaluation characteristics Page 6 37 Note The size of the reading field is determined by the distance between the start and stop sensors in conveying direction see Fig 3 5 Page 3 9 In object polling mode the CLV detects automatically an object entering or leaving the reading field To separate bar codes of the same type with identical contents connect an incremental...

Page 101: ...me controlled value or Track contolled value with connected increment encoder Ö FIRST TRIGGER SENSOR section Edge or Level Stop Ö END OF READING INTERVAL section generated by Trigger Source or Timer Timeout referred to beginning of reading interval Output of reading result referred to beginning of reading interval Ö DEVICE CONFIGURATION tab Ö OUTPUT ON GOOD READ section End of reading gate or Imme...

Page 102: ...Edge or Level Stop sensor 2 Ö END OF READING INTERVAL section generated by IN 4 Ö DEVICE CONFIGURATION tab Ö ASSIGNMENT OF INPUTS section Ö IN 4 Reading Trigger Stop Active High or Reading Trigger Stop Active Low Output of reading result referred to beginning of reading interval Ö OUTPUT ON GOOD READ section End of reading gate or Immediate or End of Label Ö Using End of label READING TRIGGER PARA...

Page 103: ...ON tab Ö OUTPUT ON GOOD READ section End of reading gate or Immediate or End of Label Ö Using End of label READING TRIGGER PARAMETERS button Ö END OF LABEL FREE RUNNING section Ö Timeout Parameterize reading trigger free running or Ö DEVICE CONFIGURATION tab Start Ö READING TRIGGER SOURCE section Free running with Timeout Timeout Stop generated by reading trigger source Ö READING TRIGGER PARAMETER...

Page 104: ...tion Right edge of conveyor Y 1 Left edge of conveyor Y 2 Level of conveyor Z 1 Maximum scanning height Z 2 Ö SCAN ANGLE LIMITATION section Min and max angle Oscillating mirror Ö additionally OSCILLATING ANGLE LIMITATION section Min and max value Define scanner position referred to the conveyor belt Ö see Table 6 4 Page 6 11 reading space scanner position Online diagnosis of configured object dete...

Page 105: ... The autofocus however is only active during the reading gate To ensure reliable object detection the CLV must detect an object of the defined minimum width within a preset time in every distance profile line scanner with oscillating mirror in at least 3 distance profiles over at least 500 ms This time is used to debounce the object detection prior to automatic starting of the internal reading gat...

Page 106: ...trol see Chapter c Parameterizing focus control Page 6 12 Configuring oscillating mirror optional see Chapter e Parameterizing oscillation mirror functions optional Page 6 18 Configuring no of bar codes to be read see Chapter h Parameterizing the evaluation characteristics Page 6 37 Note To separate bar codes of the same type with identical contents connect an incremental encoder and activate the ...

Page 107: ...the reading field whereby the distance measurement enables objects to be detected and the corresponding focus positions in the focus list to be assigned The increment management system continuously locates the current position of the objects in the reading field in the conveying direction The focus list acts as a circular buffer whereby the oldest entry determines the current focus position If the...

Page 108: ...val Ö DEVICE CONFIGURATION tab Ö TRACKING PARAMETERS button Ö RELEASE POINTS Section Object release point End of reading field Output data Note Connect the external sensor to Sensor switching input Parameterize reading trigger command strings Ö DEVICE CONFIGURATION tab Start Ö READING TRIGGER SOURCE section Serial interface Stop generated by object release point Output of reading result referred t...

Page 109: ...ted to OTC 400 optional Master slave arrangement using the CAN interface Possible reading triggers in the CLV OTS trigger Further preparations for each CLV Configuring reading area see Chapter a Parameterizing reading area Page 6 10 Selecting focus control mode see Chapter b Selecting focus control mode Page 6 11 Configuring focus control see Chapter c Parameterizing focus control Page 6 12 Config...

Page 110: ...on see Table 6 8 Page 6 16 Forwarding distance informations optional Ö READING CONFIGURATION tab Ö FOCUS CONTROL section Ö AUTOFOCUS PARAMETERS button AUTOFOCUS OPTIMIZATION PARAMETERS button OBJECT HEIGHT PASSING IN OTS MODE section Active Action Settings in CLV Setup Parameterize reading trigger Ö DEVICE CONFIGURATION tab Ö READING TRIGGER SOURCE section OTS trigger Table 6 15 Guide Parameterizi...

Page 111: ...erized in the OTC 400 see the OTS 400 Omni Tracking System Operating instructions order no 8 008 869 English edition Action Settings in CLV Setup Pameterize operation mode in the OTC 400 master Ö DEVICE CONFIGURATION tab Ö READING TRIGGER PARAMETERS button Ö OPERATING MODE section Time controlled master slave output at end of reading gate or Time controlled master slave output immediate if Table 6...

Page 112: ...on fixed focus for e g reading from side and sufficient depth of field DOF Autofocus mode Differential background and tracking see Table 6 6 Page 6 13 Sensor for beginning end of object and incremental encoder connected to the OTC 400 Master slave arrangement using the CAN interface Possible reading triggers via OTS Further preparations for each CLV Configuring reading area see Chapter a Parameter...

Page 113: ...N PARAMETERS button OBJECT HEIGHT PASSING IN OTS MODE section Active Action Settings in CLV Setup Parameterize reading trigger Ö DEVICE CONFIGURATION tab Ö READING TRIGGER SOURCE section OTS trigger Table 6 19 Guide Parameterizing reading trigger in the CLV for object tracking mode with OTC 400 Action Settings in CLV Setup 1 Define scanner position referred to conveyor belt Ö DEVICE CONFIGURATION ...

Page 114: ... that of the OTC 400 The parameter setting for the focus release point depends on whether the CLV is used as part of a group and on its position relative to the conveyor belt The focus release point is the point in the reading field at which the CLV permits a new focus switchover when the tracked object has passed this point even if the number of bar codes to be read has not yet been reached Param...

Page 115: ...d on each object Page 10 58 g Parameterizing laser timeout for trigger source Sensor input Ser interface Action Settings 1 Choose laser timeout duration or Ö DEVICE CONFIGURATION tab Ö READING TRIGGER PARAMETERS button Ö LASER TIMEOUT section Duration 2 Deactivate laser timeout The laser diode is always active independent of the pulse duration Ö LASER TIMEOUT section Click deactivate the control b...

Page 116: ... section Protocol Ö HOST INTERFACE tab Ö INTERFACE PROTOCOL section Function of the CAN interface alternative See the operating instructions Application of the CAN interface no 8 009 180 English edition Data output string of host interface Choose contents of Header Code Info Separator Splitter and Terminator blocks Ö DATA STRINGS tab Ö OUTPUT FORMAT section Position of Code Info Separator blocks i...

Page 117: ...witches to Reading mode Device Ready LED lights up In the default setting the Sensor switching input is the external trigger source of the reading pulse The reading result is output by the CLV at the end of the reading pulse via the host interface default setting and terminal interface Depending of the configuration the Result 1 to Result 4 switching outputs become live for the predefined pulse le...

Page 118: ...ration of 100 ms default setting Fig 6 7 shows two examples of the output of a reading result Good Read and No Read The reading result comprises the data contents of the bar code s and the reading diagnosis data Fig 6 8 explains the structure and function of the reading diagnosis data for Good Read and Fig 6 9 for No Read Note The CLV only outputs several bar codes in the reading result of the hos...

Page 119: ...osition CD Code distance radial measured mm CS Code reliability CA Scan effort CK Code continuity DI Decoding direction F in scanning direction R against scanning direction 4th line PO Exact code position 3 digit for tracking in unit 0 1 OW Exact oscillating angle 3 digit for tracking in unit 0 1 FC Current focus position 4 digit for tracking CX X coordinate of bar code for OTS in transport direct...

Page 120: ...ess F8 CLV Setup sends a stop command to the CLV The Sensor LED is extinguished The CLV switches off the laser diode The CLV displays the reading result in the output window of the Terminal Emulator The Read Result LED lights up for a duration of 100 ms default setting 6 5 2 Percentage evaluation In the Percentage evaluation mode the quality of the reading function is assessed no conveyor movement...

Page 121: ...in the context menu CLV Setup copies the parameter to the CLV temporarily The CLV then operates with the standard decoder until the CLV is switched off 4 Click in the toolbar The Terminal Emulator window is displayed The CLV is in the Reading mode 5 In the DEVICE MODE section choose PERCENTAGE EVALUATION The dialog box for choosing the distance configuration is then displayed 6 Choose the appropri...

Page 122: ...les the center of the scan line to be optimally positioned on the bar code Chapter 4 3 3 Adjusting mode Page 4 9 describes the procedure for going about this after the Adjusting mode has been called up The CLV does not output a reading result in this mode The Result 1 to Result 4 switching outputs do not become live The Adjusting mode can be called up by choosing VIEW in the menu bar as a device f...

Page 123: ...mplitude the CLV shuts off oscillation and positions the scan line under the angle CW 50 corresponds to an angle of deflection below 105 This position cannot be altered in One Shot mode the CLV positions the scan line under the angle CW 50 in Fixed Position mode the scan line s selected position remains unchanged Starting the background teach in 1 Mount the CLV at the reading station and align it ...

Page 124: ...CLV Setup displays the background without any parameterized limitations Autofocus space 1 Choose the READING CONFIGURATION tab 2 In the AUTOFOCUS section click the SHOW BACKGROUND button The SHOW BACKGROUND dialog box appears An example of a distance profile is shown in Fig 6 12 Note The CLV adjusts the entire profile of the taught in background by minus 100 mm 3 94 in that is the entire backgroun...

Page 125: ...ion in event controlled dynamic focus control Christmas tree effect Show CP limits can be called up via VIEW in the menu bar as a device function via CLV 490 interactively or via the Terminal Emulator Line scanner with oscillating mirror In Show CP limits mode the CLV behaves in the following manner in Oscillating mode default setting oscillating with a fixed amplitude the CLV shuts off oscillatio...

Page 126: ...ll the codes is within the range 5 If necessary correct CPmin and CPmax accordingly Perform a download to the CLV 6 Choose READING MODE to exit the Show CP limits mode The CLV returns to the Reading mode and the Device Ready LED lights up Note In the Reading mode the CLV does not actually blank the scan line visually but instead takes the values specified for the restricted evaluation range into a...

Page 127: ... hold down the left mouse button and drag the cursor to form a rectangle Pressing the right mouse button returns to the plot diagram at the normal output size 6 5 7 I O monitor in increment trigger Function of the terminal interface In this mode CLV Setup displays the conditions of the various switching inputs outputs of the CLV and any data transfer via the host interface This is done in a dialog...

Page 128: ...CTRL key and selecting with the left mouse button A block selection is done by holding down the SHIFT key and selecting with the left mouse button 6 If the sequence in the list is to be changed select the desired entry and move it to the preferred location using the up arrow and down arrow buttons Several entries can be moved selectively or as a block at the same time here as well 7 After configur...

Page 129: ...e bottom left hand side next to the arrow buttons The time stamp of the last time at which an event occurred is located below this In the RECEIVE output field CLV Setup displays the contents of the data string which was last received via the host interface by the CLV A time stamp is displayed next to this The TRANSMIT output field identifies the contents of the data string which was last sent by t...

Page 130: ...to display the event which is closest to the x position of the cursor in all output fields exception measured value table This allows the accompanying data of a data string to be called up selectively to the Receive or Transmit output field The time and increment status of a rising or falling signal edge can be called up as well If the mouse pointer is located directly between two events when clic...

Page 131: ...appear in the measured value table however Printing contents of window This function enables the signal conditions which were just displayed in the window to be printed out as a window with the designations of the plot diagram axes The printout also contains the corresponding values of the increment status time stamp measured value table and contents of the data strings of both output fields 1 Cli...

Page 132: ...e form of counters during the reading procedure to be displayed and reset The CLV does not output a reading result in this mode 1 Click in the tool bar The CLV cancels the Reading mode and the Device Ready LED is extinguished The OPERATING DATA dialog box appears Fig 6 17 2 After checking resetting the desired counters click OK to confirm any changes made The CLV then returns to the Reading mode a...

Page 133: ...5 10 Monitor Host Interface Function of the terminal interface In this mode the CLV outputs the data traffic of its host interface via the terminal interface Protocol driver handshakes and protocol specific data such as start and stop characters are suppressed here Each data string is displayed on a separate line on the screen Two monitoring modes are available that differ with regard to the data ...

Page 134: ...scan line then appears 4 Present the bar code pattern from Fig 6 1 Page 6 4 5 Click the SW TRIGGER OFF button or press F8 CLV Setup outputs the reading result in the Terminal Emulator Example O 0123412345 Note If a large amount of data is being read in at high speed and with a high transmission rate the host interface s data trafficing may no longer be completely displayed on the terminal interfac...

Page 135: ...ption in the dialog box The CLV outputs the selected elements in the data output string of the host interface with the next reading result 6 5 11 Auxiliary input Function of the terminal interface In this mode the CLV accepts a bar code entered at the terminal interface via the keyboard or hand held scanner with decoder It sends the bar code to the host in a separate data string via its host inter...

Page 136: ...oolbar The Terminal Emulator window is then displayed The CLV is in the Reading mode 2 In the DEVICE MODE section choose SELF TEST The Device Ready LED is extinguished The CLV cancels the Reading mode and starts the test routine After a few seconds the CLV outputs the encoded test result in the form of a code number Fig 6 19 3 To return to the Reading mode click READING MODE or close the Terminal ...

Page 137: ... teach in reset to default Percentage evaluation Show CP limits Adjustment mode Copy parameter memory internal external external internal Analyze CAN Scanner Network Activate factory defaults in device Choose CLV 490 DEVICE FUNCTIONS and the desired function or press the F2 key The EXECUTE DEVICE FUNCTIONS dialog box is then displayed Choose the desired function in the EXECUTE menu in the menu CLV...

Page 138: ...creen CLV Setup displays system and error messages that occur at the terminal interface of the CLV These are recorded in a file which is continuously updated The messages have the following format System message CLV SYS Message xxx Error message CLV SYS Failure xxx The additional system messages in plain text can be displayed in the terminal emulator if CLV Setup and the terminal emulator are star...

Page 139: ...via context menu right mouse button the parameter set must be stored permanently in the CLV by choosing the PERMANENT storage option 2 Save the parameter set as a configuration file scl in CLV Setup 3 Switch off the power supply of the CDM 490 or unplug both of the CLV s connecting cables from the connection module The last parameter set stored permanently in the CLV remains valid Archiving the pa...

Page 140: ...Chapter 6 Operating Instructions CLV 490 Bar Code Scanner 6 62 SICK AG Division Auto Ident Germany All rights reserved 8 009 993 O824 20 12 2004 Operation Notes ...

Page 141: ...he path of the beam similar to sunlight Switch off the device while it is being cleaned Never look directly into the reading window while the device is in operation Damage on the reading window The reading window is made of glass Scratches and streaks on the window will reduce the reading performance Use a mild non scouring detergent Never use scratching or scouring motions to clean the reading wi...

Page 142: ...time The CLV indicates any faults or malfunctions by outputting coded system and error messa ges e g CLV SYS Failure 081 via its terminal interface The messages are displayed in the CLV Setup program window in the fourth field from the left on the bottom in the status line see also Chapter 8 3 Error messages Page 8 2 CLV Setup logs the messages in a file 7 3 Disposal Irreparable devices or devices...

Page 143: ...elf monitoring After the power supply has been switched on the CLV automatically carries out a self test in which it checks important hardware components before it is initialized parameter set loaded and device functions initialized The self test can be repeated at any time by cancelling Reading mode See Chapter 6 5 13 Self test Page 6 58 If the CLV detects an error during the self test or at any ...

Page 144: ... does not light up or extinguishes The system is restarted Error key 1 011 Data error RAM 012 Address error RAM 013 RAM to small 051 Speed out of tolerance mirror wheel 061 Mirror interval out of tolerance 071 Error laser shutter 091 to 095 Error focus control 101 to 118 Error external parameter memory 130 Amplifier error 131 Background profile invalid 132 Center position CP 50 implausible 133 Bri...

Page 145: ...e external parameter memory is connect ed correctly free wiring check wire assignment None 4 When the device is switched on the Device Ready and Read Re sult LEDs blink conti nuously 2 Start option START WITH EX TERNAL PARAMETERS The CLV has not loaded the external parameter set In stead it has loaded the inter nal parameter set to its RAM The CLV however does not output data on the host interface...

Page 146: ...paragraph contact the SICK Service department Contact the SICK Service department See 4 Remedy 3rd paragraph 5 When the device is switched on the Device Ready and Read Re sult LEDs blink alternately for approx 10 s The Device Ready LED then lights up con stantly Start option START WITH COPY INTERN EXTERN The CLV has successfully copied the internal parameter set to the external memory3 and set the...

Page 147: ...rnalparameters not valid for device internal parameters loaded Error type 116 Start option START WITH EXTER NAL PARAMETERS The CLV has not loaded the external parameter set Instead it has loaded the internal pa rameter set to its RAM The CLV however does not output data on the host inter face The parameter set in the external memory is not from a CLV 490 Use the correct external para meter memory ...

Page 148: ...r set in the external memory print out the parameter set using CLV Setup If necessary display the ID of the unknown errored command group s using the STX 8 ERR ETX command in the Terminal Emulator window of CLV Setup Decode the ID using the reference manual entitled Command Language of the CLV Bar Code Scanners and check the relevant parameter values in the tabs The software of the parameter set i...

Page 149: ...ort The data connection between the slaves and or the master has been interrupted Check the entered number of slaves Check the master timeout setting Check the cables between the slaves and the master 7 The source of the reading result is the auxiliary input via the terminal interface The bar code was not detected by the reading function of the CLV but was entered subsequently with the auxiliary f...

Page 150: ...nder NUMBER OF CODES MINIMUM Instead of the code contents it outputs the defined error string in the quantity defined under NUMBER OF CODES MINIMUM One object in a set of objects with a constant number of codes for example contains fewer codes than defined in the application This message is used to indicate errors on the objects e g check whether objects are homogeneous mix with incorrect objects ...

Page 151: ...ing a pulse default setting Device Ready After switching on the power supply The CLV has no power The CLV has diagnosed a device error during the self test During operation The CLV is not in Reading mode The CLV has deactivated the laser diode 10 min default setting after the start of the current reading pulse trigger mode sensor input serial interface Check wiring power connector fitted securely ...

Page 152: ...lector photoelectric proximity switch inductive sensor not dampened The object does not pass the reading pulse sensor for trigger start with the conveyor running Connect sensor to Sensor switching input Check sensor wiring see Fig 5 5 Page 5 23 Measure output signal on sensor Insert jumper between pin 5 and pin 15 CDM 490 S 1 switch SGND_GND In the CLV Setup program choose the DEVICE CONFIGURATION...

Page 153: ...ct start and stop characters selected Use the CLV Setup program to check the host command strings choose AUXILIARY INTERFACE tab Choose MONITOR HOST INTERFACE function See Chapter 6 5 10 Monitor Host Inter face Page 6 55 Download temporarily to the CLV 3 Trigger mode Object Polling The CLV does not trigger automatically the Sensor LED does not light up the red scan line does not appear Reading mod...

Page 154: ...ADING TRIGGER PARAMETERS but ton END OF READING INTERVAL section is generated by IN 4 selected Install reading pulse sensor in front of the CLV in conveying direction See also Chapter 4 4 2 Mounting the ex ternal reading pulse sensor Page 4 11 See 2 Remedy See remedy in Table 8 5 Page 8 9 5 CLV does not terminate the reading clock or terminate the clock too late Reading mode Tracking Incremental e...

Page 155: ...and parameterization of switching inputs see OTS 400 Opera ting Instructions no 8 008 869 English edition Check in OTC 400 with the CLV Setup program choose the DEVICE CONFIGURATION tab click the READING PARAMETERS tab OPERAT ING MODE section one of the two modes for master slave selected 2 Trigger mode in the CLV OTS trigger Reading mode Tracking CLV not triggered by the OTC 400 the Sensor LED do...

Page 156: ...e reading space not or incorrectly parameterized Focus control Focus control not activated Synchronize read with presence of an object in reading field See Chapter 8 5 2 Malfunctions in Reading mode reading trigger errors Page 8 10 Align CLV Is bar code at center of scan line Check the reading quality with the CLV Setup program choose PERCEN TAGE EVALUATION See Chapter 6 5 2 Per centage evaluation...

Page 157: ...ofocus range within the limits of the parameterized reading range In the CLV Setup program choose the READING CONFIGURATION tab AUTOFOCUS section click the AUTOFOCUS PARAMETERS button click the AUTOFOCUS OPTIMIZATION PARAMETERS button is the distance mea surement active SOURCE OF DISTANCE INFORMATION section internal external selected In the CLV Setup program choose the READING CONFIGURATION tab c...

Page 158: ...ee Chapter 6 5 2 Percentage evaluation Page 6 42 In CLV Setup program choose the CODE CONFIGURATION tab SYMBOLOGIES section Enable all code types except Pharmacode set code lengths to FREE Download temporarily to CLV Start PERCENTAGE EVALUATION Code type and length are displayed in the reading result Enable recorded code type in the CODES section and disable all other types Enter the code length u...

Page 159: ...iving any distance informa tion In the CLV Setup program choose READING CONFIGURATION tab FOCUS CONTROL section OTS height information selected 2 OTS Reading mode Tracking The Read Result LED on CLV default setting Good Read does not light up during reading process CLV is not receiving any increment information from OTC 400 Releasepointsincorrectlyparameterized in the CLV Check connection and para...

Page 160: ...ing Device Ready Result 2 default setting Good Read Result 3 default setting No Read Result 4 default setting Match 1 are not outputting any pulses The event associated with the assigned function for outputting the result status of the read does not occur in the reading operation Incorrect switching mode parameterized in the CLV Not applicable In the CLV Setup program choose the DEVICE CONFIGURATI...

Page 161: ...configuration here no 2 The distance configuration focus position was not changed From the OSCILLATING MIRROR tab choose OSCILLATING WITH VARIABLE AMPLITUDE Download to the CLV In the CLV Setup program choose the READING CONFIGURATION tab click the DISTANCE CONFIGURATION button Is the amplitude value set in the correct di stance configuration here no 1 In the CLV Setup program choose the DEVICE CO...

Page 162: ...ure xxx xxx 000 215 or if you can not correct an error using the above measures the CLV may be defective The CLV does not contain any components that can be repaired by the user Please contact your local SICK office or subsidiary The telephone numbers and email addresses are listed on the back page of this manual For postal adresses see also www sick com Do not send the device to the SICK service ...

Page 163: ... Bar code length max 50 characters max 600 characters across all bar codes per reading interval Print ratio 2 1 to 3 1 No of multiple reads 1 to 99 Optical indicators 4 x LEDs status indicators Reading pulse Sensor switching input Option additionally IN 4 Free running Serial interface Object Polling OTS Host data interface RS 232 or RS 422 485 variable data output format Data transmission rate 300...

Page 164: ...mirror Reading window side Angle of emergence 105 center position CW 50 Trigger source for focus control also oscillating mirror reversal points Useful aperture angle max 50 Oscillating mirror functions permanent variable position oscillating amplitude per DC variable or fixed One Shot1 Oscillating frequency 0 2 to 4 Hz Max angle of deflection max 20 40 CW set with software Reading ranges see Page...

Page 165: ...or and heater Switching on function temperature graph see Chapter 10 4 Optional heating Page 10 40 Power on delay 35 to 40 min at 24 V DC and min ambient operating temperature 35 C 31 F Operating voltage 24 V DC 20 10 pursuant to IEC 364 4 41 Power consumption typically 75 W max 90 W Required cross section min 0 75 mm2 20 AWG for power supply Weight approx 2 2 kg approx 4 84 lb Ambient operating s...

Page 166: ...ts reserved 8 009 993 O824 20 12 2004 Technical data 9 5 2 Line scanner with oscillating mirror without with heater Fig 9 2 Dimensions of the CLV 490 line scanner with oscillating mirror side reading window All dimensions in mm in CLV 490 1010 CLV 490 1011 CLV 490 3010 CLV 490 3011 CLV 490 7010 CLV 490 7011 ...

Page 167: ... for the PC based CLV Setup program Configuring a CLV using command strings Parameter value calculations for configuring the CLV Tables Discussion of a parameterization example Special applications and procedures Instructions for replacing a CLV copying the parameter set Accessories Dimensioned drawings of the accessories Notes on supplementary documentation Glossary Copy of the EC Declaration of ...

Page 168: ...iagrams for the line scanner CLV Type Resolution Scanning method Diagram Page CLV 490 1010 1011 Standard density L s with osci mirror Reading field height resolution as a function of reading distance 10 9 CLV 490 1010 1011 Standard density L s with osci mirror Min and max reading distance DOF for 0 35 mm 40 10 10 CLV 490 1010 1011 Standard density L s with osci mirror Min and max reading distance ...

Page 169: ...tandard density Reading field height as a function of the reading distance and resolution Line scanner front reading window Reading field height Reading conditions see Table 10 1 Page 10 1 Characteristics field scanning frequency reading distance see Fig 10 6 Page 10 8 CLV 490 0010 0011 A p e r t u r e a n g l e α 4 0 A p e r t u r e a n g l e α 4 0 Dimensions in mm in Reading distance Resolution ...

Page 170: ...position at a resolution of 0 35 mm 13 8 mil and an aperture angle of α 40 Line scanner front reading window CLV 490 0010 0011 Reading conditions see Table 10 1 Page 10 1 Characteristics field scanning frequency reading distance see Fig 10 6 Page 10 8 Radial reading distance min reading distance max reading distance Resolution 0 35 mm 13 8 mil Aperture angle 40 Focus position Reading ranges from a...

Page 171: ...d radially as a function of the focus position at a resolution of 0 35 mm 13 8 mil and an aperture angle of α 56 Line scanner front reading window CLV 490 0010 0011 Radial reading distance min reading distance max reading distance Resolution 0 35 mm 13 8 mil Aperture angle 56 Focus position Reading conditions see Table 10 1 Page 10 1 Characteristics field scanning frequency reading distance see Fi...

Page 172: ...d radially as a function of the focus position at a resolution of 0 50 mm 19 7 mil and an aperture angle of α 40 Line scanner front reading window CLV 490 0010 0011 Radial reading distance min reading distance max reading distance Resolution 0 50 mm 19 7 mil Aperture angle 40 Focus position Reading conditions see Table 10 1 Page 10 1 Characteristics field scanning frequency reading distance see Fi...

Page 173: ...d radially as a function of the focus position at a resolution of 0 50 mm 19 7 mil and an aperture angle of α 56 Line scanner front reading window CLV 490 0010 0011 Radial reading distance min reading distance max reading distance Resolution 0 50 mm 19 7 mil Aperture angle 56 Focus position Reading conditions see Table 10 1 Page 10 1 Characteristics field scanning frequency reading distance see Fi...

Page 174: ...ix Fig 10 6 Characteristics field CLV 490 0010 0011 Standard density Scanning frequency as a function of the radial reading distance and resolution Line scanner front reading window CLV 490 0010 0011 Scanning frequency Hz Resolution 0 35 mm 13 8 mil 0 50 mm 19 7 mil Reading conditions see Table 10 1 Page 10 1 Radial reading distance Dimensions in mm in ...

Page 175: ...tandard density Reading field height as a function of the reading distance and resolution Resolution 0 30 mm 11 8 mil 0 35 mm 13 8mil 0 50 mm 19 7 mil Line scanner with oscillating mirror side reading window Reading field height Reading conditions see Table 10 1 Page 10 1 Characteristics field scanning frequency reading distance see Fig 10 12 Page 10 14 CLV 490 1010 1011 A p e r t u r e a n g l e ...

Page 176: ... resolution of 0 35 mm 13 8 mil and an aperture angle of α 40 Line scanner with oscillating mirror side reading window CLV 490 1010 1011 Radial reading distance Resolution 0 35 mm 13 8 mil Aperture angle 40 max reading distance Focus position min reading distance Reading ranges from approx 1 440 mm 56 7 in focus position are typical values Reading conditions see Table 10 1 Page 10 1 Characteristic...

Page 177: ...s a function of the focus position at a resolution of 0 35 mm 13 8 mil and an aperture angle of α 50 Line scanner with oscillating mirror side reading window CLV 490 1010 1011 Radial reading distance Resolution 0 35 mm 13 8 mil Aperture angle 50 Focus position max reading distance min reading distance Reading conditions see Table 10 1 Page 10 1 Characteristics field scanning frequency reading dist...

Page 178: ...as a function of the focus position at a resolution of 0 50 mm 19 7 mil and an aperture angle of α 40 Line scanner with oscillating mirror side reading window CLV 490 1010 1011 Radial reading distance Resolution 0 50 mm 19 7 mil Aperture angle 40 Focus position min reading distance max reading distance Reading conditions see Table 10 1 Page 10 1 Characteristics field scanning frequency reading dis...

Page 179: ...as a function of the focus position at a resolution of 0 50 mm 19 7 mil and an aperture angle of α 50 Line scanner with oscillating mirror side reading window CLV 490 1010 1011 Radial reading distance Resolution 0 50 mm 19 7 mil Aperture angle 50 Focus position max reading distance min reading distance Reading conditions see Table 10 1 Page 10 1 Characteristics field scanning frequency reading dis...

Page 180: ... Characteristics field CLV 490 1010 1011 Standard density Scanning frequency as a function of the radial reading distance and resolution Line scanner with oscillating mirror side reading window CLV 490 1010 1011 Scanning frequency Hz Resolution 0 35 mm 13 8 mil 0 50 mm 19 7 mil Reading conditions see Table 10 1 Page 10 1 Radial reading distance Dimensions in mm in ...

Page 181: ...Standard density deflection range as a function of radial reading distance deflection angle and resolution Line scanner with oscillating mirror side reading window CLV 490 1010 1011 Deflection range Reading conditions see Table 10 1 Page 10 1 Radial reading distance Resolution 0 30 mm 11 8 mil 0 35 mm 13 8 mil 0 50 mm 19 7 mil D e f le c t io n a n g le m a x 4 0 Dimensions in mm in ...

Page 182: ...High density Reading field height as a function of the reading distance and resolution Line scanner front reading window CLV 490 2010 2011 Reading field height Reading conditions see Table 10 1 Page 10 1 Characteristics field scanning frequency reading distance see Fig 10 18 Page 10 20 A p e r t u r e a n g l e α 4 0 A p e r t u r e a n g l e α 4 0 Reading distance Dimensions in mm in Resolution 0...

Page 183: ...l and an aperture angle of α 40 Line scanner front reading window CLV 490 2010 2011 Radial reading distance max reading distance Resolution 0 25 mm 9 8 mil Aperture angle 40 Focus position min reading distance Resolution 0 2 mm 7 9 mil Depth of field reduced by 20 compared to depth of field at resolution 0 25 mm 9 8 mil typical values Reading ranges typical values Reading conditions see Table 10 1...

Page 184: ...tion at a resolution of 0 35 mm 13 8 mil and an aperture angle of α 40 Line scanner front reading window CLV 490 2010 2011 Radial reading distance max reading distance Resolution 0 35 mm 13 8 mil Aperture angle 40 Focus position min reading distance Reading ranges from approx 1 540 mm 60 7 in focus position are typical values Reading conditions see Table 10 1 Page 10 1 Characteristics field scanni...

Page 185: ...adially as a function of the focus position at a resolution of 0 35 mm 13 8 mil and an aperture angle of α 56 Line scanner front reading window CLV 490 2010 2011 Radial reading distance max reading distance Resolution 0 35 mm 13 8 mil Aperture angle 56 Focus position min reading distance Reading conditions see Table 10 1 Page 10 1 Characteristics field scanning frequency reading distance see Table...

Page 186: ... 10 18 Characteristics field CLV 490 2010 2011 High density Scanning frequency as a function of the radial reading distance and resolution Line scanner front reading window CLV 490 2010 2011 Scanning frequency Hz Resolution 0 20 mm 7 9 mil 0 25 mm 9 8 mil 0 30 mm 11 8 mil Reading conditions see Table 10 1 Page 10 1 Radial reading distance Dimensions in mm in ...

Page 187: ... High density Reading field height as a function of the reading distance and resolution Line scanner oscillating mirror side reading window CLV 490 3010 3011 Reading field height Resolution 0 20 mm 7 9 mil 0 25 mm 9 8 mil 0 30 mm 11 8 mil A p e r t u r e a n g l e α 4 0 A p e r t u r e a n g l e α 4 0 Reading conditions see Table 10 1 Page 10 1 Characteristics field scanning frequency reading dist...

Page 188: ...the focus position at a resolution of 0 25 mm 9 8 mil and an aperture angle of α 40 Line scanner with oscillating mirror side reading window CLV 490 3010 3011 Radial reading distance Resolution 0 25 mm 9 8 mil Aperture angle 40 max reading distance Focus position min reading distance Reading ranges typical values Reading conditions see Table 10 1 Page 10 1 Characteristics field scanning frequency ...

Page 189: ...esolution of 0 35 mm 13 8 mil and an aperture angle of α 40 Line scanner with oscillating mirror side reading window CLV 490 3010 3011 Radial reading distance Resolution 0 35 mm 13 8 mil Aperture angle 40 Focus position Reading ranges from approx 1 440 mm 56 7 in focus position are typical values max reading distance min reading distance Reading conditions see Table 10 1 Page 10 1 Characteristics ...

Page 190: ...a function of the focus position at a resolution of 0 35 mm 13 8 mil and an aperture angle of α 50 Line scanner with oscillating mirror side reading window CLV 490 3010 3011 Radial reading distance Resolution 0 35 mm 13 8 mil Aperture angle 50 Focus position max reading distance min reading distance Reading conditions see Table 10 1 Page 10 1 Characteristics field scanning frequency reading distan...

Page 191: ...acteristics field CLV 490 3010 3011 High density Scanning frequency as a function of the radial reading distance and resolution Line scanner with oscillating mirror side reading window CLV 490 3010 3011 Scanning frequency Hz Reading conditions see Table 10 1 Page 10 1 Radial reading distance Resolution 0 20 mm 7 9 mil 0 25 mm 9 8 mil 0 30 mm 11 8 mil Dimensions in mm in ...

Page 192: ...11 High density Deflection range as a function of radial reading distance deflection angle and resolution Line scanner with oscillating mirror side reading window CLV 490 3010 3011 Deflection range Reading conditions see Table 10 1 Page 10 1 Radial reading distance Resolution 0 20 mm 7 9 mil 0 25 mm 9 8 mil 0 30 mm 11 8 mil D e f le c t io n a n g le m a x 4 0 Dimensions in mm in ...

Page 193: ...d height as a function of the reading distance and the tilt at a resolution of 0 5 mm 19 7 mil Line scanner front reading window CLV 490 6010 6011 Reading field height Resolution 0 5 mm 19 7 mil Tilt 45 to 45 30 to 30 15 to 15 typical values A p e r t u r e a n g l e α 4 0 A p e r t u r e a n g l e α 4 0 Reading conditions see Table 10 1 Page 10 1 Characteristics field scanning frequency reading d...

Page 194: ...5 mm 19 7 mil and an aperture angle of α 40 Line scanner front reading window CLV 490 6010 6011 Radial reading distance Resolution 0 5 mm 19 7 mil Aperture angle 40 Focus position CLV 490 7010 7011 Max reading distance for 0 5 mm 19 7 mil 40 reduced by 25 compared to max reading distance for CLV 490 6010 6011 max reading distance min reading distance Reading conditions see Table 10 1 Page 10 1 Cha...

Page 195: ...5 mm 19 7 mil and an aperture angle of α 60 Line scanner front reading window CLV 490 6010 6011 Radial reading distance Resolution 0 5 mm 19 7 mil Aperture angle 60 Focus position CLV 490 7010 7011 Max reading distance for 0 5 mm 19 7 mil 50 reduced by 25 compared to max reading distance for CLV 490 6010 6011 max reading distance min reading distance Reading conditions see Table 10 1 Page 10 1 Cha...

Page 196: ...2004 Appendix Fig 10 28 Characteristics field CLV 490 6010 6011 Low density Scanning frequency as a function of the radial reading distance and resolution Line scanner front reading window CLV 490 6010 6011 Scanning frequency Hz Resolution 0 50 mm 19 7 mil Reading conditions see Table 10 1 Page 10 1 Radial reading distance Dimensions in mm in ...

Page 197: ...ield height as a function of the reading distance and tilt at a resolution of 0 5 mm 19 7 mil Line scanner with oscillating mirror side reading window CLV 490 7010 7011 Reading field height Reading conditions see Table 10 1 Page 10 1 Characteristics field scanning frequency reading distance see Fig 10 30 Page 10 32 Resolution 0 5 mm 19 7 mil Tilt 45 to 45 30 to 30 15 to 15 typical values A p e r t...

Page 198: ...8 Reading distance at a resolution of 0 5 mm 19 7 mil aperature angle 50 see Fig 10 27 Page 10 29 Fig 10 30 Characteristics field CLV 490 7010 7011 Low density Scanning frequency as a function of the radial reading distance and resolution Line scanner with oscillating mirror side reading window CLV 490 7010 7011 Scanning frequency Hz Reading conditions see Table 10 1 Page 10 1 Radial reading dista...

Page 199: ... Deflection range as a function of radial reading distance deflection angle and tilt at a resolution of 0 5 mm 19 7 mil Tilt 45 to 45 30 to 30 15 to 15 Line scanner with oscillating mirror side reading window CLV 490 7010 7011 Deflection range Reading conditions see Table 10 1 Page 10 1 Radial reading distance D e f le c t io n a n g le m a x 4 0 Resolution 0 50 mm 19 7 mil Dimensions in mm in ...

Page 200: ...06 27 1 06 Order no Design CLV Length Connection 2 030 023 Connector cover one connection cable with 15 pin D Sub HD plug Pin assignment see Chapter 5 3 Connector pin assign ment Page 5 7 Without heater 3 m 9 84 ft CLV to CDB 420 2 033 126 Connector cover one connection cable with 15 pin D Sub HD plug one power supply cable with open end Suitable for track chain use Pin assignment see Chapter 5 3 ...

Page 201: ...ctor cover In CLV Setup the external parameter memory in the connector cover is not longer available If the memory of the CMC 400 comprises a parameter set not compatible with the CLV the CLV loads the internal parameter set from its in EEPROM into the RAM The CLV clears the parameter memory in the connector cover In CLV Setup the external parameter memory in the connector cover is not longer avai...

Page 202: ...5 no 2 031 034 Table 5 10 and Table 5 11 Page 5 11 Parameter memory no 2 027 543 Table 5 13 and Table 5 14 Page 5 13 Parameter memory no 2 020 981 Table 5 17 and Table 5 18 Page 5 15 Parameter memory no 2 021 267 Table 5 19 and Table 5 20 Page 5 16 Mount the parameter memory on the CLV as shown in Chapter 5 5 3 Connecting the supply voltage Page 5 19 and connect the cables to the CBD 420 or CDM 49...

Page 203: ...ince it is stored permanently in the CLV and is identical to the internal parameter set 10 3 4 Switching on the device for the first time Since the external parameter memory in the connector cover is empty e g on delivery af ter the CLV has started the CLV copies its current parameter set to the external parameter memory if no CMC 400 parameter memory module is available in the CDB 420 or CDM 490 ...

Page 204: ...s occur accessing the external parameter memory in the connector cover the CLV outputs error messages on the terminal interface When the CLV is started these messa ges can be displayed using the CLV Setup program 1 Connect the PC to the terminal interface on the CLV using a 3 core RS 232 data cable null modem cable CDB 420 or CDM 490 connect the PC to the internal 9 pin Aux plug See Chapter 5 5 6 ...

Page 205: ...ced with a device of the same type You do not need to connect a PC to replace the device Replace the device as described in Chapter 10 12 2 Importing the parameter set from the external memory Page 10 74 The CLV imports the external parameter set into the RAM This is sufficient to ensure that the device operates correctly If the parameter set is to be stored permanently in the CLV EEPROM a PC with...

Page 206: ...n When the 24 V DC supply voltage is applied a temperature switch first supplies electric current to the heater only This switch enables the supply voltage for the CLV when the in ternal temperature rises above 7 C 44 6 F during the warm up phase approx 35 min The device then performs a self test and switches to Reading mode The Device Ready LED lights up to indicate that the device is ready When ...

Page 207: ...on Modules are suitable to power the CLV with heater An external power supply pack with a higher power output must be used to provide the re quired voltage of 24 V DC 20 10 The incomming outgoing cables must be protec ted by corresponding fuses The optional CMP 490 Power Supply Module is not suitable for CLVs with heater See Chapter 3 1 3 System requirements for stand alone configuration Page 3 2 ...

Page 208: ...utes default setting after a reading pulse has begun The reading interval is still active even though the CLV is no longer reading The reading interval has to be terminated by a corresponding pulse signal The laser diode is activated again with the next reading pulse no code In Reading Percentage Evaluation mode the CLV indicates that no codes matching the parameterized evaluation conditions were ...

Page 209: ... 5 22 4 Switch on the power supply to the CDB 420 or CDM 490 Once the CLV has started the Device Ready LED lights up 5 Switch on the PC and start Windows 10 6 2 Installing the software The CLV Setup installation program creates a directory CLV a series of subdirectories and the necessary links A deinstaller is also installed automatically so that you can remove the program from the PC at any time ...

Page 210: ... 3 Select DOWNLOAD under SOFTWARE FILE 4 In the FILE DOWNLOAD dialog box select the option to install directly from the CD ROM Confirm with OK The software is automatically saved in the Programs CLV directory on your hard disk or Select the option to save the software locally on your local hard disk and confirm with OK In the FILE DOWNLOAD dialog box select the same target directory as selected fo...

Page 211: ...xception of the configuration files scl scanner configuration npj network project opj OTS project or rpj redundant OTS project They contain the CLV parameter sets as well as project data if serveal scanners had been organized logically by projects The deinstaller of the old version removes the program files You can use the deinstaller to remove all of the files with the exception of the configurat...

Page 212: ...ameter set on the tabs The default values are displayed when the device is used for the first time Troubleshooting If the program cannot establish communication it outputs a timeout warning and displays NO CONNECTION in the status field This may be because the CLV is not connected or because the communication parameters on the CLV do not match those on the PC In this case CLV Setup enters the CLV ...

Page 213: ...ays the detected CLV type in a separate dialog box and asks you whether you want to upload the current parameter set from the CLV 4 Confirm the dialog box with Yes CLV Setup uploads the current parameter set from the RAM of the CLV to its database and displays the values on the tabs You can edit the current parameter set on the tabs or 2 Choose OPTIONS SERIAL INTERFACE from the menu bar CLV Setup ...

Page 214: ... menus Toolbar with buttons for triggering various functions Drop down list top right for selecting the device type Frame for displaying the navigation tree of the tabs on left hand side Frame for displaying the tabs for CLV 490 Reading Configuration Device Configuration etc on right hand side The numbers of displayed tabs depends on the selected items in the navigation tree on the left side The p...

Page 215: ...unication between the CLV and CLV Setup extended Terminal mode e g for displaying CLV messages AutoBaud Detect for automatic communication setup with the CLV Selecting the COM port of the PC for adapting the data transfer parameters Monitoring the data communication of the CLV host interface Selecting language setting Selecting units of measure Displaying the last 10 configuration files that were ...

Page 216: ...ick the corresponding symbol To hide displayed sub entries click the corresponding symbol Closing Put the mouse cursor on the desired entry and select Hide dialog in the context menu using the right mouse button In the frame for displaying tabs Opening Click on the desired mark on the top of the tab If neccessary scroll the tabs Closing To close the tab in the fore ground click on the red cross at...

Page 217: ...CLV does not accept individual parameters or parameter values in the parameter set downloaded with CLV Setup it outputs a separate warning for each parameter on the screen This could be due to the fact that the version of the CLV Setup software is newer than the software version on the CLV and therefore contains new parameters and para meter values that are not implemented in the older software ve...

Page 218: ...the log file 4 To deactivate the log function click the checkbox in front of the WRITE LOGFILE option again or close the Terminal Emulator window 10 6 12 Starting CLV Setup with an INI file as an argument When the program is started CLV Setup can also be transferred the name of an INI file as a parameter To do so enter INI in front of the file Example CLVmain32 exe data Set1_490 scl INI user ini C...

Page 219: ...at first only activated in the current parameter set in the CLV s RAM The altered parameter values must be saved to non volatile memory in the EEPROM after the changes are made using a special command If the values are not saved they will be lost when the voltage supply is cut off The CLV Setup Terminal Emulator s online mode makes it possible to parameterize the CLV with command strings directly ...

Page 220: ...ommand strings for all the parameter settings You can output a list of all the parameter settings configured with CLV Setup in ASCII format To do so proceed as follows 1 In the menu bar choose EXPORT PARAMETERS under CLV 490 Starting from the default settings CLV Setup collects all the command strings required to parameterize the default configuration and customized settings The SELECT FILE NAME F...

Page 221: ...reading at object v s t v ls n f v ls n tscan tscan 1 f n ls v f n 0 02 m 1 5 m s 600 s n 8 Calculation for standard decoder Specified values Number of scans n Convoyer velocity v 1 5 m s Bar length lS 20 mm 0 8 in Scanning frequency f 600 Hz Bar code 100 readable Is Fig 10 40 Line scanner calculating the number of scans for fence type bar code arrangements v ILH Ic Line scanner lateral reading on...

Page 222: ...or side read on object Calculation for standard decoder Specified values Number of scans n Conveyer velocity v 0 5 m s Code length with blanc zone lC 100 mm 3 9 in Code length under 10 Reading field height lLH 500 mm 19 7 in Scanning frequency f 600 Hz Bar code 100 readable all scans on the code Code windows lLH lC 1 Dwell time of the bar code in the reading area lCW 100 mm cos 10 102 mm 4 in t s ...

Page 223: ... ϕ γ hs h0 d cos ϕ arc cos hs h0 d γ StartPos 1 50 CW ϕ 2 1 CW 0 5 sin α hs d d hs α sin StartPos 2 50 CW ϕ 2 1 CW 0 5 2 Oscillating angle ϕ When entering the values note the following Debouncing time of the IN 3 or IN 4 switching input One Shot trigger Start time of the oscillating mirror inertia Select the mirror speed of the return phase in accordance with the distances between the objects so t...

Page 224: ...in Standard Decoder The above distances are also required for reading bar codes with identical names identical data content and code types Prerequisite for separating bar codes with identical names 1 The CODE DISTANCE between the bar codes must be parameterized correctly DEVICE CONFIGURATION tab TRACKING PARAMETERS button 2 The code position comparison must be activated CODE CONFIGURATION tab CODE...

Page 225: ...ICode 2 Calculated code length EAN Not applicable 13 characters normal version 8 characters short version Activate 13 digit Activate 8 digit UPC Not applicable 12 characters UPC A normal version 6 characters UPC E short version Activate Version A Activate version E Codabar Number of bars Number 8 ICode 4 Calculated code length Code 128 character set A Number of bars Number 10 ICode 3 Calculated co...

Page 226: ...e Reading pulse is through a SICK photoelectric switch Output of read results via the host interface Parameterization of the CLV based on the factory defaults Requirements Testing the application for feasability with the CLV 490 before buying with the help of the SMART calculation sheet service provided by SICK Choice of CLV type here standard density line scanner CLV 490 0010 No objects irrelevan...

Page 227: ...CLV s direct distance measurement the basis of the autofocus function 10 10 5 Mounting and electrical connection 1 Mount the CLV centered 1 400 mm 55 2 in above the conveyor belt vertically accor ding to a Fig 10 44 reading window facing downward 2 Align and screw in the CLV in a reading axis with the reading window at a 10 angle against the required reading direction as shown in b Fig 10 44 The C...

Page 228: ...Page 6 1 4 Parameterize the CLV with the help of Chapter 6 4 4 Guide to parameterization menu Page 6 9 and the tab cards by following the steps described 5 After completing parameter value alterations download them to the CLV see chapter Chapter 6 4 1 Configuring the CLV via the user interface of CLV Setup Page 6 5 1 Setting up the autofocus function Part 1 READING CONFIGURATION tab Set the follow...

Page 229: ...us area s terminating planes The CLV registers the altered reading distances in this area only Autofocus limitation min 600 mm 23 6 in max 1 400 mm 55 2 in Autofocus space Right edge of conveyor Y1 50 mm 2 in Limiting levels Left edge of conveyor Y2 550 mm 21 7 in from feed level Level of conveyor Z1 50 mm 2 in Maximum scanning height Z2 800 mm 31 5 in Close the AUTOFOCUS LIMITS PARAMETERS tab Fig...

Page 230: ...PTIMIZATION PARAMETERS button The AUTOFOCUS OPTIMIZATION PARAMETERS tab then opens Fig 10 48 Set the following parameters Delay of focus change Timeout 50 ms Hysteresis 50 mm 2 in Distance Measurement active Source of distance information internal Smooth filter active active Length 3 default setting Close the AUTOFOCUS OPTIMIZATION PARAMETERS tab Fig 10 48 Parameterization example Autofocus Optimi...

Page 231: ...ng CLV position definition parameters regarding the movement level see also Fig 10 44 Page 10 61 Set the following parameters in the ANGLES section Angle alpha 90 degrees Laser beam s direction of deflection relative to the direc tion of convoyer belt Angle beta 10 degrees Laser beam s angle of incidence relative to the perpendi cular in the area Skew to the barcode 10 degrees in the direction of ...

Page 232: ...ndicular x offset x coordinate the distance from the pulse photoelectric switch to the CLV s reading window perpendicular Y coordinate 300 mm 11 8 in The middle of the CLV to the left edge of the con veyor belt in the direction of convoyer belt Z coordinate 1 400 mm 55 2 in Height of the CLV above the conveyor belt Close the SCANNER POSITION PARAMETERS tab 3 Set the reading pulse source DEVICE CON...

Page 233: ...Codes Minimum 1 Maximum 1 Code Positions deactivate remove check Decoder SMART Standard For 2 5 interleaved click on the EDIT button The 2 5 INTERLEAVED tab then opens Fig 10 53 Set the following parameters Code Length Fixed length 1 14 characters Multiple Reads for Length 1 3 Check Digit Test for Length 1 mod 10 Transmit Check Digit activate Transmit Leading Zero activate Close the tab Fig 10 52 ...

Page 234: ...n condition parameters DATA STRINGS tab Set the CLV output message format in the end user communication conditions Perform a download to CLV 10 10 7 Testing the application Check the reading rate with the Terminal Emulator in the CLV Setup while an application is running The reading rate should be 90 Fig 10 54 Parameterization example Host interface tab default setting Fig 10 55 Parameterization e...

Page 235: ...e format as the other reading results on the host interface Each string can contain the data from a bar code with a maximum length of 50 characters The CLV au tomatically enters the status ST 7 if the error status has been enabled for transmission The values of the other reading diagnosis data in the data string do not have any signifi cance To enable the CLV to receive the data content of the bar...

Page 236: ... the screen on the left and right of the text input field Fig 10 57 shows the Terminal Emulator window in extended mode 3 Use the drop down lists to set the start and stop characters to NUL 4 Enter the data content of the bar code character string on the keyboard Use the backspace key to correct any input errors The data content must not contain control characters 5 Press the RETURN or ENTER key T...

Page 237: ...the host interface Entering bar codes using a hand held scanner with integrated decoder 1 Connect the hand held scanner with decoder to the terminal interface of the CLV via CDB 420 or CDM 490 For the pin assignment see Chapter 5 5 6 Connecting the PC Page 5 22 2 Set the data format and communication parameters on the hand held scanner as shown in Table 10 9 3 Read the bar code with the hand held ...

Page 238: ...the DeviceNet See Operating Instructions CMF 400 2101 Field Bus Gateway for DeviceNet no 8 010 464 English edition 10 11 4 Connection to Ethernet TCP IP See Operating Instructions CMF 400 3101 Field Bus Gateway for Ethernet TCP IP no 8 010 735 English edition 10 11 5 Building a CAN Scanner Network See Operating Instructions Application of the CAN interface no 8 009 180 English edition 10 11 6 Inte...

Page 239: ...Aux plug See Chapter 5 5 6 Connecting the PC Page 5 22 6 Switch on the power supply to the CDB 420 or CDM 490 Once the CLV has started the Device Ready LED lights up 7 Switch on your PC and start Windows 8 Start CLV Setup If the communication parameters on the PC and CLV are identical CLV Setup uploads the parameter set from the CLV and displays the values on the tabs 9 Open the archived parameter...

Page 240: ...LV 3 Remove the CLV from the bracket Mark the position and alignment of the CLV on the bracket station 4 Mount the connector cover on the terminals correctly and screw it into place 5 Mount and align the replacement device 6 Switch on the power supply to the CDB 420 or CDM 490 The CLV starts and loads the parameter set from the external memory to the RAM The Device Ready LED blinks for approx 10 s...

Page 241: ...nal strips signal distributor for connecting the data and function interfaces 1 x internal 9 pin D Sub plug Aux 5 x LED status indicator polycarbonate housing enclosure rating max IP 65 operating temperature 351 to 40 C 31 to 104 F operating voltage 10 to 30 V DC 1 024 305 CDB 420 101 as CDB 420 001 but with 2 x cable glands dia 4 5 to 10 mm 0 18 to 0 39 in 2 x M12 connections 1 x plug 1 x socket ...

Page 242: ...on V 3 50 to Profibus DP slave via RS 232 data interface With 9 pin D Sub socket on front panel for bus connection enclosure rating IP 20 and 5 core terminal strip for connecting 2 digi tal inputs and 2 digital outputs Connection to the CDM 490 via connector operating temperature 0 to 40 C 32 to 104 F operating voltage 18 to 30 V DC via CDM 490 power consumption 2 W 1 026 643 CMF 400 1101 as CMF 4...

Page 243: ...but longer 15 x 0 25 mm2 24 AWG 10 m 32 8 ft as above 2 020 303 Connection cable for data interfaces Host Term dia 8 mm 0 32 in shielded with 15 pin D Sub HD socket and open end crimpted wires all pins connected Enclosure rating max IP 20 Required 1 per CLV 15 x 0 25 mm2 24 AWG 3 m 3 84 ft CLV 490 to host free wiring 2 020 264 Connection cable for function interfaces and power supply I O dia 8 mm ...

Page 244: ...r pin 13 and pin 14 of I O connection not connected Enclosure rating max IP 65 Required 1 per CLV je 18 x 0 14 mm2 26 AWG 3 m 3 84 ft CLV 490 to CDM 490 2 020 981 Connector cover with parameter memory EEPROM two connection cables each with dia 8 mm 0 32 in shielded with two open ends crimpted wires All pins connected however pin 13 and pin 14 of I O connection not con nected Enclosure rating max I...

Page 245: ...for track chain use Required 1 per CLV 15 x 0 23 mm2 24 AWG 2 x 1 5 mm2 16 AWG 10 m 32 8 ft CLV 490 to CDB 420 2 033 127 as 2 033 126 but longer as 2 033 126 15 m 49 2 ft as above 2 030 065 Connector cover with parameter memory EEPROM two con nection cables each with dia 6 mm 0 24 in shielded with one 15 pin D Sub HD socket and with one 15 pin D Sub HD plug Power supply cable dia 8 6 mm 0 34 in sh...

Page 246: ...4 mm2 26 AWG 2 x 1 5 mm2 16 AWG 3 m 3 84 ft CLV 490 to host sensors PLC and non SICK power pack 2 027 543 Connector cover Scanner with parameter memory EEPROM to connector cover AMV BMV two connection cables each with dia 8 mm 0 32 in shielded Each cover with 15 pin D Sub HD socket and 15 pin D Sub HD plug Pin assignment of each cable identical to device connection however pin 11 to 14 CAN interfa...

Page 247: ... 10 m 32 8 ft with M12 socket and open end Table 10 17 Accessories incremental encoder Fig 10 58 Dimensions of the angle bracket single No 2 013 824 30 1 18 6 5 26 45 1 77 30 1 18 7 27 15 59 30 1 18 ø 6 5 26 ø 6 5 26 6 5 26 6 5 26 56 2 20 15 59 30 1 18 7 5 29 97 5 3 84 25 98 50 1 97 45 1 77 Enclosed to securing the CLV 2 x cylinder head screws M6 x 10 mm 0 39 in self locking Fig 10 59 Dimensions o...

Page 248: ...0 Connection Module 8 010 601 CMP 490 Power Supply Module Fitting Instructions German English Description for installing the module in the CDM 490 Connection Module 8 010 462 CMF 400 1x01 Field Bus Gateway for Profibus DP Operating Instructions English Description for installing and setting up configuration the module in the CDM 490 Connection Module 8 010 464 CMF 400 2101 Field Bus Gateway for De...

Page 249: ...ocus position to the reading plane of the bar codes Auxiliary input Special function on Ö the terminal interface Used to enter bar code data subsequently in order to complete reading results sent to the host Capture range Zone around a moving bar code created by the CLV using the increment management and code position comparison functions Enables bar codes with identical contents and code type to ...

Page 250: ... for Ö decoding purposes by specifying the maximum and minimum CP value for the application Command strings commands CLV user interface alternative to the CLV Setup program Basic yet clearly structured command language for modifying the CLV parameter sets online Accesses the CLV command interpreter directly Special programming activities are required to use the command strings from the host Config...

Page 251: ... bar code in front of the CLV in stages When the bar code is read from above for example the distance is detected by installing photoelectric reflex switches above one another beside the conveyor belt Together with the combination of IN 0 to IN 4 switching inputs and the assignment table for the Ö distance configurations the ranges for Ö dynamic focus control are defined Only required if the Ö Aut...

Page 252: ...ding pulse Header Data block in the reading result on the Ö host interface Used as a header in the Ö data output string for the subsequent data content of the bar codes Contains up to 10 elements consisting of reading diagnosis data and or constants control characters letters digits de pending on the configuration The Header block is empty in the default setting of the CLV 490 Host interface Main ...

Page 253: ...the Ö Code Info Separator block Object height detector See distance detector Object polling The CLV automatically detects a current object entering or leaving the reading field without any external sensors Omnidirectional reading Arrangement of the scan lines of at least two CLVs which form a cross Due to the max tilt 45 of the CLV the position of a bar code to the scan lines is free One Shot Sele...

Page 254: ... start end of an object and the object release point data output parameter ized as a distance in conveyor direction referred to the increments Reading field height Length of the Ö scan line that is available for detecting the bar code in the reading plane Due to the V principle of beam generation the reading field height is dependent on the reading distance Reading interval Timeslot in which the C...

Page 255: ...ent of the bar codes Contains up to 5 elements consisting of constants control characters letters digits depending on the configuration The Splitter block is empty in the default setting of the CLV 490 Standard decoder Tried and tested Ö decoder from the CLV product family Suitable for applications with an adequate code height limited tilt and high quality code prints Start stop mode With this typ...

Page 256: ...he Ö host interface Used to terminate the data content of the bar code Contains up to 10 elements consisting of reading diagnosis data and or constants control characters letters digits depending on the configuration The Termina tor block is empty in the default setting of the CLV 490 Tracking mode With this type of continuous reading pulse several objects are located consecutively in the reading ...

Page 257: ...s Chapter 10 CLV 490 Bar Code Scanner 8 009 993 O824 20 12 2004 SICK AG Division Auto Ident Germany All rights reserved 10 91 Appendix User interface Windows based PC software CLV Setup for operating and configuring the CLV ...

Page 258: ...many All rights reserved 8 009 993 O824 20 12 2004 Appendix 10 17 EC Declaration of Conformity Fig 10 61 shows the scaled down copy of the EC Declaration of Conformity page 1 Complete copy of EC Declaration of Conformity on request Fig 10 61 Copy of the Declaration of Conformity Page 1 scaled down ...

Page 259: ... 490 5 6 Function of the CDB 420 5 3 Function of the CDM 490 5 5 Mounting 4 11 Cleaning the CLV 7 1 CLV Connect 10 82 CLV Setup Default settings 10 46 Download 6 6 Functions overview 10 49 Hot keys 10 49 Ini file 10 52 Installation on the PC 10 43 Log file for serial communication 10 52 Starting 10 46 Tabs overview 6 7 Unknown parameters 10 51 Upload 6 5 User interface 10 48 CLV Setup Help 10 50 C...

Page 260: ...nction 3 6 Max cable lengths 5 17 Monitoring in the Terminal Emulator 6 56 Parameterization 6 38 Select hardware 5 22 I I O monitor in increment trigger 6 49 Identical bar codes Function of CP CW values 4 6 Parameterzing the evaluation 6 37 Separation 4 6 IN 0 IN 4 switching inputs Assignment table 5 25 Caracteristic data 5 25 Connection 5 24 Function 3 6 Parameterization 6 39 Incremental sensor A...

Page 261: ... mode 6 44 Function in background Teach in 6 45 Function in reading mode 6 39 Function in show CP limits 6 47 Function in the percentage evalutation 6 43 Operation modes 6 18 Parameterization 6 18 Quick Start 6 3 Reversal points 3 10 Technical data 9 2 Troubleshooting 8 19 P Parameter memory external Design 10 34 Electrical connection 10 36 Error messages 8 5 Function 10 35 LEDs 3 11 Mounting 10 3...

Page 262: ...ure rating protection class 9 2 Features 3 3 Intended use 2 1 Laser radiation 2 2 Notes on device 3 1 Silicone 2 4 Supply voltage 5 17 Scanning frequency High density line scanner 10 20 High density line scanner with osc mirror 10 25 Low density line scanner 10 30 Low density line scanner with osc mirror 10 32 Standard density line scanner 10 8 Standard density line scanner with osc mirror 10 14 S...

Page 263: ...40 Default setting 5 23 Function 3 6 Max cable length 4 2 Operating modes 6 55 Terminator 6 57 Thread Blind hole Dimensions 4 3 Position 3 5 Tracking mode Function 6 35 Minimum gap 6 28 6 34 Parameterization 6 28 6 34 Troubleshooting Analysis and remedy 8 9 Error messages 8 2 Error status in the reading result 8 7 U Upload Function 6 5 Starting upload 6 5 V Variants of CLV 3 1 W Warranty 2 1 Windo...

Page 264: ...10 98 SICK AG Division Auto Ident Germany All rights reserved 8 009 993 O824 20 12 2004 Chapter 10 Operating Instructions CLV 490 Bar Code Scanner Appendix ...

Page 265: ...ons Chapter 10 CLV 490 Bar Code Scanner Appendix 10 19 Bar code example Fig 10 62 Scannable bar codes with various module widths print ratio 2 1 9 8 7 6 5 4 3 2 1 0 C L V 4 9 0 2 5 Interleaved Code 39 Module width 0 35 mm 13 8 mil Module width 0 5 mm 19 7 mil Module width 1 0 mm 39 4 mil A 1 2 3 4 A Codabar ...

Page 266: ...one 47 67 81 50 00 E Mail austefjord sick no Österreich Phone 43 0 22 36 62 28 8 0 E Mail office sick at Polska Phone 48 22 837 40 50 E Mail info sick pl Republic of Korea Phone 82 2 786 6321 4 E Mail kang sickkorea net Republika Slowenija Phone 386 0 1 47 69 990 E Mail office sick si Russia Phone 7 95 775 05 30 E Mail info sick automation ru Schweiz Phone 41 41 619 29 39 E Mail contact sick ch Si...

Reviews: