background image

10

P

a

rt

 Na

me

s

 a

n

F

unc

tions

PART NAMES AND FUNCTIONS  

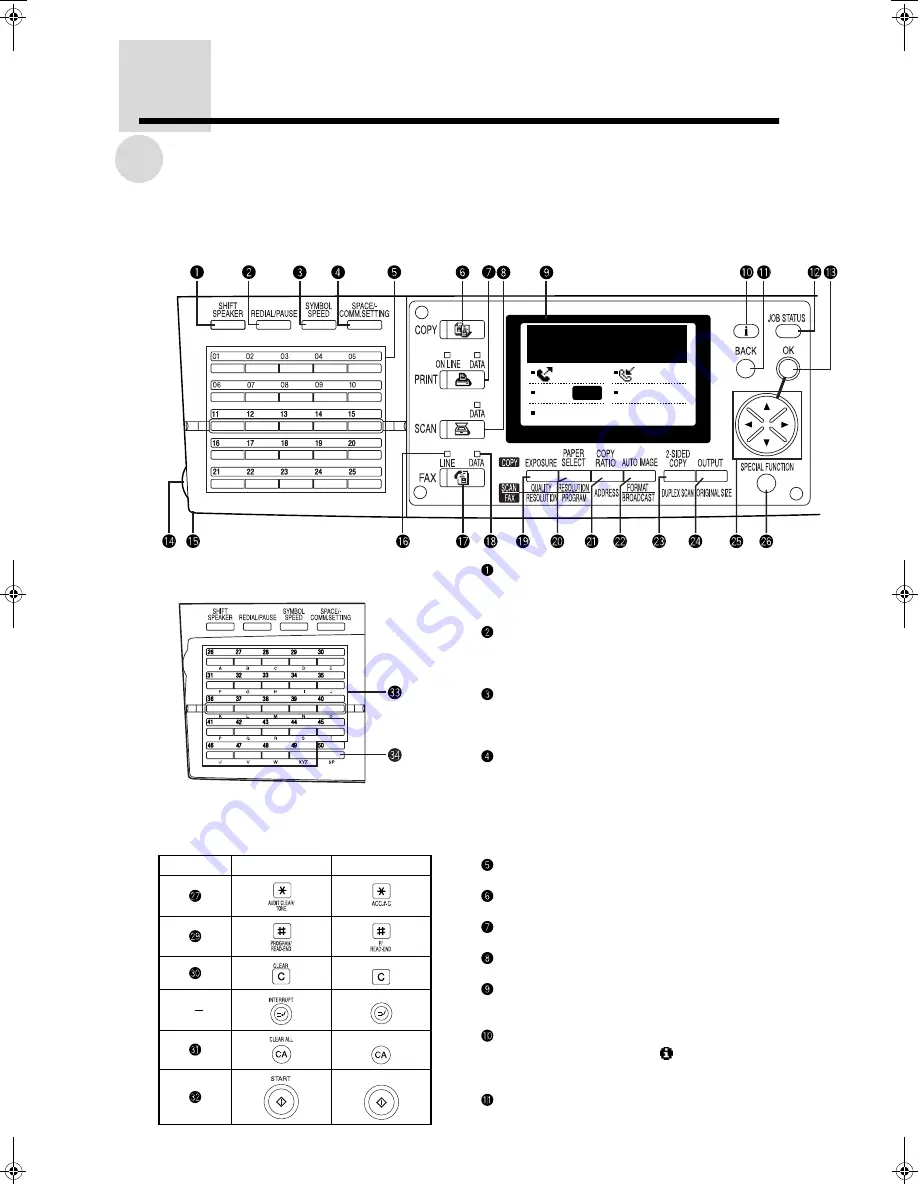
Operation Panel 

The operation panel for the U.S.A. is used in the following explanation. Refer to the table below for
differences between the panel for the U.S.A. and the panel for Canada.
 

When the rapid key overlay is open

Differences between the U.S.A. and
Canadian panels

SHIFT (character entry) / SPEAKER key (See
pages 26, 63)

This key is used when entering characters and
for on-hook dialing.

REDIAL/PAUSE key (See pages 26, 48)

This key is used to automatically redial the last
number dialed. When entering a number to be
dialed, the key can be used to insert a pause.

SYMBOL (character entry) / SPEED key (See
pages 25, 63)

This key is used to enter symbols, and to dial a
Speed Dial number.

SPACE / - (character entry) / COMM. SETTING
key (See pages 32, 63)

This key is used to enter a space or a hyphen (-),
and to change between memory transmission
and direct transmission. The key is also used to
change between automatic reception and
manual reception.

Rapid keys (01 to 25) (See page 25)

These keys are used for rapid dialing.

COPY key

This key is used to change to copy mode.

PRINT key

This key cannot be used in fax mode.

SCAN key

This key cannot be used in fax mode.

Message screen (See page 13)

This key displays the initial screen and the
function setting screen.

i key

This key is used when an 

 mark appears in

the display, or to display information about an
operation.

BACK key

In a setting or programming screen, this key is
used to move back to the previous screen.

Number

U.S.A.

Canada


Stand−by.      100%
 MAY 11 FRI 10:25AM

   MEMORY    AUTO
 CONT


 STANDARD

AUTO

DQQMࡍ࡯ࠫ㧞㧜㧜㧝ᐕ㧣᦬㧝㧣ᣣޓἫᦐᣣޓඦᓟ㧢ᤨ㧡㧢ಽ

Summary of Contents for AR-FX4

Page 1: ...N KIT OPERATION MANUAL MODEL AR FX4 BEFORE USING THE MACHINE BASIC OPERATIONS CONVENIENT FUNCTIONS 1 CONVENIENT FUNCTIONS 2 TROUBLESHOOTING USEFUL INFORMATION KEY OPERATOR PROGRAMS AND INDEX 9 27 69 105 119 131 137 Page ...

Page 2: ...environment This equipment generates uses and can radiate radio frequency energy and if not installed and used in accordance with the operation manual may cause harmful interference to radio communications Operation of this equipment in a residential area is likely to cause harmful interference in which case the user will be required to correct the interference at his own expense Note This manual ...

Page 3: ...al In order to program this information into your facsimile machine please refer to the appropriate instructions in the operation manual Important safety information If any of your telephone equipment is not operating properly you should immediately remove it from your telephone line as it may cause harm to the telephone network The AC power outlet shall be installed near the equipment and shall b...

Page 4: ...also be advised of your right to file a compliant with the FCC Your telephone company may make changes in its facilities equipment operations or procedures that could affect the operation of your equipment If this happens the telephone company will provide advance notice in order for you to make necessary modifications to maintain uninterrupted service If the equipment is causing harm to the telep...

Page 5: ...chine can be used Be sure to read this chapter before using the fax feature 1 BASIC OPERATIONS This chapter explains procedures for basic fax operations such as sending and receiving faxes and procedures for establishing settings 2 CONVENIENT FUNCTIONS 1 ADVANCED COMMUNICATION METHODS This chapter explains functions that are designed for specific purposes and circumstances Please read those sectio...

Page 6: ...UT THE SPF 20 Originals that can be Used 20 LOADING ORIGINALS 21 Using the SPF 21 Using the Platen Glass 22 SETTING THE ORIGINAL SIZE 23 Selecting an Inch based Original Size 23 Setting an AB Original Size 23 SELECTING THE RESOLUTION AND EXPOSURE 24 Selecting the Resolution and Exposure 24 CONVENIENT DIALING FEATURES 25 Auto Dialing 25 Redialing 26 On hook Dialing 26 Chapter 2 BASIC OPERATIONS SEN...

Page 7: ...ion Settings 72 Setting Up a Timer Transmission 73 CONFIDENTIAL TRANSMISSION RECEPTION 74 Using the Confidential Function 75 RELAY REQUEST TRANSMISSION 77 Storing a Relay Group 78 Using the Relay Request Function 80 POLLING 81 Using Polling 82 Using Memory Polling 84 Restricting Polling to Specified Machines Polling Security 86 F CODE COMMUNICATION 87 F code Memory Boxes 87 Using F code Transmissi...

Page 8: ...nsmission Reserve status 116 Checking Faxes Received by Confidential Reception Confidential Reception Status 117 Chapter 5 TROUBLESHOOTING PRINTING LISTS 120 Lists 120 Printing a List 128 STATUS MESSAGES 129 Self diagnosis Function 130 Message Screen During Normal Operation 130 Chapter 6 USEFUL INFORMATION INSTALLATION AND CONNECTION 132 Selecting the Line Type 132 SUPPLIES AND OPTIONS 133 Supplie...

Page 9: ... digit press the CLEAR key and then enter the correct digit 2 When you have completed the fax operation press the AUDIT CLEAR key Notes If you enter a department code for Copy mode has also been programmed for Fax mode you can change to Fax mode after completing the copy operation and continue with the fax operation without re entering your department code If you enter a department code for Copy m...

Page 10: ...power is consumed even if nothing is programmed and no settings have been established Very little battery power is consumed when the power switch is turned on When the battery dies settings and programmed information will be lost so please keep a record of this information See page 120 The life of the battery is approximately 5 years when the power switch is kept continuously off When the battery ...

Page 11: ...dential documents without the concern that they will be picked up by anyone other than the intended recipient See page 74 9 Broadcast Transmission You can send the same document to multiple recipients in a single operation See page 70 10 Relay Request Transmission You can have another machine relay a document to multiple end receiving machines See page 77 11 Timer Transmission You can set up an or...

Page 12: ......

Page 13: ...OGRAMMING AND SETTINGS 16 Program Your Own Number and Name 16 Set the Date and Time 16 Installation and Connections 16 ACCOUNT AUDIT MODE 17 Using Account Audit Mode 17 SETTING THE PAPER SIZE OF THE PAPER TRAYS 18 ABOUT THE ORIGINAL 19 Originals that can be Faxed 19 ABOUT THE SPF 20 Originals that can be Used 20 LOADING ORIGINALS 21 Using the SPF 21 Using the Platen Glass 22 SETTING THE ORIGINAL S...

Page 14: ...nter symbols and to dial a Speed Dial number SPACE character entry COMM SETTING key See pages 32 63 This key is used to enter a space or a hyphen and to change between memory transmission and direct transmission The key is also used to change between automatic reception and manual reception Rapid keys 01 to 25 See page 25 These keys are used for rapid dialing COPY key This key is used to change to...

Page 15: ...ion for sending or receiving and to establish function settings and store auto dial numbers AUDIT CLEAR TONE key See page 17 When audit mode is turned on and used for fax this key is used to enter an account password This key can also be pressed when using the phone line to issue tone signals Numeric keys These keys are used to dial numbers They are also used when establishing settings and storing...

Page 16: ...can be changed using the Copy mode key operator program Refer to the Key Operator s Guide for copying Center tray Received faxes can be output to the center tray by establishing the appropriate setting with the copier key operator program Operation panel See pages 10 11 Front cover Copier manual Open this cover to remove a paper jam Paper trays Copier manual These trays hold paper for received fax...

Page 17: ...s the date and time Send mode display This shows the send mode MEMORY Memory transmission mode See page 31 DIRECT Direct transmission mode See page 31 MANUAL Manual transmission mode See page 29 Exposure display See page 24 This shows the exposure setting for scanning an original Resolution display See page 24 This shows the resolution setting for scanning an original Reception mode display This s...

Page 18: ...eed to turn off the power Turn off the power if a machine problem occurs a foreign object falls into the machine or you need to move the machine Important When using the machine as a fax machine do not turn off the power When the power is turned off the machine cannot receive faxes Before turning off the power make sure the machine is idle If the power is turned off while the machine is in operati...

Page 19: ...ration ends the Fax mode light illuminates steadily and the machine changes to Fax mode Fax functions that can operate in Copy mode Automatic reception See page 44 Timer transmission See page 72 Memory polling See page 84 Relay Broadcast transmission See page 77 Transmission of stored memory transmission jobs See page 31 Remote reception See page 112 Manual reception See page 44 Initial state of F...

Page 20: ...ame are programmed using the key operator program See page 147 You can check the programmed name and number by printing out the Passcode List See page 126 Set the Date and Time The machine has an internal clock Set the correct date and time in the clock The date and time appear in the message screen The date and time are used for the Timer Transmission function See page 72 Be sure the correct date...

Page 21: ...code is entered the hyphens change to asterisks If you enter an incorrect digit press the CLEAR key and then enter the correct digit 2 When you have completed the fax operation press the AUDIT CLEAR key Notes If you enter a department code for Copy mode has also been programmed for Fax mode you can change to Fax mode after completing the copy operation and continue with the fax operation without r...

Page 22: ... press the OK key The changed paper size appears when you press the OK key 4 Press the OK key Notes Only the length of the paper is detected For this reason if the length of a received fax image and the length of the paper are the same but the width of the paper is smaller than the width of the fax image the sides of the fax will be cut off when printed The machine cannot correctly detect the diff...

Page 23: ... of faxed originals If you send a original of a larger width than the paper in the receiving fax machine the original will be automatically reduced You can turn off automatic reduction In this case the sides of the original will not be transmitted See page 153 Minimum original size Maximum original size Using the SPF 5 1 2 x 8 1 2 11 width x 39 3 length Long originals can be loaded Using the plate...

Page 24: ...weight thickness Non standard originals may jam Remove any clips and staples from originals before loading them Make sure that any glue ink or correcting fluid on an original has dried completely before loading the original Otherwise the inside of the machine and scanning glass may be soiled Load an original with file binding holes two holed or three holed originals so that the side with the holes...

Page 25: ... sure the pages are inserted all the way into the feeder 3 Check the original size resolution and exposure in the message screen See pages 23 24 Notes If the original is a standard size 11 x 17 8 1 2 x 14 8 1 2 x 11 8 1 2 x 11 R or 5 1 2 x 8 1 2 the original size is automatically detected and displayed If you loaded a non standard size original make sure that the displayed original size is the sam...

Page 26: ...al is a standard size 11 x 17 8 1 2 x 14 8 1 2 x 11 8 1 2 x 11 R or 5 1 2 x 8 1 2 the original size is automatically detected and displayed 5 1 2 x 8 1 2 originals cannot be automatically detected If you loaded a non standard size original make sure that the displayed original size is the same size as the size you want to send If the displayed size is smaller than the actual original size part of ...

Page 27: ...omplete the original size setting you will automatically return to the initial screen Setting an AB Original Size 1 Press the ORIGINAL SIZE key and then move to the AB size page with the key To return to the inch size page press the key or the key 2 Use the keys to select the original size and then press the OK key When you press the OK key to complete the original size setting you will automatica...

Page 28: ...elect a dark setting for an original written in pencil or that has faint letters press the key to move the setting toward To select a light setting for a dark original such as a newspaper press the key to move the setting toward Notes To cancel a resolution or exposure selection press the CLEAR ALL key In the program table and key operator table the exposure settings are indicated as Auto Very lig...

Page 29: ...d dialing 300 stations A stored destination can be dialed by pressing the SPEED key entering a 3 digit number 000 to 299 and pressing the START key Up to 36 characters can be stored for the name Group Dial keys Up to 50 stations Multiple rapid dial numbers Speed dial numbers and numbers entered with the numeric keys can be stored in one rapid key This is convenient for communicating with a group o...

Page 30: ...lling Timer transmission Group dialing On hook Dialing This function allows you to listen to the line when dialing Before dialing press the SPEAKER key You will hear the dial tone through the speaker and can then dial Faxes cannot be sent by memory transmission using on hook dialing The fax will automatically be sent by direct transmission See page 31 You can adjust the speaker volume high medium ...

Page 31: ...ng scanning or direct transmission 37 Canceling a Fax Transmission or Reception in Progress 37 Canceling a Stored Transmission Job 39 RECEIVING A FAX 41 Methods for Receiving Faxes 41 Setting the Reception Mode 42 Earlier Output of Received Data 43 Fax Output 43 Receiving a Fax 44 Substitute Reception to Memory 46 STORING EDITING AND CLEARING AUTO DIAL KEYS AND NUMBERS 47 Storing an Auto Dial Key ...

Page 32: ...e a mistake press the CLEAR key to clear the incorrect digit and then enter the correct digit 3 Press the START key After the first page is scanned your machine dials the other machine and begins transmission while the remaining pages are scanned The original is output to the original output tray Notes If you wish to have all pages scanned into memory before transmission is begun use the key opera...

Page 33: ...ual reception you can lift an extension phone connected to the machine and talk to the other party To receive a fax remove the original from the SPF or the platen glass and then press 5 and replace the extension phone See page 113 If an extension phone is not connected to the machine you will not be able to speak to the other party When the line is busy When the line is busy or ringing lasts 45 se...

Page 34: ...the numeric keys and then press the START key If you make a mistake press the CLEAR key to clear the incorrect digit and then enter the correct digit The original is scanned into memory 3 After the original is scanned change pages and then press the START key if you have another page to scan Repeat this step until all pages have been scanned into memory 4 When the final page has been scanned press...

Page 35: ...ine can only be used for normal transmission and Confidential transmission Quick On Line cannot be used for faxes sent from the platen glass Normal memory transmission is used If the memory becomes full during scanning scanning and transmission are canceled If the connection to the receiving machine cannot be established or a line error occurs recalling takes place See page 29 Even if Quick On Lin...

Page 36: ...de and then press the OK key 3 Press the OK key This completes the setting Sending a Fax by Auto Dialing To use an auto dial number the other party s fax number and name must be stored in the auto dial number See page 47 Sending a fax from the SPF 1 Insert the original in the document feeder tray See page 21 Make sure an original does not remain on the platen glass Insert the originals face up Che...

Page 37: ... See previous page Using a Speed Dial number 1 Press the SPEED key and then enter a 3 digit Speed Dial number 000 to 299 2 Press the START key If a sub address has been stored a sub address transmission will be performed Using the Address List 1 Press the ADDRESS key 2 Enter the search characters up to 10 characters and then press the OK key See page 63 You can also omit entry of the search charac...

Page 38: ...o Memory Transmission See page 32 3 Transmission begins Your machine automatically dials and sends the fax to the receiving machine Notes To cancel the transmission display the transmission job and then press the CLEAR key See page 37 If the other machine does not respond after 45 seconds of ringing or the line is busy your machine will break the connection and then automatically reattempt the tra...

Page 39: ...on Job while the Machine is Sending or Receiving You can store a fax transmission job while the machine is busy receiving a fax or sending a fax by memory transmission The procedure for storing a job is the same as for sending a fax Up to 50 jobs can be stored at once note that 50 jobs may not be possible if a large number of pages are stored or a high resolution setting is used Storing a transmis...

Page 40: ... current operation is completed Notes If you have not yet pressed the START key you can cancel a transmission job by pressing the CLEAR ALL key After the START key is pressed the transmission can be canceled from the stored transmission job screen If the original is still being scanned after the START key is pressed you can press the CLEAR key to cancel the transmission If you set up a transmissio...

Page 41: ...e cleared from memory Canceling scanning or direct transmission 1 During transmission press the CLEAR key You can also press the CLEAR ALL key 2 Select YES with the or key and then press the OK key If you do not wish to cancel select NO Canceling a Fax Transmission or Reception in Progress 1 Press the JOB STATUS key 2 Select TX RX JOBS with the or key and then press the OK key Job canceled YES NO ...

Page 42: ...NDING 01234 MEMORY TX P XXX No XXX Transmission screen Job canceled YES NO COMM 01234 MEMORY TX No XXX Status of transmission Receiving party The name appears if you are using a rapid dialing or Speed Dial number that has a name stored Type of operation In the case of a timer transmission a clock icon appears at the beginning of the transmission method name Page number currently being sent Job num...

Page 43: ...ncel with the or key and then press the CLEAR key As you press the or key the stored transmission jobs appear one at a time If only one transmission job is stored the display will not change when you press the or key 4 Select YES with the or key and then press the OK key If you do not wish to cancel select NO JOB STATUS FUNCTION REVIEW FAX PRINT OUTPUT TX RX JOBS TX RX RESERVE WAITING XXX XXX 0123...

Page 44: ...eceiving party The name appears if you are using a rapid dialing or Speed Dial number that has a name stored Type of operation In the case of a timer transmission a clock icon appears at the beginning of the transmission method name Number of pages in stored job If this is a memory transmission job the job number assigned at the specified time of transmission appears If this is a timer transmissio...

Page 45: ...ure the paper size setting is the same as the actual paper size If the width of the paper size setting is larger than the actual paper width faxes will be clipped when printed Once printed fax data is cleared from memory If the paper size setting is smaller than the actual paper size paper jams may result Fax data is not cleared from memory when a paper jam occurs In this case change the paper so ...

Page 46: ...the reception mode to manual and the extension phone setting must be turned on with the key operator program See page 148 The setting established here remains in effect until changed or until the power is turned off Setting the reception mode 1 Press the COMM SETTING key in the initial state of Fax mode 2 Select RX with the or key and then press the OK key 3 Select AUTO or MANUAL with the or key a...

Page 47: ...faxes are output to the top tray of the Job Separator If desired output can be changed to the center tray with the key operator program Copier manual The top tray of the Job Separator has a sensor that detects when the tray is full When approximately 100 pages accumulate in the tray a message appears in the display and fax printing stops If this happens remove the pages Printing will resume moment...

Page 48: ...ally after ringing even if an extension phone is connected to the machine If you answer the call using the extension phone before ringing ends and the other party is sending a fax by manual transmission you can talk to the other party and then begin fax reception by pressing 5 on the keypad of the extension phone 2 When reception ends the machine makes a beep sound The received fax is output to th...

Page 49: ...ion phone See page 111 1 Lift the extension phone 2 Press the JOB STATUS key Select MANUAL RECEIVING with the or key and then press the OK key Reception begins when the sending party initiates transmission 3 When reception ends the machine makes a beep sound After copy operation ends the received fax is output to the center tray Note In Copy mode you can also receive faxes manually by the same met...

Page 50: ...y transferred to a specified fax number See page 102 Note that faxes are cleared from memory after they are transferred If the machine runs out of paper or a paper jam occurs during reception substitute reception to memory will take place from the following page The number of pages that can be received to memory will vary depending on the amount of optional fax expansion memory installed When the ...

Page 51: ... to check the number carefully in the display as you enter it After storing a number print the Telephone Number list to make sure the number was stored correctly See pages 124 125 To enter characters refer to ENTERING CHARACTERS on page 63 Storing an Auto Dial Key or Number Auto dial keys and numbers are stored in the auto dial storing screen Follow the steps below to display the auto dial storing...

Page 52: ...bers are available 1 Display the auto dial storing screen See steps 1 and 2 on previous page 2 Select RAPID SPEED with the or key and then press the OK key 3 Perform either of the following operations Storing a rapid dialing Press the rapid key 01 to 50 that you wish to store Storing a Speed Dial number Press the SPEED key and then enter the Speed Dial number 000 to 299 that you wish to store with...

Page 53: ...ep 7 and end the storing operation 7 Select the option settings See page 52 and then press the START key The option settings allow you to store F code settings and select chain dialing transmission speed and international mode settings Notes If you enter an incorrect number or character press the CLEAR key to backspace and clear one digit character at a time and then enter the correct number or ch...

Page 54: ...can be stored in all group keys is 150 One group key cannot be stored in another group key Option settings cannot be selected for group keys Rapid dial numbers and Speed Dial numbers that have sub addresses cannot be stored in a group key 1 Display the auto dial storing screen See steps 1 and 2 on page 47 2 Select GROUP with the or key and then press the OK key 3 Press the rapid key 01 to 50 that ...

Page 55: ... then enter the desired Speed Dial number 000 to 299 with the numeric keys If you enter an incorrect number press the CLEAR key and then enter the correct number Numeric keys 1 Enter the desired full fax number and then press the OK key If you enter an incorrect number press the CLEAR key before pressing the OK key to backspace and clear one digit at a time and then enter the correct number If you...

Page 56: ...SUB ADDRESS with the or key and then press the OK key 2 Enter the sub address up to 20 digits with the numeric keys and then press the OK key Characters that can be entered are numbers and spaces However the initial character cannot be a space If you make a mistake press the CLEAR key and then re enter the correct number F code You can store a sub address and passcode for F code communication See ...

Page 57: ...n to the option setting screen and a checkmark appears to the left of SUB ADDRESS Selecting Chain dialing 1 Perform the initial step for selecting an option setting See step 1 on the previous page select CHAIN DIAL with the or key and then press the OK key A checkmark appears beside settings that are enabled 2 Select ON with the or key and then press the OK key If you do not wish to select Chain D...

Page 58: ...ps maximum speed a checkmark will appear next to TX SPEED when you return to the option setting screen This setting is not effective for polling transmission Selecting international mode 1 Perform the initial step for selecting an option setting See step 1 on page 52 select INTERNATIONAL TX with the or key and then press the OK key 2 Select the desired international mode with the or key and then p...

Page 59: ...the initial screen of Fax mode 1 Press the SPECIAL FUNCTION key select ENTRY with the or key and then press the OK key 2 Select DIAL with the or key and then press the OK key 3 Select CHANGE DELETE with the or key and then press the OK key Editing a rapid dialing or Speed Dial number A rapid dialing or Speed Dial number cannot be edited in the following cases The rapid dialing or Speed Dial number...

Page 60: ...50 that you wish to edit Editing a Speed Dial number Press the SPEED key and then enter the Speed Dial number 000 to 299 that you wish to edit with the numeric keys 5 Edit the fax number of the destination and then press the OK key Move the cursor to the digit s you wish to change with the keys and then enter the correct digit s with the numeric keys To delete a digit move the cursor to the digit ...

Page 61: ...racters altogether You can also press the START key instead of the OK key to end the editing operation at that point 8 Edit the option settings See page 52 and then press the START key Option settings that can be edited are F code settings chain dialing the transmission speed and the transmission mode Notes To skip a setting that does not require editing press the OK key You will move to the next ...

Page 62: ... key is stored in a program or an F code relay group 1 Display the change delete screen See page 55 2 Select GROUP with the or key and then press the OK key 3 Select CHANGE with the or key and then press the OK key 4 Press the group key that you wish to edit 5 Edit the group name See page 63 and then press the OK key CHANGE DELETE RAPID SPEED GROUP GROUP CHANGE DELETE ENTER GROUP NAME ABCDE ABC ...

Page 63: ...lect the key or number that you wish to delete with the keys and then press the CLEAR key Adding or deleting fax numbers entered with the numeric keys Move the cursor to a digit in the number that you wish to delete with the keys and then press the CLEAR key The entire number will be deleted To add a fax number select the place where you wish to add the number with the keys and then enter the numb...

Page 64: ... dialing or Speed Dial number is being used for transmission The rapid dialing or speed dial number is stored in a group key program or F code relay group or it is used for the relay machine in a relay group 1 Display the change delete screen See page 55 2 Select RAPID SPEED with the or key and then press the OK key 3 Select DELETE with the or key and then press the OK key 4 Perform either of the ...

Page 65: ...you select NO DELETE and then press the key details on the selected destination are displayed Press the key again to return to the previous display Clearing a group key A group key cannot be cleared in the following cases The group key is stored in a program or an F code relay group The group key is being used for a current or stored transmission 1 Display the change delete screen See page 55 2 Se...

Page 66: ...roup key that you wish to clear 5 Select DELETE with the or key and then press the OK key When you press the OK key Deleted appears in the message display If you select NO DELETE and then press the key details on the selected destination are displayed Press the key again to return to the previous display SHARP 削DELETE NO DELETE ...

Page 67: ...ntered for search characters Upper case alphabet lower case alphabet numbers special characters Items that require character entry Own name See page 16 Storing auto dial numbers See page 47 Rapid dial numbers See page 47 Speed Dial numbers See page 47 Group keys See page 50 Relay groups See page 78 Programs See page 96 Department codes See page 150 Confidential boxes See page 165 F code confidenti...

Page 68: ...betical characters When the rapid key overlay is open When the rapid key overlay is open characters can be entered To toggle between upper case and lower case letters press the SHIFT key When the rapid key overlay is closed Closing the rapid key overlay stores characters that have been entered to that point ...

Page 69: ...wice A B C D E F G H I J K L M N O P Q R S T U V W XYZ SP SHIFT SYMBOL SPACE Numeric CLEAR Used to enter special characters Used to toggle between upper case and lower case letters Use to enter symbols Used to enter a space or a hyphen The display toggles between a space and a hyphen each time you press the key Used to enter numbers 1 through 0 Clears the character selected with the cursor Use to ...

Page 70: ...nd the cursor moves to the space after the letters Notes To change a character press the CLEAR key The character directly to the left of the cursor is cleared If the cursor is over a character that character is cleared Entering numbers example 123 1 Enter 1 2 and 3 with the numeric keys Notes To change a character press the CLEAR key The character directly to the left of the cursor is cleared If t...

Page 71: ... the cursor to the bottom line and press the key To move back to the previous page move the cursor to the top line and press the key 3 Press the OK key The symbol selected with the cursor is entered and you return to the character entry screen Note If the rapid key overlay is opened while a symbol is being selected the symbol currently selected with the cursor is entered and you return to entry mo...

Page 72: ...us page move the cursor to the top line and press the key You can also change pages by pressing the key when the cursor is at the right end of the bottom line or the key when the cursor is at the left end of the top line 3 Press the OK key The special character selected with the cursor is entered and you return to the character entry screen Note If the rapid key overlay is opened while a special c...

Page 73: ...AY REQUEST TRANSMISSION 77 Storing a Relay Group 78 Using the Relay Request Function 80 POLLING 81 Using Polling 82 Using Memory Polling 84 Restricting Polling to Specified Machines Polling Security 86 F CODE COMMUNICATION 87 F code Memory Boxes 87 Using F code Transmission F code Confidential Transmission and F code Relay Request Transmission 87 F code Confidential Transmission 89 F code Relay Re...

Page 74: ...nt is automatically cleared from memory Notes If you frequently use broadcasting to send faxes to the same group of destinations it is convenient to program those destinations into a group key See page 50 A group key is a rapid key in which multiple rapid dial numbers Speed Dial numbers and full fax numbers are stored These numbers are automatically dialed by simply pressing the group key once Whe...

Page 75: ...he next number can be dialed Redialing Press the REDIAL key and then the OK key The number is stored and you can enter the next number Note that the REDIAL key must be used before any other numbers are dialed 3 When you have finished dialing the fax numbers of the destinations press the START key 4 Press the START key The receiving machine is automatically dialed and transmission begins Notes If y...

Page 76: ...in Copy mode The date and time is set in the machine using the key operator program See page 151 Timer Transmission Settings Transmission settings are selected after setting up a timer transmission You can also select transmission settings first and then set the timer transmission before pressing the START key to begin transmission Timer transmission can be used with the following operations 1 Nor...

Page 77: ...the timer transmission Notes If two timer transmissions that specify the same time are stored the transmission that was stored first is performed first Other operations transmission reception etc can be performed after a timer transmission is stored However make sure that the operation is completed before the specified time If another operation is in progress when the specified time arrives the ti...

Page 78: ...each box To use this function the sending machine must have its sender s number programmed and the receiving machine must have a confidential box and code programmed When using memory transmission mode Quick On line can be used Confidential transmission is also possible in direct transmission mode Confidential boxes and codes A confidential box is a box number for confidential fax reception and a ...

Page 79: ...d then press the OK key If a checkmark appears next to CONFIDENTIAL TX confidential transmission has already been selected 4 Enter the number of the confidential box in the receiving machine with the numeric keys and then press the OK key 5 Enter the fax number of the receiving machine and then press the OK key 6 Perform the transmission See pages 28 31 Both memory transmission mode and direct tra...

Page 80: ...d after the confidential fax is printed In manual reception mode You can lift the extension phone and talk to the other party If a fax is being sent press 5 during printing to receive the fax to memory The fax will be automatically printed after the confidential fax A confidential fax cannot be transferred See page 102 You can also print a confidential fax by the following steps 1 Press the SPECIA...

Page 81: ...can only be used when the relay machine is a Sharp machine that supports the relay broadcast function Ask the operator of the machine that you wish to use as a relay machine if a relay request is possible To make a relay request your fax number as programmed in your machine must be stored as a relay ID code in the relay machine If your machine is going to receive a relay request and act as a relay...

Page 82: ...en press the OK key 5 Press the or key to select the number of the relay group you wish to store and then press the OK key 6 Enter a name for the relay group and then press the OK key To enter characters refer to ENTERING CHARACTERS on page 63 7 Enter the fax number of the relay machine Rapid dialing Speed dialing Group dialing and Address List dialing Enter the full fax number with the numeric ke...

Page 83: ... keys 10When all of the end receiving machines have been entered press the START key Notes When entering end receiving machines if you specify a rapid dial number speed dial number or group key that is not stored in the relay machine a line error will result If you make a mistake in step 7 press the CLEAR key The same fax number cannot stored twice for the end receiving machines Clearing a relay g...

Page 84: ...SPECIAL FUNCTION key 2 Press the or key to select SENDING OPTIONS and then press the OK key 3 Press the or key to select RELAY REQUEST and then press the OK key 4 Press the or key to select the relay group and then press the OK key 5 Perform the transmission See pages 28 31 Either memory transmission mode or direct transmission mode can be used However note that the Quick On line function will not...

Page 85: ...hine Polling security See page 86 Polling Select polling Reception Receiving machine Sending machine Polling Transmission Place original Permits polling Beep Scan original into memory Memory The receiving machine calls and initiates reception of a document stored in the memory of the other machine Polling can also be performed using a timer setting Timer polling See page 72 This function allows yo...

Page 86: ...umbers To allow another machine to poll your machine store the other machine s 4 digit system number as an ID number in your machine Up to 10 ID numbers can be stored Use the key operator program to store an ID number See page 163 Ask the operator of the other machine for its system number System numbers The system number provides another means of gaining permission to poll a machine that has poll...

Page 87: ...y 2 Press the or key to select SENDING OPTIONS and then press the OK key 3 Press the or key to select SERIAL POLLING and then press the OK key 4 Enter the fax number of the other machine with the numeric keys and then press the OK key You can also use a rapid dialing Speed Dial number or group key If you wish to use the REDIAL key use it before entering any other numbers After entering a fax numbe...

Page 88: ...s as needed and then follow the steps below 1 In Fax mode press the SPECIAL FUNCTION key 2 Press the or key to select ORIGINAL STORE and then press the OK key 3 Press the or key to select MEMORY POLLING and then press the OK key 4 Press the or key to select 1 TIME or REPEAT and then press the OK key If you select 1 TIME the document data is automatically cleared from memory after your machine is p...

Page 89: ...hat you wish to clear the old document Press the OK key 3 Press the or key to select 1 TIME or REPEAT and then press the OK key 3 Press the START key Scanning begins If you are scanning from the platen glass and have another page to scan change pages and press the START key Repeat until all pages are scanned and then press the key Printing documents stored for memory polling 1 Perform steps 1 thro...

Page 90: ...passcode numbers of the sending machine Select polling or serial polling Reception Receiving machine Sending machine Polling Beep Transmission Check receiving machine s fax number against polling passcodes Polling is permitted Own fax number Polling passcodes Program own fax number own passcode During transmission anytime Prior preparation Match Prior preparation Store polling passcodes Checking r...

Page 91: ...ss and passcode F codes sub addresses and passcodes can be stored in rapid dial numbers Speed Dial numbers and programs F codes cannot be stored in group keys A passcode can be omitted if not programmed in the other machine F code Memory Boxes F code memory boxes are used for F code transmission F code memory boxes are programmed using one of three key operator programs depending on the function P...

Page 92: ... code sub address and passcode is correct before performing this procedure 1 In Fax mode press the SPECIAL FUNCTION key 2 Press the or key to select SENDING OPTIONS and then press the OK key 3 Press the or key to select SUB ADDRESS TX and then press the OK key 4 Enter the fax number of the other machine with the numeric keys and then press the OK key Only one fax number can be entered You can also...

Page 93: ... confidential box to receive F code confidential transmissions Use the key operator program to program an F code confidential box and print passcode See page 167 Up to 10 confidential boxes can be programmed and a name up to 36 characters long can be assigned to each F code confidential boxes and print passcodes The F code confidential box is a memory box for F code confidential reception and the ...

Page 94: ...elect PRINT and then press the OK key 2 Press the or key to select CONF RX DATA and then press the OK key 3 Follow steps 2 through 4 above F code Relay Request Transmission This function is used to send a fax to a relay machine using an F code and have that machine transmit the fax to multiple end receiving machines The fax is sent to the F code relay box of the relay machine and the relay machine...

Page 95: ...ission to the end receiving machines See page 72 Using F code Polling This function is used to call another fax machine and initiate reception of a document stored in the other machine s F code memory polling box A timer setting can also be specified for an F code polling operation only one timer polling job can be stored at a time including a regular polling operation When F code polling is perfo...

Page 96: ...ed the sub address is displayed To correct the sub address press the CLEAR key and re enter it 5 Enter the passcode up to 20 digits with the numeric keys and then press the OK key Characters that can be entered are numbers and spaces However the initial character cannot be a space If you used a rapid dialing or Speed Dial number that has a passcode programmed the sub address is displayed If a pass...

Page 97: ...code sub address and passcode specified by the other machine matches the F code sub address and passcode programmed in your machine s F code memory polling box Up to 10 F code polling boxes can be programmed A name up to 36 characters long can be assigned to each box F code memory polling boxes are programmed using the key operator program See page 167 Scanning an original into an F code memory po...

Page 98: ...mory polling box Adding or changing documents for F code memory polling If there is already a document in the F code memory polling box when you scan a document for F code memory polling a screen appears after step 4 on the previous page that allows you to add the new document or replace the old document with the new document Place the original on the platen glass or in the SPF adjust the original...

Page 99: ... key to select PRINT and then press the OK key Printing begins Clearing memory polling documents 1 Perform steps 1 through 4 of the procedure for scanning a document into an F code memory polling box See page 93 2 Press the or key to select DELETE and then press the OK key 3 Press the or key to select YES and then press the OK key The documents are cleared from memory Note Documents cannot be clea...

Page 100: ... select the setting that you wish to store in the program and then press the OK key If you select store original cover sheet message resolution exposure page division duplex scanning or transmission settings go to step 10 To select normal transmission broadcast transmission confidential transmission relay request transmission polling serial polling F code transmission or F code polling select SEND...

Page 101: ...gram is stored You can check the contents of a program transmission type destination by printing the Program list See page 125 Some combinations of settings selected in steps 9 and 10 may not be possible In this case a message will appear Clearing a program Before clearing a program print the Program list to check the contents See page 125 A program cannot be edited after it is stored To change a ...

Page 102: ...is not loaded for a polling serial polling or F code polling operation 1 In Fax mode load the original See pages 21 22 and then press the PROGRAM key Do not load an original if you are executing a polling program a serial polling program or an F code polling program 2 Press the or key to select the desired program and then press the OK key While the program is selected you can press the key to dis...

Page 103: ...on See page 31 or reception See page 41 Note that the Quick On Line function does not operate This function cannot be used during a copy job or during direct transmission The following transmission operations can be stored 1 Normal transmission See page 28 2 Broadcast transmission See page 70 3 Confidential transmission See page 74 4 Relay request transmission See page 77 5 Polling See page 81 6 S...

Page 104: ...ng jobs is as follows 1 Other jobs in the order they were stored a timer transmission is performed at the set time for the first transmission 2 The recall mode job when the time for the next attempt arrives If a transmission job is stored in direct transmission mode and another job is in progress transmission will begin when the current job ends Only one timer polling timer serial polling or timer...

Page 105: ...al number of 50 digits including pauses can be dialed with chain dialing When a rapid dialing or Speed Dial number is used the number of digits in the fax number stored in the rapid dialing or Speed Dial number is included in the 50 digit limit When you dial using chain dialing a pause appears in the display When you use a rapid dial number or Speed Dial number that is set for chain dialing scanni...

Page 106: ...urn the transfer function on and store a transfer fax number using the key operator program See pages 159 160 and then perform the following procedure to transfer a fax 1 In Fax mode press the SPECIAL FUNCTION key 2 Press the or key to select RX DATA TRANSFER and then press the OK key 3 Press the or key to select TRANSFER and then press the OK key Notes To cancel the transfer select NO TRANSFER in...

Page 107: ...x numbers breaks the connection without receiving the fax To use the Anti Junk Fax function turn the Anti Junk Fax key operator program on See page 161 and then store the fax numbers from which you wish to block reception using the Anti Junk Fax No key operator program maximum of 50 fax numbers See page 161 Your machine Transmission Breaks connection Line error occurs Line error occurs Sending mac...

Page 108: ...ANTI JUNK FAX 104 Anti Junk Fax ...

Page 109: ... 107 COVER SHEET FUNCTION 108 Selecting the Cover Sheet Function 108 TRANSMISSION MESSAGE 109 Selecting a Transmission Message 109 INDEX 110 EXTENSION PHONE CONNECTION 111 Connecting an Extension Phone 112 Using an Extension Phone 112 JOB FUNCTION CHECK 114 Checking Fax Function Settings Function Review 114 Checking the Status of Received Faxes Print Jobs 114 Checking the Status of Transmission Tr...

Page 110: ...plex scanning selection is only effective for one transmission Setting Duplex Scanning 1 In Fax mode press the DUPLEX SCAN key 2 Press the or key to select 2 SIDED and then press the OK key 3 Select the original type and then press the OK key Select the original type with the or key to select the binding orientation and the original orientation When inserting the original in the document feeder tr...

Page 111: ...ivision scanning can only be used on 11 x 17 and 8 1 2 x 11 R originals The duplex scanning selection is only effective for one transmission Selecting Page Division Scanning 1 In Fax mode press the SPECIAL FUNCTION key 2 Press the or key to select DUAL PAGES and then press the OK key A checkmark appears in the page division box to indicate that it is selected Note To turn off page division scannin...

Page 112: ...r memory polling See page 84 Selecting the Cover Sheet Function Turning the function on 1 In Fax mode press the SPECIAL FUNCTION key 2 Press the or key to select SENDING MENU and then press the OK key 3 Press the or key to select COVER SHEET and then press the OK key You can also press the or key to add a transmission message to the cover sheet of a fax See the next page Select the cover sheet fun...

Page 113: ...URGENT PLEASE CALL BACK or IMPORTANT If you do not wish to add a message select NO MESSAGE You can also press the or key to print the message on an 8 1 2 x 11 cover sheet See the previous page Perform the message selection procedure each time you wish to include a message After one transmission the message function automatically turns off Note To cancel a message selection press the key instead of...

Page 114: ...ogram before receiving faxes The function remains on until you turn it off See page 160 When this function is used less space is available on the paper to print the transmitted fax image and thus a received fax is sometimes divided onto two pages If the received fax is reduced before printing the black mark is also reduced Reception Your machine receiving machine Transmission Turn on index print w...

Page 115: ...nect anything other than an extension phone A transmission job can be stored while the extension phone is used for a voice call Ring Ring Ring Ring Dials Speak Both machine and phone ring Talk with phone Other party Your machine Receiving a voice call Receiving a fax Ring Ring Dials Transmission Fax tone Reception Other machine Your machine Both machine and phone ring R i n g R i n g Keypad of ext...

Page 116: ...onnection setting with the key operator program If this is not done the extension phone cannot be used even if connected Using an Extension Phone Using the phone for voice calls The extension phone can be used to place and receive voice calls just like a normal phone If the machine is set to auto reception you must lift the phone to answer a call before the machine automatically begins reception T...

Page 117: ... fax tone through the phone This function cannot be used if you are on a pulse dial line and cannot issue tone signals from your phone Refer to your phone manual to see if your phone can issue tone signals This function cannot be used when you use the extension phone to place a call The function is used to activate fax reception only when you answer an incoming call on the phone 1 Set the extensio...

Page 118: ... the status of received faxes and print jobs that are waiting to be printed as well as the job currently being printed 1 Press the JOB STATUS key 2 Press the or key to select FAX PRINT OUTPUT and then press the OK key When you are finished press the CLEAR ALL key to exit Setting Information displayed Timer setting Specified day and time of timer transmission Cover sheet message Cover sheet selecti...

Page 119: ...ly being executed is shown in the message display If transmission is not taking place NONE appears When you are finished press the CLEAR ALL key to exit Transmission job status display The display varies depending on the type of transmission and status The name of the operation appears on line 3 On occasion this may differ from the actual function name Shows DIALING COMM SENDING or RECEIVING When ...

Page 120: ...are assigned to transmissions with a timer setting Checking transmission job status 1 Press the JOB STATUS key 2 Select TX RX RESERVE with the or key and then press the OK key 3 Press the or key to display the job you wish to check If more than one job is stored you will scroll through the jobs one at a time as you press the or key When you are finished press the CLEAR ALL key to exit Item display...

Page 121: ...tial box in the message display when a confidential fax has been received to that box The received fax can be printed 1 In Fax mode press the JOB STATUS key 2 Press the or key to select CONFIDENTIAL RX and then press the OK key 3 Press the or key to select CONFIDENTIAL or SUB ADD CONF and then press the OK key 4 Press the or key to select the confidential box or F code confidential box and then pr...

Page 122: ...JOB FUNCTION CHECK 118 Job Function Check ...

Page 123: ... print communication activity reports and lists of stored settings such as auto dial numbers and programs This chapter also provides solutions to problems commonly encountered when using the fax feature Page PRINTING LISTS 120 Lists 120 Printing a List 128 STATUS MESSAGES 129 Self diagnosis Function 130 Message Screen During Normal Operation 130 ...

Page 124: ... transmissions and receptions When the number of recorded transactions exceeds 50 the report automatically prints out The recorded information can be printed more than once it is not erased after printing The Activity Report can be automatically printed at selected times Up to two times per day can be selected with the key operator program See page 146 MAY 11 2001 FRI 05 30 PM ACTIVITY REPORT SEND...

Page 125: ... the confidential box number setting or the box number was not programmed in the other machine 2 Your fax number was not programmed in your machine REL REQ FAIL When you attempted a relay request transmission 1 Your fax number was not programmed in your machine 2 You specified an auto dial number that was not stored in the other machine 3 Your fax number was not stored as a relay ID code in the ot...

Page 126: ...ssion 1 The sending machine did not have its fax number programmed 2 The sending machine specified an auto dial number for an end receiving machine that is not stored in your machine REL RQ FAIL When you received a relay request transmission 1 The sending machine s fax number was not stored as a relay ID number in your machine ERRORxx xxxx Line conditions prevented the reception from taking place ...

Page 127: ...XXXXXXXXXXXXXXXXXXXXXXXXXXXXXXXXXXX XX XX TYPE PGS JOB STATUS RECEIVER DEPT XX XX XXXXXXXXXXXXXXXXX XXXXXXXXXXXXXXXXX XXX XXX R CL XXX XXTM S R CL XXX XXTM S XXXXXXXXXXXXXXXXXXXXXXXXXXXXXXXXXXXXXXXXXXXXXXXXX XXXXXXXXXXXXXXXXXXXXXXXXXXXXXXXXXXXXXXXXXXXXXXXXX XX XX FILE TYPE RES MSG PGS CVR RECEIVER DEPT XXX XXX XXXXXXXXXXXXXXXXX XXXXXXXXXXXXXXXXX XXXXX XXXXX XX XXXXXX XXX XXX XX XX XXXXXXXXXXXXXXXX...

Page 128: ...XXXX XXXXXXXXXXXXXXXXXXXXXXXX XXXXXXXXXXXX XXXXXXXXXXXX XXX XXXbps XXX XXXbps XXXXXXXXXXXXXXXXXXXXXXXXXXXXXXXXXXXXXXXXXXXXXXXX CHAIN DIAL XXXXXXXXXXXXXXXXXXXXXXXXXXXXXXXXXXXXXXXXXXXXXXXX CHAIN DIAL SXXX SXXX K WORDS RECEIVER S FAX SUB ADDRESSING MAY 11 2001 FRI 05 30 PM GROUP LIST GROUP NAME KEY WORDS RECEIVER XXXXXXXXXXXXXXXXXXXXXXXXXX XXXXXXXXXXXXXXXXXXXXXXXXXX XXXXXXXXXXXXX XXXXXXXXXXXXX RAPID ...

Page 129: ...XXXXXXXXXXXXXXXXXXXXXXXXXXXXX CHAIN DIAL SUB ADD XXXXXXXXXXXXXXXXXXXXXXX PASSCODE XXXXXXXXXXXXXXXXXXXXXXXXX XXXXXXXXXXXXXXXXXXXXXXXXXXXXXXXXXXXXXXXXXXXXXXXX CHAIN DIAL SUB ADD XXXXXXXXXXXXXXXXXXXXXXX PASSCODE XXXXXXXXXXXXXXXXXXXXXXXXX XXX XXXbps XXX XXXbps K WORDS RECEIVER S FAX SUB ADDRESSING MAY 11 2001 FRI 05 30 PM PROGRAM LIST PROGRAM NAME SETTING ITEM RECEIVER XXXXXXXXXXXXXXXXXXXXXXXXX XXXXXX...

Page 130: ...XXXXXXXXXX XXXXXXXXXXXXXXXXXXXXXXXXXXX XXXXXXXXXXXXXXXXXXXXXXXXXXX XXXXXXXXXXXXXXXXXXXXXXXXXXX XXXXXXXXXXXXXXXXXXXXXXXXXXX XXXXXXXXXXXXXXXXXXXXXXXXXXX XXXXXXXXXXXXXXXXXXXXXXXXXXX 01 02 09 10 01 02 09 10 01 02 09 10 SENDER S NAME SENDER S FW STATION XXXXXXXXXXXXXXXXXXXXXXXXXX XXXXXXXXXXXXXXXXXXXXXXXXXXXXX XXXXXXXXXXXXXXXXXXXXXXXXXXXXXXXXXXXXXXXXXXXXXXXXXXXXXXXXXXX MAY 11 2001 FRI 05 30 PM CONFIDENT...

Page 131: ...nt Transaction Report for Receptions Print after every reception Print when an error occurs Never print Transaction Report for Confidential Receptions Print after every confidential reception Never print Printing the original when a memory transmission error occurs When a memory transmission error occurs part of the original is printed below the Transaction Report except in the case of a confident...

Page 132: ... MEM POLLING LIST See page 123 RAPID LIST See page 124 SPEED LIST See page 124 GROUP LIST See page 124 TELEPHONE LIST See page 125 PROGRAM LIST See page 125 RELAY GROUP LIST See page 125 PASSCODE LIST See page 126 CONF RX LIST See page 126 Notes If you press the CLEAR ALL key in the list selection screen you will return to the base screen If you press the BACK key you will return to the print sele...

Page 133: ...dd paper Copier manual Loading copy paper The paper tray is open Close the paper tray Remove paper from the upper tray OK RETURN The upper part of the job separator is full of paper Remove the paper A job separator error occurred Press the CLEAR ALL key and remove the error Clear paper path A paper misfeed occurred in the output section Remove the jammed paper Copier manual MISFEED REMOVAL Close t...

Page 134: ...r and then turn it back on If the error is not cleared note the 2 digit main code and the 2 digit sub code and then contact your dealer Message display Meaning This appears when a direct transmission ends xx indicates the number of pages The original is being scanned into memory during memory transmission The machine is in the standby state This appears when you press the SPEAKER key Call for serv...

Page 135: ...MATION This chapter contains useful information for using the fax feature Page INSTALLATION AND CONNECTION 132 Selecting the Line Type 132 SUPPLIES AND OPTIONS 133 Supplies 133 Options 133 TROUBLESHOOTING 134 SPECIFICATIONS 136 ...

Page 136: ...he Line Type There are two types of telephone lines tone dial and pulse dial Set the appropriate key operator program to the correct dial type for your telephone line See page 146 Important You cannot place a call if the wrong dial type is selected After you have set the correct dial type do not change the setting Insert firmly until you hear a click LINE jack ...

Page 137: ...ife we recommend that you use Sharp genuine supplies For details refer to Supplies in Operation manual for copier Options The following options are available for the fax feature of the machine Fax expansion memory AR MM5 2 MB expansion memory for fax AR MM6 4 MB expansion memory for fax AR MM7 8 MB expansion memory for fax To order supplies or options contact your Sharp dealer or your nearest Shar...

Page 138: ...he correct face up or down during scanning The original should be placed face up in the SPF and face down on the platen glass 21 22 If the receiving machine uses thermal paper was the thermal paper loaded backwards Ask the operator of the receiving machine The transmitted image is very distorted Did thunder disrupt line conditions Try sending the fax again Were the resolution and contrast settings...

Page 139: ...empty Add paper Copier manual Loading copy paper Is the other machine set to automatic reception Ask the operator of the receiving machine Is the original loaded in the other machine If the other machine uses memory polling was the original scanned into memory for polling If the other machine is using polling security has your sender s fax number been programmed in the other machine The line is di...

Page 140: ...fallback Transmission time 2 2 seconds Super G3 mode 6 seconds G3 ECM mode Paper sizes 11 x 17 8 1 2 x 14 8 1 2 x 11 5 1 2 x 8 1 2 A4 Effective recording width 11 5 maximum Transmittable original size 11 x 17 to 5 1 2 x 8 1 2 maximum length 1000 mm when using the SPF Refer to pages 21 and 22 when sending a 5 1 2 x 8 1 2 original Effective scanning width 11 7 maximum Halftone transmission Yes 256 l...

Page 141: ...ber Some of these settings are required for the fax function others are convenient features that facilitate the use of the machine Settings that have been preset at the factory can be changed to suit your conditions of use Page LIST OF KEY OPERATOR PROGRAMS 138 KEY OPERATOR PROGRAM LIST 140 USING KEY OPERATOR PROGRAMS 143 Initial Procedure 143 List Print Set 144 Initial Settings 146 Sending Functi...

Page 142: ... NO MEMORY TX DIRECT TX RECALL INTERVAL 00 15 01 RECALL TIMES 0 1 1 YES NO 30SEC 45SEC 60SEC RECALL INTERVAL 01 15 03 RECALL TIMES 00 14 02 KEY OPE LIST TRANSMISSION CONF CODE LIST SUB ADD SET LIST ACC LIST ACC USAGE LIST PRINT SELECTION BROADCAST RECEPTION CONF RECEPTION IMAGE MEM PRINT LINE ERROR AUTO LISTING STORE DELETE JUNK FAX LIST YES NO LIST PRINT SET LIST PRINT LIST SETTING INITIAL SETTIN...

Page 143: ...OUTPUT YES NO REDUCTION DIVISION 0 9 2 YES NO ON OFF YES NO YES NO YES NO STORE DELETE ANTI JUNK FAX ENTER JUNK FAX YES NO NEW REGISTRATION DELETE POLLING PASSCODE MODE NEW REGISTRATION DELETE ID MODE NEW REGISTRATION DELETE SYSTEM MODE STORE DELETE RELAY PASSCODE NEW REGISTRATION DELETE CONF CODE SET NEW REGISTRATION DELETE SUB ADDRESS CONF CODE SET NEW REGISTRATION DELETE SUB ADDRESS RELAY GROUP...

Page 144: ...E SET This setting is used to program the name of the user of the machine and the fax number 147 SPEAKER VOLUME This setting is used to adjust the on hook volume the ringing volume and the line monitor volume 148 EXTENSION TEL Enable this setting when you have connected an extension phone to the machine 148 DISTINCTIVE RING This setting is used when you have multiple phone fax numbers assigned to ...

Page 145: ...TO COVER SHEET This setting is used to have a cover sheet automatically included with each fax transmission 157 RCV FUNCTION OF RINGS AT RX This setting is used to select the number of rings the machine waits before answering in automatic reception mode 157 TRAY SELECTION This setting is used to select which output trays can be used for received faxes 158 RECEIVED DATA PRINT CONDITION This setting...

Page 146: ...another machine s system number 163 SYSTEM MODE This setting is used to store your machine s system number 164 RELAY PASSCODE This setting is used to program a relay passcode that allows other machines to request your machine to perform a relay transmission 164 CONF CODE SET This setting is used to program confidential boxes and codes 165 SUB ADDRESS CONF CODE SET This setting is used to program a...

Page 147: ...itial Procedure 1 Press the FUNCTION key 2 Press the or key to select KEY OPE PRG and then press the OK key 3 Enter your key operator code After entering your 5 digit code proceed to step 4 As you enter the code the hyphens change to asterisks If you make a mistake press the CLEAR key 4 Press the or key to select FAX and then press the OK key To use a key operator program for copy mode select COPY...

Page 148: ...IST PRINT and then press the OK key 4 Press the or key to select desired list and then press the OK key The following lists can be selected KEY OPE LIST CONF CODE LIST JUNK FAX LIST SUB ADD SET LIST ACC LIST ACC USAGE LIST Printing begins when you end the key operator program This only appears if Department Code mode is turned on with the Initial Settings key operator program KEY OPE LIST This lis...

Page 149: ...an be selected TRANSMISSION BROADCAST RECEPTION and CONF RECEPTION 6 Press the or key to select the printing condition and then press the OK key If you select TRANSMISSION the selections are ALWAYS PRINTS ERROR ONLY and NEVER PRINTS If you select BROADCAST the selections are ALWAYS PRINTS ERROR ONLY and NEVER PRINTS If you select RECEPTION the selections are ALWAYS PRINTS ERROR ONLY and NEVER PRIN...

Page 150: ...ber selection and then repeat step 7 If you wish to clear a time setting follow these steps 1 In step 5 select DELETE and then press the OK key 2 Select the time setting that you wish to clear and then press the OK key 3 Press the or key to select DELETE and then press the OK key If you make a mistake while entering the time in step 7 move the cursor to the incorrect digit with the keys the cursor...

Page 151: ...The stored fax number and name appear at the top of each fax page that is sent Only one fax number and name can be stored You can check the stored number and name by printing the PASSCODE LIST See page 126 or KEY OPE LIST See page 144 A maximum of 20 digits can be stored for the fax number A maximum of 36 characters can be stored for the name 1 Follow steps 1 through 4 of the initial procedure See...

Page 152: ...MIDDLE LOW or OFF can be selected for the ringer volume HIGH MIDDLE LOW or OFF can be selected for the line monitor volume Extension Telephone Enable this setting when an extension telephone is connected to the machine An extension telephone connected to the machine cannot be used until this setting is enabled The initial setting is enabled 1 Follow steps 1 through 4 of the initial procedure See p...

Page 153: ...d one short ring RING PATTERN 3 Two short rings and one long ring RING PATTERN 4 Three rings RING PATTERN 5 Two rings If RING PATTERN 2 or RING PATTERN 3 do not respond properly try RING PATTERN 4 If RING PATTERN 1 does not respond properly try RING PATTERN 5 Remote Reception Number This setting is used to change the number for activating fax reception from an extension phone The initial setting i...

Page 154: ...eckmark is cleared and the setting turns off Account Set Use this setting to store department codes for Department Code Mode Codes can be stored for as many as 20 departments Storing a new department code 1 Follow steps 1 through 4 of the initial procedure See page 143 2 Press the or key to select INITIAL SETTING and then press the OK key 3 Press the or key to select ACCOUNT SET and then press the...

Page 155: ... to change and the new department code and then press the OK key If you make a mistake press the CLEAR key and then re enter the correct number If you enter a department code that has not been stored you must re enter the department code 3 Enter a department name up to 36 characters and then press the OK key To enter characters see ENTERING CHARACTERS on page 63 If you do not wish to change the de...

Page 156: ...e page 143 2 Press the or key to select INITIAL SETTING and then press the OK key 3 Press the or key to select DAYLIGHT SAVING TIME SETTING and then press the OK key The setting is turned on and a checkmark appears in the checkbox in the message screen If this procedure is performed when the setting is turned on the checkmark is cleared and the setting turns off Sending Functions Resolution Contra...

Page 157: ... and the setting turns off Rotate Transmission This setting is used to have an original that is loaded vertically rotated to a horizontal orientation or vice versa when transmitted The original is rotated counter clockwise Rotation is initially turned on for each original size 1 Follow steps 1 through 4 of the initial procedure See page 143 2 Press the or key to select SENDING FUNCTION and then pr...

Page 158: ...ion this setting determines whether normal memory transmission or Quick On Line transmission is performed The initial setting is Quick On Line transmission 1 Follow steps 1 through 4 of the initial procedure See page 143 2 Press the or key to select SENDING FUNCTION and then press the OK key 3 Press the or key to select QUICK ON LINE TX and then press the OK key The setting is turned on and a chec...

Page 159: ...procedure is performed when the setting is turned on the checkmark is cleared and the setting turns off Recall Setting Busy When you attempt to send a fax and the line of the receiving machine is busy your machine will automatically re attempt the call This setting is used to select the number of recall attempts that will be made and the interval between attempts The initial setting is 2 attempts ...

Page 160: ...o step 6 4 Press the or key to select RECALL INTERVAL and then press the OK key 5 Enter the recall interval 00 to 15 with the numeric keys and then press the OK key The interval can be set to any number of minutes from 0 to 15 6 Press the or key to select RECALL TIMES and then press the OK key 7 Enter the number of recall attempts 0 or 1 with the numeric keys and then press the OK key The number o...

Page 161: ... AUTO COVER SHEET and then press the OK key 4 Press the or key to select YES and then press the OK key Receive Functions Number of Rings Auto Reception This setting is used to select the number of rings the machine waits before answering in automatic reception mode The initial setting is 2 rings 1 Follow steps 1 through 4 of the initial procedure See page 143 2 Press the or key to select RCV FUNCT...

Page 162: ... tray is enabled the checkmark will be cleared and the tray disabled 5 To enable another tray repeat step 4 6 Press the BACK key Notes The trays that can be enabled will vary depending on installed options The trays cannot all be disabled Received Data Print Condition This setting is used to select how a received fax will be printed when the machine does not have the same size of paper as the rece...

Page 163: ...This setting is used to select whether received A3 size faxes are reduced When an A3 fax is received part of the document is normally cut off This setting can be turned on to have A3 faxes reduced to fit on 11 x 17 paper The setting is initially turned off 1 Follow steps 1 through 4 of the initial procedure See page 143 2 Press the or key to select RCV FUNCTION and then press the OK key 3 Press th...

Page 164: ...OK key 3 Press the or key to select RECEIVED DATA FW STATION SET and then press the OK key 4 Press the or key to select STORE and then press the OK key 5 Enter the transfer number with the numeric keys and then press the OK key Note To clear a number follow these steps 1 Select DELETE in step 4 and then press the OK key 2 Press the or key to select DELETE and then press the OK key Index Print This...

Page 165: ...ck reception of faxes from specified fax numbers The setting is initially turned off reception from all numbers is allowed 1 Follow steps 1 through 4 of the initial procedure See page 143 2 Press the or key to select RCV FUNCTION and then press the OK key 3 Press the or key to select ANTI JUNK FAX and then press the OK key The setting is turned on and a checkmark appears in the checkbox in the mes...

Page 166: ...ow steps 1 through 4 of the initial procedure See page 143 2 Press the or key to select SPECIAL FUNCTION and then press the OK key 3 Press the or key to select POLLING SECURITY and then press the OK key The setting is turned on and a checkmark appears in the checkbox in the message screen If this procedure is performed when the setting is turned on the checkmark is cleared and the setting turns of...

Page 167: ...arp models support ID numbers For polling to take place one of the ID numbers that are stored in your machine must be the same as the System number that is stored in the other machine Up to 10 ID numbers can be stored Stored ID numbers can be checked in the Passcode List See page 126 1 Follow steps 1 through 4 of the initial procedure See page 143 2 Press the or key to select SPECIAL FUNCTION and ...

Page 168: ... press the OK key If you made a mistake move the cursor to the mistake with the keys and enter the correct number Note To clear the system number follow these steps 1 Select DELETE in step 4 and then press the OK key 2 Press the or key to select DELETE and then press the OK key Relay Passcode This setting is used to program a relay passcode that allows sending machines to request your machine to p...

Page 169: ... the OK key 3 Press the or key to select DELETE and then press the OK key Confidential Code Set This setting is used to program confidential boxes to receive confidential faxes Up to 10 boxes can be programmed Programmed boxes can be checked in the CONF CODE LIST See page 144 1 Follow steps 1 through 4 of the initial procedure See page 143 2 Press the or key to select SPECIAL FUNCTION and then pre...

Page 170: ...key 3 Press the or key to select SUB ADDRESS CONF CODE SET and then press the OK key 4 Press the or key to select NEW REGISTRATION and then press the OK key 5 Press the or key to highlight the unused sub address confidential box that you wish to program and then press the OK key 6 Enter a name for the box up to 36 characters and then press the OK key To enter characters see ENTERING CHARACTERS on ...

Page 171: ...roup up to 36 characters and then press the OK key To enter characters see ENTERING CHARACTERS on page 63 7 Program a sub address and passcode See steps 2 and 3 pages 52 53 Numbers from 0 to 9 can be entered for the sub address Numbers from 0 to 9 as well as and can be entered for the passcode If you make a mistake press the CLEAR key and then re enter the correct number 8 Specify the destinations...

Page 172: ...racters see ENTERING CHARACTERS on page 63 7 Program a sub address and passcode See steps 2 and 3 pages 52 53 Numbers from 0 to 9 can be entered for the sub address Numbers from 0 to 9 as well as and can be entered for the passcode If you make a mistake press the CLEAR key and then re enter the correct number Note To clear a sub address memory polling box follow these steps 1 Select DELETE in step...

Page 173: ...ission 89 F code Memory Polling 93 F code memory polling boxes 93 167 F code relay boxes 91 167 F code Relay Request Transmission 90 F code transmission 87 G Group Dial keys 25 50 Group list 124 I ID numbers 82 163 Index 110 Initial state 15 International mode 54 J Job Separator 12 Job Function Check 114 K Key Operator Program 138 L LINE jack 12 132 Lithium battery 6 Loading Originals 21 M Manual ...

Page 174: ...xposure 24 Selecting the Resolution 24 Sender s name 16 147 Sender s number 16 147 Serial polling 81 Speaker 12 Specifications 136 Speed Dial 25 48 Speed Dial list 124 SPF 21 Stored Original List 123 Sub address 87 Substitute Reception to Memory 46 Supplies 133 System numbers 82 T TEL jack 12 112 Telephone jack 132 Telephone lines 132 Timer Transmission 72 Transaction Report 127 Transfer function ...

Page 175: ...the telecommunications company cause to request the user to disconnect the equipment Users should ensure for their own protection that the electrical ground connections of the power utility telephone lines and internal metallic water pipe system if present are connected together This precaution may be particularly important in rural areas Caution Users should not attempt to make such connections t...

Page 176: ... JAPAN 2001E DSC1 CINSE0566QS51 AR FX4 SHARP CORPORATION SHARP ELECTRONICS CORPORATION Sharp Plaza Mahwah New Jersey 07430 2135 SHARP ELECTRONICS OF CANADA LTD 335 Britannia Road East Mississauga Ontario L4Z 1W9 ...

Reviews: