using document box
_ 1
1.
using document box
This chapter explains how to use
Document Box
with your machine.
This chapter includes:
•
About document box
•
Understanding the document box screen
•
Storing documents to document box
ABOUT DOCUMENT BOX
The Document Box feature makes it possible to store scanned data to the
hard drive. Users can send the stored data to various destinations such as
print, fax, e-mail, or an FTP/SMB server. The
Document Box
provides
three types of boxes: public (
), secured (
), and common (
). The
public box can be created by all users and all users can store data to public
boxes. The secured box can be created with password by all users. This
means that the only users who know the password can access to the box
and store their data. A common box is provided by default. Users cannot
create, edit, and delete the common box. When a user needs to store a job
that is not assigned to a box (i.e., fax receiving or PC printing in store
mode), the data will be stored in the common box by default. You can also
see the
System Box
tab from the
Document Box
screen. The
System
Box
is used for temporary data backup such as printing in delayed mode,
printing proof page.
UNDERSTANDING THE DOCUMENT BOX
SCREEN
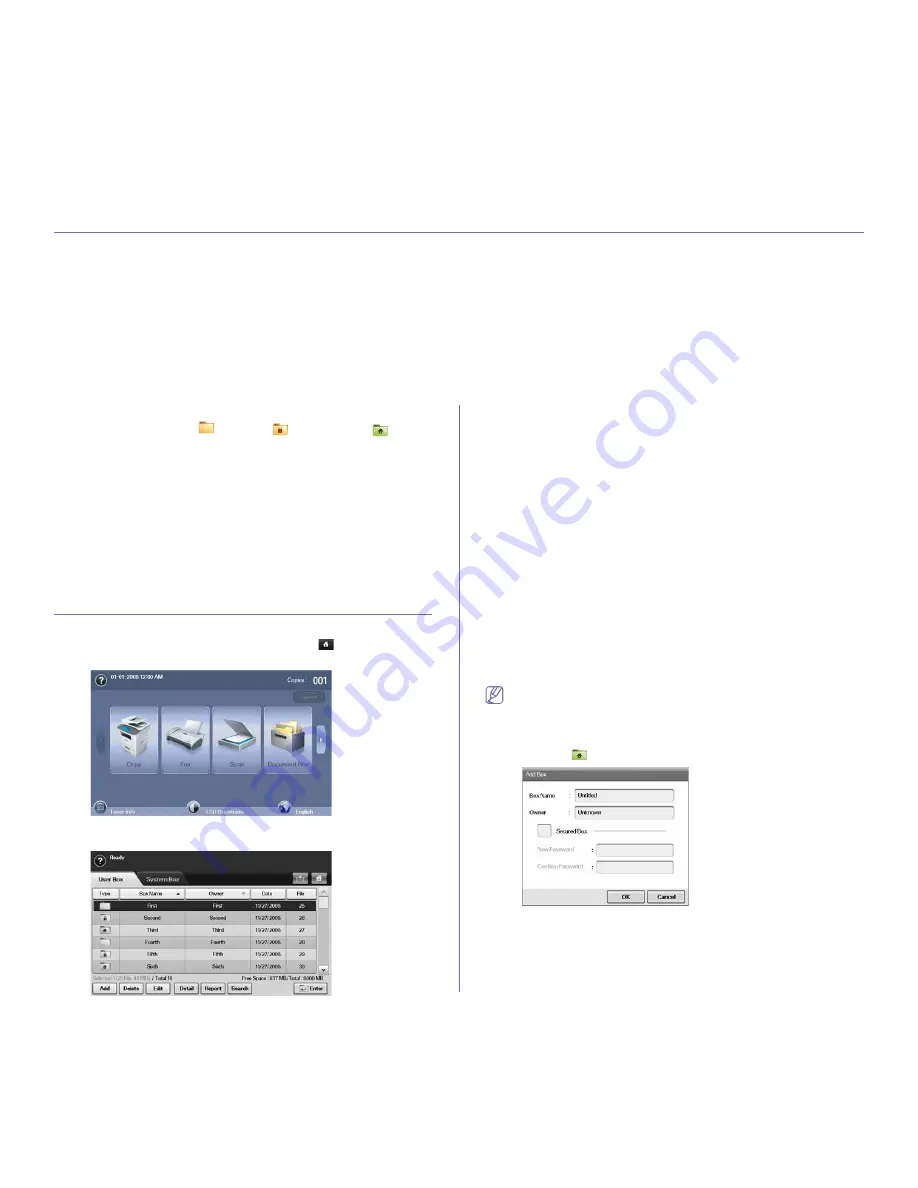
To use the
Document Box
feature, press
Document Box
on the
Main
screen. If the screen displays an other menu, press (
) to go to the
Main
screen.
Document Box Screen
•
User Box tab:
Create the box where you can save documents such as
the file you have printed, sent by email, or scanned. When you create a
box, you can set the password to secure your box. The box with a
password is called
Secured Box
, and without it, it is called public box.
•
System Box tab:
The machine provided default boxes, which you
cannot modify them.
•
Type:
Shows the box is secured or not.
•
Box Name:
Shows the box name.
•
Owner:
Shows the user name of a box.
•
Date:
Shows the date of a box created.
•
File:
Shows the number of total files in the box.
•
Add:
Lets you add more boxes.
•
Delete:
Deletes the selected box.
•
Edit:
Lets you modify a box name and an owner name.
•
Detail:
Shows box information.
•
Report:
Prints the information about the documents inside the selected
box.
•
Search:
Searches a box with a box name or an owner name.
•
Enter:
Prints or sends the stored file in the box.
Box Adding Screen
You can create a new box to store your scanned data. To add a new
Document Box
, press
Add
on the
Document Box
screen.
The following are some constraints about the document box.
•
You can create maximum 100 document boxes.
•
A document box can contain up to 200 stored-documents.
•
The length of a box name is limited to 20 characters.
•
Common (
) box is already created by default.
•
Box Name:
Enter a box name.
•
Owner:
Enter the user name of the box's owner.
•
Secured Box:
Check to make a secured-type box.
•
New Password:
Enter a new password to access the box.
•
Confirm Password:
Enter the password again.


