background image

Scanning

_ 12

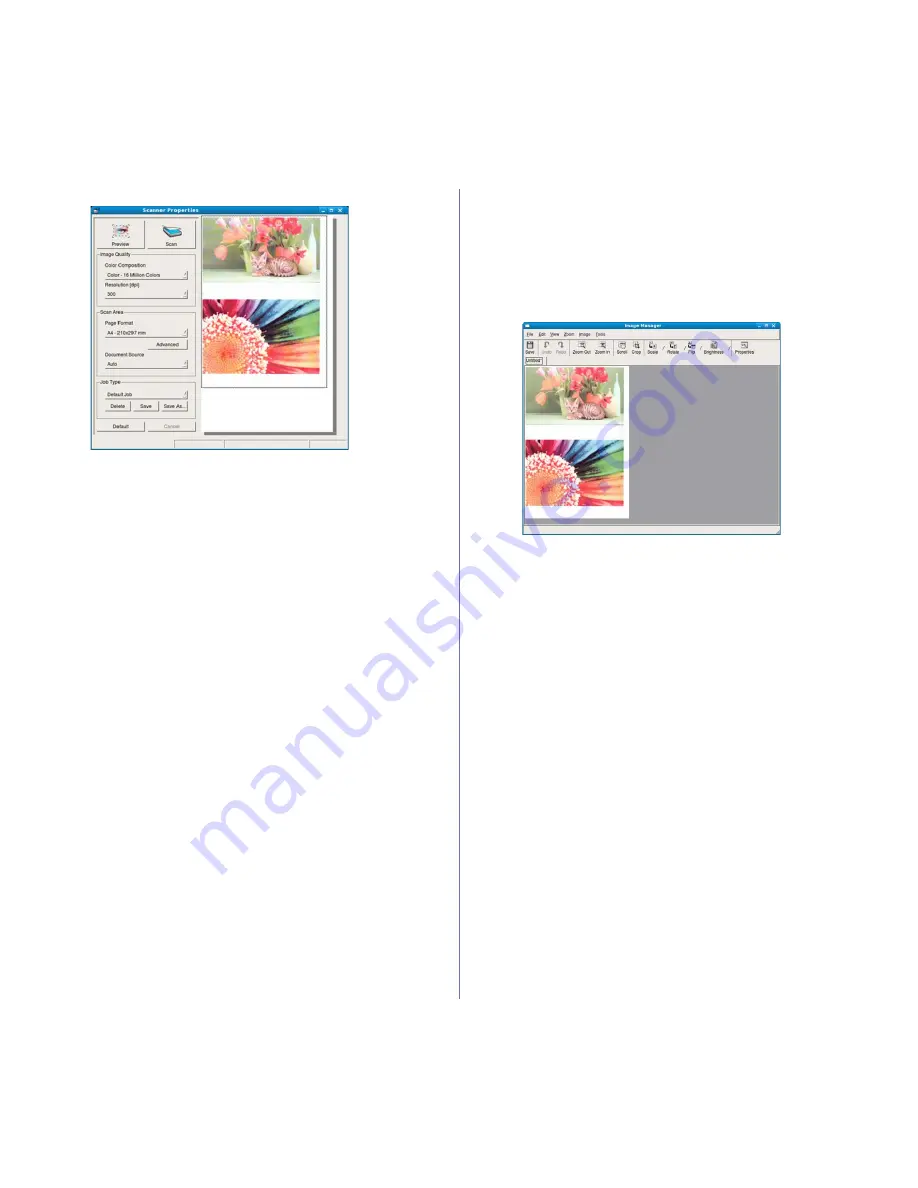
Preview Pane

.

7.

Drag the pointer to set the image area to be scanned in the 

Preview 

Pane

8.

Change the scan options in the 

Image Quality

 and 

Scan Area

 sections.

Image Quality: 

This option allows you to select the color composition 

and the scan resolution for the image.

Scan Area: 

This option allows you to select the page size. The 

Advanced

 button enables you to set the page size manually.

If you want to use one of the preset scan option settings, select the 

option from the 

Job Type

 drop-down list. (See "Adding Job Type 

Settings" on page 12.)
Click 

Default

 to restore the default setting for the scan options.

9.

When you have finished, click 

Scan

 to start scanning.

The status bar appears on the bottom left of the window to show you the 

progress of the scan. To cancel scanning, click 

Cancel

.

10.

The scanned image appears.
If you want to edit the scanned image, use the toolbar. (See "Using the 

Image Manager" on page 12.)

11.

When you are finished, click 

Save

 on the toolbar.

12.

Select the file directory where you want to save the image and enter the 

file name.

13.

Click 

Save

.

Adding Job Type Settings

You can save your scan option settings for later use.

To save a new Job Type setting:

1.

Change the options from the Scanner Properties window.

2.

Click 

Save As

.

3.

Enter the name for your setting.

4.

Click 

OK

Your setting is added to the 

Saved Settings

 drop-down list.

To save a Job Type setting for the next scan job:

1.

Select the setting you want to use from the 

Job Type

 drop-down list.

2.

The next time you open the 

Scanner Properties

 window, the saved 

setting is automatically selected for the scan job.

To delete a Job Type setting

1.

Select the setting you want to delete from the 

Job Type

 drop-down 

list.

2.

Click 

Delete

.

The setting is deleted from the list

Using the Image Manager

The Image Manager application provides you with menu commands and 

tools to edit your scanned image.

Use the following tools to edit the image:

Summary of Contents for SCX-5835 Series

Page 1: ...SCX 5835_5935 Series Multi Functional Printer User s Guide imagine the possibilities Thank you for purchasing a Samsung product ...

Page 2: ... Ltd PCL and PCL 6 are trademarks of Hewlett Packard Company Microsoft Windows Windows Vista Windows 7 and Windows 2008 Server R2 are either registered trademarks or trademarks of Microsoft Corporation PostScript 3 is a trademark of Adobe System Inc UFST and MicroType are registered trademarks of Monotype Imaging Inc TrueType LaserWriter and Macintosh are trademarks of Apple Computer Inc All other...

Page 3: ...ONMENT Warning Warning Hazards or unsafe practices that may result in severe personal injury or death Caution Hazards or unsafe practices that may result in minor personal injury or property damage Do not attempt Do not disassemble Do not touch Unplug the power cord from the wall socket Make sure the machine is grounded to prevent electric shock Call the service center for help Follow directions e...

Page 4: ...g the machine from all interface connections and request assistance from qualified service personnel Otherwise this could result in electric shock or fire If the machine exhibits a sudden and distinct change in performance unplug the machine from all interface connections and request assistance from qualified service personnel Otherwise this could result in electric shock or fire Do not forcefully...

Page 5: ...ical utility company Do not overload wall outlets and extension cords This can diminish performance and could result in electric shock or fire Use only No 26 AWGa or larger telephone line cord if necessary Otherwise it can cause damage to the machine a AWG American Wire Gauge Use the power cord supplied with your machine for safe operation If you are using a cord which is longer than 2 meters 79 w...

Page 6: ...rvice technician Do not disassemble the toner cartridge Toner dust can be dangerous to humans When storing supplies such as toner cartridges keep them away from children Toner dust can be dangerous to humans Do not burn any of the supplies such as toner cartridge or fuser unit It can cause an explosion or fire Using recycled supplies such as toner can cause damage to the machine In case of damage ...

Page 7: ...an access to laser radiation above a Class I level during normal operation user maintenance or prescribed service condition WARNING Never operate or service the printer with the protective cover removed from Laser Scanner assembly The reflected beam although invisible can damage your eyes When using this product these basic safety precautions should always be followed to reduce risk of fire electr...

Page 8: ...ontains Mercury Dispose According to Local State or Federal Laws U S A only This printer contains advanced energy conservation technology that reduces power consumption when it is not in active use When the printer does not receive data for an extended period of time power consumption is automatically lowered ENERGY STAR and the ENERGY STAR mark are registered U S marks For more information on the...

Page 9: ...us does not exceed the Class A limits for radio noise emissions from digital apparatus as set out in the interference causing equipment standard entitled Digital Apparatus ICES 003 of the Industry and Science Canada Cet appareil numérique respecte les limites de bruits radioélectriques applicables aux appareils numériques de Classe A prescrites dans la norme sur le matériel brouilleur Appareils Nu...

Page 10: ...e and 3 telephone number of either the sending machine business business entity or individual The Telephone Company may make changes in its communications facilities equipment operations or procedures where such action is reasonably required in the operation of its business and is not inconsistent with the rules and regulations in FCC Part 68 If such changes can be reasonably expected to render an...

Page 11: ...rt 68 You should also know that Your machine is not designed to be connected to a digital PBX system If you intend to use a computer modem or fax modem on the same phone line as your machine you may experience transmission and reception problems with all the equipment It is recommended that no other equipment except for a regular telephone share the line with your machine If your area experiences ...

Page 12: ...EC Certification Certification to 1999 5 EC Radio Equipment Telecommunications Terminal Equipment Directive FAX This Samsung product has been self certified by Samsung for pan European single terminal connection to the analogue public switched telephone network PSTN in accordance with Directive 1999 5 EC The product has been designed to work with the national PSTNs and compatible PBXs of the Europ...

Page 13: ...rm with Netscapes SSL This library is free for commercial and non commercial use as long as the following conditions are aheared to The following conditions apply to all code found in this distribution be it the RC4 RSA lhash DES etc code not just the SSL code The SSL documentation included with this distribution is covered by the same copyright terms except that the holder is Tim Hudson tjh crypt...

Page 14: ...Regulatory information_ 22 CHINA ONLY ...

Page 15: ...user s guide are mainly based on Windows XP CONVENTION Some terms in this guide are used interchangeably as below Document is synonymous with original Paper is synonymous with media or print media Machine refers to printer or MFP The following table offers the conventions of this guide The date format may differ from country to country Do not touch the green underside of the toner cartridge CONVEN...

Page 16: ...ubleshooting and installing accessories Network Website You can set the network environment from your computer using network managing programs such as SetIP SyncThru Web Admin Service etc This Website will be convenient for network administrators who need to manage many machines simultaneously You can download the SyncThru Web Admin Service on http solution samsungprinter com SetIP program is prov...

Page 17: ... when not in use To save paper you can print on both sides of the paper double sided printing See Printing on both sides of paper on page 3 Your machine has an extra memory slot to expand their memory See Available accessories on page 140 Zoran IPS Emulation compatible with PostScript 3 PS enables PS printing Print in various environments Copy originals in several formats Scan the originals and se...

Page 18: ...needs from printing and copying to more advanced networking solutions for your business Features by models include Included Blank Not available FEATURES SCX 5835FN SCX 5935FN USB 2 0 USB Memory Interface Document Feeder Hard Disk Network Interface Ethernet 10 100 Base TX wired LAN Duplex 2 sided printing FAX ...

Page 19: ... 2 12 3 13 4 14 5 15 6 16 7 17 8 18 9 19 10 20 Document feeder cover Multi purpose tray Document feeder width guides Front cover Document feeder input tray Document output tray Document feeder output tray USB memory port Front cover handle Control panel Multi purpose tray handle Toner cartridge Handle Multi purpose tray paper width guides Paper level indicator Scanner lid Optional tray 2a Scanner ...

Page 20: ...roduction_ 2 Rear view 1 USB host port 6 Duplex unit 2 USB port 7 Rear cover 3 Network port 8 Power receptacle 4 Telephone line socket 9 Power switch 5 Extension telephone socket EXT 10 Control board cover ...

Page 21: ...d Dials fax number and enters the number value for document copies or other options 6 Clear Deletes characters in the edit area 7 Redial Pause In standby mode redials the last number Also in edit mode inserts a pause into a fax number 8 On Hook Dial Performs same as you hold a handset under the telephone line is engaged 9 Interrupt Stops a job in process to do an urgent copy job 10 Clear All Rever...

Page 22: ...Icons shown on the display screen such as SmarThru Workflow may be grayed out depending on the optional kit or program installed in your machine To switch the display screen and see other available icons press the left right arrow on the display screen STATUS DESCRIPTION Off The machine is off line The machine is in power saver mode When data is received or any button is pressed it switches to on ...

Page 23: ...er information Detail Shows detailed information of selected option on the Current Job Completed Job and Active Notice list Delete Removes selected job from the list Delete All Removes all jobs from the list Close Closes the job status window and switches to previous view Power Saver button When the machine is not in use save electricity by pressing the power save mode button Pressing this button ...

Page 24: ...ir circulation Allow extra space to open covers and trays The area should be well ventilated and away from direct sunlight or sources of heat cold and humidity Do not set the machine close to the edge of your desk or table Printing is suitable for altitudes under 1 500 m 4 921 ft Refer to the altitude setting to optimize your printing See Altitude adjustment on page 1 Place the machine on a flat s...

Page 25: ... this program to set your machine s TCP IP addresses Macintosh PostScript Printer Description PPD file Use this file to run your machine from a Macintosh computer and print documents Scanner driver TWAIN driver is available for scanning documents on your machine Smart Panel This program allows you to monitor the machine s status and alerts you when an error occurs during printing Scan Manager You ...

Page 26: ...he software CD should automatically run and an installation window appear If the installation window does not appear click Start and then Run Type X Setup exe replacing X with the letter which represents your drive Click OK If you use Windows Vista Windows 7 and Windows 2008 Server R2 click Start All programs Accessories Run Type X Setup exe replacing X with the letter which represents your drive ...

Page 27: ...iver only available when you use a machine which supports the PostScript driver for printing on a Macintosh computer Also it provides you with the TWAIN driver for scanning on a Macintosh computer 1 Make sure that the machine is connected to your computer and powered on 2 Insert the supplied software CD into your CD ROM drive 3 Double click the CD ROM icon that appears on your Macintosh desktop 4 ...

Page 28: ...onfigurator or Image Manager Installing the SmartPanel 1 Make sure that the machine is connected to your computer and powered on 2 When the Administrator Login window appears type in root in the Login field and enter the system password You must log in as a super user root to install the machine software If you are not a super user ask your system administrator 3 From the Samsung website download ...

Page 29: ...connected machine s driver on page 3 Installing network connected machine s driver on page 2 2 Click the Windows Start menu 3 Select All programs Accessories Window Explorer 4 Enter in IP address of the host computer and press Enter in your keyboard In case host computer requires User name and Password fill in User ID and password of the host computer account 5 Right click the printer icon you wan...

Page 30: ...olution for network administrators SyncThru Web Admin Service provides you with an efficient way of managing network devices and lets you remotely monitor and troubleshoot network machines from any site with corporate internet access Download this program from http solution samsungprinter com SetIP This utility program allows you to select a network interface and manually configure the IP addresse...

Page 31: ...xt If necessary select a language from the drop down list 4 Select Typical installation for a network printer and then click Next 5 The list of machines available on the network appears Select the machine you want to install from the list and then click Next If you do not see your machine on the list click Update to refresh the list or select Add TCP IP Port to add your machine to the network To a...

Page 32: ...queue name in the Queue Name field If you cannot determine the queue name for your machine server try using the default queue first 17 For Mac OS X 10 3 if Auto Select does not work properly select Samsung in Printer Model and your machine name in Model Name For Mac OS X 10 4 if Auto Select does not work properly select Samsung in Print Using and your machine name in Model For Mac OS X 10 5 10 6 i...

Page 33: ...altitude value 7 Click Apply If your machine is connected via a USB cable set the altitude in Altitude Adjustment option on the machine s display screen See General settings on page 2 SETTING THE AUTHENTICATION PASSWORD To set up your machine or change the settings you must first login To change password follow the steps below 1 Press Machine Setup on the control panel 2 Press Admin Setting 3 When...

Page 34: ...at least an hour 7 Select On 8 Select a duration using left right arrows 9 Press OK USING POWER SAVING FEATURE When you are not using the machine for a while use this feature to save power 1 Press Machine Setup on the control panel 2 Press Admin Setting 3 When the login message appears enter password with number keypad and press OK See Setting the authentication password on page 1 4 Press the Gene...

Page 35: ...ice 4 Log in to the SyncThru Web Service as an administrator See Using SyncThru Web Service on page 1 5 Click Settings Machine Settings Printer 6 Click PCL 7 Select your preferred font in the Symbol Set list 8 Click Apply Following information shows the proper font list for corresponding languages Russian CP866 ISO 8859 5 Latin Cyrillic Hebrew Hebrew 15Q Hebrew 8 Hebrew 7 Israel only Greek ISO 885...

Page 36: ...is completely dry before loading Do not load originals that include different sizes or weights of paper Do not load booklets pamphlets transparencies or documents with other unusual characteristics LOADING ORIGINALS You can use the scanner glass or the automatic document feeder to load an original for copying scanning and sending a fax On the scanner glass Make sure that no originals are in the do...

Page 37: ...such as weight composition grain and moisture content are important factors that affect the machine s performance and the output quality When you choose print materials consider the following The type size and weight of the print media for your machine are described in print media specifications See Print media specifications on page 148 Desired outcome The print media you choose should be appropr...

Page 38: ...er width guide it may cause paper jams LOADING PAPER IN THE TRAY Tray 1 optional tray Load the print media you use for the majority of your print jobs into tray 1 Tray 1 can hold a maximum of 500 sheets of plain paper You can purchase an optional tray and attach it below the standard tray to load an additional 500 sheets of plain paper See Available supplies on page 140 Using photographic paper or...

Page 39: ...f the tray Always load the specified print media only to avoid paper jams and print quality problems See Print media specifications on page 148 Flatten any curl on postcards envelopes and labels before loading them into the multi purpose tray 1 Hold the handle of multi purpose tray and pull it down to open 2 Flex or fan the edge of the paper stack to separate the pages before loading originals 3 L...

Page 40: ...ll constructed envelopes with sharp and well creased folds Do not use stamped envelopes Do not use envelopes with clasps snaps windows coated lining self adhesive seals or other synthetic materials Do not use damaged or poorly made envelopes Be sure the seam at both ends of the envelope extends all the way to the corner of the envelope 1 Acceptable 2 Unacceptable Envelopes with a peel off adhesive...

Page 41: ...han 13 mm of curl in any direction Condition Do not use labels with wrinkles bubbles or other indications of separation Make sure that there is no exposed adhesive material between labels Exposed areas can cause labels to peel off during printing which can cause paper jams Exposed adhesive can also cause damage to machine components Do not run a sheet of labels through the machine more than once T...

Page 42: ...age appears enter password with number keypad and press OK See Setting the authentication password on page 1 4 Press the General tab 5 Press the down arrow to switch the screen press Tray Management 6 Select tray and its options such as paper size and type 7 Press OK If you want to use special sized paper such as a billing paper select Custom in the Paper tab in the Printing Preferences See Paper ...

Page 43: ... Printing Preferences window that appears in this user s guide may differ depending on the machine in use However the composition of the Printing Preferences window is similar Check the operating system s that are compatible with your machine Refer to the OS compatibility section of Printer Specifications See Printer specifications on page 2 When you select an option in Printing Preferences you ma...

Page 44: ...tures include Printing multiple pages on one sheet of paper on page 2 Printing posters on page 2 Printing booklets on page 3 Printing on both sides of paper on page 3 Change percentage of your document on page 3 Fitting your document to a selected paper size on page 3 Using watermarks on page 4 Using overlay on page 4 Printing multiple pages on one sheet of paper You can select the number of pages...

Page 45: ...From the Double sided Printing section select the binding option you want Printer Default If you select this option this feature is determined by the setting you ve made on the control panel of the machine None Long Edge This option is the conventional layout used in bookbinding Short Edge This option is the conventional layout used in calendars Reverse Double Sided Printing Check this option to r...

Page 46: ...u want to edit from the Current Watermarks list and change the watermark message and options 4 Click Update to save the changes 5 Click OK or Print until you exit the Print window Deleting a watermark 1 To change the print settings from your software application access Printing Preferences See Opening Printing Preferences on page 5 2 Click the Advanced tab select Edit from the Watermark drop down ...

Page 47: ... Click OK or Print until you exit the Print window UNDERSTANDING PRINTING PREFERENCES You can preview the settings you selected on the upper right of the Printing Preferences Opening Printing Preferences 1 Open the document you want to print 2 Select Print from the File menu The Print window appears 3 Select your machine from the Select Printer 4 Click Properties or Preferences Basic tab Use Basic...

Page 48: ...lb recycled paper Envelope 75 to 90 g m2 20 to 24 lb envelope Transparency 138 to 146 g m2 37 to 39 lb transparency paper Labels 120 to 150 g m2 32 to 40 lb label CardStock 90 to 163 g m2 24 to 43 lb cardstock Bond 105 to 120 g m2 28 to 32 lb bond Archive 70 to 90 g m2 19 to 24 lb If you need to keep the print out for a long period time such as archives select this option Advanced This option allo...

Page 49: ...t will appear very different from what it looks like on the screen If you click Reset settings in the Advanced option returns to the default setting Toner Save This option allows you to extend the life of your toner cartridge and reduces the cost per page without a significant reduction in print quality Printer Setting If you select this option this feature is determined by the setting you ve made...

Page 50: ...Using help Click from the upper right corner of the window and then click on any option The help screen gives detailed information about the printing features provided by the printer driver USING DIRECT PRINTING UTILITY This chapter explains how to use the Direct Printing Utility to print PDF files without having to open the files HDD should be installed on your machine to print PDF files using th...

Page 51: ...eferences If Printing preferences item has mark you can select other printer drivers connected with selected printer 5 Change the settings on each tab 6 Click OK If you want to change the settings for each print job change it in Printing Preferences SETTING YOUR MACHINE AS A DEFAULT MACHINE 1 Click the Windows Start menu 2 For Windows 2000 select Settings Printers For Windows XP 2003 select Printe...

Page 52: ...print a border around each page on the sheet Two Sided This option allows you to print on both sides of a paper See Printing on both sides of paper on page 11 Reverse Page Orientation This option allows you to rotate paper 180 degrees Graphics The Graphics tab provides options for selecting Resolution Select Graphics from the drop down list under Orientation to access the graphic features Resoluti...

Page 53: ... options you want to use 5 Click Print and the machine prints on both sides of the paper If you print more than 2 copies the first copy and the second copy might print on same sheet of paper Avoid printing on both sides of paper when you are printing more than 1 copy LINUX PRINTING Printing from applications There are a lot of Linux applications that allow you to print using Common UNIX Printing S...

Page 54: ...while in use you must re configure the machine port in this tab Driver This option allows you to view or select another machine driver By clicking Options you can set the default device options Jobs This option shows the list of print jobs Click Cancel job to cancel the selected job and select the Show completed jobs check box to see previous jobs on the job list Classes This option shows the clas...

Page 55: ...oriented None Flip on Long Edge This option is the conventional layout used in bookbinding Flip on Short Edge This option is the type often used with calendars Do not print on both sides of labels transparencies envelopes or thick papers It may result in paper jam and damage to the machine Pages Per Sheet You can select the number of pages to print on a single sheet of paper To print more than one...

Page 56: ...tains faint markings and dark images See Changing the darkness on page 4 Paper Supply Selects the paper supply tray Saving to box Sets the machine to save the originals to the document box for later use For details about how to use the Document Box refer to the Document Box chapter See using document box on page 1 Advanced tab Job Build Allows you to copy several pages or different types of origin...

Page 57: ...y to the next copy job After finishing the current copy job the machine automatically restores the default settings after certain time Or the machine resume to default setting when you press the Clear All button on the control panel The default copy setting can be changed in Admin Setting See Copy Setup on page 3 Selecting the size of originals Press the Basic tab Original Size then use left right...

Page 58: ...he back side of a paper For instance if you print 6 sheet of original papers every even numbered pages of originals will be printed on the front side of a paper and every odd numbered pages of originals will be printed on the back side of a paper Reverse 1 2 Sided Rotate Sided 2 Scans originals and prints them on both sides of a paper But the machine reverses the print out order of the originals T...

Page 59: ...lay Between Segments After executing a segment the job is paused with this screen is displayed Then the user can select to keep copying or stop Print Prints the sample page s of a segment to confirm the contents Delete Deletes a segment Delete All Deletes all segments Print All Prints all segments Add Segment Adds a new segment Cancel Removes all segments in the list and cancels the job 5 Press Ad...

Page 60: ...y size using the Reduce Enlarge for the N Up feature Poster copying Your original will be divided into 9 portions You can paste the printed pages together to make one poster sized document This copy feature is available only when you place originals on the scanner glass 1 Place a single original face down on the scanner glass and close the scanner lid See Loading originals on page 1 2 Press Copy f...

Page 61: ...4 Letter Legal Folio Oficio JIS B5 ISO B5 Executive A5 and Statement sized paper Cover copying The machine automatically adds covers to your copied set using stock taken from a different tray Covers must be the same size and orientation as the main body of the job 1 Place the originals face up in the document feeder Or place a single original face down on the scanner glass and close the scanner li...

Page 62: ...ace down on the scanner glass and close the scanner lid See Loading originals on page 1 2 Press Copy from the main screen 3 Press the Image tab Erase Background 4 Select the appropriate option Off Disables this feature Auto Optimizes the background Enhance The higher the number is the more vivid the background is Erase The higher the number is the lighter the background is 5 Press OK 6 Press Start...

Page 63: ...feature can be used via the local connection or the network connection See Scanning with TWAIN enabled software on page 10 SmarThru Office This program is the accompanying software for your machine You can use this program to scan images or documents This feature can be used via the local connection or the network connection See Smarthru Office on page 3 WIA WIA stands for Windows Images Acquisiti...

Page 64: ...Lists the number in order for application programs Application Shows the available application programs from your computer Select Moves to the application program you have selected Logout Logout from the Scan to PC screen Duplex Selects whether the machine scans on one side of the paper 1 Sided both sides of the paper 2 Sided or both sides of paper but the back side is rotated 180 degrees 2 Sided ...

Page 65: ...reset on page 10 File Format Selects the file format of the scan output See File Format on page 9 Back Returns to the previous screen SCANNING ORIGINALS AND SENDING THROUGH EMAIL SCAN TO EMAIL You can scan the originals and email the scanned image to several destinations from the machine by email Setting up an email account To scan and send an image as an email attachment you need to set up networ...

Page 66: ...estinations as an email attachment 1 Load originals face up into the document feeder or place a single original face down on the scanner glass See Loading originals on page 1 2 Press Scan from the main screen If the authentication message shows enter Auth ID Password and Realm Name This message shows only when the network administrator has set the authentication in SyncThru Web Service 3 Press Sca...

Page 67: ...rt 7 Enter optional information 8 Click Apply The LDAP server administrator must store the email address data The method of storing varies depending on the server and the operating systems Entering email addresses by the address book Once you have stored the frequently used addresses into the address book you can enter email addresses singly as follows 1 Press Local or Global from the Basic tab of...

Page 68: ... file The next steps are for SMB server setting using SyncThru Web Service and the setting for FTP server is the same as SMB Apply the same steps for setting up the FTP server 1 Turn your networked computer on and open the web browser 2 Enter your machine s IP address as the URL in a browser 3 Click Go to access the SyncThru Web Service 4 Click Address Book 5 Click Add 6 Enter a name and speed num...

Page 69: ...ugh this program you can change scan settings and add or delete the folders where scanned documents are saved in your computer The Samsung Scan Manager program can only be used in the Window and Macintosh system If you use the Macintosh See Setting scan information in Scan Manager on page 11 The scan data can be encrypted to protect the contents from unauthorized access You can enable the secured ...

Page 70: ...nt feeder If the machine cannot detect the original on the document feeder it automatically changes the option to 1 Sided Resolution You can adjust document resolution Press Scan Scan to Email or Scan to PC or Scan to Server the Basic tab Resolution Use left right arrows to toggle the values The higher value you select clearer the result But the scanning time may take longer 100 dpi 200 dpi and 30...

Page 71: ...to Server the Output tab Quality When you set Color Mode to Mono the Quality option is grayed out File Format You can select the file format before you proceed with the scanning job Press Scan Scan to Email or Scan to PC or Scan to Server the Output tab File Format PDF Scans originals in PDF format You can add a Digital Signature to the PDF with the certification To add the Digital Signature you h...

Page 72: ...your computer and powered on 2 Load originals face up into the document feeder or place a single original face down on the scanner glass See Loading originals on page 1 3 From the Start menu select Control Panel Scanners and Cameras 4 Double click your scanner driver icon The Scanner and Camera Wizard appears 5 Click Next 6 Set the option in Choose scanning preferences window and click Preview to ...

Page 73: ...nt to scan using TWAIN refer to the Mac OS X10 4 steps above 6 Set the scan options on this program 7 Scan and save your scanned image For more information about using Image Capture refer to the Image Capture s help Use TWAIN compliant softwares to apply more scan options You can also scan using TWAIN compliant softwares such as Adobe Photoshop If scanning does not operate in Image Capture update ...

Page 74: ...d image use the toolbar See Using the Image Manager on page 12 11 When you are finished click Save on the toolbar 12 Select the file directory where you want to save the image and enter the file name 13 Click Save Adding Job Type Settings You can save your scan option settings for later use To save a new Job Type setting 1 Change the options from the Scanner Properties window 2 Click Save As 3 Ent...

Page 75: ...oom Out Zooms the image out Zoom In Zooms the image in Scale Allows you to scale the image size you can enter the size manually or set the rate to scale proportionally vertically or horizontally Rotate Allows you to rotate the image you can select the number of degrees from the drop down list Flip Allows you to flip the image vertically or horizontally Effect Allows you to adjust the brightness or...

Page 76: ...Since the DSL Micro filter is not provided with the machine contact your Internet Service provider for use on DSL Micro filter 1 Line port 2 Micro filter 3 DSL modem Telephone line To use advanced features of the fax press Machine Setup on the control panel and Admin Setting Setup Fax Setup See Fax Setup on page 4 PREPARING TO FAX Before you send or receive a fax you need to connect the supplied l...

Page 77: ...7 Mailbox Used to store a received fax or originals in the machine memory which are ready to be polled You can use a mailbox on the same machine you are using or the one on a remote machine Each mailbox has a corresponding mailbox number name and password See Using mailbox on page 7 Back Returns to the Basic tab Image tab Original Type Enhances the fax quality based on the type of the original doc...

Page 78: ...fax numbers and select a fax number 7 Press Start when you hear a high pitched fax signal from the remote fax machine Color faxes are only supported when faxes are sent manually See Color Mode on page 6 Resending Automatically When the number you have dialed is busy or there is no answer the machine automatically redials the number To change the time interval between redials and or the number of r...

Page 79: ...l segments Add Segment Adds a new segment Cancel Removes all segments in the list and cancels the job 5 Press Add Segment 6 Place the originals face up in the DADF 7 Press Start to start scanning a segment for fax job 8 Repeat step 5 to step 7 As long as space remains on your device s hard drive you can add segments without any restriction 9 After adding segments press Send All RECEIVING A FAX Thi...

Page 80: ... Machine Setup on the control panel 2 Select Admin Setting When the login message pops up then enter password and press OK See Setting the authentication password on page 1 3 Press the Setup tab Fax Setup Received Fax Printing Duplex Select appropriate option Off Prints only one side of the paper Long Edge Prints both sides of the paper however the binding will be the long edge Short Edge Prints b...

Page 81: ... ID Detail Shows ID Fax No and Included group information if it is grouped See Storing individual fax numbers Speed Dial No on page 6 Apply Inputs the selected fax number to the sending fax number list in the Basic tab Cancel Cancels the current job and goes to the previous screen 2 Press New 3 Enter the name of the fax number in the ID field with the pop up keyboard and the fax number in the Fax ...

Page 82: ...u to retrieve poll a fax which is stored in the remote machine 1 Press Fax from the main screen 2 Press the Advanced tab Polling Poll from Remote Your can use Delay Poll From Remote to poll the fax at a specific time within 24 hours 3 Enter Passcode and Destination Fax No using the number keypad on the control panel You have to be informed Passcode from sender with the remote fax machine 4 Press O...

Page 83: ...the control panel 2 Press Admin Setting When the login message pops up enter password and press OK See Setting the authentication password on page 1 3 Press the Setup tab Fax Setup 4 Press down arrow on the right side 5 Press Toll Save 6 Press On 7 Press Start Time and set the start date and time with left right arrows 8 Press OK 9 Press End Time and set the end date and time with left right arrow...

Page 84: ... enter password and press OK See Setting the authentication password on page 1 3 Press the Setup tab Fax Setup 4 Press down arrow on the right side 5 Press Fax Forward Settings Forward to Email Setting Receive Forward 6 Press Forward and enter the From and Destination Email option using the keyboard on the display If you want the machine to print the report after forwarding a fax set the Forward P...

Page 85: ...ice Scan documents and save them on an USB memory device Print data stored on an USB memory device Format the USB memory device Your machine supports USB memory devices with FAT16 FAT32 and sector size of 512 bytes Check your USB memory device s file system from your dealer You must use only an authorized USB memory device with an A plug type connector Use only an USB memory device with metal shie...

Page 86: ...ess and more The options you change will be maintained for a certain time but after a period the options will be reset to default values Duplex This feature especially applies when the original documents to be scanned are two sided You can select whether to scan only one side of the paper or both sides of the paper Press USB Scan to USB the Basic tab Duplex Use left right arrows to toggle the valu...

Page 87: ...ll Custom Applies the current scan settings that you have chosen File Format You can select the file format before you proceed with the scanning job Press USB Scan to USB the Output tab File Format Select the appropriate option and press OK PDF Scans originals in PDF format Single Page TIFF Scans originals in TIFF Tagged Image File Format but several originals are scanned as one file Multi Page TI...

Page 88: ... menu press to go to the Main screen Document Box Screen User Box tab Create the box where you can save documents such as the file you have printed sent by email or scanned When you create a box you can set the password to secure your box The box with a password is called Secured Box and without it it is called public box System Box tab The machine provided default boxes which you cannot modify th...

Page 89: ... located in two or more boxes Send To Sends the selected document s to a destination such as e mail fax server or USB Print Prints the selected document s out Back Returns to the previous screen STORING DOCUMENTS TO DOCUMENT BOX This machine allows you to store the scanned data on the hard drive Storing documents from document box You can scan orignals directly from Document Box menu 1 Place the o...

Page 90: ...using document box_ 3 3 Enter the file name in the File Name field with the pop up keyboard Then press OK 4 Select a destination box and press OK 5 Press Start from the control panel to begin a job ...

Page 91: ... UNDERSTANDING THE STANDARD WORKFLOW SCREEN To use the Standard Workflow feature press Standard Workflow on the Main screen To switch to the other display screen press the left or right arrow on the display screen Workflow Screen Favorite Tab Favorite workform is a shortcut of public or private workform You can select a frequently used public or private workform and then the workform appears on th...

Page 92: ...Next Goes to the next tab Transmit Tab Transmit Shows the workform s transmit module name Status Shows the setting status To create a workform you have to set every mandatory items of every assigned transmit modules After you do fill out all mandatory items the Save Execute and Save button are enabled Add Module Add transmit module s Before you add module make sure that the parameters are correctl...

Page 93: ...e machine re sends the fax image to the user s email address Make sure that you enabled Default Fax in Machine Setup Admin Setting Setup tab Standard Workflow Management See Standard workflow management on page 10 Delayed start feature You can schedule the job s execution time by setting Delay Start in Properties tab when you creating a workform Notification feature You can notify the job processi...

Page 94: ...o detailed machine settings When you press Admin Setting a login message appears If the administrator set the password you have to enter the password every time you want to use Admin Setting See Setting the authentication password on page 1 General tab Sets the basic parameters of the machine such as location date time and more See General settings on page 2 Setup tab Sets the values for fax netwo...

Page 95: ...he window asking whether you set the paper size and type for the tray that was just opened Auto Tray Switch With this option On and both tray1 and tray2 are filled with letter size paper the machine automatically prints from tray2 after tray1 is empty Auto Continue When the paper is mismatched meaning that tray1 has filled with the letter size paper but the printing job needs A4 size paper the mac...

Page 96: ...ound image from SyncThru Web Service Click Settings Machine Settings System Home Window Customization and add your images on the list Multi Bin You can set the default mode for multi output bin from the following options Mailbox Stacks the printouts in a bin that the user selects from the output options in the printer driver You can modify each bin s name from Rename You also can merge two or more...

Page 97: ...t this option to On all incoming faxes go into memory A four digit Passcode is used when you want to print out received faxes in memory See Receiving in secure receiving mode on page 5 Received Fax Printing Sets the printing method for the received fax Auto Reduction When receiving a fax containing pages longer than the paper loaded in the tray the machine can reduce the size of the original to fi...

Page 98: ...See Using SyncThru Web Service on page 1 And click Security User Access Control Authentication Options Mailbox Setup Document Policy You can set the document stored in Mailbox to delete or retain documents after completion Select On for each option to delete Off to retain the data Mail Configuration You can create edit or delete Mailbox Enter Mailbox ID Mailbox Name Mailbox Passcode by pressing op...

Page 99: ... a deposit Print Job Control When it is enabled the both computer printing and copying are possible since the credit remains With Disable only the copy printing job needs the credit which means a computer printing a report or a fax job needs no credits Inhibit Services When no credit is left the machine disables the copy job only with Copy Only With All Services scanning service and copy job are d...

Page 100: ...ing to the current user s role You can create a new role group by clicking on the Add button 7 Click on User Profile and check the users You can add users by clicking the Add button If you want add information to the Address Book check the Automatically add your information to Address Book Select the user s accounting ID if the accounting service is activated Select the user s role from Role item ...

Page 101: ...or See Using SyncThru Web Service on page 1 5 Click Security Network Security External Authentication Server LDAP Server 6 Select IP Address or Host Name 7 Enter the IP address in dotted decimal notation or as a host name 8 Enter the server port number from 1 to 65535 The default port number is 389 9 Enter Search Root Directory the top search level of the LDAP directory tree 10 Select Authenticati...

Page 102: ...ation in Job Status is displayed to all users Show Non Secure Information Only Non secured information in Job Status is displayed to all users The secured information such as secured received fax list or secured print list will be displayed only to the owner Show Own Information Only All information in Job Status is displayed to the owner Hiding Method Setting Char Counts Of Information Instead of...

Page 103: ...on Complete Report To add a completion report in your workform enable this option Complete Notification To add a completion notification in your workform enable this option Default Fax To create and execute a workform including the fax feature enable this option OPTION SUB OPTION DESCRIPTION Print You can print Network Configuration PS3 Font List PCL Font List and Schedule Jobs Report Schedule Job...

Page 104: ... only when a transmission error occurs Fax Send Report Appearance You can select whether the image on the confirmation report shows or not Fax Sent Received Report Select On to have the machine store all transmission logs and print out after every 50 logs Select Off to have the machine store the log but not print out Fax Send Report The machine prints the confirmation report after each fax job onl...

Page 105: ...ed Image Output Document Box User Box System Box Standard Workflow Favorite My Workform Public Workform USB USB Format USB Print Scan to USB Basic Advanced Image Output ITEMS OPTION Supplies Life Toner Cartridge Fuser Kit Feed Roller Kit Tray 1 Feed Roller Kit Tray 2 Feed Roller Kit Bypass Tray BTR Kit Machine Info Machine Details Tray Status Print Report Usage Counters ITEMS OPTION ITEMS OPTION G...

Page 106: ... Access a web browser such as Internet Explorer from Windows Enter the machine IP address http xxx xxx xxx xxx in the address field and press the Enter key or click Go 2 Your machine s embedded website opens SyncThru Web Service allows administrator to set up the machine If you want to access Settings or Security menu login first Press Login button and enter user ID and password from the pop up wi...

Page 107: ... Programs or All Programs your printer driver name Smart Panel If you have already installed more than one Samsung machine first select the correct machine model you want in order to access the corresponding Smart Panel Right click in Windows or Linux or click in Mac OS X the Smart Panel icon and select your machine The Smart Panel window and its contents shown in this user s guide may differ depe...

Page 108: ...ffice launcher which is on the right end of taskbar to easily open the Scan Setting window In other operating systems beside Windows XP click the SmarThru icon in the tray area of the windows taskbar to activate the SmarThru Office launcher 2 Scan Setting window opens Click Advanced button to set more scan options 3 Set scan settings and click Scan For more information click Help SmarThru Office h...

Page 109: ...uctions in the window to complete the installation Printing out the machine s MAC address 1 Press Machine Setup on the control panel 2 Press Machine Status the Machine Info tab Print Report 3 Press System Report 4 Scroll down the list on the right and select Network Configuration Report 5 Press Print Setting network values 1 Print the machine s Network Configuration Report to find your machine s M...

Page 110: ...g properly Properties Allows you to view and change the printer properties Classes tab The Classes tab shows a list of available machine classes Refresh Renews the classes list Add Class Allows you to add a new machine class Remove Class Removes the selected machine class Scanners configuration In this window you can monitor the activity of scanner devices view a list of installed Samsung machine ...

Page 111: ...kage provides an appropriate port sharing mechanism that is used by Samsung printer and scanner drivers The drivers talk to their devices via so called machine ports The current status of any machine port can be viewed via the Ports configuration The port sharing prevents you from accessing one functional block of the machine device while another block is in use When you install a new machine devi...

Page 112: ...D To erase all the jobs on the list click Delete All This option erases all the jobs in the memory be careful not to erase jobs other than a fax job To erase only fax jobs on the list select fax jobs with in the Job Type list and click Delete SENDING THE TONER REORDER NOTIFICATION To set the machine to alert when the toner level is low and needs to be reordered do the following 1 Press Machine Set...

Page 113: ...se print quality problems such as toner specks or smearing Cleaning the inside of the machine clears and reduces these problems 1 Turn the machine off and unplug the power cord Wait for the machine to cool down 2 Open the front cover and pull the toner cartridge out Set it on a clean flat surface To prevent damage to the toner cartridge do not expose it to light for more than a few minutes Cover i...

Page 114: ...efilled cartridge Store toner cartridges in the same environment as your machine Expected cartridge life The life of the toner cartridge yield depends on the amount of toner that print jobs require The actual number may also be different depending on the print density of the pages you print on and the number of pages may be affected by the operating environment printing interval media type and med...

Page 115: ...hite streaks or light printing will still occur even after you have redistributed the toner 1 Open the front cover 2 Pull the toner cartridge out 3 Thoroughly roll the cartridge five or six times to distribute the toner evenly inside the cartridge If toner gets on your clothing wipe it off with a dry cloth and wash clothing in cold water Hot water sets toner into fabric Do not touch the green unde...

Page 116: ... area go to step 7 6 Close the document feeder inner cover and the document feeder cover Reload the pages you removed if any in the document feeder 7 Open the scanner lid 8 Grasp the misfeed paper and using both hands remove the paper from the feed area by carefully pulling it to the right 9 Close the scanner lid Load the removed pages back into the document feeder TIPS FOR AVOIDING PAPER JAMS By ...

Page 117: ...following sections to clear the jam In tray 1 Click this link to open an animation about clearing a jam 1 Open and close the front cover The jammed paper is automatically ejected from the machine If the paper does not exit go to the next step 2 Pull out tray 1 3 Remove the jammed paper by gently pulling it straight out If the paper does not move when you pull or if you do not see the paper in this...

Page 118: ...n removing paper from the machine 1 Open the front cover and pull the toner cartridge out lightly pushing it down 2 Remove the jammed paper by gently pulling it straight out 3 Replace the toner cartridge and close the front cover Printing automatically resumes In exit area Click this link to open an animation about clearing a jam 1 Open and close the front cover The jammed paper is automatically e...

Page 119: ...pen the fuser door 8 Pull the jammed paper out If the jammed paper does not move when you pull push the pressure lever on each side up to loosen the paper and then remove it 9 Return the lever door stopper and guide to their original position 10 Close the rear cover Printing automatically resumes In the duplex unit area Click this link to open an animation about clearing a jam If the duplex unit i...

Page 120: ...ut with the duplex unit remove the paper from the bottom of the machine Insert the duplex unit into the machine If you still do not see the paper go to the next step 3 Open the rear cover 4 Unfold the duplex guide fully 5 Pull the jammed paper out 6 Fold the duplex guide and close the rear cover ...

Page 121: ...time after activating the scan sensor When the machine is on jammed paper is detected in the document feeder Open the document feeder cover and remove the jammed original Original paper jam while reversing paper in scanner The document failed to activate the duplex sensor within the correct time while reversing the document Lift up the document input tray and remove the jammed original See Clearin...

Page 122: ...our machine stops printing Replace the toner cartridge with a Samsung genuine toner cartridge See Replacing the toner cartridge on page 2 Toner is low Order new toner cartridge The toner cartridge is almost empty Ensure a replacement cartridge is in stock See Redistributing toner on page 1 MESSAGE MEANING SUGGESTED SOLUTIONS CONDITION SUGGESTED SOLUTIONS The touch screen does not show anything Tur...

Page 123: ...ing The front cover is not closed Close the front cover Paper is jammed Clear the paper jam See Clearing paper jams on page 3 No paper is loaded Load paper See Loading paper in the tray on page 3 The toner cartridge is not installed Install the toner cartridge If a system error occurs contact your service representative The connection cable between the computer and the machine is not connected pro...

Page 124: ...is loose or defective Disconnect the machine cable and reconnect Try a print job that you have already printed successfully If possible attach the cable and the machine to another computer that you know works and try a print job Finally try a new machine cable The wrong printer driver was selected Check the application s printer selection menu to ensure that your machine is selected The software a...

Page 125: ...ay be dirty Clean the inside of your machine Contact a service representative The paper path may need cleaning Contact a service representative CONDITION POSSIBLE CAUSE SUGGESTED SOLUTIONS A a B b C c A a B b C c A a B b C c A a B b C c A a B b C c Dropouts If faded areas generally rounded occur randomly on the page A single sheet of paper may be defective Try reprinting the job The moisture conte...

Page 126: ...cation or in Printing Preferences See Opening Printing Preferences on page 5 Misformed characters If characters are improperly formed and producing hollow images the paper stock may be too slick Try different paper See Print media specifications on page 5 If characters are improperly formed and producing a wavy effect the scanner unit may need service See Cleaning the scan unit on page 3 CONDITION...

Page 127: ...g used at an altitude of 1 500 m 4 921 ft or above The high altitude may affect the print quality such as loose toner or light imaging Change the correct altitude setting to your machine See Altitude adjustment on page 1 CONDITION SUGGESTED SOLUTIONS A CONDITION SUGGESTED SOLUTION Copies are too light or too dark Use Light and Dark arrows to lighten or darken the backgrounds of copies in the Basic...

Page 128: ...e machine cable may be improperly connected or the power may be off The scanner driver is not installed or the operating environment is not set up properly Ensure that the machine is properly connected and the power is on then restart your computer The USB cable may be improperly connected or the power may be off CONDITION SUGGESTED SOLUTIONS The machine is not working there is no display or the b...

Page 129: ...rt prints The print job was too complex You might need to reduce the complexity of the page or install more memory See Installing a memory module on page 3 CONDITION SUGGESTED SOLUTIONS A PostScript error page prints The print job may not be PostScript Make sure that the print job is a PostScript job Check to see whether the software application expected a setup or PostScript header file to be sen...

Page 130: ...wn bug in Ghostscript until GNU Ghostscript version 7 05 when the base color space of the document is indexed color space and is converted through CIE color space Because Postscript uses CIE color space for Color Matching System you should upgrade Ghostscript on your system to at least GNU Ghostscript version 7 06 or later You can find recent Ghostscript versions at www ghostscript com Some color ...

Page 131: ...isplayed in the scanners options dev mfp1 relates to LP 1 and so on USB ports start at dev mfp4 so scanner on USB 0 relates to dev mfp4 respectively and so forth sequentially In the Selected port pane you can see if the port is occupied by another application If this is the case you should either wait for completion of the current job or press the Release port button if you are sure that the prese...

Page 132: ...espan may differ You must purchase supplies including toner cartridges in the same country where you purchased your machine Otherwise supplies will be incompatable with your machine since the system configuration of these vary from country to country AVAILABLE ACCESSORIES You can purchase and install accessories to enhance your machine s performance and capacity TYPE AVERAGE YIELDa a Declared yiel...

Page 133: ...y the handle and slowly insert the cartridge into the opening in the machine Tabs on the sides of the cartridge and corresponding grooves within the machine will guide the cartridge into the correct position until it locks into place completely 6 Close the front cover Make sure that the cover is securely closed NECESSARY PRECAUTIONS TO TAKE WHEN INSTALLING ACCESSORIES Disconnect the power cord Nev...

Page 134: ...above may not match those on an actual memory module and its slot 5 Press the memory module into the slot with care until you hear a click Do not press the memory module strongly or the module may be damaged If the module does not seem to fit into the slot properly carefully try the previous procedure again 6 Close the control board cover by aligning the groove on it with the notch on the machine ...

Page 135: ...when there seems to be a consistent problem with paper pickup or when its specified yield is reached 1 Open the document feeder cover 2 Remove the document feeder rubber pad from the document feeder as shown below 3 Insert a new document feeder rubber pad into place 4 Close the document feeder cover 1 Document feeder rubber pad ...

Page 136: ...y Face down 250 sheets 80 g m2 20 lb bond Power rating AC 110 127 V or AC 220 240 V See the Rating label on the machine for the correct voltage frequency hertz and type of current for your machine Power consumption Average operating mode Less than 750 W Ready mode Less than 100 W Power Save mode Less than 25 W Power off mode 0 W Noise Levelb Ready mode 39 dB A Printing mode 52 dB A Copying mode 54...

Page 137: ...ironment printing interval media type and media size e It varies depending on the product configuration ITEM DESCRIPTION Printing method Laser beam printing Printing speeda a It will be affected by operating system used computing performance application software connecting method media type media size and job complexity Up to 33 ppm A4 35 ppm Letter Duplex printing speed Up to 17 ipm A4 18 ipm Let...

Page 138: ...m 13 7 inches Effective scanning width Max 208 mm 8 2 inches Color bit depth Internal 36 bit External 24 bit Mono bit depth 1 bit for lineart halftone 8 bit for gray scale ITEM DESCRIPTION Copy Speeda a Copy speed is based on Single Document Multiple Copy Up to 33 cpm A4 35 cpm Letter Duplex copy speed Simplex to Duplex 1 2 Up to 17 ipm in A4 18 ipm in Letter Duplex to Duplex 2 2 Up to 13 ipm in A...

Page 139: ... JBIG JPEG Tx only Modem speed 33 6 Kbps Transmission speed Up to 3 seconds pagea a Standard resolution MMR JBIG Maximum modem speed Phase C by ITU T No 1 chart Memory Tx ECM Maximum document length 356 mm 14 inches Resolution Standard 203 x 98 dpi Fine 203 x 196 dpi Super Fine 300 x 300 dpi Rxb only b Rx stands for receiving a fax Memory HDD Backup Receive 2 000 pages Send 500 pages Halftone 256 ...

Page 140: ...nd 5 sheets stacking Envelope No 10 105 x 241 mm 4 12 x 9 5 inches Envelope DL 110 x 220 mm 4 33 x 8 66 inches Envelope C5 162 x 229 mm 6 37 x 9 01 inches Envelope C6 114 x 162 mm 4 48 x 6 38 inches Thick paper Refer to the Plain paper section Refer to the Plain paper section 90 to 105 g m2 24 to 28 lb bond 350 sheets stacking 90 to 105 g m2 24 to 28 lb bond 20 sheets stacking Thin paper Refer to ...

Page 141: ...TAN 00 800 500 55 500 FINLAND 30 6227 515 www samsung com fi FRANCE 01 4863 0000 www samsung com fr GERMANY 01805 SAMSUNG 726 7864 0 14 min www samsung de GUATEMALA 1 800 299 0013 www samsung com latin HONDURAS 800 7919267 www samsung com latin HONG KONG 3698 4698 www samsung com hk www samsung com hk_e n HUNGARY 06 80 SAMSUNG 726 7864 www samsung com hu INDIA 3030 8282 1800 110011 1800 3000 8282 ...

Page 142: ...amsung com se SWITZERLAND 0848 SAMSUNG 7267864 CHF 0 08 min www samsung com ch TADJIKISTAN 8 10 800 500 55 500 TAIWAN 0800 329 999 www samsung com tw THAILAND 1800 29 3232 02 689 3232 www samsung com th TRINIDAD TOBAGO 1 800 SAMSUNG 726 7864 www samsung com latin TURKEY 444 77 11 www samsung com tr U A E 800 SAMSUNG 726 7864 8000 4726 www samsung com ae U K 0845 SAMSUNG 726 7864 www samsung com uk...

Page 143: ...g systems running on them The BOOTP servers assign the IP address from a pool of addresses to each client BOOTP enables diskless workstation computers to obtain an IP address prior to loading any advanced operating system CCD Charge Coupled Device CCD is a hardware which enables the scan job CCD Locking mechanism is also used to hold the CCD module to prevent any damage when you move the machine C...

Page 144: ...he physical layer and frame formats and protocols for the media access control MAC data link layer of the OSI model Ethernet is mostly standardized as IEEE 802 3 It has become the most widespread LAN technology in use during the 1990s to the present EtherTalk A suite of protocols developed by Apple Computer for computer networking It was included in the original Macintosh 1984 and is now deprecate...

Page 145: ...f the radio spectrum and organizing interconnection arrangements between different countries to allow international phone calls A T out of ITU T indicates telecommunication ITU T No 1 chart Standardized test chart published by ITU T for document facsimile transmissions JBIG Joint Bi level Image Experts Group JBIG is an image compression standard with no loss of accuracy or quality which was design...

Page 146: ...wo dimensional documents in a device independent and resolution independent format PostScript PostScript PS is a page description language and programming language used primarily in the electronic and desktop publishing areas that is run in an interpreter to generate an image Printer Driver A program used to send commands and transfer data from the computer to the printer Print Media The media lik...

Page 147: ...rm Naming Convention UNC is a standard way to access network shares in Window NT and other Microsoft products The format of a UNC path is servername sharename Additional directory URL Uniform Resource Locator URL is the global address of documents and resources on the Internet The first part of the address indicates what protocol to use the second part specifies the IP address or the domain name w...

Reviews: