


Menu item
Description
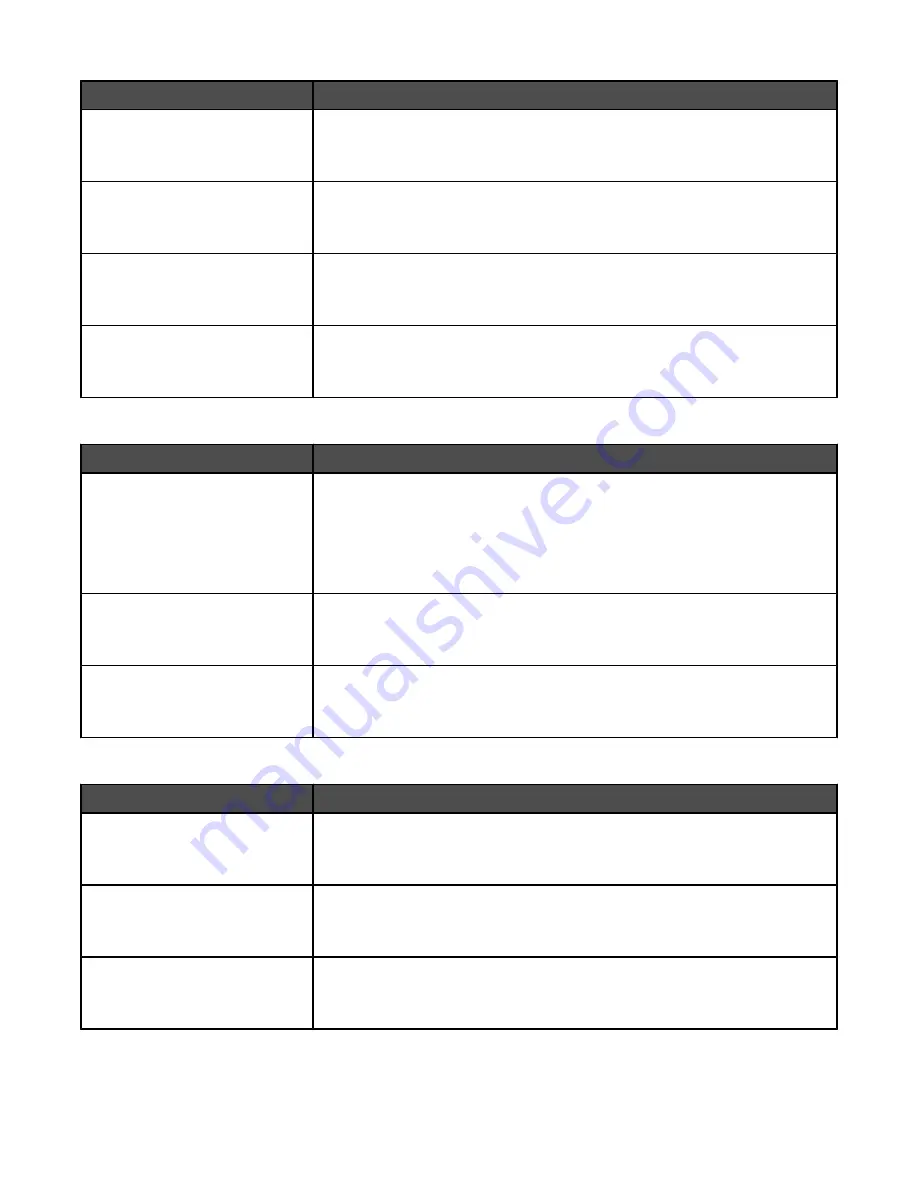
Logs Display
Remote Station Name
Dialed Number
Specifies whether printed logs display the dialed number or the station name
returned
Enable Job Log
On
Off
Enables access the Fax Job log
Enable Call Log
On
Off
Enables access the Fax Call log
Log Output Bin
Standard Bin
Bin 1
Specifies the output bin where fax logs are printed
Speaker Settings
Menu item
Description
Speaker Mode
Always Off
On until Connected
Always On
Notes:
•
Always Off turns the speaker off.
•
“On until Connected” is the factory default setting. The speaker is on and
issues a noise until the fax connection is made.
•
Always On turns the speaker on.
Speaker Volume
High
Low
Controls the volume setting
Note:
High is the factory default setting.
Ringer Volume
On
Off
Controls the fax speaker ringer volume
Note:
On is the factory default setting.
Distinctive Rings
Menu item
Description
Single Ring
On
Off
Answers calls with a one-ring pattern
Note:
On is the factory default setting.
Double Ring
On
Off
Answers calls with a double-ring pattern
Note:
On is the factory default setting.
Triple Ring
On
Off
Triple Ring Answers calls with a triple-ring pattern
Note:
On is the factory default setting.
150
Summary of Contents for InfoPrint 1759
Page 1: ...InfoPrint Color 1759 MFP 1769 MFP MT 4886 4887 User s Guide S510 7102 00...
Page 2: ......
Page 14: ...14...
Page 34: ...1 USB port 2 Ethernet port 3 Scanner connector 4 Scanner connector 34...
Page 204: ...If the service message appears again contact Customer Support and report the message 204...
Page 272: ...Printed in USA S510 7102 00...