8.0 Installation
19
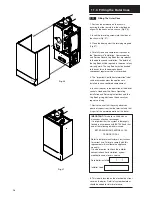
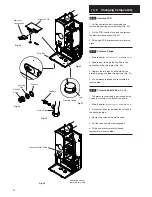
8.4
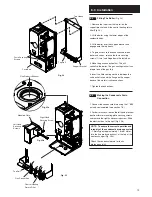
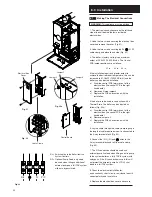
Fitting The Boiler
(Fig. 24)
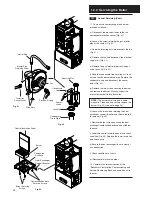
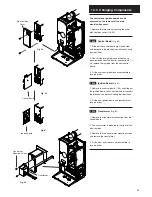
1. Remove the tape from the tap rail on the
support bracket and fit the central heating return
filter (Fig. 25).
2. Lift the boiler using the lower edges of the
combustion box.
3. Lift the boiler over the support bracket and
engage onto the top hooks.
4. To gain access to the connections between
boiler and valves, release the facia securing
screws (
1
/
4
turn) and hinge down the facia box.
5. Make the gas connection first. This will
centralise the boiler. The gas sealing washer is an
integral part of the gas tap.
6. Insert the fibre sealing washers between the
valve outlet face and the flange on the copper
bends of the water circuit connections.
7. Tighten the connections.
8.5
Making the Condensate Drain
Connection
1. Connect the condensate drain using the 1” BSP
nut and seal supplied. (see section 7.8.)
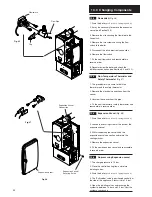
2. For better access, loosen the left hand electrical
box/transformer mounting plate securing screws
and remove the right hand securing screw. Slide
the electrical box to the right (Fig. 25b).
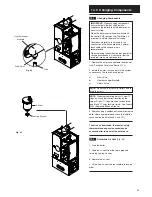
NOTE: To ensure the correct operation and
integrity of the condensate drainage system
-
Carefully pour approximately 1 litre of water
into the flue products exhaust, at the top of the
heat exchanger (Fig. 25a).
Check the condensate drain for leaks,
blockage and fall.
Top Hooks
Support Bracket
Facia Box
Facia Securing
Screws
Gas Connection
Tap Rail
Fig. 24
Fig. 25
Flue Products Exhaust
Fig. 25a
Tap Rail
Central Heating
Return Filter
Fig. 25b
Right Hand
Securing Screw
Left Hand
Securing
Screws
Mounting Plate


