


11.0 Fitting the Outer Case
26
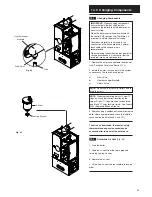
11.1
Fitting The Outer Case
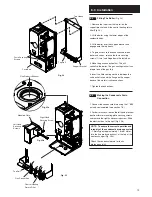
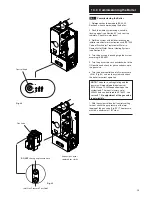
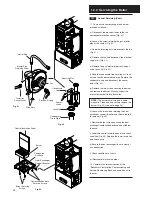
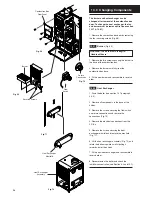
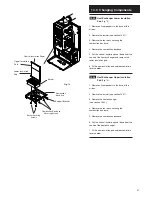
1. Position the outercase on the chassis,
ensuring that the four slots in the side flanges
align with the hooks on the chassis (Fig. 36).
2. Insert the two fixing screws into the sides of
the chassis (Fig. 37).
3. Close the door against the retaining magnets
(Fig. 37).
4. Carefully read and complete all sections of
the “Benchmark” Installation, Commissioning
and Service Record Log Book that are relevant
to the appliance and installation. The details of
the Log Book will be required in the event of any
warranty work. The Log Book must be handed
to the user for safe keeping and each
subsequent regular service visit recorded.
5. The “Important Ventilation Information” label
can be removed unless the appliance is
installed in an unventilated compartment.
6. Instruct the user in the operation of the boiler
controls. Hand over the Users Operating,
Installation and Servicing Instructions and the
Log Book, giving advice on the necessity of
regular servicing.
7. Advise the user that they may observe a
plume of vapour from the flue terminal, and that
it is part of the normal operation of the boiler.
IMPORTANT:
This boiler is fitted with an
aluminium alloy heat exchanger.
It is important that the system is thoroughly
flushed in accordance with BS 7593 and that
one of the following inhibitors is used:
BETZ DEARBORN SENTINEL X100
FERNOX COPAL
Refer to inhibitor manufacturer’s instructions
for correct use. Failure to comply with this
requirement will invalidate the appliance
warranty.
It is also important to check the inhibitor
concentration after installation, system
modification and at every service.
Date Boiler Installed
Inhibitor Used
8. This label is located on the electrical box front
cover on the boiler. Detail of system treatment
should be added for future reference.
/ /
Fig. 36
Fig. 37


