background image

Circuit descriptions and abbreviation list

GB 96

EM1A

9.

9.2

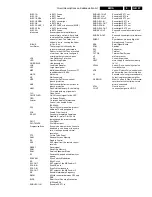
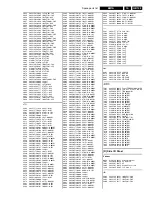
Abbreviation list

AARA

Automatic Aspect Ratio Adaptation: 
algorithm that adapts aspect ratio to 
remove horizontal black bars; 
keeping up the original aspect ratio

ACI

Automatic Channel Installation: 
algorithm that installs TV sets 
directly from cable network by 
means of a predefined TXT page

ADC

Analogue Digital Converter

AFC

Automatic Frequency Control: 
control signal used to tune to the 
correct frequency

AGC

Automatic Gain Control: algorithm 
that controls the video input of the 
featurebox

AI

Artificial Intelligence

AM

Amplitude Modulation

ANR

Automatic Noise Reduction: one of 
the algorithms of Auto TV

AR

Aspect Ratio: 4 by 3 or 16 by 9

ASF

Auto Screen Fit: algorithm that 
adapts aspect ratio to remove 
horizontal black bars but without 
throwing away video information

ATV

See Auto TV

AUDIO_C

Audio Centre

AUDIO_L

Audio Left

AUDIO_R

Audio Right

AUDIO_SL

Audio Surround Left

AUDIO_SW

Audio Subwoofer

AUDIO-L-PROC

Audio left processed

AUDIO-R-PROC

Audio right processed

AUDIO-SR

Audio surround right

Auto TV

Name for the combination of picture 
features/improvements, which work 
automatically (ANR/Auto sharpness/
Auto Histo/ambient light).

BC-PROT

Beam current protection

BG

System B and G

BLC-INFO

Black current information

B-SC1-IN

Blue EXT1 in

B-SC2-IN

Blue EXT2 in

B-TXT

Blue teletext

CENTER

Centre speaker

C-FRONT

Chrominance front input

CL

Constant Level: audio output to 
connect with an external amplifier

ComPair

Computer aided rePair

CRT

Cathode Ray Tube or picture tube

CSM

Customer Service Mode

CTI

Colour Transient Improvement: 
manipulates steepness of chroma 
transients

CVBS

Composite Video Blanking and 
Synchronisation

CVBS-SC1-IN

CVBS EXT1 in

CVBS-SC2 OUT

CVBS EXT2 out

CVBS-SC2-IN

CVBS EXT2 in

CVBS-SC3-IN

CVBS EXT3 in

CVBS-SC4-IN

CVBS EXT4 IN

CVBS-TER

CVBS terrestrial

CVBS-TXT-DS-
OUT

CBVBS teletext Dual Screen out

CVBS-TXT-OUT

CVBS teletext out

CVBS-Y-FRONT

CVBS luminance front input

DAC-HOP

Digital analogue converter HOP IC

DBE

Dynamic Bass Enhancement: extra 
low frequency amplification

DC-filament

Filament supply voltage 

DC-PROT

DC protection

DFU

Direction For Use: description for the 
end user

DNR

Digital Noise Reduction: noise 
reduction feature of the box

DSP

Digital Signal Processing

DST

Dealer Service Tool: special remote 
control designed for dealers to enter 
e.g. service mode

DVD

Digital Versatile Disc

DYN-FASE-COR

Dynamic phase correction

EHT

Extra High Tension

EHT-INFO

Extra High Tension information

EPG

Electronic Program Guide: system 
used by broadcasters to transmit TV 
guide information (= NexTView)

EW

East West, related to horizontal 
deflection of the set

EXT

External (source), entering the set 
via EXT or via cinches

FBL

Fast Blanking: DC signal 
accompanying RGB signals

FBL-SC1-IN

Fast blanking signal for EXT1 in

FBL-SC2-IN

Fast blanking signal for EXT2 in

FBL-TXT

Fast Blanking Teletext

FBX

Feature Box: part of small signal /
separate module which contains 100 
Hz processing, extra featuring and 
AutoTV algorithms

FEAT-U

U from Feature Box

FEAT-V

V from Feature Box

FEAT-Y

Y from Feature Box

FILAMENT

Filament of CRT

FLASH

Flash memory

FM

Field Memory or Frequency 
Modulation

FMS

Functional Module Specification: 
document that describes an isolated 
hardware function

FRONT-C

Front input chrominance (SVHS)

FRONT-DETECT

Front input detection

FRONT-Y_CVBS

Front input luminance or CVBS 
(SVHS)

FRS

Functional Requirement 
Specification: software specification 
document

G-SC1-IN

Green EXT1 in

G-SC2-IN

Green EXT2 in

G-TXT

Green teletext

HA

Horizontal Acquisition: horizontal 
sync pulse coming out of the HIP

HD100

Horizontal Drive: horizontal sync 
pulse coming out of the featurebox

HDTV

High Definition TV: highest 
resolution defined by the ATSC 
standard (1080 lines and 1920 
horizontal pixels, referred to as 
1080i) The second HDTV standard, 
720p x 1280 is not used in EM1A 
chassis (3fH standard not feasible)

Headroom

Extra margin provision to avoid 
clipping of signals

HEATER

Heater (Filament)

HFB

Horizontal Flyback Pulse: horizontal 
sync pulse from large signal 
deflection

HFB+13V

Non rectified output 13V-winding 
LOT

HIP

High-end video Input Processor: 
video and chroma decoder of EM1A

HOP

High-end video Output Processor: 
video, sync and geometry controller 
of EM1A

HP

Headphone

HSI 

Hardware Software Interface

IN-FRONT-SNDL

Sound left front in

IN-FRONT-SNDR

Sound right front in

IN-SC1-B

In EXT1 Blue

Summary of Contents for EM1A

Page 1: ...ew 32 Testpoint overview LSP 33 Testpoint overview SSB DW CRT panel 34 7 Electrical diagram s en PWB s Diagram PWB Main supply Diagram A1 35 43 48 Standby supply Diagram A2 36 43 48 Line deflection Diagram A3 37 43 48 Frame deflection Diagram A4 38 43 48 Audio amplifier Diagram A5 39 43 48 Headphone amplifier Diagram A6 40 43 48 Tuner I O SIMM connector Diagram A7 41 43 48 Front control Diagram A8...

Page 2: ... buttons Side I O connections Figure 1 1 SVHS 1 gnd v 2 gnd v 3 Y 1 Vpp 75 Ω j 4 C 0 3 Vpp 75 Ω j Audio video 1 Video 1 Vpp 75 Ω jq 2 Audio L 0 2 Vrms 10 kΩ jq 3 Audio R 0 2 Vrms 10 kΩ jq 4 Headphone 32 2000 Ω 10 mW rt 1 2 2 Rear connections Figure 1 2 Monitor out 1 Video 1 Vpp 75 Ω kq 2 Audio L 0 5 Vrms 10 kΩ kq 3 Audio R 0 5 Vrms 10 kΩ q AV1 in 1 Y 0 7 Vpp 75 Ω jq 2 Pb 0 7 Vpp 75 Ω jq 3 Pr 0 7 V...

Page 3: ...verview GB 3 EM1A 1 1 3 Chassis overview Figure 1 3 CL 06532130_003 eps 181000 LARGE SIGNAL PANEL SMALL SIGNAL BOARD B A CRT SCAVEM PANEL F MAINS SWITCH PANEL J MAINS HARMONIC PANEL Y SIDE I O PANEL D PIP DOUBLE WINDOW PANEL C TOP CONTROL PANEL E DAF PANEL I ...

Page 4: ...net should be checked for defects to avoid touching of any inner parts by the customer 2 2 Maintenance instructions It is recommended to have a maintenance inspection carried out by a qualified service employee The interval depends on the usage conditions When the set is used under normal circumstances for example in a living room the recommended interval is 3 to 5 years When the set is used in ci...

Page 5: ... with D and without E aerial signal Voltages in the power supply section are measured both for normal operation G and in Standby F These values are indicated by means of the appropriate symbols The picture tube PWB has printed spark gaps Each spark gap is connected between an electrode of the picture tube and the Aquadag coating The semiconductors indicated in the circuit diagram and in the parts ...

Page 6: ... key The request DELETE appears next to the selected channel number or source Press the cursor right to delete Press the SURF key repeatedly to scroll through the selected channels or sources Cursor Up Down allows you to select the next or previous item on the menu and to select another picture format Left Right allows you to access the sub menus and adjust the settings V Volume Increases or decre...

Page 7: ...t character You can key up to a maximum of 5 characters Press the MENU key to store the named channel Naming of channels INSTALL LANGUAGE AUTO STORE MANUAL STORE SORT CHANNEL EDIT NAME INSTALL LANGUAGE AUTO STORE MANUAL STORE SORT CHANNEL EDIT ƒ NAME SORT FROM TO EXCHANGE EXCHANGED 3 4 5 6 7 SKIPPED INSTALL LANGUAGE AUTO STORE MANUAL STORE SORT CHANNEL EDIT NAME CNN Manual tuning allows you to sto...

Page 8: ...t x of your TV Better playback quality can be obtained if you also connect the Video Audio Left and Right only for stereo equipment cables 3 to the VIDEO AUDIO L Mono and R input AV2 IN Note in case of mono equipment only the left loudspeaker reproduces sound Use a mono to stereo adaptor not supplied for sound reproduction via all internal loudspeakers The MONITOR OUT connectors can be used for da...

Page 9: ...on the right side of the TV Switch on the equipment é Select the correct external on your TV and on your video recorder Set your video recorder to record You record what you are watching on the screen Do not switch channel numbers or do not switch off your TV when you are recording Record with your video recorder Connect your camera or camcorder to sockets at the right side of your TV é Connect th...

Page 10: ...e the VOLUME Check that the television is not muted press the button on the remote control When no signal is detected the television automatically switches off the sound This is proper operation and does not indicate a malfunction Check the transmission system s sound settings of this set Adjust the contrast and brightness setting or select another picture setting with the smart picture key Check ...

Page 11: ...le and pull backward 3 Remove Mains switch module from bottomplate see description below 4 Free the necessary wiring from their fixation clamps for the ease of handling 5 Sometimes a cable must be disconnected for the ease of handling like the degaussing coil 0020 and loudspeaker 1735 1736 1737 cables 6 Now reposition following modules in order to cope with the LSP service position DAF module from...

Page 12: ...original position but for ease of use a SSB extension board is available under number 9965 000 05769 Before usage of this board the LSP top bracket has to be taken out This can be done by 1 Remove the DAF panel see 4 2 5 2 Remove the 2 screws which hold the bracket at the right side 3 Lift the bracket at the same side It hinges at the cooling plate Note For some type numbers the LSP has to be move...

Page 13: ...B while sliding the module in the direction of the CRT 2 2 The board can easily be lifted from its bracket after releasing the 2 fixation clamps 3 4 2 6 Accessing the Mains Harmonic panel Figure 4 8 1 The complete module can be removed from the LSP bracket after removal of the DAF panel by removing screw 1 and then slide the module in the opposite direction of the CRT 2 2 The board can easily be l...

Page 14: ...position 2 1 Release the two fixation clamps by pulling them backward 1 2 At the same time the complete assy must be pulled backward 2 3 If the board has to be removed release the 2 clamps at the bracket sides and lift panel up 3 4 3 Mounting the Rear Cover Before mounting the Rear Cover some checks has to be performed Check whether the Mains Cord is mounted correctly in the guiding brackets Check...

Page 15: ...lity mode and no ident timer normally the set is automatically switched off when no video signal IDENT was received for 15 minutes Entering Via a standard RC handset by entering the code 062596 followed by the MENU button Via ComPair Via grounding the Front Detect line on the Side I O panel during switch ON pins 1 and 7 of connector 0936 By the DEFAULT button on the DST while the set is in the nor...

Page 16: ...ption bytes 8 codes possible summary of options are explained below 5 Sub menus are listed in a scroll menu N O R M A L R E D P I C T U R E B R I G H T N E S S S O U N D C O L O U R F E A T U R E S C O N T R A S T I N S T A L L S H A R P N E S S C O L O U R T E M P S A M S A M S A M S A M S A M N P R G W S S B S Y S T E M O B 1 O B 2 H R S 0 0 0 3 S W I D E M 1 1 A 1 1 0 E R R 0 0 0 0 0 0 0 O P T ...

Page 17: ...2 2 Details on available software versions can be found in the chapter Software Survey of the publication Product Survey Colour Television Line 2 Error code buffer for more details see paragraph 5 3 Displays the last 7 errors of the error code buffer Line 3 Software and hardware functionality of the EM1A is controlled by option bits An option byte or option number represents 8 of those bits Each o...

Page 18: ...omer Service Mode the picture is OK Decrease the CONTRAST value The new Personal Preference value is automatically stored after 3 minutes 5 3 2 Sound problems No sound or sound too loud after channel change switching on After switching on the Customer Service Mode the volume is OK Increase decrease the volume level The new Personal Preference value is automatically stored after 3 minutes 5 4 ComPa...

Page 19: ...p ComPair and select File menu Open select EM1A Fault finding and click OK 9 Click on the icon to switch ON the communication mode the red LED on the ComPair interface will light up 10 Switch ON the TV set with the mains switch 11 When the set is in standby click on Start up in ComPair mode from standby in the ComPair EM1A faultfinding tree otherwise continue Figure 5 5 The set has now started up ...

Page 20: ...MSP connected to the 5 V supply are constantly monitored When none of these devices responds to the micro controller for a prolonged time the micro controller assumes that there is a failure in the 5 V supply By starting up the set via grounding of the FRONT_DETECT line on the side I O the 5 V protection will be overruled and it will be easier to determine the cause The 5V protection will be activ...

Page 21: ... of some circuits will be switched off Also in protection the LED will blink the number of times equivalent to the most recent error code 5 6 The blinking LED procedure The contents of the error buffer can also be made visible through the blinking LED procedure This is especially useful when there is no picture When the SDM is entered the LED will blink the contents of the error buffer Error codes...

Page 22: ...he microprocessor namely the BRIDGE_PROT coming from the line stage and the DEFL_PROT protection coming from the frame deflection stage If one of these protections is triggered the set is positioned in Standby mode The Painter will now try to re start the set If this will not succeed after 5 times after 30 60 s the Painter will generate error 7 this error can have several causes such as a Flash BR...

Page 23: ...eady Standby info high µP has been reset by POR Standby supply starts oscillating off Low_power_standby High_power_standby no no yes yes POR available within 1 second Standby high Go to protection Error code 05 HOP POR not successfull read POR bit from the HOP Wait 1500ms and reset MSP Sound IC DISABLE I2C while EHT is starting up 250ms Give HOP_start_commando within 23 5 ms after a POR is obtaine...

Page 24: ...o put supply in on mode TS7529 is blocking then Load capacitor C2515 VBAT with a load of 500 ohm Supply can not work without a minimum load Use a variac to slowly increase the VMAINS Measure over sensing resistors R3514 15 whether a nice sawtooth voltage becomes available Also measure the VBAT output VBAT may never exceed 141 V If so there is something wrong in the feedback circuitry e g regulator...

Page 25: ...re is caused by or check feed back circuit See repair tip main power supply supply needs a minimal load No picture no sound LED works fine Supply does not work correctly If e g VBAT is only about 90 V regulator IC 7506 could be damaged No RC5 reception Red LED does not echo RC commands Processor circuitry or RC receiver is wrong In case set reacts on local keyboard operation error must be found in...

Page 26: ...Fault finding and repair tips GB 26 EM1A 5 Personal notes ...

Page 27: ...athodes of the CRT pin 8 6 and 11 of the CRT connector Select the cathode with the highest VDC value for the measurement 4 Adjust Vcutoff with the Vg2 SCREEN potmeter of the LOT to 170 2 VDC Figure 8 2 8 2 2 Focusing 1 Tune the set to a circle or crosshatch test pattern use an external video pattern generator 2 Adjust the 1st Focus potmeter upper LOT potmeter see figure 8 1 until the horizontal an...

Page 28: ...uency showed in the line Fine tune is between 471 18 MHz and 471 31 MHz you don t need to re adjust the IF AFC 5 If not adjust the frequency in the Fine tune line to 471 25 MHz and store the program by leaving the menu this is very important because this will disable the AFC algorythm 6 Now go to the SAM and select Alignments General IF AFC 7 First you must align the IF AFC parameter such that you...

Page 29: ...al input Set amplitude to 1 mVRMS and set frequency for PAL BG to 475 25 MHz 2 Set CONTRAST to the maximum value 99 3 Measure with a colour analyser calibrated with the spectra on the centre of the white square on the screen Adjust the level of NORMAL BLUE and NORMAL RED to get the right XY coordinates See table 8 1 Table 8 1 8 4 Options 8 4 1 Options Options are used to control the presence absen...

Page 30: ...PMU Incredible picture via menu OFF menu item INCR PICT not available ON available OB2 8 CBFL Comb filter OFF no comb filter on the SSB ON comb filter present on the SSB OB3 1 SURF Surf OFF disabled ON enabled OB3 2 CHNA China set OFF disabled ON enabled OB3 3 VSLC Vertical slicing OFF disabled ON enabled OB3 4 W169 Double Window 16 9 OFF disabled ON enabled OB3 5 W4X3 Double Window 4 3 OFF disabl...

Page 31: ...nction enabled OB3 1 W4X3 Double Window 4 3 OFF function disabled ON function enabled OB3 2 ISUR Incredible Surround OFF function disabled ON function enabled OB3 3 PIPF PIP Functionality OFF function disabled ON function enabled OB3 4 PIPT PIP Tuner OFF function disabled ON function enabled OB3 5 PIPS PIP Surf OFF function disabled ON function enabled OB2 6 PIPC PIP Control OFF function disabled ...

Page 32: ... the EM1A LSP has a very large hot part including the deflection coil The SSB is a high tech module 2 sides reflow technology full SMC with very high component density and complete shielding for EMC reasons Despite this it is designed in such a way that repair on component level will be possible To achieve this attention has been paid to The position of service test lands Tuner side Accessibility ...

Page 33: ... Degaussing circuit The Main Supply a SOPS supply based on the down converter principle generates the 141 V VBAT and the 28 V for the audio part Difference with former MG sets is that VBAT is not mains isolated hot and is alignment free 9 1 3 Power supply diagram A1 A2 General The power supply has a number of main functions These functions are dealt with in succession Mains filter Degaussing pictu...

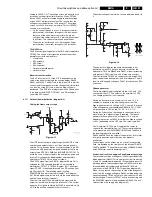
Page 34: ...mary coil will induce a counter e m f that wants to maintain the current The voltage on the drain of the FET will increase The secondary voltage 8 9 will become positive and will charge C2104 via D6107 and D6111 All energy that was stored in L5101 during t0 t1 will be transferred into the load Due to the transformer principle a voltage will now be induced in the primary winding 3 5 and the co coup...

Page 35: ...in coil L will be transferred to electrostatic energy in capacitor C The VIN will only supply current during the time that S is closed while a constant current is flowing through RL VBAT is directly proportional with VIN and the time that S is closed and reverse proportional with period time T So by changing the duty cycle it will be possible to control VBAT Figure 9 6 At start up of the main supp...

Page 36: ...BY At the moment the set is switched ON the HOP is not working as much as possible IC s are made voltageless during STANDBY Therefore it is impossible that the STANDBY line carries line pulses so the main supply cannot start up This problem is solved via the low power start up possibility of the HOP Via pin 22 the HOP receives via the STANDBY_INFO line from the Painter a voltage of 5 2 V coming fr...

Page 37: ...ion delivering HA and VA Switching off IF filtering The HIP has various inputs Full matrix switch with 2 CVBS inputs 2 Y C or additional CVBS inputs 1 CVBS front end input Two RGB and 1 YUV input Outputs Three separate switchable outputs can be used 1 YUV output is fed to the PICNIC 2 CVBS outputs One for Teletext Dual Screen and the other for output to MONITOR OUT to have WYSIWYR What you see is ...

Page 38: ... without movement Variable Vertical Sample Rate Conversion Synchronous No Parity Eight bit Reception an Transmission interface SNERT bus Depending on the chassis model the FBX6 can have the following specification 9 1 8 Video High end Output Processor HOP diagram B4 General In the HOP High end Output Processor TDA9330 the video processor and digital deflection processor are integrated The main fun...

Page 39: ...herefore this pulse is converted into a VDHOP signal by a 530 µs monostable oscillator extended by 16 5 lines This signal is on block function level equal to VSYNC and FRAMEDRIVE The Painter is synchronised on the HD100 pulse from the FBX and on the VSYNC for the synchronisation of TXT OSD When no CVBS is offered to the video processor the VA and HA pulses are switched off by the HIP and the VD an...

Page 40: ...left side will be reduced C2433 is charged quadratic during time interval t1 t2 Left and right the voltage across the deflection coil decreases causing the deflection to slow down In the centre the voltage increases and the deflection will be faster An S shaped current will have to be superimposed onto the saw tooth current This correction is called finger length correction or S correction C2433 i...

Page 41: ...en 8 and 8 V Figure 9 12 The sawtooth voltage for the frame output stage is not generated by the HOP but by a discrete circuit after the optocoupler 7610 via R3600 and R3601 a linear increasing voltage over C2601 is built up with a large time constant The circuit around TS7603 is a current source driving C2601 with a current value derived from the E W modulator This will result in an S shaped volt...

Page 42: ...und output MSP3451G Virtual Dolby The MSP3451 which is used in all versions supporting Virtual Dolby is capable of supporting 4 stereo inputs and 1 mono AM INPUT Therefore the extra input selector HEF4052 is not needed The MSP3451 is also capable of supporting 2 EXT outputs so the trick used in the MSP3415 set up to get a constant level output is not needed The MSP3451 has a separate headphone out...

Page 43: ...n and Blue are added together and offered to the emitter TS7300 On the collector of this transistor configured in a common base the sum of these 3 signals is obtained Via the emitter follower formed with TS7301 this signal is conveyed to the differentiator C2303 R3309 and R3318 Only the high frequencies are differentiated small RC time The positive and negative pulses of this signal drive respecti...

Page 44: ... IF frequency settings by the RESET signal TUNER 7201 SPLITTER LATAM AP RF to Main Tuner 1352 4 5 1 11 IF RGB YUV INPUT2 RGB YUV MATRIX COLOUR DECODING SYNC RBG YUV MATRIX YUV INTERFACE RGB INPUT1 RGB OUTPUT DOUBLE WINDOW PROCESSOR IC7801 SAB9081H TDA888X IC7301 7803 TDA8601 1333 4305 PIP AUDIO PIP AUDIO 12 11 10 6 7 8 8 12 10 10 6 8 9 2 3 4 4 3 1 0205 Y MAIN OUT U MAIN OUT V MAIN OUT Y PIP MAIN I...

Page 45: ...1 MB DRAM of the video data is done entirely in the digital domain The conversion back to the analogue domain is done by DACs Internal clocks are generated by PLLs which lock on to the applied horizontal and vertical syncs from the main sub pictures The main picture syncs are applied to pin 70 vert pin 94 hor and the sub picture syncs are applied to pin 72 vert and pin 87 hor For DW mode the main ...

Page 46: ...supply voltage DC PROT DC protection DFU Direction For Use description for the end user DNR Digital Noise Reduction noise reduction feature of the box DSP Digital Signal Processing DST Dealer Service Tool special remote control designed for dealers to enter e g service mode DVD Digital Versatile Disc DYN FASE COR Dynamic phase correction EHT Extra High Tension EHT INFO Extra High Tension informati...

Page 47: ... PILOTMUTE Pilot Mute signal Progressive Scan Scan mode where all scan lines are displayed in one frame at the same time creating a double vertical resolution PTP Picture Tube Panel RAM Random Access Memory RC Remote Control RC5 RC5 signal from the remote control receiver RESET Reset signal ROM Read Only Memory SAM Service Alignment Mode SC Sandcastle pulse derived from sync signals SCAVEM Scan Ve...

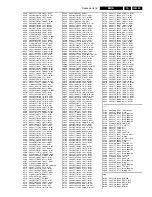
Page 48: ...µF 20 350V 2469 4822 122 31169 1n5F 10 500V 2471 2222 460 90025 18nF 2 63V 2480 4822 121 43856 4n7F 5 250V 2485 2222 460 90022 10nF 2 63V 2489 4822 124 40433 47µF 20 25V 2492 4822 126 14076 220nF 25V 2493 5322 122 32654 22nF 10 63V 2494 4822 126 14076 220nF 25V 2495 4822 126 14076 220nF 25V 2496 4822 126 13838 100nF 20 80 50V 2497 4822 126 14076 220nF 25V 2498 4822 126 14585 100nF 10 50V 2499 4822...

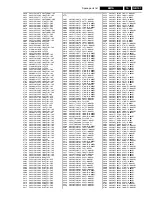
Page 49: ...0176 1Ω 5 0 5W 3621 4822 116 80176 1Ω 5 0 5W 3622 4822 116 80176 1Ω 5 0 5W 3623 4822 051 20223 22k 5 0 1W 3624 4822 052 10158 1Ω5 5 0 33W 3625 4822 116 83872 220Ω 5 0 5W 3626 4822 116 83872 220Ω 5 0 5W 3627 4822 116 52238 12k 5 0 5W 3628 5322 116 53564 3Ω3 5 0 5W 3630 4822 051 10102 1k 2 0 25W 3631 4822 051 20472 4k7 5 0 1W 3632 4822 117 10833 10k 1 0 1W 3633 4822 117 11449 2k2 5 0 1W 3639 4822 05...

Page 50: ...irtual DS 1020 3104 328 10991 SSB Middle East virtual DS 1301 2422 540 98456 Crystal 12MHz 1309 2422 543 01184 Crystal 4 433619MHz 1310 2422 543 01183 Crystal 3 579545MHz 1405 2422 549 44374 Saw Filter OFWK9352L 1405 2422 549 44389 Saw Filter OFWK9361L 1406 2422 549 44324 Crystal 5 5 5 74MHz 1407 2422 549 44043 Crystal 4MHz 1408 2422 549 44376 Saw Filter 1408 2422 549 44388 Saw Filter 1409 2422 54...

Page 51: ...1 30682 6k8 5 0 062W 3053 4822 051 30103 10k 5 0 062W 3055 2422 086 11013 Fuse 1Ω5 3056 4822 117 12925 47k 1 0 063W 3057 4822 117 12925 47k 1 0 063W 3059 4822 051 30472 4k7 5 0 062W 3060 4822 051 30272 2k7 5 0 062W 3061 4822 051 30103 10k 5 0 062W 3062 4822 051 30101 100Ω 5 0 062W 3063 4822 051 30101 100Ω 5 0 062W 3064 4822 051 30101 100Ω 5 0 062W 3300 2322 750 63908 Fuse 3Ω9 5 3301 4822 117 13632...

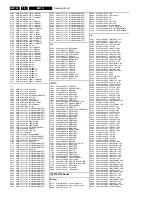
Page 52: ...1 92557 SAA5667 7001 9352 659 94557 SAA5647HL M1 7002 4822 130 60373 BC856B 7003 3198 010 42310 BC847BW 7004 3198 010 42310 BC847BW 7005 9322 116 74668 LD1117D33 7006 4822 209 73852 PMBT2369 7007 4822 209 73852 PMBT2369 7011 9322 156 63668 CY7C1019V33 15VC 7012 4822 209 17377 M24C32 WMN6 7301 9352 625 23518 TDA9330H N2 7303 5322 130 42756 BC857C 7307 9352 630 99118 Comb filter multi TDA9181 7308 9...

Page 53: ... 4822 051 20471 470Ω 5 0 1W 3801 4822 117 11503 220Ω 1 0 1W 3802 4822 117 10361 680Ω 1 0 1W 3803 4822 117 11503 220Ω 1 0 1W 3804 4822 051 30681 680Ω 5 0 062W 3805 4822 051 30221 220Ω 5 0 062W 3806 4822 051 30681 680Ω 5 0 062W 3807 4822 051 30221 220Ω 5 0 062W 3808 4822 117 10361 680Ω 1 0 1W 3809 4822 051 30221 220Ω 5 0 062W 3810 4822 051 30681 680Ω 5 0 062W 3811 4822 117 11503 220Ω 1 0 1W 3812 482...

Page 54: ...hift assy EMG 1430 2422 086 10581 Fuse 400mA 65V b 5430 3128 138 38911 DC shift coil d 6432 9340 317 00133 BYD33V 6433 9340 317 00133 BYD33V 8318 3104 301 08731 2P3 220mm I DAF Panel Various 0030 3104 304 21651 DAF DC SHIFT BRACKET 0317 4822 265 20723 2P 0318 2422 025 16374 2P male V 0391 3104 311 02452 JST 340mm 0397 4822 267 10973 1P g 2800 2222 375 90504 820pF 5 2kV 2890 2222 375 90504 820pF 5 ...

Reviews: