background image

242

Connecting to a 

C

omputer

8

Manipulating Captured Images 

on a Computer

The captured still pictures and movies can be transferred to a computer 

by connecting the camera using a USB cable, and RAW images can be 

developed using the provided software “SILKYPIX Developer Studio 3.0 LE”. 

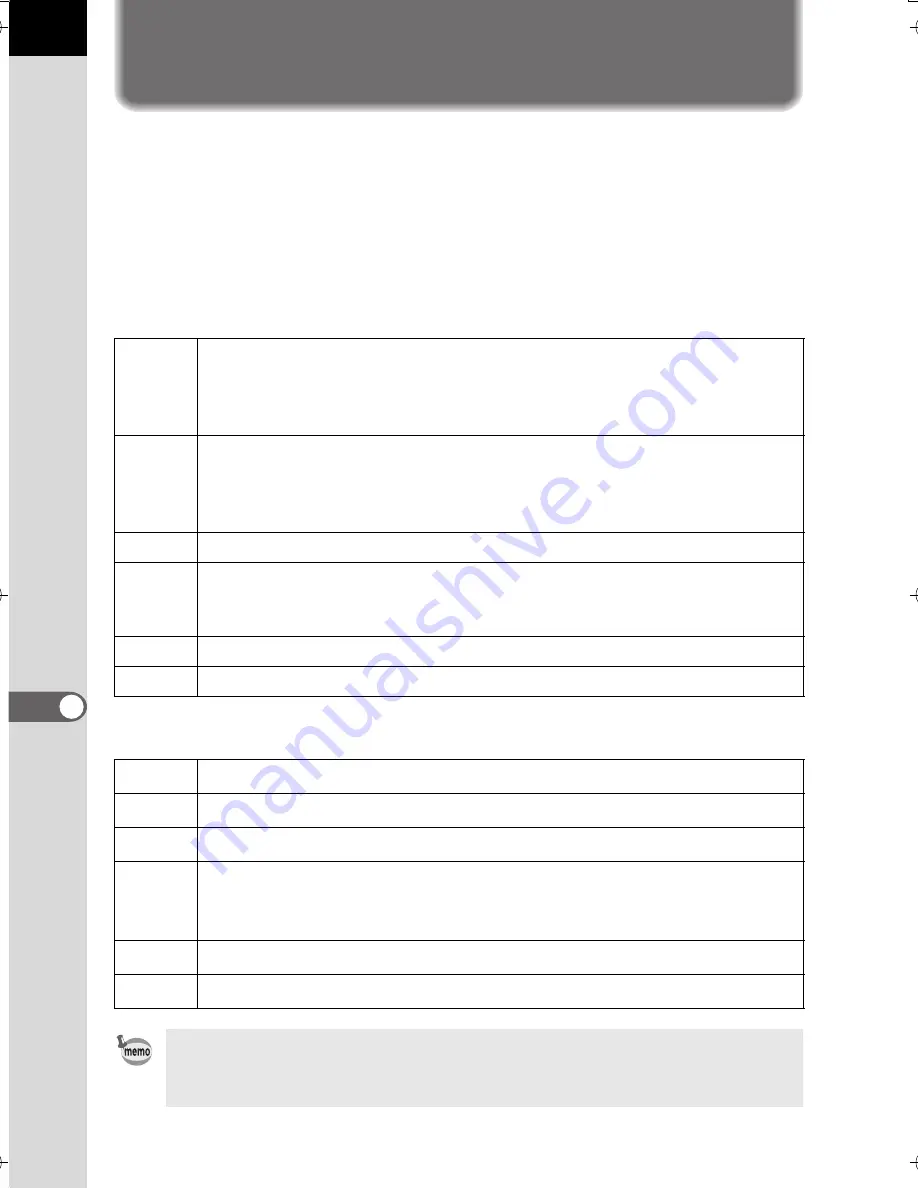
When connecting the camera to a computer and using the software, we 

recommend using a computer with the following system requirements. 


Windows


Macintosh

OS

Windows XP (SP3 or later, 32-bit Home/Pro), Windows Vista 

(32-bit, 64-bit), Windows 7 (32-bit, 64-bit), Windows 8 (32-bit, 64-bit)

Installation requires administrator rights 

Can be run as a 32-bit application on any 64-bit Edition of Windows 

CPU

Intel Pentium-compatible processor (Pentium 4, Athlon XP or higher 

recommended) 

Supports multi-core processors (Intel Core i5, i7; Core 2 Quad, Duo; 

AMD Phenom II X4, X6; Athlon II X2, X4; and other) 

RAM

1 GB minimum (2 GB or more recommended)

HDD

For installing and starting up the program: 100 MB minimum of free 

space

For saving image files: Approx. 10 MB/file 

Monitor 1024×768 dots, 24-bit full color or higher
Others

Input devices such as a keyboard and mouse 

OS

Mac OS X 10.5, 10.6, 10.7 or 10.8

CPU

Intel processor-compatible, Power PC

RAM

1 GB minimum (2 GB or more recommended)

HDD

For installing and starting up the program: 100 MB minimum of free 

space

For saving image files: Approx. 10 MB/file 

Monitor 1024×768 dots, 24-bit full color or higher
Others

Input devices such as a keyboard and mouse 

Use the provided software to develop RAW images captured with this camera. 

QuickTime is required to play back movies transferred to a computer. 

You can download it from the following site: http://www.apple.com/quicktime/

K-500.book  Page 242  Friday, June 14, 2013  2:29 PM

Summary of Contents for Silkypix K-500

Page 1: ...SLR Digital Camera O Operating Manual K 500...

Page 2: ...arks of Apple Inc registered in the U S and other countries Intel Intel Core and Pentium are trademarks of Intel Corporation in the U S and other countries SDXC Logo is a trademark of SD 3C LLC Eye Fi...

Page 3: ...with the rechargeable lithium ion battery D LI109 the AA battery holder D BH109 with four AA batteries or an optional AC adapter The power supply provided with this camera varies depending on the coun...

Page 4: ...e the battery charger and AC adapter exclusively developed for this camera with the specified power and voltage Using a battery charger or AC adapter not exclusive to this camera or using the exclusiv...

Page 5: ...ot rub them Flush your eyes with clean water and get medical attention immediately Caution Only use the specified battery with this camera Use of other batteries may cause an explosion or fire Do not...

Page 6: ...Ni MH batteries The batteries could explode or catch fire AA batteries for use with this camera other than Ni MH batteries cannot be charged Do not open the battery cover or remove the batteries whil...

Page 7: ...gh temperatures or high humidity Do not leave the camera in a vehicle as the temperature can get very high Do not subject the camera to strong vibrations shocks or pressure Use a cushion to protect th...

Page 8: ...and the card from being formatted by the camera or computer The SD Memory Card may be hot when removing the card immediately after using the camera Do not remove the SD Memory Card or turn off the pow...

Page 9: ...Eye Fi cards which have been updated to the newest firmware Set Eye Fi to Off or do not use an Eye Fi card in a location where the use of wireless LAN devices is restricted or prohibited such as airpl...

Page 10: ...8 Memo...

Page 11: ...wfinder 37 How to Change Function Settings 39 Using the Direct Keys 39 Using the Control Panel 40 Using the Menus 41 Getting Started 45 Attaching the Strap 46 Inserting the Battery 47 Using the Lithiu...

Page 12: ...ate Capture Mode 86 Auto Picture Modes 87 Scene Modes 88 Exposure Modes 90 Setting the Exposure 91 Setting the Sensitivity 91 Changing the Exposure Mode 93 Adjusting the Exposure 96 Locking the Exposu...

Page 13: ...mat 147 JPEG Recorded Pixels 148 JPEG Quality 148 Color Space 148 Setting the White Balance 149 Adjusting the White Balance Manually 152 Adjusting the White Balance with Color Temperature 154 Correcti...

Page 14: ...ages 192 Deleting Multiple Images 193 Deleting Selected Images 193 Deleting a Folder 194 Deleting All Images 195 Processing Images 196 Changing the Number of Recorded Pixels Resize 196 Cutting Out Par...

Page 15: ...e 233 Setting the Photographer Information 234 Using an Eye Fi Card 236 Setting the DPOF Settings 239 Connecting to a Computer 241 Manipulating Captured Images on a Computer 242 Saving Images on a Com...

Page 16: ...gth 275 Using the Aperture Ring 276 Cleaning the CMOS Sensor 277 Removing Dust by Shaking the CMOS Sensor Dust Removal 277 Removing Dust with a Blower 278 Using the GPS Unit 280 Shooting Celestial Bod...

Page 17: ...hooting Settings Explains procedures for changing the shooting settings such as the file format 6 Playback Functions and Image Editing Explains various operations for playing back and editing images 7...

Page 18: ...ned below In this manual the arrow keys of the four way controller are referred to in the following way 1 Indicates reference page numbers explaining a related operation Indicates useful information I...

Page 19: ...our Camera Check the package contents and the names and functions of the working parts before use Checking the Contents of the Package 18 Names and Functions of the Working Parts 19 How to Change Func...

Page 20: ...e camera was purchased The camera may come with the AA battery holder D BH109 and four AA lithium batteries instead of the rechargeable lithium ion battery D LI109 and battery charger D BC109 Hot shoe...

Page 21: ...of the camera will not be effective Card access lamp Tripod socket Self timer lamp Remote control receiver Mirror AF assist light Microphone Monitor Battery cover Hot shoe Card cover Strap lug Lens mo...

Page 22: ...rts are used and how they function when in capture mode Capture Mode The factory default setting of each part is explained here but some parts have multiple functions and work differently depending on...

Page 23: ...on Press to pop up the built in flash p 73 9 V Y button You can assign a function to this button p 171 0 Focus mode switch Changes the focus mode p 105 a U i Live View button Displays the Live View im...

Page 24: ...9 p 112 When the camera is in mode or when the focus is locked during Live View press this button to magnify the image on the monitor p 113 g Four way controller 2345 Displays the Sensitivity White Ba...

Page 25: ...ge is JPEG and its data still remains in the buffer memory press this button to save the image in RAW format p 74 2 Shutter release button Press halfway to switch to capture mode 3 Main switch Move to...

Page 26: ...186 p 187 8 Q Playback button Switches to capture mode 9 4 button Confirms the setting you selected in the menu or playback screen 0 Four way controller 2345 Use this to move the cursor or change the...

Page 27: ...ooting The camera is in standby mode when the status screen or the Live View image is displayed Press the M button in standby mode to display the control panel and change settings p 29 If you press th...

Page 28: ...ite Balance fine tuning p 150 23 Eye Fi communication status p 236 24 Number of shots during Interval Shooting or Multi exposure 25 File Format p 147 26 JPEG Recorded Pixels p 148 27 JPEG Quality p 14...

Page 29: ...value 22 EV bar scale 23 Sensitivity p 91 24 Number of recordable still pictures movie recordable time 25 Face detection frame Indicator 11 appears only when the optional GPS unit is attached to the...

Page 30: ...e Live View image when used in dark locations The higher the sensitivity the more noise and color unevenness may occur in the monitor image and or captured image If you continue shooting for a prolong...

Page 31: ...4 16 Shake Reduction p 120 Movie SR p 134 17 Contrast AF p 110 18 Destination setting p 215 19 Current date and time p 62 20 SD Memory Card status 21 Number of recordable still pictures movie recordab...

Page 32: ...r release button halfway or turn the camera off and on again to return to the status screen Available only when the optional GPS unit is attached to the camera and is operating p 280 The Shooting Info...

Page 33: ...led information on how and when the image was taken is displayed in two pages p 32 Histogram Display The captured image and brightness histogram are displayed p 34 Not available during movie playback...

Page 34: ...30 AM AM 10 10 10 10 0 0 0 0 1 125 1 125 F8 0 F8 0 G1A1 G1A1 50mm 50mm 125 125 100 0001 100 0001 0 0 0 0 0 0 0 0 0 0 10 30 10 30 AM AM 1 2 3 4 5 6 7 8 9 10 11 12 13 29 30 14 15 16 17 20 19 18 21 22 23...

Page 35: ...at p 147 23 JPEG Recorded Pixels p 148 Movie Recorded Pixels p 134 24 JPEG Quality p 148 Movie Quality Level p 134 25 Highlight Correction p 155 26 Shadow Correction p 155 27 Distortion Correction p 1...

Page 36: ...image is JPEG and the image can also be saved in RAW format p 74 Histogram Display RGB Histogram Display 1 Histogram Brightness 7 Aperture value 2 Protect setting 8 Sensitivity 3 Folder number File nu...

Page 37: ...stogram Display If a color is partially cut off on one side it indicates that the color is under or overexposed that the light is very weak or strong in that color or that the white balance is incorre...

Page 38: ...uttons and e dials that can be operated at that time Example Guide Indicators 2 Four way controller 2 d button 3 Four way controller 3 M button 4 Four way controller 4 m button 5 Four way controller 5...

Page 39: ...cus mode p 105 Appears when set to 5 Shutter speed Underlined when it can be adjusted 6 Aperture value Underlined when it can be adjusted 7 Focus indicator p 67 Lit when the subject is in focus Blinks...

Page 40: ...exposure is set 14 AE Metering p 101 Appears when Center weighted metering or Spot metering is selected 15 Shake Reduction p 120 Appears when the Shake Reduction function is activated 16 Flash Exposu...

Page 41: ...White Balance Flash Mode and Drive Mode by pressing the four way controller 2345 p 78 Below how to set Flash Mode is explained as an example 1 Press the four way controller 4 in standby mode The Flas...

Page 42: ...ange the setting for You cannot select items that cannot be changed as a result of current camera settings 3 Press the 4 button The setup screen of the selected item appears 4 Use the four way control...

Page 43: ...Mode 3 menu is explained as an example 1 Press the 3 button in standby mode The A Rec Mode 1 menu appears on the monitor The menus listed below are displayed in the following situations You can also...

Page 44: ...e 3 button to cancel the pop up menu or return to the previous screen Custom Image Custom Image Digital Filter Digital Filter Image Capture Settings Image Capture Settings AE Metering AE Metering MENU...

Page 45: ...again Your settings may not be saved if the camera is turned off improperly such as by removing the battery while the camera is on You can select either to display the menu tab selected the last time...

Page 46: ...44 Before Using Your Camera 1 Memo...

Page 47: ...he camera to taking pictures Be sure to read this and follow the instructions Attaching the Strap 46 Inserting the Battery 47 Inserting Removing an SD Memory Card 54 Attaching a Lens 56 Adjusting the...

Page 48: ...Getting Started 2 Attaching the Strap 1 Pass the end of the strap through the strap lug then secure it on the inside of the clasp 2 Attach the other end of the strap in the same manner as described ab...

Page 49: ...chased The item not provided with the camera is optionally available Use the battery charger D BC109 and the rechargeable lithium ion battery D LI109 to power the camera When using the battery for the...

Page 50: ...harger Do not use the Battery Charger D BC109 to charge batteries other than D LI109 Charging other batteries may cause damage or heating Replace the battery with a new one in the following cases If t...

Page 51: ...inserting Be careful as the camera or battery may become hot when the camera is used continuously for a long period of time Remove the battery when you will not use the camera for a long while The bat...

Page 52: ...rechargeable and reusable A battery charger that is compatible with the batteries is required AA alkaline batteries These are easily obtainable when the batteries you are using run out but they may n...

Page 53: ...mpty Battery depleted The camera turns off after displaying the message f y or F red may appear even when the battery level is sufficient if the camera is used at low temperatures or when performing c...

Page 54: ...r Refer to Step 1 on p 49 Remove the battery if it is inserted in the camera 3 Pull out the connection cable cover 1 on the right of the battery cover and insert the DC coupler into the battery chambe...

Page 55: ...SD Memory Card or data may be corrupted if the connection to the power supply is lost while the card is being accessed The connection cable will protrude from the connection cable cover on the camera...

Page 56: ...t to open 1 2 3 Insert the card all the way with the SD Memory Card label facing toward the monitor Do not remove the SD Memory Card while the card access lamp is lit Do not open the card cover while...

Page 57: ...the direction of the arrow 4 Be sure to fully close the card cover The camera will not turn on if the card cover is open For details on the approximate number of still pictures and amount of time of m...

Page 58: ...after removing the lens from the camera Do not insert any fingers into the camera mount or touch the mirror The camera body and lens mount incorporate lens information contacts Dirt dust or corrosion...

Page 59: ...o make sure that the lens is locked in place 4 Remove the front lens cap by pushing the indicated portions inward To remove the lens Attach the lens cap first and then turn the lens counterclockwise w...

Page 60: ...the eyecup removed 1 Remove the eyecup by pulling it out in the direction of the arrow 2 Look through the viewfinder and slide the diopter adjustment lever left or right Adjust the lever until the AF...

Page 61: ...you do not perform any operations within a set period of time Auto Power Off To reactivate the camera turn it on again or perform any of the following operations Press the shutter release button half...

Page 62: ...and press the 4 button The Initial Setting screen appears in the selected language Proceed to Step 6 if W Hometown does not have to be changed 2 Press the four way controller 3 to move the frame to W...

Page 63: ...ur way controller 23 to select Standard or Large and press the 4 button Selecting Large increases the text size of the selected menu items 8 Press the four way controller 3 to select Settings complete...

Page 64: ...h in Step 2 the camera switches between am and pm depending on the time If the hometown and the date and time are not set the Initial Setting screen or Date Adjustment screen will be displayed again t...

Page 65: ...set the exact time press the 4 button when the time signal on the TV radio etc reaches 0 seconds Pressing the 3 button while setting the date and time cancels the settings made up to that point and sw...

Page 66: ...64 Getting Started 2 Memo...

Page 67: ...the mode dial to n Auto Picture to have the camera select the optimum settings based on the subject For information about advanced functions and settings for taking pictures refer to chapter 4 and on...

Page 68: ...ake pictures by simply pressing the shutter release button You can take pictures while looking through the viewfinder or while viewing the image on the monitor 1 Set the mode dial to n The capture mod...

Page 69: ...utter release button halfway The autofocus system operates The focus indicator appears and you will hear a beep when the subject comes into focus focus lock When set to n mode the optimal capture mode...

Page 70: ...1Setting the Display for Instant Review p 220 U i button Deletes the image p 75 Rear e dial S Magnifies the image p 186 m button Saves the RAW image only when the data is available p 74 The beep that...

Page 71: ...ame turns green when focused Subsequent steps are the same as shooting with the viewfinder Press the U i button to end the Live View shooting Taking Pictures Using Live View You can magnify the centra...

Page 72: ...an s Auto position For details on the built in flash and instructions on how to take pictures with an external flash refer to Using the Flash p 249 Setting the Flash Mode Flash Mode Function C Auto F...

Page 73: ...m r Wireless Mode You can synchronize an optional external flash without using a sync cord p 257 Capture Mode Selectable Flash Mode n H C i E F r e K c E F G H I r b L a p E F k r The flash does not d...

Page 74: ...s Selectable Flash Compensation Value 1 3 EV 2 0 1 7 1 3 1 0 0 7 0 3 0 0 0 3 0 7 1 0 1 2 EV 2 0 1 5 1 0 0 5 0 0 0 5 1 0 When the flash output exceeds its maximum amount the compensation will not be ef...

Page 75: ...retracted 2 Take a picture The flash discharges When the flash mode is set to C or i the flash is not discharged if the lighting conditions do not require flash for correction even when the flash is...

Page 76: ...le format of the last captured image is JPEG and its RAW data still remains in the buffer memory you can save the RAW image during Instant Review or playback if Save RAW Data is enabled in Instant Rev...

Page 77: ...ect Delete and press the 4 button The image is deleted Deleting a Single Image Deleted images cannot be restored Protected images cannot be deleted p 229 You can delete multiple images at once Refer t...

Page 78: ...76 Basic Operations 3 Memo...

Page 79: ...able with this camera How to Operate the Shooting Functions 78 Selecting the Appropriate Capture Mode 86 Setting the Exposure 91 Focusing 105 Checking the Depth of Field Preview 118 Using the Shake Re...

Page 80: ...etails on how to use the direct keys and menus refer to How to Change Function Settings p 39 Direct Keys Setting Items Key Item Function Page 2 Sensitivity Sets the ISO sensitivity p 91 3 White Balanc...

Page 81: ...and contrast before shooting an image p 161 Digital Filter 2 Applies a digital filter effect when taking pictures p 165 HDR Capture 2 Enables capturing images with high dynamic range p 156 Image Captu...

Page 82: ...F Active Area 2 Selects the part of the viewfinder to focus on p 108 AF Assist Light Sets whether to use the AF assist light when autofocusing in dark locations p 107 Lens Correction 2 Reduces distort...

Page 83: ...on p 120 Input Focal Length Sets the focal length when using a lens for which focal length information cannot be obtained p 275 A4 Live View Sets the Live View display and focus method settings p 111...

Page 84: ...he movie exposure mode from e c or a mode p 133 Movie Capture Settings Recorded Pixels 1 Sets the number of recorded pixels and size of the movie Framerate 1 Sets the number of frames shot per second...

Page 85: ...ensitivity p 92 3 Meter Operating Time Sets the meter operating time p 101 4 AE L with AF Locked Sets whether to lock the exposure value when the focus is locked p 100 5 Link AE and AF Point Sets whet...

Page 86: ...e white balance is set to F Auto White Balance 11 Color Temperature Steps Sets the adjustment steps for color temperature p 154 12 AF S Setting Sets the action priority for when the focus mode is set...

Page 87: ...n is pressed p 221 18 Catch in Focus Enables Catch in Focus shooting when a manual focus lens is attached and the shutter is released automatically when the subject comes into focus p 117 19 AF Fine A...

Page 88: ...capture mode to the dial indicator Capture Mode Characteristics Page n Auto Picture mode Automatically selects the optimal capture mode for the subject p 87 H Scene mode Lets you choose the capture mo...

Page 89: ...images of fast moving subjects such as at sporting events Night Scene Portrait For capturing images of people in low light conditions such as dusk or at night Even though the flash is used the camera...

Page 90: ...prevent camera shake either turn on the Shake Reduction function or mount the camera on a tripod K Sunset For capturing sunrises or sunsets in beautiful vivid color d Blue Sky For capturing images of...

Page 91: ...t condition U Candlelight For capturing scenes in candlelight n Stage Lighting For capturing moving subjects in poorly lit place E Museum For capturing images in places where a flash is prohibited The...

Page 92: ...ty to suit the brightness of the surroundings b Shutter Priority Automatic Exposure Lets you set the desired shutter speed for expressing subject movement c Aperture Priority Automatic Exposure Lets y...

Page 93: ...controller 2 in standby mode The Sensitivity setting screen appears 2 Use the four way controller 23 to select ISO AUTO or ISO 3 Turn the rear e dial S to change the sensitivity value For ISO AUTO tu...

Page 94: ...e If the mode dial is set to a when the sensitivity is set to ISO AUTO the camera operates in L mode More noise may appear in captured images if a higher sensitivity is set You can reduce image noise...

Page 95: ...a when the sensitivity is set to ISO AUTO the camera operates in L mode 1 Set the mode dial to e K b c L a or p R or S appears on the status screen for the value that can be changed Changing the Expo...

Page 96: ...he proper exposure is displayed in a bar scale while the shutter speed or aperture value is adjusted The exposure value blinks red when the difference from the proper exposure is 3 0 or larger The pro...

Page 97: ...m Setting 2 menu Mode1 Exposure continues while the shutter release button is pressed default setting Mode2 Exposure starts with the first press of the shutter release button and ends with the second...

Page 98: ...A Custom Setting 1 menu 1 Press the m button 1 and then turn the rear e dial S 2 The exposure is adjusted m and the compensation value are displayed in the status screen viewfinder and Live View scree...

Page 99: ...sation value is not canceled by turning the camera off or by switching to another capture mode Changing the Exposure Automatically when Shooting Exposure Bracketing Standard exposure Underexposure Ove...

Page 100: ...s displayed in the status screen viewfinder and Live View screen when the subject comes into focus 6 Press the shutter release button fully Press and hold the shutter release button until three pictur...

Page 101: ...or taking the first image When 7 One Push Bracketing of the A Custom Setting 1 menu is set to On even if the shutter release button is not continuously pressed three pictures are automatically taken w...

Page 102: ...uations while the L button is pressed while the shutter release button is pressed halfway for twice the amount of the meter operating time p 101 You will hear a beep when AE Lock is activated and deac...

Page 103: ...r and no automatic adjustment is performed even during backlit scenes N Spot The brightness is measured only within a limited area at the center of the sensor You can use this in combination with AE L...

Page 104: ...controller 5 and use the four way controller 23 to select a setting Reducing the Image Noise Noise Reduction Pictures cannot be taken while the camera is performing a noise reduction process In partic...

Page 105: ...l of noise reduction which is applied to the selected sensitivity value The sensitivity values displayed vary according to the 1 EV Steps and 2 Sensitivity Steps settings made in the A Custom Setting...

Page 106: ...ter Speed NR Auto Determines conditions such as shutter speed sensitivity and the camera s internal temperature and automatically applies Noise Reduction as necessary default setting On Applies Noise...

Page 107: ...and k p 106 Set the focusing point in AF Active Area p 108 Faster autofocus performance than contrast detection AF is possible Shooting with Live View Contrast detection AF Face detection and trackin...

Page 108: ...ode is fixed to l in c Portrait s Landscape b Macro Night Scene Portrait x Forest A Night Scene Z Night Scene HDR K Food K Sunset Q Surf Snow y Backlight Silhouette U Candlelight E Museum of H mode Th...

Page 109: ...Auto mode Switches automatically between l and k modes according to the subject Set in AF A of AF Settings in the A Rec Mode 2 menu The focus mode is fixed to f in n mode In H mode f is not available...

Page 110: ...era selects the optimum AF point even if the subject is not centered default setting c Auto 11 AF Points Out of the 11 AF points the camera selects the optimum AF point even if the subject is not cent...

Page 111: ...ization of the A Rec Mode 4 menu p 171 press the V Y button to enable or disable changing the AF point and turn the front rear e dial to change the AF point as in Step 4 You can select the upper or lo...

Page 112: ...he Contrast AF during Live View D Face Detection Detects and tracks faces of people default setting The main face detection frame for autofocus and auto exposure is displayed in yellow E Tracking Trac...

Page 113: ...can set whether to display a grid info overlay histogram and bright dark area warning during Live View in Live View of the A Rec Mode 4 menu When Info Overlay is disabled the indicators which provide...

Page 114: ...on The range of the selectable area is displayed with broken lines and a rectangle appears on it You can set the AF area by changing the position and size of this rectangle 5 Select the AF area Availa...

Page 115: ...halfway the image on the monitor is magnified centering around the AF point 3 Turn the rear e dial S to change the magnification Magnification can be selected from x2 x4 or x6 4 Press the 4 button or...

Page 116: ...even if the subject is not in focus You can manually adjust the focus using the matte field in viewfinder 1 Set the focus mode switch to 2 Look through the viewfinder and turn the focusing ring If th...

Page 117: ...e a picture Focusing Using Live View Rear e dial S to the right y Magnifies the image up to 6 times Rear e dial S to the left f Reduces the image up to 2 times Four way controller 2345 Changes the dis...

Page 118: ...when necessary Care should be taken as adjusting the autofocus may make it difficult to capture images with the appropriate focus Any camera shake during test shooting may make it difficult to obtain...

Page 119: ...value to the default setting Shooting in Catch in Focus Mode When 18 Catch in Focus of the A Custom Setting 3 menu is set to On and one of the following types of lenses is attached Catch in Focus sho...

Page 120: ...rough the viewfinder You can check the depth of field in the viewfinder while the V Y button is pressed During this operation no shooting information is displayed in the viewfinder and the shutter can...

Page 121: ...ars on the monitor during preview and you can check the composition exposure and focus Available operations 3 Press the shutter release button halfway Digital Preview is ended and the autofocus system...

Page 122: ...urring caused by subject movement To take pictures of a moving subject increase the shutter speed The Shake Reduction function may not fully reduce camera shake when taking close up shots In this case...

Page 123: ...situations Self timer shooting Remote Control shooting when p mode is set when HDR Capture is set and the Auto Align function is disabled during Composition Adjustment The Shake Reduction function is...

Page 124: ...shutter release button halfway The autofocus system operates Shooting with the Self timer g Self timer 12 sec The shutter is released after about 12 seconds Use this mode to include the photographer i...

Page 125: ...nds after the shutter release button is pressed fully Select Single Frame Shooting in the Drive Mode setting screen to cancel shooting with the self timer The setting is canceled automatically when th...

Page 126: ...link and the camera is in a standby status 5 Press the shutter release button halfway The autofocus system operates Shooting with a Remote Control Unit Optional h Remote Control The shutter is release...

Page 127: ...Single Frame Shooting in the Drive Mode setting screen to cancel shooting with a remote control unit The setting is canceled automatically when the camera is turned off if you clear the check box for...

Page 128: ...era is ready to take pictures continuously 4 Press the shutter release button halfway The autofocus system operates Continuous Shooting g Continuous Shooting Hi Takes pictures continuously at high spe...

Page 129: ...inuously at the same interval If the focus mode is set to k focusing is continuously activated during Continuous Shooting The shutter cannot be released until charging is complete when using the built...

Page 130: ...e time interval between shots from 3 seconds to 24 hours Number of Shots Set from 2 to 999 The number of pictures that can be set varies depending on the shooting conditions such as the amount of avai...

Page 131: ...hours or minutes and use the four way controller 23 to set the time Press the 4 button to complete the setting 10 Use the four way controller 23 to select Start shooting and press the 4 button The cam...

Page 132: ...previous image processing cannot be completed before taking the next picture no picture may be taken Although each shot taken is displayed with Instant Review they cannot be magnified deleted or saved...

Page 133: ...y controller 23 to select Auto EV Adjustment and use the four way controller 45 to select P or O When set to O the exposure is adjusted according to the number of shots 5 Use the four way controller 2...

Page 134: ...ailable operations When the above operations are performed or after the set number of shots are taken the screen in Step 3 appears again 7 Press the 3 button twice Multi exposure is ended U i button D...

Page 135: ...3 button in any other capture mode 2 Use the four way controller 23 to select Exposure Setting and press the four way controller 5 3 Use the four way controller 23 to select e c or a and press the 4 b...

Page 136: ...ary depending on the recorded pixels 7 Set Quality Level to C D or E 8 Press the 3 button The C Movie 1 menu appears 9 Use the four way controller 23 to select Recording Sound Level and use the four w...

Page 137: ...select Q or R and press the 4 button 12 Press the 3 button The camera is ready to record a movie Q Uses Movie Shake Reduction default setting R Does not use Movie Shake Reduction The settings describ...

Page 138: ...4 Press the shutter release button fully Movie recording starts A red P displayed at the top right of the screen blinks during movie recording 5 Press the shutter release button again Movie recording...

Page 139: ...starts when the shutter release button is pressed fully even if the subject is not in focus You can record a movie continuously up to 4 GB or 25 minutes When the SD Memory Card is full recording stops...

Page 140: ...y controller 5 Interval Movie Interval Select from 3 sec 5 sec 10 sec 30 sec 1 min 5 min 10 min 30 min or 1 hour Recording Time Set the duration of recording from 12 seconds to 99 hours The time that...

Page 141: ...the four way controller 23 to set the time Press the 4 button to complete the setting 10 Use the four way controller 23 to select Start shooting and press the 4 button The camera is ready to record a...

Page 142: ...ontroller 5 Forwards a frame when paused Press and hold four way controller 5 Fast forwards playback Four way controller 4 Reverses a frame when paused Press and hold four way controller 4 Fast revers...

Page 143: ...2 Use the four way controller 45 to display the frame to save as a still picture 3 Press the m button The save confirmation screen appears 4 Use the four way controller 23 to select Save as and press...

Page 144: ...irst frame at the dividing point is displayed at the top of the screen Up to four points can be selected to divide the original movie into five segments Available operations Proceed to Step 8 if you d...

Page 145: ...t The divided movie is then saved as separate files and the single image display reappears Select dividing points in chronological order from the beginning of the movie When canceling the selected div...

Page 146: ...144 Shooting Functions 4 Memo...

Page 147: ...le formats and camera operating settings in capture mode Setting a File Format 146 Setting the White Balance 149 Correcting Images 155 Setting the Image Finishing Tone 161 Customizing the Button E dia...

Page 148: ...8 for details about each of these settings 3 Use the four way controller 23 to change the settings and press the 4 button 4 Press the 3 button twice The screen that was displayed before selecting the...

Page 149: ...ages but they are saved as actual original information When you perform the development process by using the RAW Development function p 205 you can create JPEG images with these effects RAW Captures i...

Page 150: ...g to the JPEG Quality setting The quality of a captured image depends on the shooting settings resolution of the printer and a variety of other factors JPEG Quality C Best Quality clearer File size la...

Page 151: ...n cloudy days Approx 6 000K J Fluorescent Light For use when taking pictures under fluorescent lighting Select the type of fluorescent light D Fluorescent Daylight Color Approx 6 500K N Fluorescent Da...

Page 152: ...to change the parameters Available operations 3 Press the M button The fine tuning screen appears 4 Fine tune the white balance The white balance is fixed to F in n and H modes V Y button Uses Digital...

Page 153: ...our way controller 23 Adjusts the tone of the colors between green G and magenta M Four way controller 45 Adjusts the tone of the colors between blue B and amber A d button Resets the adjustment value...

Page 154: ...four way controller 2345 to move the frame to the position you want to measure 6 Press the 4 button The white balance is measured and the screen that was displayed in Step 2 appears again Adjust the...

Page 155: ...ite balance settings of the selected image are saved as Manual White Balance and the camera is ready to take a picture The white balance setting is K Saving the White Balance Settings of a Captured Im...

Page 156: ...or Color Temperature step units is Kelvin You can change the step units to Mired in 11 Color Temperature Steps of the A Custom Setting 2 menu However figures are converted to and displayed in Kelvin 3...

Page 157: ...ection and press the 4 button The Highlight Correction or Shadow Correction screen appears 3 Use the four way controller 45 to change the settings For Highlight Correction select from Auto default set...

Page 158: ...e 2 menu High Dynamic Range Image Capture HDR Capture Available by setting through the control panel or in the A Rec Mode 1 menu Z Night Scene HDR Available by selecting from H mode p 88 HDR Capture i...

Page 159: ...vated take note of the following points Make sure to hold the camera firmly so that the composition of the picture does not change while the three images are captured If there is a great difference of...

Page 160: ...n Distortion occurs more easily when using a zoom lens or a small diameter lens and straight walls or the horizon in an image appear curved Lateral chromatic aberration Lateral chromatic aberration is...

Page 161: ...n functions are disabled when using an accessory such as a close up ring or rear converter that is attached between the camera and the lens The shooting speed for Continuous Shooting may be slower whe...

Page 162: ...o take a picture Composition Adjustment Four way controller 2345 Moves the composition up down left or right Adjust up to 16 steps approximately 1 0 mm on the image sensor Rear e dial S Adjusts the le...

Page 163: ...natural look that is close to the actual color Portrait Reproduces a healthy and bright skin tone Landscape Increases color saturation highlights shapes and produces a vivid color image Vibrant Chang...

Page 164: ...eters appears 5 Use the four way controller 23 to choose the parameter you want to change m button Saves the background image only when the data is available M button Displays the screen to adjust the...

Page 165: ...rameter Bright Natural Portrait Landscape Vibrant Radiant Saturation 4 to 4 Hue 4 to 4 High Low Key Adj 4 to 4 Contrast 4 to 4 Sharpness 4 to 4 Muted Bleach Bypass Saturation 4 to 4 Toning Off Green Y...

Page 166: ...of playback mode The playback mode palette appears 2 Use the four way controller 2345 to select s Save Cross Processing and press the 4 button The camera will search for cross processed images startin...

Page 167: ...Extractable Range of Color 1 1 to 5 Extracted Color 2 Off Red Magenta Blue Cyan Green Yellow Extractable Range of Color 2 1 to 5 Toy Camera For taking pictures that look as if taken with a toy camera...

Page 168: ...ures with the edge areas darkened Shading Type 4 types Shading Level 3 to 3 Invert Color Inverts the colors in the image Off On Color For taking pictures with the selected color filter Color Red Magen...

Page 169: ...Displays the screen to adjust the parameters m button Saves the background image only when the data is available V Y button Uses Digital Preview to preview the background image with the filter effect...

Page 170: ...r way controller 5 The E Dial Programming 1 screen appears 2 Use the four way controller 23 to select an exposure mode Turn the rear e dial S to display the E Dial Programming 2 screen 3 Press the fou...

Page 171: ...default setting c b e m eSHIFT eLINE eSHIFT m eLINE K o default setting o eSHIFT o eLINE o eSHIFT eLINE m o o m b b default setting b b m m b b o o AUTO o b o AUTO c c default setting c m c c m o c o...

Page 172: ...the 4 button 6 Press the 3 button The screen that was displayed in Step 2 appears again Repeat Steps 2 to 6 to change the settings of other exposure modes 7 Press the 3 button twice The screen that wa...

Page 173: ...image and select the file format when the V Y button is pressed p 172 default setting Exposure Bracketing Takes multiple pictures with different exposure settings p 97 Optical Preview While the V Y b...

Page 174: ...o choose a file format The left side is the File Format p 147 setting and the right side is the file format when the V Y button is pressed Setting the One Push File Format O The recording format retur...

Page 175: ...23 to select a file format and press the 4 button 5 Press the 3 button three times The screen that was displayed before selecting the menu item appears again MENU Cancel after 1 shot Cancel after 1 sh...

Page 176: ...was displayed before selecting the menu item appears again Setting the L Button Operation Enable AF1 Both the L button and shutter release button are available to perform autofocus p 105 default sett...

Page 177: ...s the four way controller 5 The Save USER Mode screen appears Capture mode e K b c L a p Sensitivity White Balance Flash Mode Flash Exposure Compensation Drive Mode Exposure Bracketing Exposure Compen...

Page 178: ...he Settings and press the four way controller 5 The Rename USER Mode screen appears 2 Use the four way controller 23 to select USER1 or USER2 and press the four way controller 5 The text entry screen...

Page 179: ...Four way controller 2345 Moves the text selection cursor Rear e dial S Moves the text input cursor m button Switches between upper and lower case letters 4 button Enters a character selected with the...

Page 180: ...ed Use the four way controller 23 to switch between pages 3 Press the 4 button The camera returns to the Save USER Mode screen You can easily retrieve saved settings 1 Set the mode dial to B or C The...

Page 181: ...A mode settings return to the default values and the screen that was displayed before selecting the menu item appears again The settings changed in Step 2 are not saved as A mode settings When the cam...

Page 182: ...180 Shooting Settings 5 Memo...

Page 183: ...ck functions and how to edit the captured images How to Operate the Playback Edit Functions 182 Setting the Playback Display Method 185 Selecting the Playback Functions 186 Deleting Multiple Images 19...

Page 184: ...e p 192 D Digital Filter 1 Modifies an image with various filter effects which for example change the color tone of an image and produce a soft or slim appearance p 198 n Resize 1 2 Changes the number...

Page 185: ...saved on the SD Memory Card p 239 u Slideshow Plays back the images one after another p 191 K Save as Manual WB 1 Saves the white balance settings of a captured image as Manual White Balance p 153 s S...

Page 186: ...layback Menu Items Menu Item Function Page Q1 Slideshow Plays back images one after another You can set how images will be displayed in the slideshow p 190 Quick Zoom Sets the initial magnification wh...

Page 187: ...ct from 16 8 4 2 or Off default setting 3 Use the four way controller 23 to select Bright Dark Area and use the four way controller 45 to select O or P When set to O bright portions blink red and dark...

Page 188: ...our way controller 2345 Changes the display area Front e dial R Retains the magnification and the position of the display area and shows the previous next image d button Returns the position of the di...

Page 189: ...ed 3 Select the image s to display Available operations 4 Turn the rear e dial S to the right toward y The camera returns to the single image display Displaying Multiple Images Four way controller 234...

Page 190: ...mbnail Display Icons such as C and are displayed with images except in 81 Thumbnail Display Calendar Filmstrip Display Images are grouped and displayed by the shooting date Changing the Multiple Image...

Page 191: ...d to the left toward f in the single image display the screen selected here will be displayed Four way controller 23 Selects a shooting date Four way controller 45 Selects an image taken on the select...

Page 192: ...ur way controller 23 to change the setting and press the 4 button Playing Back Images Continuously Setting the Slideshow Display Item Description Setting Display Duration Select an image display durat...

Page 193: ...w ends the camera returns to the single image display even if you do not press the four way controller 3 Starting the Slideshow 4 button Pauses resumes playback Four way controller 4 Displays the prev...

Page 194: ...he four way controller 2345 to select s Image Rotation and press the 4 button The selected image is rotated in 90 increments and the four thumbnail images are displayed 3 Use the four way controller 2...

Page 195: ...setting 2 Press the U i button The screen to select images to delete is displayed 3 Select images to delete Available operations Deleting Selected Images Protected images cannot be selected You can s...

Page 196: ...e folder display screen appears 2 Press the U i button The delete confirmation screen appears 3 Use the four way controller 23 to select Delete and press the 4 button The selected folder and all image...

Page 197: ...eting all images is displayed 2 Press the four way controller 2 to select Delete All Images and press the 4 button All images are deleted The confirmation screen appears when there are protected image...

Page 198: ...creen to select the recorded pixels appears 3 Use the four way controller 45 to select the number of recorded pixels and press the 4 button You can select one of the image sizes starting from one size...

Page 199: ...ng frame Available operations 4 Press the 4 button The save confirmation screen appears 5 Use the four way controller 23 to select Save as and press the 4 button The cropped image is saved as a new im...

Page 200: ...to 5 Toy Camera Creates an image that looks as though it was shot with a toy camera Shading Level OFF Low Medium High Blur Low Medium High Tone Break Red Green Blue Yellow Retro Creates an image with...

Page 201: ...ur Low Medium High Soft Creates an image with a soft focus throughout the image Soft Focus Low Medium High Shadow Blur OFF ON Starburst Creates an image with a special sparkling look by adding extra g...

Page 202: ...ith the background image You can select a different image by turning the front e dial R Proceed to Step 7 if you do not need to change the parameters 4 Press the M button The screen to adjust the para...

Page 203: ...ngle image display 2 Select D Digital Filter in the playback mode palette and press the 4 button 3 Use the four way controller 23 to select Recreating filter effects and press the 4 button The filter...

Page 204: ...processed image is saved as a new image If Searching for the original image is selected in Step 3 the original image prior to digital filter application can be retrieved If the original image is no l...

Page 205: ...elect o Thumbnail p Square q Random1 r Random2 s Random3 or p Bubble Images are displayed according to the file number from the smallest number for o and are displayed in random order for other layout...

Page 206: ...and press the 4 button After the index image is saved the camera returns to playback mode and the index image is displayed u Auto Picks images automatically from all of the images saved w Manual Lets...

Page 207: ...the 4 button The parameters saved in the image file appear Proceed to Step 6 if you do not need to change the parameters If there are no images that can be processed No image can be processed appears...

Page 208: ...developed and saved as a new JPEG image 8 Use the four way controller 23 to select Continue or Exit and press the 4 button Select Continue to edit other images The screen that was displayed in Step 4...

Page 209: ...ent confirmation screen appears 4 Use the four way controller 23 to select Develop images as shot or Develop images with modified settings and press the 4 button To change parameters select Develop im...

Page 210: ...ded Pixels When Develop images with modified settings is selected refer to p 206 to change other parameters All images are developed with the same settings 6 Press the 4 button The save confirmation s...

Page 211: ...DEO PC output terminal 3 Connect the other end of the cable to the input terminal on the AV device 4 Turn the AV device and camera on The camera turns on in video mode and the camera information is di...

Page 212: ...ss the 4 button 4 Press the 3 button twice The screen that was displayed before selecting the menu item appears again You cannot adjust the volume on the camera while the camera is connected to an AV...

Page 213: ...7 Changing Additional Settings This chapter describes how to change additional settings How to Operate the Set up Menu 212 Camera Settings 214 File Management Settings 228...

Page 214: ...m Function Page R1 Language u Changes the language in which menus and messages appear p 60 Date Adjustment Sets the date format and time p 62 World Time Sets the display of the local date and time of...

Page 215: ...names for images p 233 Copyright Information Sets the photographer and copyright information embedded in Exif p 234 Eye Fi Sets when using an Eye Fi card p 236 R3 Auto Power Off Sets the time until t...

Page 216: ...Sound Effects 1 screen appears 2 Use the four way controller 45 to adjust the volume Select from six levels When set to Z 0 you can turn all the sound effects off 3 Use the four way controller 23 to...

Page 217: ...d press the four way controller 5 The X Destination screen appears 4 Use the four way controller 45 to select a destination city Turn the rear e dial S to change the region The location time differenc...

Page 218: ...s again Refer to List of World Time Cities p 217 for cities that can be selected as a destination or hometown Select W Hometown in Step 3 to change the city and DST setting X appears in the control pa...

Page 219: ...ico City NTSC Kathmandu PAL Lima NTSC Dacca PAL Santiago NTSC East Asia Yangon NTSC Caracas NTSC Bangkok PAL Buenos Aires PAL Kuala Lumpur PAL Sao Paulo PAL Vientiane PAL Rio de Janeiro NTSC Singapore...

Page 220: ...he four way controller 45 to select O or P for Guide Display 3 Use the four way controller 23 to select Display Color and use the four way controller 45 to select from twelve display colors 4 Press th...

Page 221: ...button 5 Press the 3 button The screen that was displayed before selecting the menu item appears again Adjusting the Brightness and the Color of the Monitor Brightness Level Changes the brightness of...

Page 222: ...menu item appears again Setting the Display for Instant Review Enlarge Instant Review You can magnify the image on the monitor with the rear e dial S p 186 Save RAW Data Sets whether to save the RAW...

Page 223: ...menu and press the four way controller 5 The Pixel Mapping screen appears 2 Press the four way controller 2 to select Pixel Mapping and press the 4 button Defective pixels are mapped out and corrected...

Page 224: ...3 to select a battery type and press the 4 button When set to Auto detect the camera will automatically detect the type of batteries being used Battery Settings Minimizing Battery Consumption Perform...

Page 225: ...e item you selected here the battery level will not be correctly determined Please set the correct battery type Usually there is no problem using Auto detect however it may take a while to detect the...

Page 226: ...unction Default Setting Function Default Setting Flash Mode O Flash Exposure Comp O Drive Mode O Digital Filter P White Balance O HDR Capture P Custom Image O Shooting Info Display P Sensitivity O Pla...

Page 227: ...et up 3 menu is performed all Memory settings return to the default values p 226 P The status screen is always displayed first when the camera is turned on O The display selected from the Shooting Inf...

Page 228: ...he items of the A Custom Setting menu can be reset to default values 1 Select Reset Custom Functions in the A Custom Setting 3 menu and press the four way controller 5 The Reset Custom Functions scree...

Page 229: ...e 2 Press the 3 button twice The screen that was displayed before selecting the menu item appears again Checking the Camera Version Information Visit our website for more information and procedural de...

Page 230: ...matting starts When formatting is completed the screen that was displayed before selecting the menu item appears again Formatting an SD Memory Card Do not remove the SD Memory Card while formatting Th...

Page 231: ...ont e dial R to select an image 5 Press the four way controller 2 to select Protect and press the 4 button Select Unprotect to cancel the protection of the image The image is protected and the Y icon...

Page 232: ...ep 6 3 Press the four way controller 3 select PENTX and press the four way controller 5 The text entry screen appears 4 Change the text Setting the Naming System of the Folder Date The two digits of t...

Page 233: ...t selection cursor Rear e dial S Moves the text input cursor 4 button Enters a character selected with the text selection cursor at the position of the text input cursor d button Returns the folder na...

Page 234: ...s the four way controller 5 The Create New Folder screen appears 2 Press the four way controller 2 to select Create folder and press the 4 button A folder with a new number is created Creating New Fol...

Page 235: ...ress the four way controller 5 The File Name screen appears 2 Press the four way controller 5 The text entry screen appears 3 Change the text Enter the text in the same way as Folder Name Refer to Ste...

Page 236: ...he four way controller 5 The text entry screen appears 4 Enter the text Up to 32 single byte alphanumeric characters and symbols can be entered Setting the Photographer Information Use the provided so...

Page 237: ...text in the same way as Photographer 7 Press the 3 button twice The screen that was displayed before selecting the menu item appears again Four way controller 2345 Moves the text selection cursor Rea...

Page 238: ...rred in the following cases when an image has already been transferred when the size of a movie is 2 GB or more when an Eye Fi card is write protected when a wireless LAN access point cannot be found...

Page 239: ...When transferring a large number of images use the optional AC adapter kit or install a fully charged battery If the internal temperature of the camera becomes high during transferring images the came...

Page 240: ...specified 7 Use the four way controller 23 to select Transfer and press the 4 button After the message Transfer request accepted appears the camera returns to the single image display Four way control...

Page 241: ...de palette appears 2 Use the four way controller 2345 to select r DPOF and press the 4 button The screen to select how to change the settings is displayed 3 Use the four way controller 23 to select Si...

Page 242: ...nting the date Repeat Steps 4 to 6 to make DPOF settings for other images 7 Press the 4 button The DPOF settings for the selected image or all images are saved and the camera returns to the single ima...

Page 243: ...er This chapter explains how to connect the camera to a computer install the supplied software on the CD ROM etc Manipulating Captured Images on a Computer 242 Saving Images on a Computer 243 Using th...

Page 244: ...recommended Supports multi core processors Intel Core i5 i7 Core 2 Quad Duo AMD Phenom II X4 X6 Athlon II X2 X4 and other RAM 1 GB minimum 2 GB or more recommended HDD For installing and starting up...

Page 245: ...way controller 5 3 Use the four way controller 23 to select MSC or PTP and press the 4 button Unless otherwise specified select MSC 4 Press the 3 button twice The screen that was displayed before sele...

Page 246: ...emory Card with a volume label K 500 If the K 500 dialog appears when the camera is turned on select Open folder to view files using Windows Explorer and click the OK button 4 Save the captured images...

Page 247: ...set up on a computer log on with an account that has administrative rights before installing the software 1 Turn the computer on Make sure no other software is running 2 Place the CD ROM into the CD...

Page 248: ...uent steps 4 Select the desired language in the Choose Setup Language screen and click OK 5 When the InstallShield Wizard screen appears in the selected language click Next Follow the instructions on...

Page 249: ...Click User Registration on the screen in Step 3 on p 246 A world map for Internet User Registration is displayed If the computer is connected to the Internet click the displayed country or area and t...

Page 250: ...248 Connecting to a Computer 8 Memo...

Page 251: ...9 Using the Flash This chapter provides details on the built in flash and describes how to take pictures with an external flash Using the Built in Flash 250 Using an External Flash Optional 254...

Page 252: ...is used You can use Slow speed Sync in Night Scene Portrait of H mode or b L or a mode when shooting portraits with the sunset in the background Both the portrait and the background are captured beau...

Page 253: ...h mode to E or F 3 Set the shutter speed for b mode or shutter speed and aperture value for L or a mode Set so a proper exposure is obtained at a shutter speed of 1 180 seconds or slower 4 Press the E...

Page 254: ...he sensitivity is ISO 200 and the aperture value is F5 6 L1 17 5 6 approx 3 m L2 3 5 approx 0 6 m Therefore the flash can be used in a range of about 0 6 m to 3 m However the built in flash in this ca...

Page 255: ...oting distance Example When the sensitivity is ISO 200 and the shooting distance is 4 m F 17 4 approx 4 2 If the resulting number 4 2 in the above example is not available as a lens aperture a smaller...

Page 256: ...s required Flash Camera Function Built in Flash AF540FGZ AF360FGZ AF200FG AF160FC Red eye reduction flash z z z Auto flash discharge z z z Automatically switching to the flash sync speed z z z Apertur...

Page 257: ...flash is fully charged and then take a picture The b will light in the viewfinder or Live View screen when the flash is ready fully charged Using the P TTL Auto Flash For details such as operation met...

Page 258: ...nd the external flash 4 Set the external flash sync mode to HSb high speed sync 5 Make sure that the external flash is fully charged and then take a picture The b will light in the viewfinder or Live...

Page 259: ...hutter release button halfway The built in flash is set to the same channel as the external flash unit Using Flash in Wireless Mode Set the external flash to WIRELESS Two or more AF540FGZ AF360FGZ ext...

Page 260: ...are fully charged and then take a picture Wireless Shooting Using a Combination of the Built in Flash and an External Flash Unit r is not available in the following situations in C mode when the drive...

Page 261: ...ly charged and then take a picture Wireless Shooting Using a Combination of External Flash Units MASTER Discharge both the flash directly connected to the camera and the wireless flash unit as the mai...

Page 262: ...bine two or more external flashes AF540FGZ AF360FGZ or AF200FG For connecting an AF540FGZ flash unit you can use the extension cord connection terminal on the flash For connecting an AF360FGZ or AF200...

Page 263: ...light discharged from multiple units 1 Connect the external flash to the camera indirectly Refer to p 260 for details 2 Set the sync mode for the external flash to contrast control sync mode 3 Confir...

Page 264: ...aster flash unit the flash output ratio is 2 master unit 1 slave units When an external flash is used in combination with the built in flash the flash output ratio is 2 external flash 1 built in flash...

Page 265: ...ult Settings 264 Functions Available with Various Lens Combinations 272 Cleaning the CMOS Sensor 277 Using the GPS Unit 280 Error Messages 282 Troubleshooting 285 Main Specifications 288 Index 297 WAR...

Page 266: ...t Direct Keys A Rec Mode Menu Item Default Setting Reset Setting Page Sensitivity ISO AUTO ISO 100 to 3200 Yes p 91 White Balance F Yes p 149 Flash Mode Depends on capture mode Yes p 70 Drive Mode Sin...

Page 267: ...Lat Chromatic Ab Adj On Yes Multi exposure Number of Shots 2 times Yes p 131 Auto EV Adjustment Off Yes Interval Shooting Interval 00 00 03 Yes p 128 Number of Shots 2 images Yes Start Interval Now Y...

Page 268: ...ea Off Yes Instant Review Display Time 1sec Yes p 220 Enlarge Instant Review On Yes Save RAW Data On Yes Histogram Display Off Yes Bright Dark Area Off Yes E Dial Programming e Rb Sc e Yes p 168 K R S...

Page 269: ...osure Time 5 00 Yes GPS LED Indicators On Yes Calibration Positioning Interval 1min Yes GPS Time Sync On Yes Save USER Mode Yes 1 p 175 Item Default Setting Reset Setting Page Exposure Setting e Yes p...

Page 270: ...setting p 197 Index p 203 Protect No p 229 DPOF No p 239 Slideshow Yes p 191 Save as Manual WB p 153 Save Cross Processing Yes p 164 RAW Development Recorded Pixels p Quality Level C Yes p 205 Movie...

Page 271: ...ccording to initial setting No Text Size According to initial setting No p 61 Sound Effects Volume 3 Yes p 214 Setting All on LCD Display Guide Display On Yes p 218 Display Color 1 LCD Display Setting...

Page 272: ...ptions p 227 Item Default Setting Reset Setting Page 1 EV Steps 1 3 EV Steps Yes p 96 2 Sensitivity Steps 1 EV Step Yes p 92 3 Meter Operating Time 10sec Yes p 101 4 AE L with AF Locked Off Yes p 100...

Page 273: ...Off Yes p 125 15 Release While Charging Off Yes p 73 16 Flash in Wireless Mode On Yes p 258 17 Save Menu Location Reset Menu Location Yes p 221 18 Catch in Focus Off Yes p 117 19 AF Fine Adjustment O...

Page 274: ...rture of F2 8 or faster Only available at the s position 2 Lenses with a maximum aperture of F5 6 or faster 3 Available when using the built in flash AF540FGZ AF360FGZ AF200FG or AF160FC 4 Only availa...

Page 275: ...lenses use the KAF mount Refer to respective lens manuals for details Note that this camera is not equipped with a power zoom function When the aperture ring is set to a position other than s or a le...

Page 276: ...may occur DAE 16 50mm F2 8 ED AL IF SDM When the focal length is 20 mm or less or when the focal length is 35 mm and the shooting distance is less than 1 5 m vignetting may occur DA 17 70mm F4 AL IF...

Page 277: ...camera is ready to take a picture Setting the Focal Length 8 10 12 15 18 20 24 28 30 35 40 45 50 55 65 70 75 85 100 120 135 150 180 200 250 300 350 400 450 500 550 600 700 800 If the focal length for...

Page 278: ...ken with a specified aperture value but an exposure deviation may occur F appears for the aperture indicator Manual diaphragm lens such as reflex lens lens only c FA SOFT 28mm FA SOFT 85mm F SOFT 85mm...

Page 279: ...and press the four way controller 5 The Dust Removal screen appears 2 Press the 4 button The Dust Removal function is activated by shaking the CMOS sensor To activate the Dust Removal function every t...

Page 280: ...or cleaning kit to clean the CMOS sensor Never use a spray blower or a blower with a brush They may scratch the CMOS sensor Also do not wipe the CMOS sensor with a cloth Do not clean the sensor when t...

Page 281: ...nd dust from the CMOS sensor 6 Turn the camera off The mirror automatically returns to its original position 7 Attach the lens or body mount cover Sensor Cleaning Sensor Cleaning Raises mirror and ope...

Page 282: ...lestial bodies can be captured as individual points even when shooting with a long exposure setting p 281 GPS Time Sync Automatically adjusts the camera s date and time settings using information acqu...

Page 283: ...again Exposure ends When Timed Exposure is enabled shooting ends automatically after the set Exposure Time has elapsed Shooting Celestial Bodies ASTROTRACER When you do not want the indicators on the...

Page 284: ...t be transferred when an Eye Fi card is not inserted p 236 Cannot use this card The inserted SD Memory Card is not compatible with this camera Memory card error There is a problem with the SD Memory C...

Page 285: ...e is damaged Try downloading the update file again Image folder cannot be created The maximum folder number 999 and file number 9999 are being used and no more images can be saved Insert a new SD Memo...

Page 286: ...available in n H or C mode Camera overheated Disabling Live View temporarily to protect circuitry Live View cannot be used because the camera s internal temperature is too high Try using Live View ag...

Page 287: ...ed properly Check the orientation of battery Re insert battery according to the symbols p 49 p 50 The battery power is low Replace with a charged battery or use the optional AC adapter kit The shutter...

Page 288: ...utter release button fully The subject is too close Move away from the subject and take a picture The focus mode is set to Set the focus mode switch to l or A p 105 The AE Lock function does not opera...

Page 289: ...mation cannot be obtained is used set the focal length in the Input Focal Length screen p 275 Shutter speed is too low for the Shake Reduction function to be effective when panning or shooting night s...

Page 290: ...or operations Sensitivity Standard Output ISO AUTO 100 to 51200 EV steps can be set to 1 EV 1 2 EV or 1 3 EV Image Stabilizer Sensor shift Shake Reduction File Formats Recording Formats RAW DNG JPEG E...

Page 291: ...ness and colors adjustable White Balance Auto Method using a combination of the CMOS sensor and the light source detection sensor Preset Modes Daylight Shade Cloudy Fluorescent Light D Daylight Color...

Page 292: ...Forest Scene modes Portrait Landscape Macro Moving Object Night Scene Portrait Sunset Blue Sky Forest Night Scene Night Scene HDR Night Snap Food Pet Kids Surf Snow Backlight Silhouette Candlelight St...

Page 293: ...ast Shading Invert Color Color HDR Capture Auto HDR 1 HDR 2 HDR 3 Auto Align automatic composition correction Exposure Bracket Value 1 EV 2 EV 3 EV Multi exposure Number of Shots 2 9 Exposure adjusted...

Page 294: ...a Retro High Contrast Shading Invert Color Color Tone Expansion Sketch Water Color Pastel Posterization Miniature Soft Starburst Fish eye Slim Base Parameter Adj RAW Development File Format JPEG Image...

Page 295: ...es Playback time approx 270 minutes With AA battery holder D BH109 with four AA lithium batteries Number of recordable images with 50 flash usage approx 710 images without flash usage approx 1250 imag...

Page 296: ...s USB Cable I USB7 Strap O ST132 Rechargeable Lithium ion Battery D LI109 Battery Charger D BC109 AC plug cord Software CD ROM S SW133 Depending on the country and region where the camera was purchase...

Page 297: ...emory Card The number of storable images may vary depending on the subject shooting conditions selected capture mode and SD Memory Card etc Recorded Pixels JPEG Quality RAW C D E p 4928 3264 214 379 7...

Page 298: ...296 Appendix 10 Memo...

Page 299: ...s 88 Q Surf Snow 88 y Backlight Silhouette 89 U Candlelight 89 n Stage Lighting 89 E Museum 89 C Movie 136 A AA batteries 50 AC adapter 52 Accessories 18 Adding the date DPOF 240 AdobeRGB 148 AE Lock...

Page 300: ...ition Adjustment 160 Compression ratio 148 Computer 241 Connection cable cover 19 52 Continuous mode k 107 Continuous playback 190 Continuous Shooting 126 Contrast Custom Image 163 Contrast AF 110 Con...

Page 301: ...stem 148 File number 225 233 Filter 165 Filter Effect Custom Image 163 Fine Sharpness Custom Image 164 Firmware 227 Firmware Info Options 227 Fish eye Digital Filter 199 Flash 70 249 Flash White Balan...

Page 302: ...20 Interface Options 210 243 Interval Movie 138 Interval Shooting 128 Invert Color Digital Filter 166 198 ISO sensitivity 91 J JPEG 147 JPEG Quality 148 JPEG Recorded Pixels 148 K Kelvin 154 Kids R 88...

Page 303: ...1 Night Scene A 88 Night Scene HDR Z 88 Night Scene Portrait 87 88 Night Snap l 88 Ni MH rechargeable batteries 50 Noise Reduction 102 NTSC 210 O 4 button 22 24 109 One Push File Format 172 One Push B...

Page 304: ...r Cleaning 278 Shade White Balance 149 Shading Digital Filter 166 198 Shadow Correction 155 Shake Reduction 120 Sharpness Custom Image 163 Shooting celestial bodies 281 Shooting Info Display 30 Shooti...

Page 305: ...ing Curtain Sync 71 Tripod socket 19 TTL phase matching autofocus 105 Tungsten White Balance 149 U Updating software 227 USB Connection 243 USER mode 175 User registration 247 V Vibrant Custom Image 1...

Page 306: ...304 Appendix 10 Memo...

Page 307: ...s by non authorized PENTAX service facilities Procedure During 12 month Warranty Period Any PENTAX which proves defective during the 12 month warranty period should be returned to the dealer from whom...

Page 308: ...rge and only after you accept the quoted service charge instruct the service station to proceed with the servicing This warranty policy does not affect the customer s statutory rights The local warran...

Page 309: ...l interference to radio communications However there is no guarantee that interference will not occur in a particular installation If this equipment does cause harmful interference to radio or televis...

Page 310: ...compliant with the standards Records maintained continue to reflect the equipment being produced can be expected to be within the variation accepted due to quantity production and testing on the stati...

Page 311: ...propriate waste handling If a chemical symbol is added beneath the symbol shown above in accordance with the Battery Directive this indicates that a heavy metal Hg Mercury Cd Cadmium Pb Lead is presen...

Page 312: ...310 Appendix 10 Memo...

Page 313: ...i 1 20457 Hamburg GERMANY http www pentax de P PENTAX RICOH IMAGING UK LTD PENTAX House Heron Drive Langley Slough Berks SL3 8PN U K http www pentax co uk P PENTAX RICOH IMAGING AMERICAS CORPORATION 6...

Reviews: