57
Save to JPG or AVI
5.9
The HDDR unit allows you to print a recorded image to a local or network printer.
To print an image, follow these steps:
2) From the Search Screen, stop on the image you wish to print. Make sure only one camera is selected by double-
clicking on the image you want. (Only one camera should be displayed)
NOTE
: Only one camera can be selected at a time for this function to work.
3) Select the Print Button. A Print Options window should appear.
4) Depending on the printer you are using you may have several printing options available to you. (Refer to your
printer manual for more information)
5) Press the ‘Print’ button to print the selected images.
If you do not have a printer installed, the ‘NO DEFAULT PRINTER INSTALLED’ message will appear.
5.10
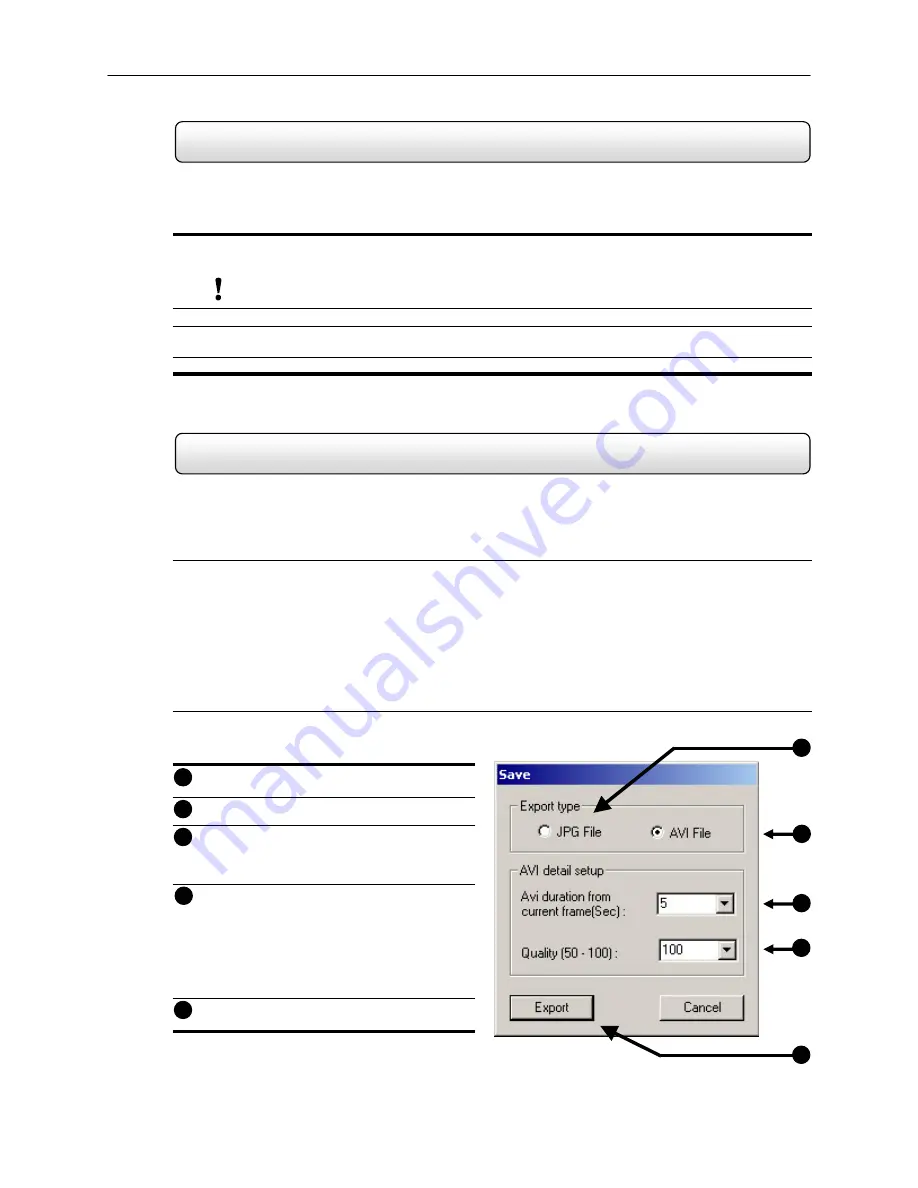
The HDDR unit allows you to export single images in the JPG file format and save video clips in an AVI format. Both
JPG and AVI file formats are the most commonly used graphical formats today. Virtually every computer offers some
type of support for these file formats and therefore make them the most ideal formats to use.
Definition
JPG:
(Joint Photographic Experts Group) - The name of the committee that designed the photographic image-
compression standard. The format (.jpg) is optimized for compressing full-color or grayscale photographic images. JPG
images are 24-bit (16.7 million color) graphics.
AVI:
(Audio/visual interleaved) files are one of the more popular animated image formats in use today. They are
most often used for video playback, though they are also used for more simple things such as the Windows "file copy"
and "search" animations. AVI image data can be stored uncompressed, but it is typically compressed using a Windows-
supplied or third party compression and decompression module called a codec.
JPG File
– Saving to a JPG File allows you to
export a single image (or frame).
AVI
File
– Saving to an AVI File allows you to
save a video clip.
AVI
Duration
– Allows you to enter a duration
to record the AVI for (in seconds). Although 100
Seconds is the longest displayed, you can
manually enter a longer time.
Image
Quality
– Often times it is necessary to
reduce the overall size of an AVI file (When you
wish to email it to someone for example). You
can do this by reducing the image quality. By
reducing the image quality, the AVI video
appears more Pixilated. When size is not an
issue setting the quality to 100 is highly
recommended.
Export
– The Export button begins the saving
process.
1
2
3
4
5
Figure 5.10
1
2
3
4
5
Figure 5.10


