46
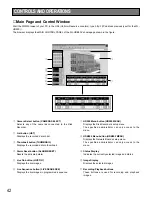
2. Click the ZOOM buttons to adjust the lens zoom.
WIDE:
Optically brings an object closer.
TELE:
Optically brings an object further.
3. Click the
[FOCUS]
buttons to adjust the lens focus.
FAR:
Sets the lens focus for further object.
NEAR:
Sets the lens focus for closer object.
AUTO:
Automatically set the lens focus.
4. Click the
[IRIS]
buttons to adjust the lens iris.
CLOSE:
Closes the lens iris.
OPEN:
Opens the lens iris.
RESET:
Resets the lens iris to the factory default
setting.
5. Click the
[AUTO PANI]
buttons to control the auto
panning function.
ON:
Activates auto panning function.
OFF:
Deactivates auto panning function.
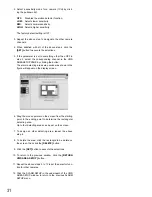
6. Clicking anywhere on the live image moves the camera
(optional) up and down, or to the right and left.
• The camera pan/tilt angle increases (or decreases) as
the point clicked moves further (or closer) to the image
center.
• To move the camera continuously, click the image
repeatedly.
You cannot pan or tilt the camera continuously by
dragging on the image.
7. Select a preset position number (1 - 64) to be displayed
by clicking the pulldown list, then click the
[SET]
button.
8. To return to the previous MAIN CONTROL PANEL, click
the
[MAIN MENU]
button on the panel.
Summary of Contents for WJ-HDB502
Page 7: ...7 WJ HDB502 BOARD SETUP ...
Page 13: ...13 WJ HD500 SETUP ...
Page 38: ...39 SYSTEM OPERATIONS ...

