43
■
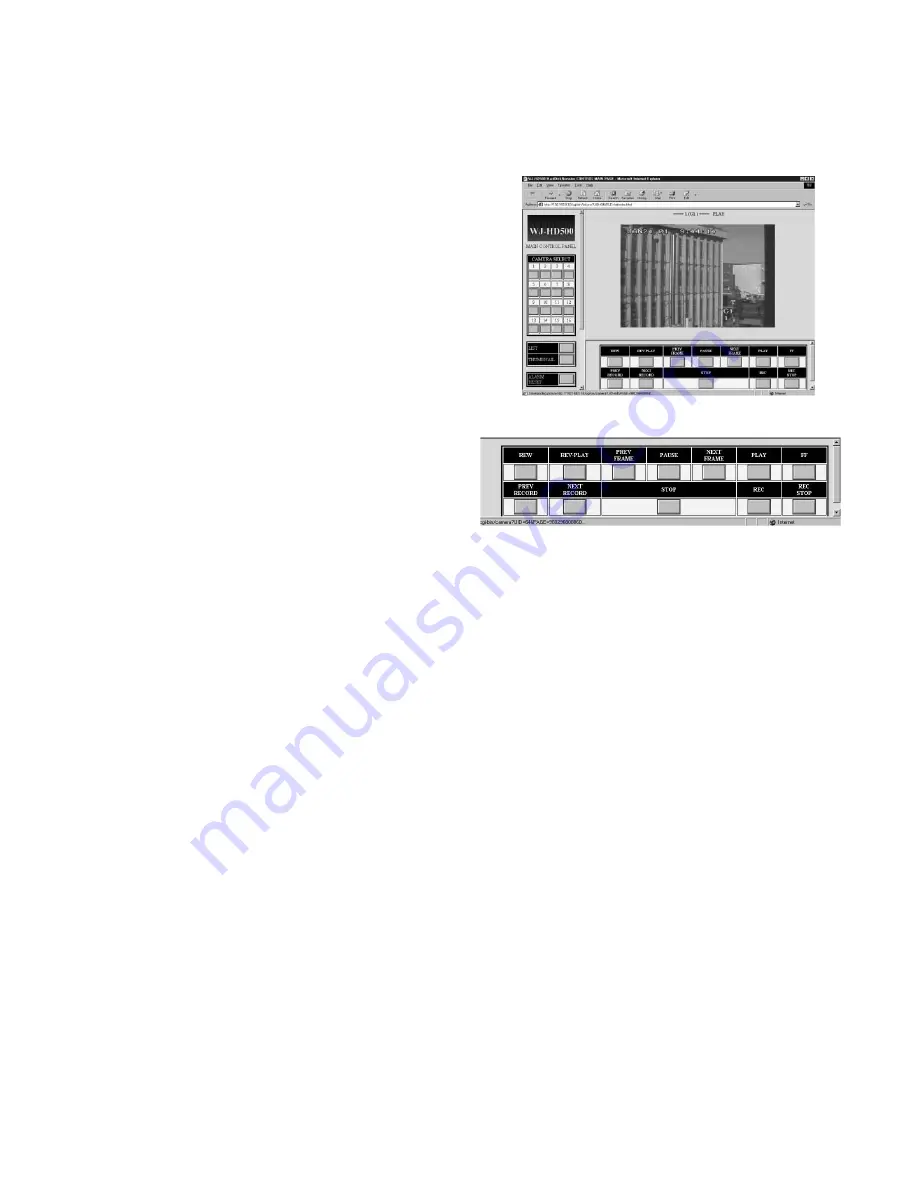
Monitoring Live Images
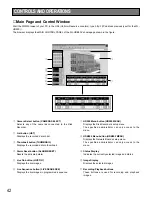
The cameras connected to the Disk Recorder can be
monitored in the MAIN CONTROL PANEL on the display
screen.
The following two modes are available for controlling the
inputs from the cameras.
●
Spot Monitoring
1. Click the
[LIVE ON]
button on the panel.
The camera image (1 ch) will appear on the screen.
2. Click the desired Camera Select
[1 - 16]
button on the
panel.
The camera images corresponding to the button will
appear on the panel.
3. Repeat the above step 2 to select other camera images
on the panel.
●
Sequence Monitoring
1. Click the
[LIVE ON]
button on the panel.
The camera image (1 ch) will appear on the panel.
2. Click the
[LIVE SEQUENCE]
button on the panel.
The sequence will be started from the camera images
programmed previously.
Refer to VIDEO MODE SETUP in the WJ-HDB502 setup
for further detailed.
3. To return to the spot monitoring, click the Camera
Select
[1 - 16]
button to be displayed.
■
Recording Live Images
The live images can be recorded as same as Manual
Recording in Time Lapse Recording.
The recording operation is only available the users set
access level 1.
1. Click the
[REC]
button on the panel.
• When the user name and password dialog box
appears, enter the user name and password to log-in.
• The Manual Recording will start.
2. To quite the recording, click the
[REC STOP]
button on
the panel.
■
Playing Back Recorded Images
The recorded images on the disk can be played back on
the panel.
The procedure described below are for operations playing
back the hard disk.
●
Basic Playback
1. Clicking the
[PLAY]
button on the panel will play back
the most recent recordings in the forward direction.
• When the user name and password dialog box
appears, enter the user name and password to log-in.
2. To pause the playback, click the
[PAUSE]
button on
the panel.
• “PAUSE” will appear in the Status Display.
• To resume playback, click the
[PAUSE]
button on the
panel again.
3. To quit playback, click the
[STOP]
button on the panel.
●
Reverse Playback
During playback or playback pause, click the
[REV-PLAY]
button on the panel to play back the recording in the
backward.
• “R-PLAY” will appear in the Status Display.
Summary of Contents for WJ-HDB502
Page 7: ...7 WJ HDB502 BOARD SETUP ...
Page 13: ...13 WJ HD500 SETUP ...
Page 38: ...39 SYSTEM OPERATIONS ...

