30
The factory default setting is OFF.
Refer to the Video Motion Detector Setting for further
detailed.
9. Select either SPOT or OFF by clicking the button.
The item lets you select the mode for displaying an
alarm on the Multiscreen Monitor.
SPOT:
The camera image that has activated the alarm
is displayed in single spot mode.
OFF:
Ignores alarm activation and continues to display
the images in the mode selected previously.
The factory default setting is SPOT.
10. Select either SPOT or OFF by clicking the button.
The item lets you select the mode for displaying an
alarm on the Spot Monitor.
SPOT:
The camera image that has activated the alarm
is displayed in single spot mode.
OFF:
Ignores alarm activation and continues to display
the images in the mode selected previously.
The factory default setting is SPOT.
■
Alarm Port Setting
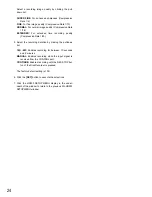
This item lets you designate the alarm input from the
ALARM port located on the rear of the Disk Recorder.
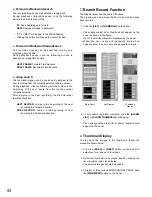
1. Click the ALARM TERMINAL SETUP in the underneath
of the ALARM SETUP window.
The table as shown in the figure will appear on the dis-
play screen.
2. Select an alarm input channel (1CH - 16CH) in the
ALARM editing area by clicking the pulldown list.
3. Select a camera number (CAM1 - CAM16) correspond-
ing to the input in the CAMERA editing area by clicking
the pulldown list.
4. Select the type of contact to meet the system require-
ment in the INPUT editing area by clicking the pulldown
list.
Normally Open:
Accepts alarm input from Normally
Open contacts.
Normally Close:
Accepts alarm input from Normally
Closed contacts.
The factory default setting is Normally Open.
5. Click the
[SET]
button to execute the selections and the
corresponding alarm channel will be replaced in the
table.
6. Repeat the above steps 2 to 5 to designate the other
input channels.
7. When satisfied with all of the above steps, click the
ALARM SETUP display to return to the previous ALARM
SETUP window.
■
Video Motion Detector Setting
The following settings are available when the Motion
Detector Board (Optional) is installed.
This item lets you determine the mode of the motion detec-
tor function when the Disk Recorder detects a motion on
the video image.
Notes:
• Make sure that the VIDEO MOTION DETECTION is set
to ON in the ALARM SETUP window previously.
• When the detecting area is set small, the function may
not detect object.
It is recommended that the areas and sensitivity levels
are made test before the settings.
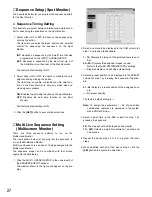
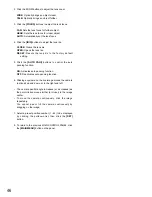
1. Click the VMD AREA SETUP in the underneath of the
ALARM SETUP window.
The VMD AREA SETUP window as shown in the figure
will appear on the display screen.
Summary of Contents for WJ-HDB502
Page 7: ...7 WJ HDB502 BOARD SETUP ...
Page 13: ...13 WJ HD500 SETUP ...
Page 38: ...39 SYSTEM OPERATIONS ...

