45
●
List Display
To play back the images in the list, follow the procedure
shown below.
1. Click the
[LIST SEARCH]
or
[ALARM LIST SEARCH]
button on the panel to display the following dialog
window as shown in the figure.
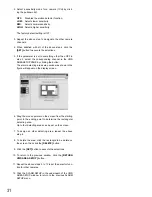
2. Specify the search term to be played back in the
window.
q
Select a group by clicking the pulldown list.
w
Select a month, date and last 2 digits for the year
by pressing the keyboard.
e
Select an hour (military time) and minutes by
pressing the keyboard.
r
Select a recording number by pressing the
keyboard.
3. Click the
[SEARCH]
button.
A list of records including the most recent recording will
appear on the panel.
4. Click the
[PREV]
or
[NEXT]
button on the panel to
select next or previous 16 thumbnail.
5. Select a recording number to be displayed by clicking
the Recording Number Display on the panel.
6. To return to the previous MAIN CONTROL PANEL, click
the
[MAIN MENU]
button on the panel.
■
Alarm Reset Function
The Alarm Function activates the warning alarm status,
when the externally connected alarm sensor is turned on, or
an installed Video Motion Detector (optional) is activated.
1. When an alarm is activated in the system, “ALM” will
appear on the Status Display of the MAIN CONTROL
PANEL.
2. To return to the normal state previously, click the
[ALARM RESET]
button on the panel.
• When the user name and password dialog box appears,
enter the user name and password to log-in.
■
Camera Controls
Start the WWW browser of your PC, in the URL (Uniform
Resource Locators), type “http:// (IP address previously set
for the WJ-HD500) /mpindex.html”.
The browser displays the MP204 CONTROL VIEW panel as
shown in the figure.
On the panel, the cameras (option) can be set by remote
control from this panel.
Note:
To control the camera described below, the specified
equipment is equipped in the system.
1. Click the desired Camera Select
[1 - 16]
button on the
panel.
The camera images corresponding to the button will
appear on the panel.
2400bps 4800bps 9600bps
38400bps 19200bps
ALL GROUP GROUP1 GROUP2
ALL GROUP4 GROUP3
Summary of Contents for WJ-HDB502
Page 7: ...7 WJ HDB502 BOARD SETUP ...
Page 13: ...13 WJ HD500 SETUP ...
Page 38: ...39 SYSTEM OPERATIONS ...


