background image

5.1 Printing from Windows applications

You can print a file created in a Windows application. For example, to print from WordPad, proceed as follows:

1

Open the document you want to print.

2

Select 

[Print]

 from the menu.

3

Select the unit’s name as the active printer.

R

When mode restriction (feature #154) is activated, enter the department code in the printer settings using 

[Job

Type]

 beforehand (page 50). If the department code does not match, or the department code restricts the

print mode, printing will be cancelled.

R

To change the printer settings, click 

[Preferences]

, then click the desired tab. Change the printer settings,

then click 

[OK]

.

4

Click 

[Print]

.

Note:

R

For details about the paper specifications, see page 128.

Setting the printer properties

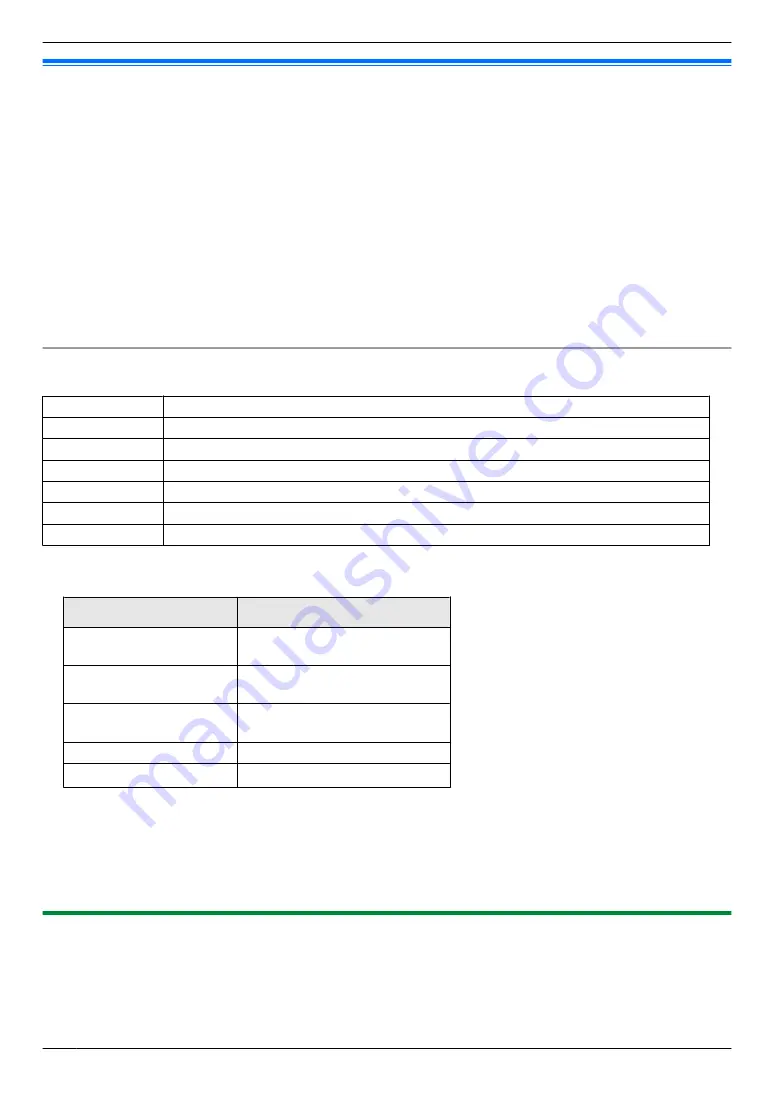
You can change or display the settings on the following tabs.

[Basic]

Paper size, media type, pages per sheet, duplex, etc.

[Output]

Number of prints, collate, etc.

[Job Type]

Mode restriction, Secure Print

[Quality]

Quality, contrast, toner save feature, etc.

[Effects]

Watermark, overlay.

[Profile]

Saving the desired settings, selecting the saved settings, etc.

[Support]

Version information.

Note:

R

Select the desired media type on the 

[Basic]

 tab according to the recording paper.

Recording paper type

Media type

Plain paper

75 g/m² to 105 g/m²

[Plain Paper]

Thin paper

60 g/m² to 75 g/m²

[Thin Paper]

Thick paper

105 g/m² to 220 g/m²

[Thick Paper]

Label

[Label]

Envelope

[Envelope]

*1

*1 Select 

[Envelope #10]

[Envelope DL]

[Japanese Envelope You #4]

[Japanese Envelope Chou #3]

 or

[Japanese Envelope Chou #4]

 for the paper size. To print on an envelope clearly, set the top, bottom, left,

and right margins to more than 10 mm.

R

When printing from a computer, the printer properties setting overrides the following unit’s programming features:
– Media type setting (feature #383 and feature #384)
– Toner save setting (feature #482)

5.1.1 Duplex printing

For example, to print from WordPad, proceed as follows:

R

Plain paper and thin paper can be used.

1

Open the document you want to print.

2

Select 

[Print]

 from the menu.

50

5. . Printing

5. Printing

Summary of Contents for KX-MB2100 series

Page 1: ...e environment Location selection fax supported models only y If your unit has feature 114 you can change the location setting See the setup list page 95 LA models only When you turn the power ON for the first time select your location The language for display and reports etc will be changed automatically Language selection If your unit has feature 110 you can change the language setting See the se...

Page 2: ...y to waste conscious packaging practices Note R Current model availability depends on country area R To use the unit with a computer this operating instructions explains the steps for Windows 7 Windows Vista and Windows XP R To use the unit with Windows 8 it is recommended to operate a computer in Desktop mode In order to use Multi Function Station open the Start screen and start Multi Function St...

Page 3: ...38 KX MB2168 KX MB2170 KX MB2177 KX MB2178 Fax 1 U U U Broadcast transmission U U U Caller ID 2 U U U Distinctive ring 3 4 U U U LAN U U U Wireless LAN U Automatic document feeder U U U U Manual tray U U U U Feature limitations due to your suffix 1 TEL FAX mode is not available for AG LA and TW models 2 Caller ID feature is not available for EU models 3 Distinctive ring feature is not available fo...

Page 4: ...To activate this feature see Activating scan to email address LAN supported models only y on page 58 Scan to FTP server SMB folder LAN supported models only y Scan to FTP server You can send the scanned document to an FTP server To activate this feature see Setting the information for scan to FTP server LAN supported models only y on page 59 Scan to SMB folder You can send the scanned document to ...

Page 5: ...r PC fax reception on page 82 Web fax preview LAN supported models only y You can display a received fax document in a web browser without printing and print or save the necessary document after you confirm the image For details about this feature see 8 6 3 Web fax preview LAN supported models only y on page 83 Fax to email address LAN supported models only y You can automatically transfer a recei...

Page 6: ... rear cover C may also get warm This is normal For best performance Toner cartridge and drum cartridge R When replacing the toner cartridge or drum cartridge do not allow dust water or liquids to come in contact with the drum This may affect print quality R Genuine Panasonic toner cartridges and drum cartridges are recommended R It is recommended not to add non genuine toner to the unit including ...

Page 7: ...dust high temperature and vibration R The unit should not be exposed to direct sunlight R Do not place heavy objects on top of the unit When you leave the unit unused for a long period of time unplug this unit from the power outlet R The unit should be kept away from heat sources such as heaters kitchen stoves etc Damp basements should also be avoided R Do not poke the unit with a sharp object suc...

Page 8: ...rom your unit Fax or LAN supported models only y 47 4 3 Registering items in the address book through a web browser LAN supported models only y 49 5 Printing Printing from Your Computer 5 1 Printing from Windows applications 50 5 2 Easy Print Utility 54 Printing Programs 5 3 Programming features PC print 56 6 Scanning Scanning from the Unit 6 1 Scanning from the unit Push Scan 57 Scanning from a C...

Page 9: ...r jam 117 12 2 Document jams Automatic document feeder y 120 13 Cleaning Cleaning the Unit 13 1 Cleaning the white plates and glass 122 13 2 Cleaning the document feeder rollers y 123 Cleaning the Cartridge 13 3 Cleaning the drum cartridge 123 14 General Information Specifications 14 1 Specifications 125 Copyrights 14 2 Information of copyrights and licences LAN supported models only y 132 15 Inde...

Page 10: ...X MB2110 KX MB2117 U U U U KX MB2120 KX MB2128 U U U U KX MB2130 KX MB2137 KX MB2138 U U U U KX MB2168 KX MB2170 KX MB2177 KX MB2178 U U U U Models E Output tray F Drum cleaner pre installed inside the unit 2 G Power cord 3 H Extension guide 4 KX MB2110 KX MB2117 U U U U KX MB2120 KX MB2128 U U U U KX MB2130 KX MB2137 KX MB2138 U U U U KX MB2168 KX MB2170 KX MB2177 KX MB2178 U U U U 10 1 Introduct...

Page 11: ... AG models only 5 CX HX ML RU HK TW models only Note R Save the original carton and packing materials for future shipping and transportation of the unit R After unpacking the product take care of the packing materials and or power plug cap appropriately 1 1 1 Accessory information n Replacement accessory To ensure that the unit operates properly we recommend the use of Panasonic toner and drum car...

Page 12: ...H D Parts A ADF Automatic Document Feeder cover B Output tray C Document entrance D Document guides E Manual tray F Document tray G Standard input tray H Recording paper guides I Recording paper exit J Document exit K Document cover 12 1 Introduction ...

Page 13: ...IJ C A D E F B Parts KX MB2110 KX MB2117 KX MB2120 KX MB2128 KX MB2130 KX MB2137 KX MB2138 KX MB2168 KX MB2170 KX MB2177 KX MB2178 A Speaker U U B Handset connection jack U 1 U 1 C LED U U D Telephone line jack U U E External telephone line jack U U F Rear cover U U U G Power inlet U U U H Power switch U U U I USB interface connector U U U 13 1 Introduction ...

Page 14: ...0 KX MB2128 KX MB2130 KX MB2137 KX MB2138 KX MB2168 KX MB2170 KX MB2177 KX MB2178 J LAN interface connector R 10Base T 100Base TX U U 1 Only for models that include a handset unit See page 10 if your unit has a handset 14 1 Introduction ...

Page 15: ... F MOK SETN To store a setting during programming G Mw STOPN To stop an operation or programming session To erase a character number H Mh SCANN Mi COPYN Ml FAXN 2 To switch to the scan mode copy mode or fax mode I Mn COPY SIZEN To select the copy size MT REDIALN 2 To redial the last number dialled MVN Pause 2 To insert a pause during dialling J Mq ZOOMN To enlarge or reduce a document when copying...

Page 16: ... connection P Mx STARTN To copy a document To scan a document push scan To send a fax 2 Q MG ToneN To change from pulse to tone temporarily during dialling when your line has rotary pulse service 1 Only for models without the fax feature y 2 Only for models that support the fax feature y 3 Only for models that support the Caller ID feature y 4 Only for models that support wireless LAN y 5 See page...

Page 17: ...ng the indentation A A R If the unit is in sleep mode press a key to put the unit in standby mode for the next process when replacing the toner cartridge and or drum cartridge 2 Remove the drum cartridge A which is pre installed in the unit A A 3 Remove the protective sheet A from the drum cartridge R Do not touch or scratch the drum surface A R PAPER JAMMED is displayed before the protective shee...

Page 18: ...and machine life we recommend that you clean slots and openings page 7 and the inside of the unit page 122 123 when replacing the toner cartridge and or drum cartridge Note R To ensure that the unit operates properly we recommend the use of Panasonic toner cartridge and drum cartridge See page 11 for accessory information Toner save feature If you want to reduce toner consumption set the toner sav...

Page 19: ...A D C G F E H B Power cord 1 R Connect to a power outlet See page 125 for detail specifications EXT jack 2 R You can connect an answering machine or an extension telephone Remove the stopper if attached and take care of it appropriately LAN cable not supplied 3 R To assure continued emission limit compliance use only shielded LAN cable Category 5 Cat 5 Ethernet cable Network router Network hub not...

Page 20: ...tilation and protection against overheating R If another device is connected to the same telephone line as this unit you may experience unexpected problems as this unit is not designed to share a telephone line fax supported models only y For Germany and Austria only Connector pinouts fax supported models only y Socket To phone line 2 5 4 3 1 a2 2 3 La 4 Lb 5 6 b2 6 1 Connecting the handset See pa...

Page 21: ...NUN A MBNM5NM0NM0N A DHCP 2 M0N A DISABLED A MOK SETN 3 Set each item For the IP address 1 M5NM0NM1N A IP ADDRESS A MOK SETN 2 Enter the IP address of the unit A MOK SETN For the subnet mask 1 M5NM0NM2N A SUBNET MASK A MOK SETN 2 Enter the subnet mask of the network A MOK SETN For the default gateway 1 M5NM0NM3N A DEFAULT GATEWAY A MOK SETN 2 Enter the default gateway of the network A MOK SETN A M...

Page 22: ...work name SSID A MOK SETN 3 MCDN Display the desired connection type A MOK SETN 4 MCDN Display the desired network authentication type A MOK SETN 5 MCDN Display the desired data encryption type A MOK SETN 6 Enter the network key A MOK SETN R Depending on the settings for your wireless access point this step can be omitted if encryption is not used R CONNECTING blinks while connecting When the conn...

Page 23: ...nection page 23 R For wireless LAN connection y refer to 2 9 3 Wireless LAN connection y page 23 2 9 2 USB connection LAN connection 1 Easy Installation R The installation will start automatically 2 When the setup program starts follow the on screen instructions R Easy Print Utility and Device Monitor will also be installed 3 The Connection Type dialogue box appears For USB connection 1 Connect di...

Page 24: ... computer the model name will be automatically detected 2 Click Install then follow the on screen instructions 5 When Wireless LAN Setting tool is launched follow the on screen instructions to configure the wireless LAN settings 2 9 4 Other information To view or install the operating instructions data 1 Start Windows and insert the supplied CD ROM into your CD ROM drive 2 Click Operating Instruct...

Page 25: ...uch as tabs or staples Paper that has dust lint or oil stains Paper that will melt vaporize discolour scorch or emit dangerous fumes near 200 C such as vellum paper These materials may transfer onto the fusing roller and cause damage Moist paper Inkjet paper Chemically treated paper such as carbon or carbonless duplicating paper Electrostatically charged paper Badly curled creased or torn paper Pa...

Page 26: ...ows instead of displaying the name of tray 1 Standard input tray 2 Manual tray y 3 2 1 Standard input tray R If you load more than the specified amount of paper a paper jam may occur and the paper may be damaged R Depending on the type of paper the loaded paper may exceed the upper limit mark C C In this case remove some paper from the tray 1 Pull the standard input tray A until it clicks into pla...

Page 27: ...recording paper guides to adjust the width to the size of the recording paper R Make sure that the recording paper is under the paper limit mark A and the paper should not be loaded over the snubbers B A B 4 Insert the standard input tray into the unit lifting the front part of the tray Then push it completely into the unit 27 3 Basic Operations ...

Page 28: ...d extension guide beforehand See page 10 if it is supplied to your unit 1 Remove the recording paper guide 1 Pinch the rear guide then slide it inside 2 Push down the stopper A and then remove the guide completely A 2 Install the extension guide 1 Insert the hooks of the extension guide into the small holes of the tray A R Make sure the arrows B match to install the extension guide correctly 2 Sli...

Page 29: ... position A To remove the extension guide 1 Remove the recording paper guide 2 Release the hooks A from the bottom of the standard input tray to remove the extension guide A 3 After removing the extension guide replace the recording paper guide 29 3 Basic Operations ...

Page 30: ... R Do not drop the standard input tray R Hold the standard input tray with both hands when removing or installing The standard input tray weighs approximately 2 kg when fully loaded with recording paper Approx 2 kg 30 3 Basic Operations ...

Page 31: ...e the unit Be sure to close the rear cover after printing It can hold one sheet at a time When printing or copying multiple sheets add the next sheet after the first sheet has been fed into the unit 1 Adjust the width of the guides A to the size of the recording paper R If the unit is in sleep mode press a key to put the unit in standby mode for the next process 2 Insert the paper print side up B ...

Page 32: ... portrait copy set the original in portrait direction To make a landscape copy set the original in landscape direction 3 Close the document cover Note R Confirm that there are no documents in the automatic document feeder y R Place the original onto the scanner glass gently To avoid malfunction do not press down too firmly R If the original is a book thicker than 15 mm do not close the document co...

Page 33: ...er Paper with a coated surface Paper with printing on the opposite side that can be seen through the other side such as newsprint R When feeding certain types of document for example if back of the page is not clean through the automatic document feeder it is possible that dirty marks may be left on the original document To prevent this we recommend feeding the document one page at a time when usi...

Page 34: ...rea Scanner glass 208 mm 289 mm 4 mm 4 mm 4 mm 4 mm Automatic document feeder y 216 mm 208 mm 4 mm 4 mm 4 mm 4 mm R When using the unit as a scanner the effective scanning length depends on the selected paper size Size and weight of the document y n Document size Minimum document size 128 mm 128 mm Maximum document size 600 mm 216 mm n Document weight R Single sheet 60 g m to 75 g m R Multiple she...

Page 35: ...mputer page 82 Secure Print R To start the Secure Print application that can manage printing jobs page 98 Device Remote Control page 43 R To program the features R To store edit or erase items in the address book R To view items in the journal report 1 R To view items in Caller ID list 2 R To store caller information into address book 2 R To store or erase items for broadcast transmission 1 R To u...

Page 36: ...omputer name is displayed on the unit PC name 1 LAN supported models only y R The computer name that will be displayed on the unit Assign a unique name for the PC name to avoid errors or the scanned image may be sent to the incorrect computer 1 Displayed only when the unit is connected to the LAN Scan Save to R To select the folder where the scanned image will be saved Viewer File Email OCR Custom...

Page 37: ...ware from Choose a default e mail program A OK To configure the wireless LAN settings y 1 Start Multi Function Station 2 Click Device tab A Wireless LAN Setting R When the setting tool starts follow the on screen instructions 37 3 Basic Operations ...

Page 38: ...ck to the default setting press the specified number using the dial keypad in step 3 not available for some programs If you want to reset all features activate feature 159 page 39 3 6 Programming features Basic Feature Code Description Default key Date and time 101 Enter the date and time using the dial keypad Your logo 102 Enter your logo using the dial keypad Your fax number 103 Enter your fax n...

Page 39: ...de restriction 154 To activate the mode restriction See page 96 for details M0N Change password 155 To change the password for feature programming via remote operation When entering the new code using 0 9 R The default password is 1234 Note R It is recommended that you change this password from the default password R This password is also used for feature programming via a web browser LAN supporte...

Page 40: ...ted the unit will print the Caller ID list automatically after every 30 new calls M0N Time adjustment 226 Using this feature the unit s date and time setting will be automatically adjusted when caller information is received Note R If the time has not previously been set Caller ID will not adjust the clock R If the time is not adjusted correctly due to a problem in Caller ID service this feature i...

Page 41: ...o select the default operation mode copy or fax when the selected time of the mode timer feature 464 elapses Note R You cannot select scan mode using this feature M1N Mode timer 464 To set the timer before returning to the default operation mode feature 463 M2N QUICK JOB priority for copy 478 The selected job will be displayed first M1N Counter view for departments 479 To view the count number of ...

Page 42: ... then enter the programming password feature 155 A OK 4 Select the desired feature from the menu 5 Change the settings or edit the information R This step will vary depending on the feature 6 Submit R The new setting will be transferred to the unit 7 Close the web browser Note R The settings displayed in the web browser can be updated by clicking Reload 42 3 Basic Operations ...

Page 43: ...programming password feature 155 A OK R The new data will be transferred to the unit and the window will close Note R Some of the features cannot be programmed from your computer R If another person is changing the unit settings from the unit s operation panel the changes made from the PC may be overwritten So check the unit is not in use before making changes to the settings 3 8 2 Using Device Mo...

Page 44: ... menu Status Toner and paper information etc Information Current status of the unit and network information etc 3 Confirm the status of the unit Note R You can update the status of the unit by clicking Reload 44 3 Basic Operations ...

Page 45: ...r certain features n The following depends on suffix and or language selection feature 110 For AG EU Portuguese Spanish and LA M2N M3N M4N M5N M6N M7N M8N M9N A B C 2 Á Ã Ç D E F 3 É G H I 4 Í J K L 5 M N O 6 Ñ Ó Õ P Q R S 7 T U V 8 Ú W X Y Z 9 a b c 2 á ã ç d e f 3 é g h i 4 í j k l 5 m n o 6 ñ ó õ p q r s 7 t u v 8 ú w x y z 9 For CX EU English Dutch French Turkish HK HX English Czech Hungarian ...

Page 46: ... 3 g h i 4 j k l 5 m n o 6 p q r s 7 t u v 8 w x y z 9 For RU M2N M3N M4N M5N M6N M7N M8N M9N To search for a name by initial Example LISA 1 Initiate the address book 2 M5N repeatedly Display any name with the initial L R To search for symbols press MG ToneN 3 MCDN LISA R To stop the search press Mw STOPN 46 4 Telephone Number and Email Address ...

Page 47: ...K SETN R A hyphen or a space entered in a telephone number counts as 2 digits 1 Up to 32 digits can be entered fax supported models only y 2 Up to 63 digits can be entered LAN supported models only y 6 Mt MENUN Erasing a stored item 1 Mt MENUN repeatedly ADDRESS BOOK SET 2 MFEN EDIT A MOK SETN 3 MCDN Display the desired item A MOK SETN A MBN 4 MOK SETN A Mt MENUN 4 2 3 Programming items into the b...

Page 48: ...ant to add A MOK SETN R To add other items repeat this step up to 20 items 5 Mt MENUN Erasing a stored item from the broadcast memory 1 Mt MENUN repeatedly BROADCAST SETUP 2 Press MOK SETN 3 MCDN Display the desired broadcast memory location A MOK SETN A MBN 4 MCDN Display EACH A MOK SETN 5 MCDN Display the item you want to erase A MOK SETN 6 MOK SETN A Mt MENUN 48 4 Telephone Number and Email Add...

Page 49: ...OOK from the menu 5 Click Edit next to the desired item you want to register or edit 6 Enter the name email address etc 7 Submit 8 Close the web browser Note R You can register or edit the destinations using the unit page 47 Programming the stored items for broadcast transmission y The pre programmed destinations can be used for the following features Broadcast transmission for fax page 75 1 Start...

Page 50: ...ode restriction Secure Print Quality Quality contrast toner save feature etc Effects Watermark overlay Profile Saving the desired settings selecting the saved settings etc Support Version information Note R Select the desired media type on the Basic tab according to the recording paper Recording paper type Media type Plain paper 75 g m to 105 g m Plain Paper Thin paper 60 g m to 75 g m Thin Paper ...

Page 51: ...ing types of labels Labels that are wrinkled damaged or separated from the backing sheet Any sheet of labels that has spaces in it where some of the labels have been removed Labels that do not completely cover the backing sheet as follows To print on envelopes Use envelopes designed for laser printing We recommend the following High quality envelopes of 90 g m to 110 g m paper for Envelope CHOUKEI...

Page 52: ...elopes that have diagonal seams Textured envelopes or envelopes with shiny surfaces Envelopes that seal by removing a peel off strip Envelopes with more than one flap to be sealed Envelopes with adhesive on the flap Envelopes that are baggy or not sharply creased Embossed envelopes Envelopes that have previously been printed on Envelopes that include cotton and or fibre material Diagonal seam cons...

Page 53: ...Clasp Transparent window 53 5 Printing ...

Page 54: ...ode in the printer settings using Job Type beforehand page 50 If the department code does not match or the department code restricts the print mode printing will be cancelled Job Type settings cannot be performed from the printer settings of Panasonic Easy Print Utility dialogue 5 2 1 Ecology printing features You can use various printing features and preview the resulting printed image without ha...

Page 55: ... to 4 on 5 2 Easy Print Utility 2 Click the Save PDF file icon on the print toolbar 3 Specify the folder to save enter the file name and then click Save The Save PDF file dialogue appears while PDF files are being created and saved Note R The PDF file created with Easy Print Utility is an image type 55 5 Printing ...

Page 56: ...the unit during the set time Enter the desired data timeout setting from 5 and 600 seconds using the dial keypad R The default setting is 060 seconds Mutual A4 letter print 776 This feature allows printing in A4 size even if letter size recording paper is loaded and vice versa When this feature is activated printing is possible between A4 letter size Note R This feature is not available for the ma...

Page 57: ... Sending to an SMB folder Scan to SMB folder R To activate this feature see Setting the information for scan to SMB folder LAN supported models only y page 59 1 LAN connection only y Helpful hints The OCR software is not supplied Install the desired third party OCR software then specify the path of the OCR software To specify the path see following Start Multi Function Station A Settings A Specify...

Page 58: ...splayed in the Quick Image Navigator window after scanning When scanning to Multi Function Viewer for models other than JT models the scanned image will be displayed in the Multi Function Viewer window after scanning However when you select PDF as a file format the software that is associated to open PDF files will start R When scanning to email the email software will automatically start and the ...

Page 59: ...red FTP server 7 Enter the server name IP address folder path etc A Submit 8 Close the web browser Note R If you do not enter a folder path in step 7 the scanned image will be saved in the root folder Setting the information for scan to SMB folder LAN supported models only y When you send scanned files to an SMB folder you can register the SMB folder destinations up to 6 destinations to the unit t...

Page 60: ...rt Multi Function Station 3 Application A Viewer 4 For Quick Image Navigator for JT models click the Acquire Image to Import Folder icon in the Quick Image Navigator window For Multi Function Viewer for models other than JT models click the Scan icon in the Multi Function Viewer window 5 If necessary change the scanning settings on your computer R To preview the scanned image click Preview You can...

Page 61: ...ceed as follows 1 Set the original 2 Start an application that supports TWAIN or WIA scanning 3 For TWAIN scanning Select Acquire Image from the menu For WIA scanning Select From scanner or camera from the menu 4 If necessary change the scanning settings on your computer A Scan R The scanned image will be displayed in the application window after scanning Note R Scanning from WIA compliant applica...

Page 62: ...ription Default key Scan parameter hold 494 To hold the previous scanning parameter for Push Scan When this feature is activated the unit will hold the previous scan settings for each mode of push scan M0N 62 6 Scanning ...

Page 63: ...cally even when in the copy mode fax supported models only y 7 1 2 Various settings for making copies To select the copy size 1 Mn COPY SIZEN repeatedly ORIGINAL SIZE 2 MCDN Select the size of your original document A MOK SETN 3 MCDN Select the size of recording paper size A MOK SETN Note R When 2 is selected you can change the recording paper size by pressing MEN repeatedly R The appropriate zoom...

Page 64: ...t entrance side of the document To make an enlarged copy of the other side of the document turn the document around and then make a copy 1 Set the original 2 Mq ZOOMN repeatedly Select the zoom rate that fits the size of your document and recording paper A MOK SETN ZOOM 100 1 50 200 1 MCDN Change the zoom rate by 1 at a time from 25 to 400 if necessary You can also enter the desired percentage spe...

Page 65: ...an the 1st page R To scan the next page place the document and press MOK SETN Repeat this until all the documents are scanned then press Mx STARTN When using the automatic document feeder y press Mx STARTN Note R After you finish copying press Mw STOPN to reset this feature R A4 letter legal 216 330 or 216 340 size recording paper plain and thin can be used R 2 sided copy is not available for the ...

Page 66: ...his feature R The unit will store the documents into memory at a reduced resolution while collating the copies If the memory becomes full while storing the unit will only print out the stored pages R You can hold the previous collate setting feature 469 Proof set feature automatic document feeder only y If you activate this feature the unit will make 1 set of a collated copy and stop temporarily s...

Page 67: ... documents A MOK SETN 5 MCDN Select the desired page layout A MOK SETN 6 If necessary enter the number of copies up to 99 7 Mx STARTN 8 Place the next document on the scanner glass A MOK SETN R Repeat this until you have scanned all pages and then press Mx STARTN R You can press Mx STARTN anytime to start copying Image repeat feature To copy a single document repeatedly onto one page Image repeat ...

Page 68: ... Cards or making multiple copies of small documents such as a business cards R You can save the previous page layout setting feature 467 7 2 5 Poster feature Scanner glass only You can make copies divided into 2 4 or 9 sections to make enlarged copies of the individual sections You can then glue them together to make a poster Original document 1 X 2 2 X 2 3 X 3 1 Set the original 2 Mo PAGE LAYOUTN...

Page 69: ...s MOK SETN Repeat this until all the documents are scanned then press Mx STARTN When using the automatic document feeder y press Mx STARTN Note R After you finish copying press Mw STOPN to reset this feature R You can save the previous page layout setting feature 467 R When the original document size and recording paper size are different you can only make a 2 in 1 or 4 in 1 copied document For ex...

Page 70: ...them in half to create booklets The documents will be reduced to fit the recording paper 8 7 6 5 4 3 2 1 1 2 3 4 5 6 7 8 1 Set the original 2 Mo PAGE LAYOUTN repeatedly PAGE LAYOUT 3 MCDN BOOKLET A MOK SETN 4 MCDN LEFT BIND or RIGHT BIND A MOK SETN 5 MCDN Select the desired binding pages 1 Makes a booklet with every 4 documents printed as separate blocks ALL Makes a booklet with all documents prin...

Page 71: ...ALL is selected in step 5 the unit will cancel the printing 7 2 9 Edge feature You can set the unit not to copy the outer edges of the document without reducing the copied documents to fit the recording paper This is useful for copying documents with dirty edges 1 Set the original 2 Mo PAGE LAYOUTN repeatedly EDGE 3 MCDN ON A MOK SETN 4 MCDN LONG EDGE A MOK SETN 5 Enter the long edge width using t...

Page 72: ...ld the previous margin setting feature 475 7 2 11 Copy reservation You can make a copy reservation under the following conditions while the unit is printing documents from your computer while the unit is printing received fax documents fax supported models only y 1 Set the original 2 While PC PRINTING or PRINTING 1 is displayed switch to copy mode then press Mx STARTN 1 Displayed only for models t...

Page 73: ...467 To hold the previous page layout setting M0N Zoom hold 468 To hold the previous zoom setting M0N Collate hold 469 To hold the previous collate setting M0N Duplex hold 470 To hold the previous duplex setting M0N Edge hold 473 To hold the previous edge setting M0N Frame margin 474 To set the frame margin When this feature is activated your copies will be automatically reduced according to the ma...

Page 74: ... When using the automatic document feeder y press Mx STARTN Note R To change the contrast resolution setting see the following To select the contrast page 74 To select the resolution page 74 R If the line is busy or if there is no answer the unit will automatically redial the number 2 or more times in the following functions Sending a fax Broadcast transmission y 1 Redialling using MT REDIALN 1 Fo...

Page 75: ...st transmission y You can send the same document to multiple parties up to 20 To use this feature store the fax numbers into broadcast memory page 47 1 Set the original 2 If necessary change the resolution page 74 and the contrast page 74 3 Specify the destination 1 MWN 2 MCDN Select the desired broadcast destination 4 Start the broadcast transmission When using the scanner glass press Mx STARTN t...

Page 76: ...ension telephone answering machine 2 Set the ring count of the answering machine to less than 4 R Set the ring count in FAX ONLY mode of the unit to more than 4 if you use with auto answer ON Note R For TEL mode and TEL FAX mode y Use with an extension telephone if a handset unit is not supplied with your unit page 10 The ringer volume setting should be ON R A4 or letter size recording paper is re...

Page 77: ...dset 8 5 3 TEL FAX mode y How phone calls and faxes are received 1 The other party calls your unit 2 The unit will wait for the duration of 2 rings 1 before answering the call R During this time an extension telephone will ring 3 The unit will answer the call and try to distinguish between fax and phone call 4 When it is a fax The unit receives the fax automatically without ringing When it is a ph...

Page 78: ...rst 3 Record a greeting message on the answering machine 4 Activate the answering machine 5 Set the unit to the desired receiving mode R If you set to FAX ONLY mode change the ring count in FAX ONLY mode to more than 4 feature 210 6 Make sure each of the following is unique the remote access code of the answering machine the fax activation code feature 434 Note R If the call is a phone call the an...

Page 79: ... service provider telephone company for details 1 R This unit is not compatible with AOH service 1 R This unit is designed in accordance with DGT regulations and supports both DTMF and FSK Caller ID 2 R If the unit s Caller ID features do not function properly confirm that your phone line and the phone line of the caller supports Caller ID Consult your local telephone company for more information ...

Page 80: ...CALLER IDN 3 MCDN Display the desired item A MFN A MOK SETN A Mw STOPN Storing caller information 1 Set the unit to the fax mode 2 Mz CALLER IDN 3 MCDN Display the desired item A Mt MENUN 4 Press MFN or MEN A MOK SETN A MOK SETN 8 5 6 Junk fax prohibitor If you subscribe to Caller ID service page 79 this feature prevents fax reception from calls that do not show caller information Additionally the...

Page 81: ... on the list 4 Press Mw STOPN to exit To print the junk fax prohibitor list 1 Mt MENUN repeatedly JUNK FAX PROH 2 MEN repeatedly JUNK LIST PRINT A MOK SETN 3 Press Mw STOPN repeatedly to exit To erase an item from the junk fax prohibitor list 1 Mt MENUN repeatedly JUNK FAX PROH 2 MEN repeatedly JUNK LIST DISP A MOK SETN 3 MCDN Display the desired item A MFN 4 MOK SETN A Mt MENUN 81 8 Fax ...

Page 82: ...Station R Click Select to change the active unit To prevent sending a fax to the wrong destination 1 Start Multi Function Station A Application A PC FAX 2 Tools A Function Setup 3 Select the desired setting from the Send list Display the Fax Send confirmation for every transmission The confirmation dialogue box of the fax number is displayed before sending a fax Do not enter a fax number directly ...

Page 83: ...nt through the unit Viewing a received document 1 Select Received Log in Communication Log 2 Click the item you want to view 3 Click the View icon in the toolbar R If a received fax document is stored in the unit s memory click Receive a Fax beforehand Note R You can view print or transfer the received document using your computer R Messages transferred to your computer will be deleted from the un...

Page 84: ...dobe Reader is required to view it R on the display means the image has already been viewed printed or saved R You can delete images showing To delete a document after viewing a fax document in step 5 click List to go back to the list To delete a document after printing or saving a fax document in step 5 click Reload to update the list 8 6 4 Transferring faxes to email address LAN supported models...

Page 85: ... the fax to email feature and set the destinations 1 Device A Configuration Web Page A Device 2 Type root as the user name then enter the programming password feature 155 A OK 3 Select the FAX FEATURE from the menu 4 Select ON from the FAX AUTO EMAIL drop down list 5 Click Edit next to DESTINATION 6 Click Address Book next to the desired destination 7 Click the name that you want to send the recei...

Page 86: ...elect FINE SUPER FINE or PHOTO resolution transmission time will increase M1N Duplex print setting for fax reception 407 To set the duplex print for fax reception You can select the long or short edge or deactivate this feature M0N Overseas mode 411 If you cannot send a fax overseas even if the number is correct and the line is connected activate this feature before sending the fax This feature im...

Page 87: ... 421 If you want to restrict dialling fax numbers manually using the dial keypad to avoid misdialling for example activate this feature Note R When this feature is activated you cannot make redial calls to fax numbers entered using the dial keypad the fax number re entry setting feature 422 will be deactivated M0N Fax number re entry 422 When this feature is activated if you dial a fax number manu...

Page 88: ...448 the unit will not beep However the unit will start to beep when the memory is nearly full LAN supported models only y M1N Friendly reception 438 To receive a fax automatically when you answer a call and hear a fax calling tone slow beep When this feature is activated you do not have to press Mx STARTN and then M2N for fax reception M1N PC fax setting 442 If you wish to receive a fax to a compu...

Page 89: ...t as the user name then enter the programming password feature 155 A OK 4 Select the FAX FEATURE from the menu 5 Select ON from the RECEIVE NOTIFY drop down list 6 Click Edit next to RECEIVE PC LIST 7 Click List next to the desired destination 8 Click the desired PC from the list A Submit 9 Close the web browser M0N Fax to email address setting 452 If you wish to transfer a received fax document t...

Page 90: ...eactivated Machine name 507 To set the machine name Enter the name of the unit to recognize on the LAN up to 15 characters using the English alphabet and numbers R The first and last letter must be an English alphabet or numbers R Hyphen can also be entered using M1N Note R In order to recognize the unit on the LAN the default name of the unit is assigned automatically If you change the name assig...

Page 91: ...connect the following cables before activating this feature Telephone line cord USB cable LAN cable LAN mode 580 To select LAN mode Important R To set this feature make sure that The unit is in standby mode The document is not set to the automatic document feeder The recording paper is not set to the manual tray The delayed send feature is not activated feature 412 M1N Wireless status 581 If featu...

Page 92: ...use NetBIOS name is not correct Correct the machine name feature 507 343 Online NetBIOS is not working because NetBIOS name is duplicated others Change the machine name feature 507 344 Online Cannot resolve the NetBIOS name between other networks because there is no specified WINS server Consult your network administrator 352 Online Bonjour is not working because Bonjour hostname is not correct Co...

Page 93: ...IPv6 Consult your service provider or network administrator for details Setting the information for scan to FTP FTP FEATURE Enter the FTP server information to send scanned images from the unit to an FTP server For details about this feature see the scanning chapter Setting the information for scan to SMB SMB FEATURE Enter the SMB folder information to send scanned images from the unit to an SMB f...

Page 94: ...which error notifications will be sent and select the types of problems LIFE WARNING A warning indicating that the toner cartridge or drum cartridge needs to be replaced soon MEDIA PATH ERROR An error indicating that there is a problem with an input tray LIFE ERROR An error indicating that the toner cartridge or drum cartridge needs to be replaced 4 Submit 5 Close the web browser 94 9 Network ...

Page 95: ...D supported models only y Important R Make sure the Caller ID list on web is set to ENABLED beforehand feature 568 1 Start Multi Function Station 2 Device A Configuration Web Page A Device 3 Type root as the user name then enter the programming password feature 155 A OK 4 Select FAX FEATURE from the menu 5 Click List next to CALLER ID 6 The Caller ID list will be displayed 7 Close the web browser ...

Page 96: ...K SETN 4 Enter the name up to 16 characters see page 45 for character entry A MOK SETN 5 Enter a 4 digit department code using 0 9 A MOK SETN 6 If necessary change the PRINT or COPY setting MCDN Select the desired setting A MOK SETN 7 Mt MENUN Editing mode restriction for departments Important R Make sure feature 154 is set to ON beforehand 1 Mt MENUN repeatedly DEPARTMENT SETUP A MEN 2 Enter the ...

Page 97: ...epeatedly DEPARTMENT SETUP A MEN 2 Enter the administrator code feature 151 A MOK SETN 3 MFEN RESET COUNTER A MOK SETN 4 MOK SETN A Mw STOPN R To cancel resetting press Mw STOPN Note R The count numbers of copies prints will be reset only when the mode restriction feature 154 is activated 10 3 QUICK JOB feature You can pre program frequently used scan copy types up to 3 for each The following sett...

Page 98: ...ister to Google Cloud Print R Google account information may be required for registration Printing via Google Cloud Print service 1 Open the document you want to print from the application supported Google Cloud Print 2 Start the printing procedure R This procedure varies depending on the application you are using For details about how to perform the printing procedure refer to the documentation f...

Page 99: ...only if the other party s fax machine is equipped with a voice contact feature 10 6 1 Initiating voice contact 1 Press Ms MONITORN while sending or receiving a fax R Your unit will display VOICE STANDBY The other party s fax machine will ring R When the other party answers your unit will ring and PLEASE PICK UP will be displayed 2 Lift the handset to start talking Note R When your unit rings while...

Page 100: ...the following beforehand 1 Mt MENUN A MBNM4NM3NM0N A M1N A MOK SETN A Mt MENUN Note R While the Distinctive Ring feature is activated you cannot change the receiving mode How phone calls and faxes are received for models other than HK If the incoming call is for the fax number the unit will ring with the assigned ring pattern and automatically start fax reception If the incoming call is for the ph...

Page 101: ...the ring pattern assigned for fax R Not available for HK models 1 Set feature 430 to ON 2 Mt MENUN A MBNM4NM3NM1N 3 MCDN Select the desired ring pattern assigned for fax A MOK SETN A Mt MENUN 101 10 Other Useful Features ...

Page 102: ... 117 R If the PC fax setting feature 442 is set to ALWAYS check the connection between the computer and the unit R If the fax preview mode feature 448 is set to ON use the web browser on the computer connected via the LAN to view print or save the documents and then erase unnecessary documents page 84 y NO DOCUMENT FAILED PICKUP R The document was not fed into the unit properly Re insert it and tr...

Page 103: ...the recording paper size setting and load the appropriate recording paper Note R 1 Check the standard input tray The displayed paper size depends on the recording paper size setting feature 380 R 2 Check the manual tray The displayed paper size depends on the recording paper size setting feature 381 CHECK PICK UP INPUT TRAY 2 R Recording paper was not fed into the unit properly Re insert the recor...

Page 104: ...nual tray Load paper page 31 PAPER IN TRAY 2 R The recording paper is installed in the manual tray page 31 PAPER JAMMED OPEN REAR COVER OPEN FRONT COVER R A recording paper jam occurred Remove the jammed paper page 117 R Remove the protective sheet from the drum cartridge page 17 PCFAX R If the PC fax setting feature 442 is set to ALWAYS check the connection between the computer and the unit check...

Page 105: ...sion error occurred Try again For G models Display Cause Solution MEM NEAR FULL R The memory is nearly full of received documents due to a lack of recording paper or a recording paper jam Install paper page 25 or clear the jammed paper page 117 RECEIVE ERROR R A reception error occurred 11 3 Interface messages Display Cause Solution CONNECT ERROR R IP address of the server or network configuration...

Page 106: ...r the recording paper does not stack properly in the recording paper exit R High humidity may cause the recording paper to curl Try turning the paper over and re inserting it If paper curl is excessive please remove it from the recording paper exit If you still have this problem please try with freshly unpacked paper I cannot adjust the volume display items stored in the address book R The unit is...

Page 107: ...mming via remote operation R You may have changed the feature programming password If you do not remember it assign a new programming password using feature 155 When required to enter the current password enter 0101 instead I forgot the current administrator code for mode restriction settings feature 151 R You may have changed the administrator code If you do not remember it assign a new password ...

Page 108: ...d of greyscale when printing from Microsoft PowerPoint or other applications R Select Color or remove the check next to Grayscale in the print dialogue so that coloured or grey objects will be printed in greyscale properly When using the unit as a printer the printing result is distorted R When your unit is connected to the computer by USB if you cancel printing using your computer then immediatel...

Page 109: ...g the unit as a scanner automatic document feeder only y R Remove the document in the automatic document feeder and re insert it Even after clicking Cancel scanning continues R Please wait It may take a while for the cancel request to be accepted The name of the desired computer is not displayed on the unit when scanning documents from the unit LAN supported models only y R The printer driver has ...

Page 110: ... call waiting the service may have been activated during fax transmission Connect the unit to a line that does not have these services R Another telephone on the same line is off the hook Hang up the extension telephone and try again The other party complains about the quality of their received documents R Try copying the document If the copied image is clear there may be something wrong with the ...

Page 111: ...eceived documents due to a lack of recording paper or a recording paper jam Load paper page 25 or remove the jammed paper page 117 R If the PC fax setting feature 442 is set to ALWAYS check the connection between the computer and the unit R If the fax preview mode feature 448 is set to ON use the web browser on the computer connected via the LAN to view print or save the documents and then erase u...

Page 112: ...The other party complains they only hear a fax tone and cannot talk R FAX ONLY mode is set page 76 Tell the other party the number is only used for faxes R Change the receiving mode to TEL mode page 76 or TEL FAX mode y page 77 The MT REDIALN or MVN button does not function properly R If this button is pressed during dialling a pause will be inserted If pressed immediately after a dial tone is obt...

Page 113: ... 172 xx 255 254 1 Class C 255 255 255 0 192 168 xx 1 192 168 xx 254 2 1 xx should be the same value for the unit and for the computer as shown in the following example Example 172 16 0 1 172 16 255 254 The available range of xx is 16 31 2 xx should be the same value for the unit and for the computer as shown in the following example Example 192 168 0 1 192 168 0 254 The available range of xx is 0 ...

Page 114: ...y R Confirm the setting information of your wireless access point For details about the procedure refer to the documentation for your wireless access point The unit cannot be connected to the wireless access point R Place the unit and your wireless access point close together and then try to configure again R If appliances that generate magnetic waves microwave ovens digital cordless telephones et...

Page 115: ...r down report will be printed out stating which fax items in the memory have been erased 11 4 10 Firewall setting tool for Microsoft Windows users LAN supported models only y After installing Microsoft Windows XP Service Pack 2 or later Windows Vista Windows 7 you will not be able to use the following functions because the Windows Firewall feature will be activated and block the connection Device ...

Page 116: ...fy or add the printer driver which changes after installing this series Multi Function Station You can modify or add a printer driver as follows 1 Start Windows and insert the KX MB200 KX MB700 KX FLB880 series CD ROM into your CD ROM drive R If the Select Language dialogue box appears select the desired language that you want to use with this software Click OK 2 Modify 3 Select Modify Utilities o...

Page 117: ... until it clicks into place then pull it completely out lifting the front part of the tray A Case 1 When the recording paper has jammed near inside the unit near the bottom 1 Push down the indentation A and release the bottom cover A 2 Remove the jammed paper A A R The jammed paper may be fit to the bottom of the unit 3 Close the bottom cover until it locks into place Important R Make sure that th...

Page 118: ...er unit B gets hot Do not touch it Note R The area near the rear cover C may also get warm R If the recording paper cannot be removed from rear side expand the paper exit and then remove the jammed paper D After removing it replace the paper exit to the original position E D Caution R Near the recording paper exit roller shaft E gets hot Do not touch it 4 Push up the green levers A to the original...

Page 119: ...e of the recording paper A is sticking out push the recording paper towards the back to release it and then pull it out A R If the top edge of the recording paper B is sticking out pull it out by holding the front part of the jammed paper B R After the jammed paper has been removed re insert the drum cartridge into the unit 5 Close the front cover to clear the error message then insert the standar...

Page 120: ...n the recording paper in the manual tray is not fed into the unit properly The display will show the following CHECK PICK UP INPUT TRAY 2 1 Remove the recording paper 2 Re insert the recording paper Note R If the message is still displayed check the recording paper specifications and re install recording paper See page 31 for details 12 2 Document jams Automatic document feeder y The display will ...

Page 121: ...the document entrance A R If you cannot remove the jammed document A open the document cover remove the document then close the document cover A When the document has jammed near the document exit A 3 Close the ADF cover R Press Mw STOPN to clear the message 121 12 Paper Jams ...

Page 122: ...paper the original document the scanned data or the fax document received by the other party y Caution R Do not use paper products such as paper towels or tissues for cleaning 1 Open the document cover A A 2 Hold the document cover while cleaning the white plates A and the scanner glass B A B 3 Close the document cover A A 122 13 Cleaning 13 Cleaning ...

Page 123: ...d let all parts dry thoroughly A 4 Close the ADF cover 5 Turn the power switch ON 13 3 Cleaning the drum cartridge Important R If the groove of the drum cartridge is dirty lines or dirty patterns may appear on printed sheets Be sure to remove any toner remaining on the inside of the drum cartridge to maintain the print quality R The cleaner for the drum cartridge is pre installed in the unit Open ...

Page 124: ...ide of the drum cartridge Repeat this for the right groove C A B C Note R Be sure to clean all the way to the edge of each groove R After cleaning replace the cleaner to the original place 124 13 Cleaning ...

Page 125: ...B2178 Less than 3 3 W 2 Less than 3 5 W 3 Less than 4 2 W 4 Ready Approx 65 W Copy Approx 500 W Maximum Approx 1 000 W When the fuser lamp turns on Dimensions Width Depth Height Approx 410 mm 400 mm 320 mm Width is 447 mm when the handset unit is installed 5 Mass Weight Approx 12 kg Operating environment 10 C 32 5 C 20 70 RH Relative Humidity Maximum monthly duty cycle 12 000 printed pages 6 Scann...

Page 126: ...mm in fine photo resolution 15 4 lines mm in super fine resolution Transmission time 8 9 Approx 4 s page ECM MMR Memory transmission 10 Data compression system 8 Modified Huffman MH Modified READ MR Modified Modified READ MMR Fax memory capacity 8 3 0 MB in total Approx 80 pages of memory reception Approx 150 pages of memory transmission Based on the ITU T No 1 Test Chart in standard resolution Pr...

Page 127: ...upport the fax feature y 9 Transmission speed depends on the page contents resolution telephone line conditions and capability of the other party s machine 10 Transmission speed is based on the ITU T No 1 Test Chart with original mode If the capability of the other party s machine is inferior to your unit the transmission time may be longer 11 To assure continued emission limit compliance use only...

Page 128: ... CHOUKEI 3 Envelope CHOUKEI 4 Duplex A4 Letter Legal 216 330 216 340 Paper type Simplex Plain paper Thin paper Thick paper Label Envelope Duplex Plain paper Thin paper Paper weight Simplex 60 g m to 220 g m Duplex 60 g m to 105 g m 1 When printing with the computer custom size recording paper can also be used 210 216 279 356 mm Tray load sheets Tray type Paper type Tray load sheets Paper feed 1 Tr...

Page 129: ...may occur and the paper may be damaged 2 The number of sheets may vary depending on the usage environment 3 Depending on the type of paper the loaded paper may exceed the upper limit mark In this case remove some paper from the tray 4 Thick paper and special media will be printed out from the rear side In this case remove each paper media after printing 5 The number of sheets that can be held in t...

Page 130: ...216 279 mm Legal 216 356 mm B5 ISO 176 250 mm B5 JIS 182 257 mm 16K 195 270 mm 216 330 216 330 mm 216 340 216 340 mm Custom size 210 216 279 356 mm Envelope Envelope 10 104 7 241 3 mm Envelope DL 110 220 mm Envelope YOUKEI 4 105 235 mm Envelope CHOUKEI 3 120 235 mm Envelope CHOUKEI 4 90 205 mm 130 14 General Information ...

Page 131: ...hank you for purchasing a Panasonic fax machine Things you should keep a record of Attach your sales receipt here For your future reference Date of purchase Serial number found on the rear of the unit Table of Contents1 1 Table of Contents Introduction and Installation Accessories 1 1 Included accessories 1 2 Accessory information Finding the Controls 1 3 Description of buttons 1 4 Overview Instal...

Page 132: ...org This product includes cryptographic software written by Eric Young eay cryptsoft com The word cryptographic can be left out if the rouines from the library being used are not cryptographic related This product includes software written by Tim Hudson tjh cryptsoft com R This product includes any other Open Source Software R For information of copyrights and licences of the Open Source Software ...

Page 133: ...on 88 436 Silent fax ring count 88 437 Memory reception alert 88 438 Friendly reception 88 442 PC fax setting 88 443 PC fax reception 83 448 Fax preview mode 83 450 Web fax preview access code 88 451 Fax receive notify 89 452 Fax to email address setting 89 458 All received fax erase 89 459 Set fax features to default 89 460 Input tray setting for copy 73 461 Default copy resolution 73 462 Contras...

Page 134: ...send Feature 412 86 DHCP mode Feature 500 90 Dial keypad entry restriction Feature 421 87 Dial tone detection Feature 423 87 Dialling mode Feature 120 38 Directory 49 Display contrast Feature 145 39 Display interval Feature 148 39 Distinctive Ring service Feature 430 87 DNS server 1 Feature 504 90 DNS server 2 Feature 505 90 Drum cartridge 17 Drum life 131 Duplex feature Copy 65 Print 50 Duplex ho...

Page 135: ...rd input tray Feature 380 40 Paper type Manual tray Feature 384 41 Standard input tray Feature 383 41 Password Feature 155 39 PC fax reception Feature 443 83 PC fax setting Feature 442 88 PC print features 56 Power failure 115 Power save Feature 403 41 Power switch 20 Print Duplex 50 Special media 51 Programming 38 Pull scan 60 Scan application 60 Viewer 60 Push scan 57 Q Quick scan mode Feature 4...

Page 136: ...s book 47 Broadcast 47 Caller information 80 Subnet mask Feature 502 90 T TEL mode 76 TEL FAX mode 77 Time adjustment Feature 226 40 Toner cartridge 17 Toner cartridge life 131 Toner save Feature 482 18 41 V Voice contact 99 W Web fax preview access code Feature 450 88 WINS server 1 Feature 538 91 WINS server 2 Feature 539 91 Wireless LAN 21 Wireless restore Feature 586 91 Wireless status Feature ...

Page 137: ...137 Notes ...

Page 138: ...138 Notes ...

Page 139: ...139 Notes ...

Page 140: ...PNQX6667ZA D0514KU0 Panasonic System Networks Co Ltd 2014 ...

Reviews: