background image


INF-15 

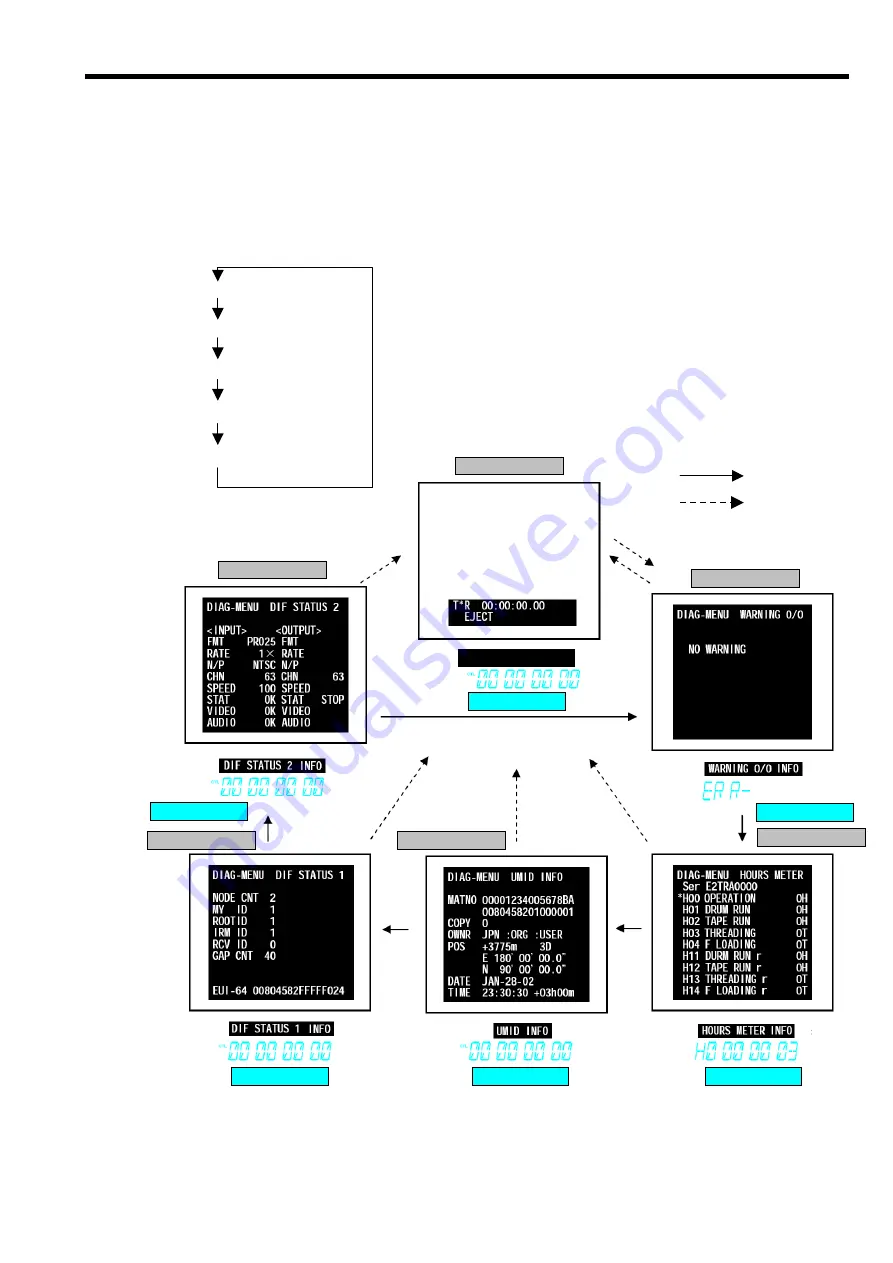
9. DIAG MENU DISPLAY 

 
  The DIAG-MENU is the menu for investigating the status of the VTR, and it has the indicated information. 
• Warning display (WARNING information) 
• Hour meter display (HOUR METER information) 
• UMID display (UMID information) 
• DIF status display (DIF STATUS 1 and 2 information) 
 
 1. 

Press 

the 

“DIAG”

 button so that the above information is displays on the monitor and Front Display. 

 2. 

Press 

the

 “SEARCH”

 button in order to change the display as shown below. 


3.  The Diag Menu is closed by pressiing the

 “DIAG” 

button again. 

Monitor Screen 

Monitor Screen 

Monitor Screen 

Monitor Screen 

Monitor Screen 

Monitor Screen 

Front Display 

Front Display 

Front Display 

Front Display 

Front Display 

Front Display 

NORMAL SCREEN 

Note:  

: SEARCH Button 

: DIAG Button   

HOUR METER SCREEN 

WARNING O/O SCREEN 

DIF STATUS 2 SCREEN 

UMID INFO SCREEN 

DIF STATUS 1 SCREEN 

Summary of Contents for AJ-D93MC

Page 1: ...k Diagrams Sec 6 Schematic Diagrams Sec 7 Major Parts Location 2004 Matsushita Electric Industrial Co Ltd All rights reserved Unauthorized copying and distribution is a violation of law ORDER NO BSD04080160 D25 AJ SD93P E AJ D93MC Digital Video Cassette Recorder AJ YA93P Analog Interface Board AJ YA94G SDI Interface Board ...

Page 2: ...warnings or cautions to advise non technical individuals of potential dangers in attempting to service a product Products powered by electricity should be serviced or repaired only by experienced professional technicians Any attempt to service or repair the product or products dealt with in this service information by anyone else could result in serious injury or death ...

Page 3: ... 3 ...

Page 4: ... 4 AJ D93MC ...

Page 5: ... 5 ...

Page 6: ... 6 AJ YA93P AJ YA94G ...

Page 7: ...devices are integrated circuits and some field effect transistors and semiconductor chip components The following techniques should be used to help reduce the incidence of component damage caused by static electricity 1 Immediately before handling any semiconductor component or semiconductor equipped assembly drain off any electrostatic charge on your body by touching a known earth ground Alternat...

Page 8: ... 8 AJ SD93P E ...

Page 9: ... 9 ...

Page 10: ... 10 ...

Page 11: ... 11 AJ YA93P AJ YA94G ...

Page 12: ...FCD0409NTKK145E466E467 ...

Page 13: ...f the Other Parts INF 8 5 MANUAL TAPE EJECT Emergency Eject INF 9 6 Cleaning Method INF 10 6 1 Cylinder Head Cleaning Method Daily INF 10 6 2 Cylinder Lead Cleaning Method Weekly INF 10 6 3 A C Head Cleaning Method Weekly INF 10 6 4 Pinch Roller and Capstan Shaft Cleaning Method Weekly INF 10 6 5 Post Cleaning Method Weekly INF 10 7 SOFTWARE VERSION DISPLAY INF 11 7 1 SOFTWARE and PLD VERSION are ...

Page 14: ...t Axis Driver 1 5 mm 26 VFK1300 A D Board DAQ 12 Quatech 27 VFM3580KM DVCPRO Alignment Tape No 1 or VFM3580KL NTSC 27 VFM3680KM DVCPRO Alignment Tape No 1 or VFM3680KL PAL 28 VFM3581KM DVCPRO Alignment Tape No 2 or VFM3581KL NTSC 28 VFM3681KM DVCPRO Alignment Tape No 2 or VFM3682KL PAL 29 VFM3582KM DVCPRO Alignment Tape No 3 or VFM3582KL NTSC 29 VFM3682KM DVCPRO Alignment Tape No 3 or VFM3682KL PA...

Page 15: ... mm VFK1188A Dial Tension Gauge VFK0749 Froiral Grease for plastics MOR265 Morlytone Grease for metal VFK1147A 0X100 Philips Driver Fine VFK1146A 00X75 VFK1209A Torque Driver VFK1375 VFK1179A 0 71 mm Hex Driver VFK1148A 1 5 mm VFK1178A 0 89 mm VFK1149B 9 VFK1155 REV Silver 10 11 VFK1208 Neutral Black with hole Position Tool VFK1156 PLAY Black 13 VFK1151 Nut Driver 2 5 mm 15 VFK0948A Check Light 23...

Page 16: ...tion Cassette VZZ0095 32 33 Cleaning Cloth AJ CL12MP Cleaning Tape 36 VFK1193 Extender Board 39 VFM3010EDS or EDL NTSC VFM3110EDS or EDL PAL DV Alignment Tape Color Bars 31 40 VFK0906 Lubrication Oil VFK1304A Flexible cable Part No VWJ20E5500L0 Flash Memory Version up Tool VFK1304 includes the flexible cable VWJ20E5500L0 VFM3380KM NTSC VFM3480KM PAL DVCPRO50 Alignment Tape 30 VFK1590 C PLD Writer ...

Page 17: ...00 ITI pattern Linearity adjustment 2 3 VFM3582KM KL NTSC Manufacturer X value adjustment tape VIDEO PCM AUDIO CUE TIME min Signal Purpose Signal Purpose Signal Purpose 0 00 Color bar 75 with drop out track X value adjustment 6KHz 10VU X value adjustment 2 4 VFM3380KM NTSC 50M adjustment tape VIDEO PCM AUDIO CUE TIME min Signal Purpose Signal Purpose Signal Purpose 0 00 Color bar with teletext 100...

Page 18: ...g 2 8 VFM3681KM KL PAL Manufacturer LISTA adjustment tape VIDEO PCM AUDIO CUE TIME min Signal Purpose Signal Purpose Signal Purpose 0 00 ITI pattern Linearity adjustment 2 9 VFM3682KM KL PAL Manufacturer X value adjustment tape VIDEO PCM AUDIO CUE TIME min Signal Purpose Signal Purpose Signal Purpose 0 00 Color bar 75 with drop out track X value adjustment 6KHz 10VU X value adjustment 2 10 VFM3480...

Page 19: ...erator with CF OUT TSG131A PAL PAL analog composite component signal generator with CF OUT SCH meter NTSC Waveform monitor NTSC 1760 op SC or 1780R Vector scope NTSC SCH meter PAL Waveform monitor PAL 1761 op SC or 1781R Vector scope PAL Tektronix Oscilloscope Digital voltmeter D V M Frequency counter Audio noise meter Audio analyzer Spectrum analyzer 1 This option 05 is added for dvcpro service t...

Page 20: ...M 14 Reel Drive Motor Unit VEM0585C IM 15 Pinch Solenoid VSJ0227 IM 16 S Brake Solenoid VSJ0216 IM 17 T Brake Solenoid VSJ0216 IM 18 Distinction SW Unit MIC SENSOR VXA7014C IM 19 Cleaner Solenoid VSJ0226 IM 20 Main Cam Gear VDG1168 IM 21 M Stopper Brake Solenoid VSJ0216 IM 22 Front loading unit VXA7347 R 23 Front Loading Motor VXA5597 F 24 Fan motor L6FAHBBD0001 Exchange after every 12 000 h of en...

Page 21: ...or 1 Cylinder Unit 19 Cleaner Solenoid 12 A C Head 13 Loading Motor 1 Arm Unit 7 Mode SW Unit 15 Pinch Solenoid 17 T Brake Solenoid 4 S Reel Motor Unit 5 T Reel Motor Unit 14 Reel Drive Motor Unit 11 Tension Arm Unit 10 S5 Post Base Unit 9 T1 Boat Unit 3 Cleaning Arm Unit 20 Main Cam Gear 8 S1 Loading Arm Unit 2 Pinch Arm Unit 18 Distinction SW Unit 6 Thrust Screw Unit 16 S Brake Solenoid 21 M Sto...

Page 22: ...see Figure 5 2 a Insert the rubber side of the take up jig to the cassette rid opening position from mechanism side b Turn the flange of the supply reel in the direction of winding to eliminate the tape slack Take care not to damage the tape in the process Figure 5 2 Rotate the S Reel 4 Repeat item 2 and 3 until the tape wound up completely inside of the cassette 5 When the tape is completely gott...

Page 23: ...ouch a head chip Clean the drum lead with a pick 6 3 A C Head Cleaning Method Weekly Wipe the A C head with a cloth dipped in cleaning liquid Wipe again with a dry cloth 6 4 Pinch Roller and Capstan Shaft Cleaning Method Weekly Wipe the Pinch Roller and Capstan with a cloth dipped in cleaning liquid 6 5 Post Cleaning Method Weekly Wrap a cloth on a pick Wipe each posts with that pick Wipe again wi...

Page 24: ... REW buttons together then the Check Sum is displyed as shown the above 7 1 B Michrocomputer Software Version Display 1 Turn on the power of the VTR and place it in the EJECT mode 2 Press the PLAY STOP buttons and FP MENU buttons simultaneously so that the monitor TV shows the HOUR METER display 3 Press the Search button so that the Software Version of the Microcomputer is displayed as shown below...

Page 25: ...D I F DI 4324B AVIO IO 4326B SDI SI 4327A 3 Move the cursor by using the Joy Stick so that the PLD version is displayed on the Front Panel as shown the above Note If the optional boards AJ YA93 and AJ YA94G are not installed the monitor TV shows AVIO and SDI DIAG MENU PLD VERSION Ser F4TRA0001 P SERVO VSI4319A 1 0 AVMON VSI4323B 1 4 2829 DVPRC VSI4322B 1 1 D7F8 AVPRC VSI4321C 1 0 F0C0 D I F VSI432...

Page 26: ... HEAD DV RP HEAD Figure 8 1 2 DVCPRO 50 DVCPRO 25 RP HEAD 1 Enter into the RF adjustment menu and select RP HEAD 2 The error rate is displayed on the AUDIO LEVEL METER 3 Specification of Error Rate Figure 8 2 The error rate is displayed and measured on the AUDIO LEVEL METER at the first page main screen of Service menu mode refer to figure 8 1 SERVICE MENU NO AOO A00 SERVO ADJUST B00 RF ADJUST F00...

Page 27: ...O DV ATF HEAD TCG SW CH 1 CH 2 CH 3 CH 4 INT REGEN RPL1 VIDEO RPL2 VIDEO RPR1 VIDEO RPR2 VIDEO RP INT PRESET RPL1 AUDIO RPL2 AUDIO RPR1 AUDIO RPR2 AUDIO TCG SW INT REGEN VIDEO Error rate is displayed INT PRESET AUDIO Error rate is displayed Specification of Error Rate VTR mode Specification of Error Rate DVCPRO All Modes DVCPRO PB Head alignment tape playback Under the A position at level meter DV...

Page 28: ...that the above information is displays on the monitor and Front Display 2 Press the SEARCH button in order to change the display as shown below 3 The Diag Menu is closed by pressiing the DIAG button again Monitor Screen Monitor Screen Monitor Screen Monitor Screen Monitor Screen Monitor Screen Front Display Front Display Front Display Front Display Front Display Front Display NORMAL SCREEN Note SE...

Page 29: ...to reset by controlling the Joy Stick Only H11 H14 with r can be reset 4 When confirming the message r OK press the PLAY button on the Front Panel the data H for the item where the cursor is located will be reset 5 Press the MENU button simultaneously press the PF button so that the VTR returns to the normal screen DIAG MENU HOURS METER Ser 0000000001 H00 OPERATION 1000H H01 DRUM RUN 2000H H02 TAP...

Page 30: ...al RF CUE Board TP233 R P L HSW Signal SERVO Board TP6502 R P R or PB R ENVELOPE Signal RF CUE Board TP235 P R R HSW Signal SERVO Board TP6302 R P L or PB L ENVELOPE Signal RF CUE Board TP233 R P L HSW Signal SERVO Board TP4102 CUE Signal RF CUE Board Figure 10 1 Figure 10 2 Figure 10 3 ...

Page 31: ...INF 18 RF CUE Board COMPONENT SIDE SERVO Board COMPONENT SIDE TP6302 TP6502 TP4102 TP233 TP235 TG6001 ...

Page 32: ...INF 19 11 INTERNAL SWITCH SETTING The switch setting on the AVIO board part of AJ YA93 is as shown below ...

Page 33: ...AVPROC FPG ALTERA IC I201 901 VSI4321 12 2 4 DVPROC FPG ALTERA IC1501 VSI4322 12 2 4 F3 DPROC D I F FPG ALTERA IC10501 VSI4324 12 2 4 F4 AVIO AVIO FPG ALTERA IC3400 VSI4326 12 2 4 F5 SDI SDI FPG ALTERA IC255 P1802 On the DPROC Board 1 Flash Memory Version up Tool VFK1304A 2 Version up Software VFK1248N 3 CPLD Writer VFK1590 4 CPLD Version up Software Max Plus II supplied from ALTERA VSI4327 12 2 4...

Page 34: ...memory writing Version Upgrade Software VFK1248N or higher VFK1248N consist of 4 type of software as shown below VSI2312N exe f_servo obf FW103u exe Setting ini Personal Computer WINDOWS95 98 RS 232C Cable D sub 25pin 25 pin cross cable or D sub 9 pin 25 pin cross cable Flash Memory Version Up Tool VFK1304A 2 Switch setting of the flash memory version upgrade tool Confirm that the switch settings ...

Page 35: ...SYS IF Microcomputers DPROC Board 1 Turn on the VTR power 2 Copy the program software for the SERVO and SYS_IF as shown in the table 12 1 into the personal computer 3 Execute the VSI2312N exe so that the following screen appears 4 Select the CPU Microcomputer sheet as shown in figure 12 2B 1 Figure 12 2B 1 5 Select the each item on the Setup Panel as shown in the table 12 2B 2 3 Writing data Board...

Page 36: ...e Process window reach to 100 that means the software programming complete as shown in figure 9 1B 3 Figure 12 2B 3 9 Press Exit button to end the program If the error occurs during above process repeat the process from step 5 again 10 Turn the power of the VTR off and then on This will reboot the VTR 11 Confirm that software version is updated Click Start button Confirm 100 Click Exit button ...

Page 37: ...ocomputer sheet as shown in figure 9 1C 1 Figure 12 2C 1 5 Select the each item on the Setup Panel as shown in the table 9 1 10 3 Writing data Board Name Slot No 3 Microcomputer Select 4 Software Select FILE data FILE Extension 4 Target machine ID check SERVO Board F1 MN10300 Series Do not set any one MOT mot or s off Port COM1 Baud Rate 115200 Stop Bits 1Bit Byte size 8Bits 5 Setting for PC Parit...

Page 38: ...lowing screen appears Note The check sum is not calculated for the SERVO microcomputer Figure 12 2C 3 7 Click Start button as shown in figure 9 1C 3 so that the following comment appears in the MS DOS screen Do you continue Y N Figure 12 2C 4 ...

Page 39: ...l start Figure 12 2C 5 9 The screen display of MS DOS changes to Windows screen after the programming complete 10 Press Exit button to end the program 11 Turn the power of the VTR off and then on This will reboot the VTR 12 Confirm that software is updated ...

Page 40: ...N Board F2 AVMON FPG IC3200 AVMON AVPROC FPG IC1201 901 AVPROC DVPROC FPG IC1501 DVPROC DPROC Board F3 D I F FPG IC10501 D I F AVIO Board F4 AVIO FPG IC3400 AVIO SDI Board F5 SDI FPG IC255 SDI ttf Port COM1 Baud Rate 115200 Stop Bits 1Bit Byte size 8Bits 4 Setting for PC Parity None The numbers 1 4 in the above tables show the number in figure 9 1D 1 Setup Panel Table 12 2D 2 6 Click OK button so ...

Page 41: ...ve process repeat the process from step 7 again 10 Turn off and on the power of VTR in order to reboot the machine 11 Confirm that the software version is updated 12 Turn off the VTR power and remove the Flash memory version up tool and cables Click Start button Confirm 100 Click Exit button ...

Page 42: ...ct ASAP 2 in programming software portion in order to download it File NAME jcf File Included in VSI4319A file Copy all files of the VSI4319A which is included jct file to floppy disk Personal Computer WINDOWS 95 or 98 Table 12 2E 1 2 Connection 1 Connect the D sub Cable between CN201 for ALTERA connector of the CPLD WRITER VFK1590 and Personal Computer Printer port 2 Connect the CPLD WRITER Cable...

Page 43: ...lect tab Option and then Hardware Setup 5 On Hardware Setup dialog set the Hardware Type to Byte Blaster MV Figure 12 2E 4 6 On main window select tab JTAG and then select Restore JCF 7 Select the floppy drive and then select the jcf format file jcf on dialog box of Restore JCF and then press OK button Figure 12 2E 5 ...

Page 44: ... the message Programming Complete appears then PLD version upgrade is completed Click OK button on the Programming complete message Dialog 11 Confirm that PLD version of VTR is updated Refer to pageINF 12 Figure 12 2E 7 MAX PLUS are registered trademarks of Altera Corporation Windows95 and Windows98 are registered trademarks of Microsoft Corporation SDI Progress bar ...

Page 45: ...RVICE MENU PRO 50M NO P 1 P 1 REC ADJUST P 2 PB ADJSUT P 3 RP ADJSUT P 4 DEFAULT END SERVICE MENU 50M NO C 7 SAVE LOAD INIT LOAD END MAIN Screen JOY STICK RF ADJUST Sub Screen 1 ITEM SETTING Screen ITEM SETTING Screen Except DEFAULT DEFAULT DEFAULT operation SERVICE MENU SERVO NO A16 0 A16 PBL GAIN 50 0 A17 PBL GAIN 25 0 A18 RPR GAIN DV 0 A19 TRK VAL 50 0 A20 TRK VAL 25 0 END SERVICE MENU SERVO NO...

Page 46: ...ing is saved to MEM 2 as the factory adjustment LOAD The saved backup value can be loaded to MEM 1 as the current setting INIT LOAD The default value is loaded to MEM 1 The default value is different from the factory adjustment value 4 Press the SET button on the front panel Then the selected operation is carried out and then the item setting screen is displayed again MEM1 MEM2 FACTORY MEM 2 has f...

Page 47: ...r PG mono multi automatic adjustment Yes RISE 0 1649 4095 0 1649 4095 FALL A06 PG SHIFT 25 0 1649 4095 0 1649 4095 Alignment tape is used for PG mono multi automatic adjustment Yes A07 T PHOTO Voltage value 0 0V 3 3V Indication of the detection voltage of the photo sensor for beginning and end detection on the T side This is used for adjustment of the sensitivity of the photo sensor No A08 S PHOTO...

Page 48: ...ta linearity for RPL1 RPL2 head No A16 PBL GAIN 50 128 0 127 128 0 127 LISTA sensitivity adjustment for PBL1 PBL2 head Yes A17 PBL GAIN 25 128 0 127 128 0 127 LISTA sensitivity adjustment for PBL1 PBL2 head Yes A18 RPR GAIN DV 128 60 127 128 60 127 LISTA sensitivity adjustment for RPR1 RPR2 head Yes A19 TRK VAL 50RP 128 0 127 128 0 127 The CTL tracking offset value can be changed for RP head for 5...

Page 49: ...Y STICK is pressed the selected operation will be performed and it will return to the item setting screen When the MENU button is pressed no operation will be performed and it will return the item setting screen DVCRRO 25M ADJUST sub screen Item No SUPER DISP Item contents Q 1 REC ADJUST Adjustment of the recording system for DVCPRO 25 Mbps Q 2 PB ADJUST Adjustment of the playback system PB head f...

Page 50: ...nd move the cursor to the desired operation item SAVE Save the present set values as the factory default values LOAD Load the saved factory default values as the present set values When SAVE operation has not been performed the initial values will be loaded INIT LOAD Load the initial value which designer decide as the present set values 3 When the JOY STICK is pressed the selected operation will b...

Page 51: ...rent Yes Use for electrical adjustment P06 128 60 127 128 60 127 Q06 P06 Q06 REC CURR R2 128 60 127 128 60 127 Adjustment of the RP R2 head recording f characteristic Yes Use for electrical adjustment P13 Q13 ADJ CH 0 1 2 3 4 OFF PBL PBR RPL RPR Channel Head selection for recording adjustment The setting is held until exit from 50M ADJUST 25M ADJUST No Factory use only P16 Q16 REC DATA 0 1 NORMAL ...

Page 52: ... When a status is detected where the playback clock frequency at the time of mode switching during playback is outside the permissible range set by MONI LIM PB1 for the specified time or longer this function automatically pulls the frequency back to the reference frequency corresponding to the relative speed The setting is held until exit from 50M ADJUST 25M ADJUST No Factory use only P66 Q66 MONI...

Page 53: ...G R2 128 20 127 128 20 127 Adjustment of the R2 head playback amplitude Yes Use for electrical adjustment P09 Q09 ENV L1 0 255 0 255 Yes Factory use only P10 Q10 ENV L2 0 255 0 255 Yes Factory use only P11 Q11 ENV R1 0 255 0 255 Yes Factory use only P12 Q12 ENV R2 0 255 0 255 Playback signal envelope level read out value averaged for each track of each head ENV L1 L1 head ENV L2 L2 head Averaging ...

Page 54: ... is set value 10 24 Yes Factory use only Do not change any setting P22 Q22 MONI LIM N 0 28 127 0 28 127 Setting of the frequency offset tolerance value for PLL frequency monitor control The actual tolerance range in regard to the reference frequency is set value 10 24 Yes Factory use only Do not change any setting P23 Q23 TH EYE 0 110 255 0 110 255 Setting of the threshold value for judging the si...

Page 55: ... for electrical adjustment P37 Q37 T L2 1A 88 32 4 88 32 4 Yes Use for electrical adjustment P38 Q38 T L2 1B 88 32 4 88 32 4 Yes Use for electrical adjustment P39 Q39 T L2 2B 40 0 31 40 0 31 Yes Use for electrical adjustment P40 Q40 T L2 3B 31 0 31 31 0 31 The initial values for six of the seven tap coefficients of the adaptive equalization filter excluding the fixed center tap are set for the L2 ...

Page 56: ...8 32 4 Yes Use for electrical adjustment P51 Q51 T R2 2B 40 0 31 40 0 31 Yes Use for electrical adjustment P52 Q52 T R2 3B 31 0 31 31 0 31 The initial values for six of the seven tap coefficients of the adaptive equalization filter excluding the fixed center tap are set for the R2 head The tap coefficient values after adaptive equalization filter convergence at the time of standard tape playback a...

Page 57: ... When a status is detected where the playback clock frequency at the time of mode switching during palyback is outside the permissible range set by MONI LIM PB1 for the specified time or longer this function automatically pulls the frequency back to the reference frequency corresponding to the relative speed The setting is held until exit from 50M ADJUST 25M ADJUST No Factory use only P66 Q66 MONI...

Page 58: ...ment P08 Q08 R08 MAG R2 128 20 127 128 20 127 Adjustment of the R2 head playback amplitude Yes Use for electrical adjustment P09 Q09 R09 ENV L1 0 255 0 255 Yes Factory use only P10 Q10 R10 ENV L2 0 255 0 255 Yes Factory use only P11 Q11 R11 ENV R1 0 255 0 255 Yes Factory use only P12 Q12 R12 ENV R2 0 255 0 255 Playback signal envelope level read out value averaged for each track of each head ENV L...

Page 59: ...ory use only Do not change any setting P23 Q23 R23 TH EYE 0 110 255 0 110 255 Setting of the threshold value for judging the signal quality after equalization The judgment result for the signal quality is used for adaptive equalization PLL fault detection function and other control Yes Factory use only Do not change any setting P24 Q24 R24 TH ULK 0 98 255 0 98 255 Setting of the threshold value fo...

Page 60: ...ctrical adjustment P37 Q37 R37 T L2 1A 88 32 4 88 32 4 Yes Use for electrical adjustment P38 Q38 R38 T L2 1B 88 32 4 88 32 4 Yes Use for electrical adjustment P39 Q39 R39 T L2 2B 40 0 31 40 0 31 Yes Use for electrical adjustment P40 Q40 R40 T L2 3B 31 0 31 31 0 31 The initial values for six of the seven tap coefficients of the adaptive equalization filter excluding the fixed center tap are set for...

Page 61: ...ut is possible only at the time of PLAY REC Operation At the time of P53 Q53 IC READ SINGLE Read out and display are performed each time the SET button is pressed At the time of P53 Q53 IC READ CONT Read out and display are performed once every second Yes Use for electrical adjustment P53 Q53 R53 IC READ 0 1 2 OFF SINGLE CONT The following data are read out from the EQ200 IC However there are limi...

Page 62: ...ere the playback clock frequency at the time of mode switching during palyback is outside the permissible range set by MONI LIM PB1 for the specified time or longer this function automatically pulls the frequency back to the reference frequency corresponding to the relative speed The setting is held until exit from 50M ADJUST 25M ADJUST DV ADJUST No Factory use only P66 Q66 R66 MONI KINDSEL 1 2 3 ...

Page 63: ...the AVMON Board Yes G00 AUDIO ADJUST Item Set value No SUPER DISP No SUPER DISP Setting contents and outline function explanation BACK UP Remarks G01 REF_LEVEL1 0 1 2 FS 20 FS 18 FS 12 Selection of the audio I O reference level 0 Full scale 20 dB Shipping setting for T P 1 Full scale 18 dB Shipping setting for E 2 Full scale 12 dB Change of the set value is possible only when G02 REF_LEVEL2 0 dB h...

Page 64: ...set 1 6 min The still timer should be reset Yes H02 LTC OUT SEL 0 1 N STOP STOP Selection of TC output according to the mode or not 0 Output always independent of the mode 1 ON OFF switching of the TC output according to the VTR mode However the TC output always is ON at the time of SETUP MENU 317 AUD MEM MODE AMU_X AMU_VO Yes H02 TC output in case of LTC OUT SEL STOP setting TC INT EXT Mode VV EE...

Page 65: ...INF 52 14 ERROR MESSAGES ...

Page 66: ...INF 53 ...

Page 67: ...INF 54 ...

Page 68: ...INF 55 ...

Page 69: ...ng UID Important Note The UID number should not be changed from the original one If the original UID number is needed contact Panasonic Service Engineering 1 Connect the Flash memory version up tool VFK1304A and RS 232C Straight Cable between the connector P1802 on the DPROC Board and personal computer as shown below 2 Make sure that the direction of the flat cable connection face side and reverse...

Page 70: ... line ends of ASCII Receiving 6 Turn ON the VTR power 7 Input uid and then press the Enter key so that the current UID will be appeared The 8 digits of the first half are always 0084582 The 8 digits of the last half are unique code 8 Input uid_write enable and press the Enter key and make sure that the display shows OK 9 Input uid and press the Enter key and make sure that the display shows OK 10 ...

Page 71: ... F 2 Board POWER 1 Board POWER 2 Board F1 SERVO Board F2 AVMON Board F3 DPROC Board 1394 MODULE Board F4 AVIO Board AJ YA93 F5 SDI Board AJ YA94G RF CUE Board STD JACK Board OPT JACK Board AJ YA93 MOTHER Board MECHA I F 3 Board FRONT Board EJECT Board UPPER SW Board ...

Page 72: ...l DIS 1 1 2 Front Panel Removal DIS 1 1 3 Bottom Case removal DIS 1 1 4 Front Loading Unit Removal DIS 1 1 5 Rear Panel Removal DIS 2 1 6 MECHA IF 3 Board Removal DIS 3 1 7 Power Supply Unit Removal DIS 3 1 8 Power Supply Unit Disassembly DIS 3 1 9 Mechanism Chassis Unit Removal DIS 4 ...

Page 73: ...e removal 1 Unscrew the 4 screws D and 4 screws E 2 Remove the Bottom Case 1 4 Front Loading Unit Removal 1 Disconnect the 2 connectors To the Loading Motor and P1 2 Push the red plastic screw in front of the worm gear of the cassette down motor with a screwdriver and turn it counterclockwise to move the cassette holder to the position where the two screws F can be seen as shown the first figure o...

Page 74: ...nstalled remove the SDI Board as shown below 4 When the Optional Boards IVIO Board and OPT JACK Unit is installed unscrew the 4 screws J 5 Pulling back the OPTJACK Board Unit and remove it Note The OPTJACK has been connected with the MOTHER board by connectors as shown below 6 Unscrew the 5 screws K and L 7 Unscrew the 2 screws M and remove the Rear Panel G G F M J SDI Board AJ YA94G OPTJACK Board...

Page 75: ...screw the 2 screws O 3 Unscrew the 2 screws P and lift up the Power Supply Unit 1 8 Power Supply Unit Disassembly 1 Unscrew the 6 screws Q and then remove the side cover 2 Remove the Plastic Barrier and POWER 2 Board 3 Unscrew the 4 screws S and R and then remove the POWER 1 Board P1001 P1501 O P Q Plastic Barrier POWER 2 Board R S POWER 1 Board MECHA IF 3 Board N Slide the Board in this direction...

Page 76: ...the 3 screws T and then temporary remove the RF CUE Board 3 Remove the Front Loading Unit according to the paragraph 1 4 Front Loading Unit Removal 4 Unscrew the 4 screws U and lift up the handle on either side attached to the Mechanism Chassis U Mechanism Chassis Handles P6202 P6201 P4001 T RF CUE Board ...

Page 77: ...tion and Adjustment T4 Post Height Adjustment MECH 16 3 21 CTL Self Recording Level Confirmation MECH 17 3 22 Play Tape Path Limit Confirmation MECH 17 3 23 Confirmation of Envelope on REV REW and FF mode MECH 18 3 24 Confirmation of Play Start Envelope MECH 18 3 25 REV mode Tape Path Limit Confirmation MECH 19 3 26 FF REW mode Tape Path Limit Confirmation MECH 19 3 27 Screw Lock Tight of A C Head...

Page 78: ...it Replacement MECH 47 5 13 Loading Motor Replacement MECH 47 5 14 Mode SW Unit Replacement MECH 48 5 15 Main Cam Gear Replacement MECH 48 5 16 Thrust Screw Replacement and Adjustment MECH 49 5 17 S5 Post Base Unit Replacement MECH 49 5 18 Tension Arm Unit Replacement MECH 50 5 19 S1 Post Loading Arm Unit Replacement Adjustment MECH 51 5 20 T1 Boat Unit Replacement and Adjustment MECH 52 5 21 A C ...

Page 79: ...st S5 Post T1 Post T2 Post T3 Post T4 Post UPPER FIXED FIXED LOWER LOWER UPPER FIXED LOWER LOWER S1 Post S2 Post S3 Post S4 Post S5 Post Cylinder Unit T1 Post T2 Post T3 Post A C HEAD Capstan shaft T4 Post 21 7mm Mini DV DVCPRO M DVCPRO L VFK1149B Post Driver VFK1151 Nut Driver ...

Page 80: ...IVE CTL SERVO TP30 FP FRAME PULSE SERVO TP301 CUE RF CUE TP4102 LISTA Adjustment R P L ATF ERR RF CUE TP6701 PB L ATF ERR The selection can be made by the service menu R P R ATF ERR RF CUE TP6801 R P L HSW SERVO TP233 PB L HSW SERVO TP232 TRG R P R HSW SERVO TP235 A C Head Adjustment Mode Adjustment Name Adjustment mode SERVICE MENU Azimuth X Value Adj A15 RPL LIN 25 A13 RPL LIN 50 X Value Compens...

Page 81: ... table about Post Driver to be used to adjust each post Figure 3 1 1 Post Post Driver S4 S5 Post VFK1149B T3 T4 Post VFK1151 Post Limit S4 S5 Post Lower Limit 0 2 0 05mm Turn 1 round more counterclockwise from lower limit position T3 T4 Post Lower Limit 3 2 Tension Arm Adjustment Flowchart Figure 3 2 1 VFK1154 VFK1154 Reference face Reference face Mech Neutral Plate Mech Neutral Plate a Upper Limi...

Page 82: ... SERVICE MENU 2 Select the A00 SERVO ADJUST and press the SET button to open the SERVO ADJUST MENU 3 Select the A09 TENSION 4 Install the VFK1208 black with hole as shown in figure 5 Connect the Digital voltmeter to TP201 6 Rotate JOG dial clockwise pushing Search button so that the mechanism shift to Loading mode on mark is displayed on A09 TENSION 7 Confirm the DC voltage at TP201 is 2 5V 0 1V N...

Page 83: ...rd of the Front Loading Unit 3 Unscrew the 6 screws and remove the Top Plate on the Front Loading Unit as shown in figure 3 4 1 4 Connect the Flexible cable to P3 on the Carriage Board of Front Loading Unit Adjustment Procedure 1 Open the SERVICE MENU and Select the A00 SERVO ADJUST and press the SET button to open the SERVO ADJUST MENU 2 Select the A09 TENSION 3 Rotate JOG dial clockwise pushing ...

Page 84: ...and Select the A00 SERVO ADJUST and press the SET button to open the SERVO ADJUST MENU 2 Select the A09 TENSION 3 Rotate JOG dial clockwise pushing Search button so that the mechanism shift to Loading mode on mark is displayed on A09 TENSION 4 Push the tension post to the direction R by the tension gauge as shown in Figure 3 7 1 until the voltage at the test point becomes 1 2V It means REV positio...

Page 85: ... 07N To calibrate Tension Meter the tape must be inserted into the posts of Tension Meter as shown in figure 3 8 1 Figure 3 8 1 1 Play back the beginning portion of the tape 2 Insert the tension meter between S3 post and S4 post as shown in figure 3 8 2 3 Confirm that the tension value is within the specification Figure 3 8 2 4 Place the unit in REV x1 mode 5 Insert the tension meter between S4 po...

Page 86: ...pe Classified list of specification 1 Open the Service Menu Servo and move the cursor to A07 T PHOTO 2 Insert the VFK1423 and check the voltage which is shown on the menu 3 Adjust VR201 to meet the specification of T side photo Sensor Voltage 4 Move the cursor to A08 S PHOTO and check the voltage which is shown on the menu 5 Adjust VR202 to meet the specification of S side photo Sensor Voltage Fig...

Page 87: ...m Adj 3 12 Post Limit Confirmation PLAY 3 14 A C Head Tilt Adjustment 3 15 A C Head Height Adjustment 3 16 A C Head Tilt Confirmation 3 17 A C Head Height Conf 3 18 A C Head Azimuth X value Adj 3 20 REV Tape Path Conf T4 Post Adj 3 21 CTL Self Recording Level Conf T4 Post Adj Each Post Limit Conf Each Post Limit Conf and A C Head Adj S4 Post Conf To PG and LISTA Adj OK OK OK OK OK OK OK OK NG NG N...

Page 88: ... side of envelope first and then adjust S1 post 5 After finishing this adjustment unload the tape and load the tape again then confirm the shape of Envelope waveform does not change Figure 3 11 1 3 12 Post Limit Confirmation PLAY SPEC Post limit is shown in the following table Curl should not appear on tape edge MODE PLAY TAPE Blank tape TOOL VFK1149 or VFK1149B Post Driver VFK1151 Nut Driver 1 Co...

Page 89: ...ease when A C Head Press down Loosened direction In case CTL level increase when A C Head lift up NOTE Please refer to figure 3 13 4 for the portion to lift up and press down A C Head None Fixing height H After height adjustment tighten the screw H to fix height of A C Head Normally the CUE level is decreased when the screw H is tightened Adjust screw B considering it 19 6cN m 2 0Kgf cm X value ad...

Page 90: ... A isn t loose before perform A C Head Tilt adjustment The screw A should be always touch to top of A C Head 5 When the height of A C Head is adjusted by the Nut B the screw H should be loosen first And after height adjustment finished tighten the screw H lightly Figure 3 13 4 6 After finish X value adjustment hit the portion L lightly and confirm the specification of X value 7 Each adjustment of ...

Page 91: ...tment should be finished in tightening direction And confirm that the screw A isn t loose 3 The Adjustment of Tilt Azimuth and Height influence each other Hence those adjustment should be performed alternately Figure 3 14 1 3 15 A C Head Height Adjustment SPEC CUE A A max CTL C1 C2 1 8V CUE AUDIO TP4102 RF CUE TEST POINT CTL TP30 SERVO ADJ SCREW B H A C Head MODE 25M mode PLAY TAPE NTSC VFM3580KM ...

Page 92: ... C Head tilt Adjustment 5 If the adjustment is performed confirm the tape path condition according to Post Limit Confirmation procedure item 3 12 Figure 3 16 1 Figure 3 16 2 3 17 A C Head Height Confirmation SPEC CUE A A max CTL C1 C2 1 8V CUE AUDIO TP4102 RF CUE TEST POINT CTL TP30 SERVO ADJ SCREW B H A C Head MODE 25M mode PLAY TAPE NTSC VFM3580KM or VFM3580KL 14 to 22min PAL VFM3680KM or VFM368...

Page 93: ... the rising edge of CTL match with the front position of non recorded portion of CUE If not adjust the Screw F to match both phase refer to 3 13 A C Head Adjustment Method 4 Adjust A C Head Horizontal position so that CTL trigger at the frame start match with the reference of HSW t2 The frame start CTL is located at the edge between 6 4 and 5 5 portion To adjust A C Head Horizontal position loosen...

Page 94: ... not appear on tape at T3 and T4 post TEST POINT CTL TP30 SERVO ADJ T4 post height MODE See below TAPE NTSC VFM3580KM or VFM3580KL PAL VFM3680KM or VFM3680KL TOOL VFK1151 Nut Driver VTR mode Mode PLAY 1 PLAY on 25M mode REV 1 SHTL 1 on 25M mode 1 Place the unit into REV X1 mode and confirm that the CTL output level becomes more than 75 of that of play mode Confirm that the tape path becomes lower ...

Page 95: ...nfirm the height of T4 Post refer to item 3 20 REV Tape Path Confirmation and Adjustment 3 22 Play Tape Path Limit Confirmation SPEC Each post limit shown in figure below MODE PLAY TAPE VFM3580KM L or Blank Tape Tape limit refer to figure Post Name A B C D E F Adjustment Point Adjustment Item S5 post NG OK OK NG NG NG S4 Tension post NG NG OK NG NG NG S4 S5 post Post Height Pre Adjustment S1 post ...

Page 96: ...f spec adjust S4 post height refer to item 3 1 Post Height Pre Adjustment Figure 3 23 1 3 24 Confirmation of Play Start Envelope SPEC Envelope Waveform signal should be rising up immediately at PLAY mode TEST POINT Refer to Table 3 23 1 on previous item 3 23 Confirmation of Envelope on REV REW and FF mode MODE REW REV PLAY FF PLAY Loading completion STOP PLAY TAPE L Cassette 123min Recorded tape T...

Page 97: ...er to figure 3 25 1 Post Name A B C D E F S5 Post OK OK OK NG NG NG S4 Post Tension Post NG OK OK NG NG NG S1 Post OK NG NG NG NG NG T1 Post OK OK OK NG NG NG T3 Post OK OK OK NG NG NG T4 Post OK OK OK NG NG NG 1 Place the unit into FF and REW mode and confirm the each post limits is within the specification 2 If out of specification adjust the post height by following the each adjustment procedur...

Page 98: ...T4 post SHTL Repeat FWD REV mode maximum speed at Pinch ON condition Tape Damage Tape Long time L cassette thin tape AJ 5P92LP recorded tape Tape end portion Tape damage should not occur on tape at lower limit of T3 and T4 post 1 Place the unit into above Confirmation mode 2 Confirm that tape damage doesn t occur on tape at lower limit of T3 and T4 post 3 If it is out of SPEC adjust T4 post and re...

Page 99: ...ent Waving Measurement Sensitivity Adjustment Sensitivity Detection Linearity Adjustment Waving Measurement Sensitivity Adj R P Head 25M mode Linearity Adjustment 25M mode Sensitivity Adj PB Head 25M mode Linearity Adjustment 50M mode Sensitivity Adjustment Sensitivity Detection Sensitivity Adj PB Head 50M mode Sensitivity Adjustment Sensitivity Detection Sensitivity Adj R P Head 50M mode Sensitiv...

Page 100: ...AD Converter board Classified list for LISTA Connection 1 Connect the LISTA cable to A D Board in the PC 2 Connect the clips of the LISTA cable to test point on the P C Board 3 Boot up the LISTA software on DOS mode 4 After the LISTA software boot up FORMAT SELECT display appears Select the DVCPRO 50 so that the VTR SELECT Menu appears 5 Select AJ D950 in VTR SELECT menu so that the Alignment Tape...

Page 101: ...d select the item 4 Alignment Tape to enter the data on the attachment sheet which is enclosed with alignment tape 7 If LISTA software has the data of alignment tape select the serial number of Alignment tape then message ok y n appears on the screen And press Y or ENTER key so that LISTA main menu is displayed on screen In case Alignment Tape data is already registered In case Alignment Tape data...

Page 102: ...nd input the number 0 or 1 to select the PAL NTSC Following the format select PAL NTSC Select tape type 18µm 10µm 9µm 4 After selecting the tape type the frame for entering the DATA and CHECK SUM appears on the screen Input the numerical value on the data sheet which are enclosed with alignment tape If input the wrong number the error message appears on the screen after the Check Sum calculation t...

Page 103: ...ignal monitor appears refer to figure 3 32 2 Then press Enter to start the software 4 When the picture is appeared as shown in figure 3 32 3 adjust ATF Gain A14 RPL GAIN 25 so that the Sens Value is in the Specification To return the main menu press ESC key 5 Select Lista Main Menu 1 Sensitivity Measurement so that the screen of ATF Error Signal monitor appears refer to 3 32 2 6 Playback a Lista a...

Page 104: ...MECH 26 Adjust within specification Sens Value 101 58mV um Sens 1 104 72mV um Sens 2 98 44mV um Figure 3 32 3 Figure 3 32 4 Confirm this value ...

Page 105: ...orm appears on the screen 6 When the waveform as shown below is displayed on the screen press the BS Back Space key to move the waveform at the center of the scale on screen Adjust S1 and T1 post height by using the post driver so that the linearity waveform becomes as flat as possible and it should be within the specification Adjust linearity to have waveform in between the red dot lines on the s...

Page 106: ...e file data to PC 1 Basically this operation should be performed after linearity and waving measurement is finished 2 Select the item 3 Data Save Load on the LISTA main menu and select the item 1 Save 3 The linearity waveform as Peak Hold is displayed on the screen and message File Name appears on the screen Then enter the File Name less than 8 letters Nextly enter the Serial No and press enter th...

Page 107: ...creen of ATF Error Signal monitor appears Then press Enter to start the software 4 When the picture is appeared as shown in figure 3 34 3 adjust ATF Gain A17 PBL GAIN 25 so that the Sens Value is in the Specification 5 After finishing the Adjustment press ESC key to return the main menu 6 Select the Lista Main Menu 1 Sensitivity Measurement so that the screen of ATF Error Signal monitor appears re...

Page 108: ...MECH 30 Adjust within specification Sens Value 101 58mV um Sens 1 104 72mV um Sens 2 98 44mV um Figure 3 34 3 Figure 3 34 4 Confirm this value ...

Page 109: ...in the SERVO ADJUST menu 2 Playback a LISTA alignment tape VFM3581KM or VFM3581KL 3 Select the LISTA 6 ATF Error Signal Monitor so that the screen of ATF Error Signal monitor appears Then press Enter to start the software 4 When the picture is appeared as shown in figure 3 35 1 adjust ATF Gain A12 RPL GAIN 50 so that the Sens Value is in the Specification To return the main menu press ESC key 5 Se...

Page 110: ...MECH 32 Figure 3 35 2 Confirm this value ...

Page 111: ...on the screen 6 When the waveform as shown below is displayed on the screen press the BS Back Space key to move the waveform at the center of the scale on screen Adjust S1 and T1 post height by using the post driver so that the linearity waveform becomes as flat as possible and it should be within the specification Adjust linearity to have waveform in between the red dot lines on the screen 7 Afte...

Page 112: ...e file data to PC 1 Basically this operation should be performed after linearity and waving measurement is finished 2 Select the item 3 Data Save Load on the LISTA main menu and select the item 1 Save 3 The linearity waveform as Peak Hold is displayed on the screen and message File Name appears on the screen Then enter the File Name less than 8 letters Nextly enter the Serial No and press enter th...

Page 113: ...Playback a LISTA alignment tape VFM3581KM or VFM3581KL 3 Select the LISTA Main Menu 6 ATF Error Signal Monitor so that the screen of ATF Error Signal monitor appears Then press Enter to start the software 4 When the picture is appeared as shown in figure 3 37 1 adjust ATF Gain A16 PBL GAIN 50 so that the Sens Value is in the Specification 5 After finishing the Adjustment press ESC key to return th...

Page 114: ...MECH 36 Figure 3 37 2 Confirm this value ...

Page 115: ...n be changed by 0 key on the key board 2 Select the item A18 RPR GAIN DV in the SERVO ADJUST menu 3 Playback a DV LISTA alignment tape VFM3000EDS 4 Select the LISTA 6 ATF Error Signal Monitor so that the screen of ATF Error Signal monitor appears refer to figure 3 38 2 Then press Enter to start the software In case ATF Error Signal Monitor or sensitivity Measurement is selected Select for sensitiv...

Page 116: ...djustment press ESC key to return the Main Menu 7 Select the Lista Main Menu 1 Sensitivity Measurement so that the screen of ATF Error Signal monitor appears refer to 3 38 2 8 Playback a DV Lista alignment tape and press Enter to start the Sensitivity measurement 9 Confirm that the sensitivity value is within the specification refer to figure 3 38 4 10 If it is out of specification return to item ...

Page 117: ...ar signal to VTR and record it 2 Playback the just recorded portion and confirm the envelope output is within the specification refer to Figure 3 39 1 Long time L Cassette this tape AJ 5P92LP 3 Input the color bar signal to VTR and record it 4 Playback the just recorded portion and confirm the envelope output is within the specification refer to figure 3 39 2 5 If it is out of specification perfor...

Page 118: ...in Figure 5 1 2 3 Remove the flexible cable which is connected to P33 on the MECH I F as shown in 5 1 1 4 Unscrew the 3 screws which has spring from the Cylinder Unit as shown as Figure 5 1 1 then remove the Cylinder Unit without touching any mechanical parts Figure 5 1 2 NOTE Don t touch the cylinder by finger directly when removing the Cylinder Unit Installation 1 Install the new Cylinder Unit a...

Page 119: ...m that the Cleaner Roller rotate when rotate the cylinder by hand while pressing the core of the Cleaner Solenoid 4 Install the T1 Guide 5 After installing the T1 Guide please perform the item 5 3 T1 Guide Position Adjustment Figure 5 2 1 5 3 T1 Guide Position Adjustment 1 Place the unit to loading condition without the tape 2 Observe the clearance B between T1 Guide and T1 post as shown in Figure...

Page 120: ...pe Damage Confirmation Long Play Type 3 27 Screw Lock Tight A C Head T3 T4 Post 3 24 Confirmation of Play Start Envelope 3 25 3 26 Tape Path Limit Confirmation REV REW FF Note PG Shifter Adjustment 3 29 LISTA Adjustment Procedure 3 30 LISTA Connection and Boot up 3 32 RP Head Sensitivity Adjustment and Sensitivity Detection 25M Mode 3 39 Self REC PLAY ENV Confirmation END EQ Adjustment START Elect...

Page 121: ...stall the Reel Outer Rail to New Supply and Take Up Reel Rotor Unit 2 Hang on the Reel Rotor Unit on Reel Inner Rail and Install the Reel Rotor Unit matching the pin of Drive Arm Unit with groove position of Reel Base as shown in Figure 5 5 2 3 Install the 4 screws C D E and F 4 Confirm that the Reel Rotor Unit moves smoothly on the Rail by hand 5 Move the Reel Rotor Unit to front side by hand and...

Page 122: ...t brake 8 Confirm the torque is within the specification 9 Put the torque gauge on T Reel and turn the torque gauge to direction B until T Reel slips against brake 10 Confirm the torque is within the specification Figure 5 6 1 5 7 Supply Take up Brake Arm Unit Replacement Removal 1 Press the iron core of Brake Solenoid to release the Brake 2 Remove the cut washers A and remove the supply and Take ...

Page 123: ...ustment change the reel position to S and L cassette size and confirm that the clearance A is within the specification Figure 5 8 2 5 9 Take up Brake Solenoid Replacement and Adjustment Removal 1 Disconnect the P18 on the MECH I F 2 Unscrew the 2 screws A and remove the Take Up Brake Solenoid Base Unit as shown in Figure 5 9 1 3 Unscrew the 2 screws B and remove the Take Up Brake Solenoid from Tak...

Page 124: ...e new Pinch Solenoid following the removal steps in reverse order 2 After installation perform the Pinch Solenoid Position Adjustment Figure 5 10 1 5 11 Pinch Solenoid Position Adjustment SPEC T 0 3 mm TEST Gap T ADJUST Screw A and Hole B MODE EJECT Power OFF TOOL Eccentric Driver VFK0357 1 Confirm the power is turned off 2 Push the pinch roller by hand to be close to capstan 3 Push the pinch sole...

Page 125: ...r to item 5 10 3 Unscrew the screw B and remove the Emergency Shaft as shown in Figure 5 13 1 4 Unscrew the 2 screws C and remove the Loading Motor Neutral Unit as shown in Figure 5 13 1 5 Unscrew the 2 screws D and remove the Loading Motor Unit as shown in Figure 5 13 1 Installation 1 Install the new Loading Motor Unit to Loading Motor Neutral Unit by tightening 2 screws D 2 Install the Loading M...

Page 126: ... reverse order Refer to item 5 13 Loading Motor Replacement 2 After installing the Pinch Solenoid Unit Pinch Solenoid Position adjustment is required Refer to item 5 11 Figure 5 14 1 5 15 Main Cam Gear Replacement Removal 1 Remove the Pinch Solenoid Unit and Loading Motor Unit Refer to item 5 10 and 5 13 2 Remove the Main Cam Gear as shown in Figure 5 15 1 Installation 1 Install the Main Cam Gear ...

Page 127: ...n in Figure 5 16 2 6 Put the glue Ex Three Bond 1401B on the Thrust Adjustment Screw 7 Confirm that the Oil Seal does not leak on the Capstan Housing as shown in Figure 5 16 1 Figure 5 16 1 Figure 5 16 2 5 17 S5 Post Base Unit Replacement Removal 1 Unscrew the screw A and remove the S5 Post Base Unit as shown in Figure 5 17 1 Installation 1 Install the S5 post Base Unit following the removal steps...

Page 128: ...Unit following the removal steps in reveres order 2 After installation Tension Arm Adjustment steps should be performed the following Figure 5 18 1 Figure 5 18 2 3 3 Tension Sensor Voltage Adjustment 1 Tension Offset Adjustment START 3 4 Tension Sensor Voltage Adjustment 2 Neutral Playback position Adjustment 3 5 Rev Voltage Confirmation 3 6 Tension Regulator Spring Adjustment 3 7 Rev Tension Conf...

Page 129: ... remove the S1 Loading Arm Unit as shown in Figure 5 19 1 Installation 1 Install the new S1 Loading Arm Unit following the removal steps in reverse order and then S1 Post Loading Arm Unit Phase Adjustment should be performed as follows 2 After installation confirm that the S1 Post move smoothly on the Loading Rail 3 Tension Arm and Tape path Adjustment should be performed Adjustment Install and ad...

Page 130: ... boat Confirmation and Adjustment Procedure Tool T Arm Height Adj Tool A VFK1542 T Arm Height Adj Tool B VFK1543 1 T1 boat replacing procedure 1 Turn the emergency red screw clockwise and set T1 Boat Unit to the position which the point A B and C in Figure 5 20 2 be on the same line 2 Push the Pinch Roller by hand to be close to Capstan and push the Pinch Solenoid by hand so that the Pinch Roller ...

Page 131: ...joint 2 If no deformation then reposition the loading rail as described below Figure 5 20 4 1 Loosen the screw A 2 While pressing the projection B leftward tighten the screw If loading unloading operation still is not smooth remove CYL and loosen screws A and C Turn the rail clockwise as shown in the figure and then tighten the screws If the operation still is not smooth replace loading rail or th...

Page 132: ...ove the Shield Cover by removing 2 screws D in Figure 5 21 1 4 Unsolder the lead wires as shown in Figure 5 21 3 When unsoldering the lead wires do not unsolder all at the same time Installation 1 Remove the Shield Case from the New A C Head and solder the lead wires to New A C Head Refer to Figure 5 21 3 2 Reinstall the shield case to A C Head 3 Install the A C Head to A C Head Plate by tightenin...

Page 133: ...ner Solenoid Unit as shown in Figure 5 22 1 3 Unscrew the 2 screws B and remove the Cleaner Solenoid as shown in Figure 5 22 1 Installation 1 Install the new Cleaner Solenoid following the removal steps in reverse order 2 After installation perform the Cleaner Solenoid Position adjustment Figure 5 22 1 START 3 14 A C Head Tilt Adjustment NOTE PG Shifter Adjustment 3 18 A C Head Azimuth X value Adj...

Page 134: ...it then the Cleaning Roller return to original position 6 Press the iron core of the Cleaner Solenoid and confirm that the Cleaner Roller rotates when the Cylinder is rotated by hand Figure 5 22 2 Figure 5 22 3 Note If the cleaner Base Plate is removed execute the Cleaner roller Position adjustment 5 22 2 Cleaner Roller Position Adjustment Tools required Eccentric Driver VFK0357 1 Observe the clea...

Page 135: ... the removal steps in reverse order 2 Confirm that the M and L cassettes touch to Distinction Switch Unit correctly Figure 5 23 1 5 24 Reel Drive Motor Unit Replacement Removal 1 Disconnect the P16 on the MECH I F 2 Unscrew the 2 screws A and remove the Reel Drive Sensor P C Board as shown in Figure 5 24 1 3 Unscrew the 2 screws B and remove the Reel Drive Motor Unit as shown in Figure 5 24 1 Inst...

Page 136: ... 26 1 4 Remove the Cut Washer B and remove the MIC Drive Arm Unit as shown in Figure 5 26 1 5 Remove the Cut Washer C and remove the MIC Geneva Gear as shown in Figure 5 26 1 6 Remove the Cut Washer D and remove the Reel Drive Arm Unit as shown in Figure 5 26 2 7 Remove the Supply and Take Up Reel Rotor Unit Refer to item 5 5 8 Remove the 2 Cut Washers E and remove the Supply and Take Up Base Driv...

Page 137: ... 1 Point of Adjustment 1 Reel in M Size position 2 Set the REC Inhibit SW in front position of Distinction SW Unit 3 Protrusion of MIC Drive Arm Unit is positioned as shown in Figure 5 26 3 4 Holes between Reel Drive Cam Gear and MIC Geneva Gear are matched 5 27 M Stopper Solenoid Replacement Adjustment Removal 1 Remove the P24 on the MECH I F 2 Unscrew the 4 screws A and B and remove the M Stoppe...

Page 138: ...id so that the clearance A is within the specification And tighten the 2 screws A Figure 5 27 2 6 1 Mech I F P C Board 5 28 T4 Post Position Adjustment 1 Confirm that the hole B of T4 connection Gear match with the hole of T4 post as shown in figure 5 28 1 2 Confirm that the portion C of T4 connection Gear and hole A Those are located as shown in figure 5 28 1 3 If not adjust the phase of T4 post ...

Page 139: ...ELE 5 3 1 PLL DC Adjustment ELE 5 4 AVIO BOARD AJ YA93 F4 ELE 6 4 1a Reference CF Detection Adjustment NTSC ELE 7 4 2a Component Y Level Adjustment NTSC ELE 7 4 3a Component Y Level Adjustment NTSC ELE 7 4 1b Reference CF Detection Adjustment PAL ELE 8 4 2b Component Y Level Adjustment PAL ELE 8 4 3b Component Y Level Adjustment PAL ELE 8 4 4 Audio Initial Setting ELE 9 4 5 Audio Output Level Adju...

Page 140: ...bance my appear in the IEEE1394 EE mode DPROC Noise on the audio or video disturbance my appear in the EE mode AVIO No problem SDI No problem 1 POWER UNIT 1 Power Unit and VR Location 1 1 Power Supply Voltage Adjustment BOARD POWER UNIT TP TP3 on the extender board ADJ VR1301 TAPE INPUT MODE EJECT M EQ Digital Voltmeter SPEC 3 20V 0 05V 1 Extend the DPROC Board F3 with the extender board 2 Turn ON...

Page 141: ...16 0 01 cNm 15g cm 2g cm 5 times average 1 Remove the Front Loading Unit Refer to SEC2 Disassembly Procedures 2 Connect the Carriage tool see the following figure to connector P1 which is coming from the MECH I F board to Carriage board of the front loading unit 3 Open the SERVICE MENU Refer to SEC1 Service Information 4 Select the A00 SERVO ADJUSTS and press the SET button to open the Servo Adjus...

Page 142: ...screws and remove the Top Plate on the Front Loading Unit as shown in figure below 4 Connect the Flexible cable to P3 on the Carriage Board of Front Loading Unit Adjustment Procedure 1 Open the SERVICE MENU 2 Select the A00 SERVO ADJUST and press the SET button to open the SERVO ADJUST MENU 3 Select the A09 TENSION 4 Install the VFK1208 black with hole as shown in figure 5 Connect the Digital volt...

Page 143: ... menu 2 6 PG Shifter Adjustment 25M BOARD SERVO F1 TP ADJ SERVICE MENU TAPE VFM3580KM or KL NTSC VFM3680KM or KL PAL INPUT MODE PLAYBACK M EQ Oscilloscope SPEC T1 T2 253 6usec 8usec 1 Open the SERVICE MENU Refer to SEC1 Service Information 2 Select the A00 SERVO ADJUST and press the SET button to open the SERVO ADJUST MENU 3 Select the A06 PG SHIFT 25 4 Play back the color bar portion of the 25M a...

Page 144: ...ent BOARD AVMON F2 TP TP300 ADJ VC300 INPUT MODE EE TAPE M EQ Oscilloscope SPEC 0VDC 0 1VDC Service Menu F00 VIDEO AJUST F18 DIF PLL TEST ON 1 Open the Service Menu and select the above 2 Adjust VC300 so that the DC voltage is in the specification TP300 VC300 ...

Page 145: ...00 VR302 TP421 TP420 TP422 VR4601 VR4203 VR202 VR4600 VR4501 VR201 VR200 VR4500 VR4202 VR4201 VR4200 SW4100 SW4001 HIGH 600 HIGH 600 AJ SD93 W AJ YA93 YA94G REF IN SDI IN SDI OUT GENLOCK THRU OUT MONITOR TV SIGNAL GENERATOR REF OUT CF OUT VIDEO MON OUT VIDEO 1 VIDEO 2 VIDEO 3 CH B1 CH B2 CH B3 CH A EXT REF SIGNAL GENERATOR COMPOSITE OUT CABLE 1 CABLE 2 CABLE 3 CABLE 4 Note Cables 1 4 should be sam...

Page 146: ...justment NTSC BOARD AVIO F4 TP Y OUT ADJ VR202 INPUT SDI INPUT 100 Color Bar MODE EE TAPE M EQ WFM SPEC Video V 714mV 3mV Setup Menu 070 TV SYSTEM 525 1 Press the Video Select button on the front panel to select the Y PB PR mode 2 Adjust VR202 so that the video level V is in the specification 4 3a Component Y Level Adjustment NTSC BOARD AVIO F4 TP PB PR OUT ADJ VR201 PB VR200 PR INPUT SDI INPUT 10...

Page 147: ... the CF pulse from the signal generator and TP420 is as shown below 4 2b Component Y Level Adjustment PAL BOARD AVIO F4 TP Y OUT ADJ VR202 INPUT SDI INPUT 100 Color Bar MODE EE TAPE M EQ WFM SPEC Video V 714mV 3mV Setup Menu 070 TV SYSTEM 625 1 Adjust VR300 so that the video level V is in the specification 4 3b Component Y Level Adjustment PAL BOARD AVIO F4 TP PB PR OUT ADJ VR201 PB VR200 PR INPUT...

Page 148: ... OUT LV 0dB 4dB 722 REC CH CH1 723 REC CH2 CH2 724 REC CH3 CH3 725 REC CH4 CH4 4 5 Audio Output Level Adjustment BOARD AVIO F4 TP AUDIO OUT CH1 CH4 ADJ VR4500 CH1 OUT LV VR4501 CH2 OUT LV VR4600 CH3 OUT LV VR4601 CH4 OUT LV INPUT INT SG 0 MODE EE TAPE M EQ Monitor TV Oscilloscope Audio Analyzer SPEC AJ SD93P E 0 dBu 0 1dB AJ SD93MC 4 dBu 0 1 dB 1 Set the Switches on the Front Panel as shown below ...

Page 149: ...ELE 10 5 RF CUE BOARD 1 TP VR Location 2 TP VR Location Servo Board COMPONENT SIDE TP5501 TP5301 COMPONENT SIDE TP234 TP235 TP232 TP233 ...

Page 150: ...ADJ SUB SCREEN 2 ITEM SELECT SCREEN TEST POINT RF QUE TRIGGER POINT SERVO P03 ATF MAG L1 P04 ATF MAG L2 TP5301 EQ0 ATFLEV TP232 HSW PB L P 2 PB ADJUST P07 ATF MAG R1 P08 ATF MAG R2 TP5501 EQ1 ATFLEV TP234 HSW PB R P03 ATF MAG L1 P04 ATF MAG L2 TP5301 EQ0 ATFLEV TP233 HSW RP L P 3 RP ADJUST P07 ATF MAG R1 P08 ATF MAG R2 TP5501 EQ1 ATFLEV TP235 HSW RP R 5 2 RF Level Adjustment 25M BOARD RF CUE TP Se...

Page 151: ...G L1 on the item select screen 3 Connect the oscilloscope to Measuring Point and Trigger Point as shown in the table below 4 Play back the DV alignment tape in the STILL mode 5 Open the service menu and select R71 TRACKING MOD AUTO L on the item select screen and then wait for the RF envelope becomes maximum level Note Incase of the R1 R2 head adjustment select R71 TRACKING MOD AUTO R on the item ...

Page 152: ...OS Windows95 98 98SE ME 2000 or Over Display Over 256 color if lower than 256 color the color may have the distortion How to get this software Download Automatic RF Adjustment Software VFK1806 from Jig software page on BSD Web site Installation Method 1 Extract the downloaded software 2 Click setup exe 3 Follow the indication Un installation Method Open Control Panel on Windows and use Add Remove ...

Page 153: ...ly on limited process STOP The program can be stopped forcibly by clicking this portion Data Download Receiving EVR data to PC from VTR connected VTR to PC Data Upload Transfer the RF adjustment data from PC to VTR for setting up PC to VTR Data Upload can not be functioned unless Data Download Load on File menu or all adjustment program is executed Data Initialize include Upload Setting up the RF ...

Page 154: ...oad on File menu or all adjustment program is executed Load Error rate and or EVR data can be loaded from the file dst 3 Indicate Menu This is the menu which indicate ErrorRate EVR Adjustment value Error Rate Error rate data can be displayed EVR EVR data can be displayed 4 Help Menu Manual The Operating Instruction Manual for this software will be in this menu Current software version doesn t have...

Page 155: ...ng category is selected 25M REC or 50M REC can be individually selected 2 Selection of Playback category Select each item according to the one which the adjustment measurement is required Check mark on the BOX shows that its item is selected valid 3 Selection of Recording Category Select each item according to the one which the adjustment measurement is required Check mark on the BOX shows that it...

Page 156: ...ELE 17 b The result of error rate The error rate data can be displayed and printed c EVR value Chart The EVR value adjustment data can be displayed and printed Print Selection of Format Print ...

Page 157: ...am Adjust Measurement Select Program Error Rate 5 Select the item needed about adjustment measurement from Adjustment Measurement item selection BOX refer to a 2 6 Select Program Start 7 Serial no is displayed Press OK button The information on this window can be changed and added 8 Follow the indication on the message box Then adjustment is started automatically 9 Error result is displayed after ...

Page 158: ... automatically stored in the memory after finishing the Automatic Equalizer adjustment 2 Select Program STOP if the program needs to be stopped 3 Remaining time of the tape is monitored by this program VTR automatically rewind the tape when the Tape remaining time isn t enough for adjustment or measurement Select Program IRQ if need to stop REW mode ...

Page 159: ...O OVERALL BLOCK DIAGRAM BLK 2 SERVO F1 BLOCK DIAGRAM BLK 3 MECHA IF BLOCK DIAGRAM BLK 4 AVMON F2 BLOCK DIAGRAM BLK 5 DPROC F3 BLOCK DIAGRAM BLK 6 IEEE1394 MODULE F3 SUB BLOCK DIAGRAM BLK 7 AVIO F4 BLOCK DIAGRAM BLK 8 SDI F5 BLOCK DIAGRAM BLK 9 RF CUE BLOCK DIAGRAM BLK 10 ...

Page 160: ...93 SDI VEP83649 AJ YA94 SERVO VEP82253 AVMON VEP83646 1394 MODULE VEP83636 P11 P12 P1202 P1201 P2 P1 P1001 POWER 2 VEP81237 POWER 1 VEP81236 P1502 POWER SWITCH STD JACK VEP80D20 UPPER SW VEP80D22 EJECT VEP80D17 FRONT VEP86342 FRONT SUB VEP80D16 MECHA IF 3 VEP82255 MECHA IF 2 VEP82254 MECHA IF 1 VEP82239 RF CUE VEP85219 DPROC VEP83647 F1 F2 F3 F4 F5 CYLINDER UNIT A C HEAD UNIT FAN MOTOR 5P 96P 96P ...

Page 161: ...ONES D A DE EMPH MUT VR MIX AMP AMP MUT MUT AUDIO MONITOR OUT FRONT MONI SEL SEARCH FILTER REC PROCESS PB_CNT REC_CNT PB PROCESS SLICER A D PHASE CONV 1394 6pin PHY FPGA DUEL 1394 MODULE BOARD SDRAM SDRAM CPU BUS CPU BUS CPU BUS CPU BUS DV BUS CPU BUS NSTD SD SDI ENCORDER SD SDI DECORDER PHASE CONV DELAY PHASE CONV DELAY S P EQ P S BUFF INCOM_FRM INCOM_H REF_H REF_FRM DIF_FRM PB_FRM 27MHz PB_CLK27...

Page 162: ...YL OS CTL FILTER 0 1 CTL GAIN 0 1 CYL OS ADJ CTL OS P702 18B 16B 18A 17A 6B 20B 17B CPU MN1030 P4 TAPE SENSOR LED DRIVE TIMING CNTRL LEVEL CONV IC355 TIMING CNTRL DRIVE SERIAL IC359 Q350 1 QR354 357 LOAD ERR LOAD ERR MIC 2 28B MIC 3 32A P4 P4 P4 P4 P4 P4 P4 P4 P4 P4 P4 P4 P4 P4 CTL REC CURR TRL ERR SRL ERR CYL ERR CAP ERR TRL DIR TRL ON L SRL ON L CYL ON H CAP DIR TRL I SRL I TRL BRK ON TAPE SENSO...

Page 163: ...ERR 21C TRL ERR 19C TRL ON 18A TRL DIR 18B SRL ERR 20B SRL ON 20C SRL DIR 19A IC502 2 IC502 2 IC562 3 P565 P562 IC650 1 Q650 3 5 IC600 1 Q600 1 4 TO FROM F1 SERVO BOARD VIA MECHA IF 2 MOTHER BOARDS BOARD BOARD MECHA I F 3 BOARD P750 P750 P750 P750 FROM F1 SERVO BOARD VIA MOTHER BOARDS MECHA I F MECHA I F 2 MOTHER BOARDS ...

Page 164: ...EF SEL CLK PB CLK REF SEL CLK ENC CLK TBC CLK REF SEL CLK PB CLK ENC CLK CLK54 CLK54 CLK54 CLK54 ENC CLK PB CLK REF CLK ENC CLK TBC CLK ENC CLK TBC CLK P3001 P3001 P3001 P3001 P3001 P3001 P3001 P3001 P3001 P3001 P3001 P3001 P3001 P3001 P3001 P3001 IC3304 IC3401 5 X3300 IC3300 DASDLR 16B P3001 D A AMP LEVEL SELE DE EMPHA AMP DRIVE AMP DRIVE AMP AMP LEVEL SELE DE EMPHA AMP DRIVE AMP DRIVE AMP L MONI...

Page 165: ... SCLK INCOM_L DINCOM_L A_IN_L REC_FRM_A X2 27MHz 54MHz REC RP1 DAT 79A REC RP0 DAT 79B REC CTRL RP0 72B 73A 73B 74A 74B 75A TSR 64B TRP0 1 2 3 58B 59A 59B 60A REC RP0 DAT 79B REC RP1 DAT 79A EQ0 DAT 76B EQ0 CLK 76A EQ1 DAT 77B EQ1 CLK 77A SLOW H 61A FLUSH 62B CUEREV H 62A TAPE REV H 63A LIN H 61B FEND 57A EQ0 CLK 78A EQ1 CLK 78B REC SPA 64A FPS1 58A PLAY0 PLAY1 HSW 67B 68A OSD CLK 36B OSD DAT 37A ...

Page 166: ...0707 4 RESET GEN GATE IC10705 10707 7 6 12B 14 21B TPA TPA 4 5 TPB TPB 1 2 TPA TPA 4 5 UPDAT 0 15 5 12A 14 21A UPADR 1 15 40A 48A DVPBDAT 0 7 41B 48B DVRECDAT 0 7 CFNRESET 34A NPOWERDOWN NUPCS NUPRD NUPWAIT NUPBHW NUPBLW BCLK NUPINT 2A 5B 22A B 23A B 24A B DVPBFRM DVPBSSP DVREFFRM DVRECFRM DVRECSSP 37 39A 38 39B CFCLK 33B CF DATA 32B FPGA DUEL P10101 P10101 P10101 P1701 P1701 P1701 FROM TO F3 DPRO...

Page 167: ...CT LEVL SELECT MUTE MUTE MUTE MUTE AMP AMP AMP AMP MUTE MUTE MUTE MUTE CH1 OUT H C 16A 17A P3001 CH2 OUT H C 18B 19B CH3 OUT H C 21A22A CH4 OUT H C 23B 24B IC4001 3 5 IC4002 4 6 IC4100 2 4 IC4101 3 5 IC4007 9 IC4008 10 IC4106 8 IC4107 9 IC4201 VR4200 IC4202 VR4201 IC4203 VR4202 IC4204 VR4203 IC4206 IC4205 IC4207 11 IC4208 12 IC4209 13 IC4210 14 IC4500 QR4500 Q4500 IC4501 QR4501 Q4501 IC4600 QR4600...

Page 168: ...PB AUD12 S PB AUD34 SIN PB AUD34 SIN PB AUD12 SID OUT SID IN D OUT DATA12 D OUT DATA 34 FROM F2 AVMON BOARD FROM F2 DPROC BOARD TO F3 F4 DPROC AND AVIO BOARDS TO F3 DPROC BOARD J200 J100 P1 P1 P1 P1 P1 AV DATA 0 7 AV ADR 0 3 EQ CLOCK GEN SERIAL PARALLEL CONV SDI DECODER SDI PROCESS FPG CLOCK BUFFER BUFFER PARALLEL SERIAL CONV SDI ENCODER SDI YC 0 9 21B C 22A B C 23A B C 24A B REC YC 0 7 15A B C 16...

Page 169: ...2B REC CYRL 2 23A REC CYRL 1 23B REC CYRL 0 25A REC CTRL RP1 22A REC CYRL 3 25B REC CTRL RP0 27A RP1 HSW 27B RP0 HSW 36A 36B DRATE0 DRATE1 40A ADJ H 40B DVCPRO H 39B PB H 29B PLAY0 HSW 29A PLAY1 HSW 10A 9B 9A EVR LD H CLK DATA 13A RE RP0 DAT 12A FE_CLK 13B REC RP1 DAT 19A EQ0 DAT 19B EQ0 CLK 14B REC CLK 18A EQ1 DAT 14B REC CLK 33A REC SPA 35B NOISELESSLOW 32A 31B 32B EQ SED SCL SDATA 30B EQ RESET ...

Page 170: ...TS IDENTIFIED WITH THE MARK HAVE THE SPECIAL CHARACTERISTICS FOR SAFETY WHEN REPLACING ANY OF THESE COMPONENTS USE ONLY THE SAME TYPE CONTENTS NOTE DO NOT USE THE PART NUMBER SHOWN ON THIS DRAWING FOR ORDERING THE CORRECT PART NUMBER SHOWN IN THE PARTS LIST AND MAY BE SLIGHTLY DIFERENT OR AMENDED SINCE THIS DRAWING WAS PREPARED AVNON P C B VEP83646 CBA 1 POWER2 P C B VEP81237 CBA 2 RF CUE P C B VE...

Page 171: ...102 D3 Q3100 D2 IC3103 D2 Q3101 D2 IC3104 D2 Q3102 D2 IC3105 B3 Q3103 D2 IC3200 B2 Q3300 C1 IC3201 A3 Q4200 D3 IC3300 C3 Q4201 D3 IC3301 D1 Q4202 E2 IC3302 B1 Q4203 E3 IC3303 D1 Q4204 E3 IC3304 B1 Q4205 F3 IC3306 C1 Q4206 E3 IC3307 C1 QR4200 E3 IC3400 B2 IC3401 D3 TG3301 B1 TG3220 A4 IC3402 D3 TP3300 B1 IC3403 C3 IC3404 C3 VC3300 C1 IC3405 D3 VR3100 D2 IC4001 E1 VR4001 F2 IC4002 F1 VR4002 E2 IC400...

Page 172: ...EF LOC IC1001 A1 IC1201 C1 IC1202 D2 IC1203 B4 P1001 A4 P1201 D4 P1202 C4 Q1001 B2 Q1205 B1 Q1206 B1 VR1201 C1 VR1301 D1 FOIL SIDE COMPONENT SIDE REF LOC IC1204 C4 IC1206 B3 IC1207 B3 IC1301 A1 IC1302 A3 Q1202 C4 Q1203 C4 Q1204 C4 QR1001 C2 QR1201 C4 QR1202 C4 QR1203 C4 QR1204 C4 ...

Page 173: ...D2 Q6751 B4 IC6103 D3 Q5401 D2 Q6771 A4 IC6104 D3 Q5402 D2 Q6851 C3 IC6105 D3 Q5403 D3 Q6871 B4 IC6106 D3 Q5404 D2 QR5101 D2 IC6107 C4 Q5421 D2 QR5102 D2 IC6108 C3 Q5424 D2 QR5121 D2 IC6109 C3 Q5461 D2 QR5122 D2 IC6301 A3 Q5462 D2 QR5141 D2 IC6401 A2 Q5463 D2 QR5142 D2 IC6402 A3 Q6301 A2 QR5161 E2 IC6501 B3 Q6302 A2 QR5162 E2 IC6601 B2 Q6303 A2 QR5261 E2 IC6602 B3 Q6304 A2 QR5461 E2 IC6751 B3 Q630...

Page 174: ... E3 QR358 E2 IC61 C3 IC353 E1 QR362 E2 IC62 B3 IC354 E1 IC63 C3 IC355 F3 TG1 D3 IC64 B3 IC357 F2 TG2 B1 IC65 C2 IC358 E2 TP1 D3 IC100 A3 IC359 E2 TP30 D2 IC101 A3 IP150 B2 TP31 D1 IC102 B3 IP250 D1 TP81 C1 IC103 B3 TP83 B2 IC104 B3 P1 E3 TP121 D2 IC105 B3 P2 C4 TP123 D2 IC106 B3 P151 A1 TP161 D2 IC151 A1 P250 D1 TP163 D2 IC153 A1 TP201 A3 IC251 C1 Q1 D3 TP230 B2 IC252 C1 Q2 D3 TP231 B2 IC253 E1 Q3...

Page 175: ...2 IC6905 E2 IC6906 F2 Q4002 F1 Q5101 D2 Q5121 D2 Q5141 D2 Q5161 E2 Q5241 E2 Q5242 E2 Q5243 E2 Q5244 D2 Q5245 D2 Q5246 E2 Q5441 E2 Q5442 E2 Q5443 E2 Q5444 D2 Q5445 D2 Q5446 E2 Q6307 A3 Q6403 A3 Q6507 B3 Q6603 B3 SERVO P C BOARD VEP82253 F1 FOIL SIDE REF LOC IC154 C2 IC155 C1 IC156 C2 IC356 E2 Q5 D3 Q6 D3 Q352 E2 QR1 C3 QR2 C3 QR3 C3 QR4 C3 QR5 D3 QR6 D3 QR7 D3 QR154 A1 QR350 E1 QR353 F2 QR354 E2 QR...

Page 176: ... P100 C2 SW213 D3 SW214 E3 SW200 A2 SW215 E3 SW201 A2 SW216 E3 SW202 G2 SW217 F3 SW203 G2 SW218 D3 SW204 F2 SW205 G2 VR200 G1 SW206 G2 VR400 B3 SW207 F2 VR401 B3 SW208 F1 VR402 C3 SW209 F3 VR403 C3 SW210 F3 VR404 A3 1 2 3 A B C D E F G G F E D C B A 1 2 3 REF LOC REF LOC IC100 B1 Q400 A3 IC101 C1 Q401 A3 IC200 D2 QR100 B1 IC201 E2 QR300 D1 IC202 E2 QR301 D1 IC203 E2 QR302 D1 IC301 D2 QR303 E1 IC40...

Page 177: ...653 D5 Q700 C3 Q702 C3 Q703 C3 Q704 B3 QR600 B6 QR601 B6 AVIO P C BOARD VEP83648 F4 FOIL SIDE REF LOC REF LOC IC3100 C3 Q4500 F1 IC3205 A3 Q4501 E1 IC3301 A1 Q4502 F2 IC3305 A1 Q4503 E2 IC3310 A1 Q4504 F3 IC3313 B1 Q4505 E3 IC3600 B3 Q4600 D1 IC4001 E3 Q4601 C1 IC4002 E3 Q4602 D2 IC4005 E2 Q4603 C2 IC4006 E2 Q4604 D3 IC4007 E2 Q4605 C3 IC4008 E2 QR3100 C3 IC4100 D3 QR4500 E1 IC4101 D3 QR4501 E1 IC...

Page 178: ... IC3300 B1 IC4212 E1 Q4607 C3 IC3302 C1 IC4213 D1 IC3303 B1 IC4214 C1 SW4001 E3 IC3304 B1 IC4400 E1 SW4100 D3 IC3307 B1 IC4401 E1 IC3308 B2 IC4402 D1 TG3005 D4 IC3309 A1 IC4403 D1 TG3423 A3 IC3311 B1 IC4404 C1 TP3420 A1 IC3312 B1 IC4405 F1 TP3421 A2 IC3314 A1 IC4406 E1 TP3422 A2 IC3315 B1 IC4407 D1 IC3400 A2 IC4408 C1 VR3200 B3 IC3401 A2 IC4409 D1 VR3201 A3 IC3500 B3 IC4502 F2 VR3202 A3 IC3501 B2 ...

Page 179: ...SW1 OPTJACK P C BOARD VEP80D21 COMPONENT SIDE COMPONENT SIDE REF LOC P1 A4 P2 B4 P3 D1 SW1 B1 FOIL SIDE REF LOC IC100 B2 IC101 B1 Q100 B1 CBA 9 4 3 2 1 A B C D ...

Page 180: ... IC1604 A3 IC1606 B1 IC1801 D1 IC1802 C1 IC1901 C1 IC2107 B3 P201 C4 P202 E3 P1701 B2 P1802 A1 COMPONENT SIDE REF LOC IC1 A3 IC2 D3 IC4 A3 IC50 B3 IC51 B3 IC100 E1 IC101 E1 IC151 C1 IC202 D2 IC203 E2 IC255 C2 P1 B4 FOIL SIDE REF LOC IC403 D3 IC405 D3 IC501 E3 IC503 E3 IC505 C3 IC601 F3 IC602 E3 IC702 E3 IC801 B4 IC803 A4 IC805 B3 IC806 B4 IC1001 E3 IC1002 F2 IC1301 E1 IC1601 A1 IC1602 A2 IC1605 A2...

Reviews: