


NHDR
-
4xxxAHD user’s manual ver. 1.1
All rights reserved © AAT Holding S.A.
49
ALARMS
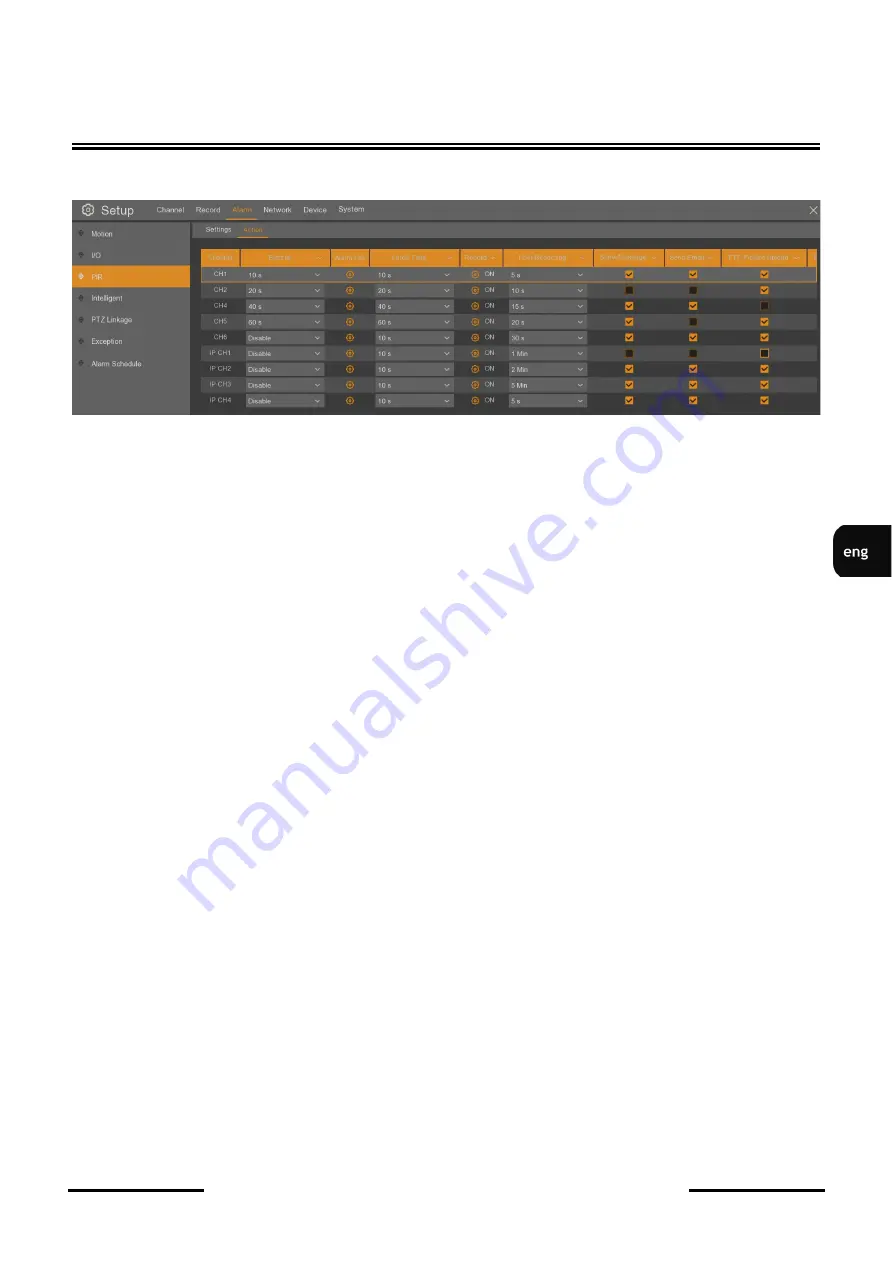
The
Action
tab contains settings of response to PIR detection.
The table columns are described below. Some columns may not be visible, to see them you need to
move the scroll bar at the bottom of the screen:
Channel
-
channel name.
Buzzer
-
duration time of sound alarm after PIR detection (
Disable
,
10s
,
20s
,
40s
,
60s
).
Alarm Out
-
enable alarm output. It is possible to change alarm output status on the recorder
(
Local
-
>1
) or in Novus 2000 or 4000 series IP camera (eg.
IP K.1
-
>1
).
Latch Time
.
-
time of the alarm output duration:
10s
,
20s
,
40s
,
60s
.
Record
-
switching on the video stream recording when the PIR detection occurs (it depends on the
recording schedule settings). It is possible to set the recording of multiple cameras to an event from
a
single camera.
Post Recording
-
defines the time of active alarm after the alarm ends:
5s
,
10s
,
15s
,
20s
,
30s
,
1min
,
2min
,
5min
. It also specifies full screen display and alarm recording time.
Show Message
-
displays the icon on the screen when the PIR detection is activated.
Send email
-
send an e
-
mail message when PIR detection occurs. The camera image will be sent as
attachment. Requires e
-
mail configuration in the
Network / Email
menu.
Full screen
-
displays the camera image in full screen mode when the PIR detection is activated.
FTP picture Upload
-
saves image from camera to FTP server. Requires ftp configuration in the
Network / FTP
menu.
FTP video Upload
-
saves short video film from camera to FTP server. Requires ftp configuration in
the
Network / FTP
menu.
Picture to Cloud
-
saves image from camera to the cloud. Requires e
-
mail configuration in the
Network / Email
menu and cloud activation in
Device / Cloud
menu.
Video to Cloud
-
saves short video film from camera to the cloud. Requires e
-
mail configuration in
the
Network / Email
menu and cloud activation in
Device / Cloud
menu.
There are buttons in the bottom right corner:
-
Alarm
or
PIR Detection
-
opens a separate action or PIR detection settings window.
-
Copy
-
copies selected parameters of one camera to anothers.
-
Default
-
restores the default settings of this screen.
-
Apply
-
saves all settings.