background image

Operation OEM6 Cards and Enclosure

Chapter 4

OEM6 Family Installation and Operation User Manual Rev 7

57

The log displays the L-Band serial number in the fifth field following the log header. The log also provides 
the status of your subscription. Refer to the LBANDINFO log in the 

OEM6 Family Firmware Reference 

Manual

 (OM-20000129) for more information.

To activate the subscription, the receiver must be powered and tracking an L-Band satellite. When 
advised by OmniSTAR of the appropriate satellite frequency and data link rate for your location, use the 

ASSIGNLBAND

 command to configure your receiver. 

Example:

assignlband omnistar 1557855 1200

To confirm tracking of an L-Band signal, log the L-Band status information by entering the following 
command:

log lbandstat

If receiving OmniSTAR HP, the fifth field of the LBANDSTAT log should be 00c2, as shown in the 
following example:

lbandstat com1 0 81.0 finesteering 1596 235136.000 00000000 d1c2 5968
<1557854678 48.98 1098.9 0.00 

00c2

 0000 153860 545 0 0000 0201 154019 

68000000 00000000

Refer to the NovAtel application note 

APN-051 Positioning Modes of Operation

 for OmniSTAR specifics.

4.6

Transferring Time Between Receivers

The 

ADJUST1PPS

 command is used as part of the procedure to transfer time between receivers. The 

number of Pulses Per Second (PPS) is always set to 1 with this command. It is typically used when the 
receiver is not adjusting its own clock and is using an external reference frequency.

The TIMESYNC log is also used to synchronize time between receivers. It contains a time status field 
that may show COARSE or FINE, among others. For a complete list of the time status values and 
definitions, refer to the GPS Time Status section in Chapter 1 of the 

OEM6 Family Firmware Reference 

Manual

 (OM-20000129).

4.6.3 Procedures to Transfer Time 

on 

page 59

 provides details on the time transfer procedure. Terms 

used in the procedure are defined in 

4.6.2 Time Definitions 

on 

page 58

. Refer also to the 

ADJUST1PPS 

command and the TIMESYNC log descriptions in the 

OEM6 Family Firmware Reference Manual


(OM-20000129)

.

4.6.1

GPS to Receiver Time Synchronization

Receiver time synchronization with GPS time does not occur until the receiver locks onto the first 
satellite. The GPS L1 signal has two main streams of data modulated on the carrier. These data streams 
are the C/A code (1.023 MHz rate) and the P(Y) code (10.23 MHz rate). Additionally, a navigation 
message (at a 50 Hz rate) contains GPS satellite data including the ephemeris, clock corrections and 
constellation status. This navigation message is encoded on both the C/A and P(Y) codes. The 
navigation message is transmitted via individual subframes and each subframe is 300 bits in length. With 
the 50 Hz data bit rate there is a new subframe transmitted every six seconds.

The latest frequencies can be obtained from: 

www.omnistar.com

 The terms PPS and TIMEMARK are synonymous.

Summary of Contents for OEM6

Page 1: ...OEM6 Family Installation and Operation User Manual OM 20000128 Rev 7 May 2014 ...

Page 2: ...document is subject to change without notice and does not represent a commitment on the part of NovAtel Inc The software described in this document is furnished under a licence agreement or non disclosure agreement The software may be used or copied only in accordance with the terms of the agreement It is against the law to copy the software on any medium except as specifically allowed in the lice...

Page 3: ... Required 22 2 3 Selecting a GNSS Antenna 22 2 3 1 Choosing a Coaxial Cable 23 2 3 2 Mounting the GNSS Antenna 23 2 3 3 Connecting the Antenna to the Receiver 24 2 4 Power Supply Requirements 24 2 5 Card Installation Overview 25 2 5 1 Installing an OEM6 Family Card with Wiring Harness and Enclosure 26 2 5 2 Applying Power to the Receiver 30 2 5 3 Connecting Data Communications Equipment 30 2 6 OEM...

Page 4: ...ation 57 4 6 2 Time Definitions 58 4 6 3 Procedures to Transfer Time 59 4 7 Additional Features and Information Card and Enclosure 62 4 7 1 Universal Serial Bus USB 62 4 7 2 CAN Bus 63 4 7 3 Strobes 63 4 7 4 Status Indicator 64 4 7 5 External Oscillator 64 4 7 6 Antenna LNA Power 64 4 7 7 Ethernet 65 4 8 Logging and Retrieving Data Overview 65 4 8 1 Onboard Memory 66 4 8 2 Remote Logging Initiatio...

Page 5: ...zation Code 90 8 3 Updating or Upgrading Using the WinLoad Utility 91 8 3 1 Transferring Firmware Files 91 8 3 2 Using the WinLoad Utility 92 8 4 Updating Using SoftLoad Commands 93 8 4 1 SoftLoad Commands and Logs 93 8 4 2 Working With S Records 94 8 4 3 Sending Firmware Data 95 8 4 4 SoftLoad Update Method 96 8 4 5 Firmware Update Using FTP or USB Mass Storage Device 98 8 4 6 SoftLoad Direct Com...

Page 6: ...escription 146 Power Supply 163 Antenna Power Output 163 Logic Level I O 163 Communication Ports 165 CAN Interfaces 165 USB Interfaces 167 Ethernet Port 168 System Performance 170 F Accessories and Replacement Parts 171 FlexPak6 171 Accessories 171 Manufacturers Part Numbers 172 G Electrostatic Discharge ESD Practices 173 Overview 173 Handling ESD Sensitive Devices 173 Prime Static Accumulators 17...

Page 7: ...fication 117 20 Bill of Materials critical components 120 21 Bill of Materials critical components 121 22 Bill of Materials 121 23 OEM628 Strobes 129 24 OEM628 Strobe Electrical Specifications 129 25 ESD Critical Components 132 26 CAN Critical Components 133 27 USB Critical Components 134 28 Ethernet Transformer Characteristics 136 29 Bill of Materials critical components 136 30 FlexPak6 Port Pin ...

Page 8: ...r 60 21 Transfer FINE Time from Fine Clock to Warm Clock Receiver 61 22 1 PPS Alignment 61 23 Location of Receiver Status Word 69 24 Reading the Bits in the Receiver Status Word 69 25 Location of Receiver Error Word 70 26 Reading the Bits in the Receiver Error Word 70 27 Status LED Flash Sequence Example 72 28 Cross Over Ethernet Cable Configuration OEM628 and OEM638 74 29 Cross Over Ethernet Cabl...

Page 9: ... Transceiver Implementation Schematic 133 66 OEM628 USB Implementation Schematic 134 67 Ethernet Reference Schematic 135 68 Ethernet LED Buffer Schematic 136 69 FlexPak6 Dimensions 138 70 I O Breakout Cable 140 71 I O DB HD15 Strobe Port Cable 141 72 Straight Through Serial Cable 142 73 Null Modem Cable 143 74 12 V Power Accessory Cable 144 75 OEM638 Dimensions 146 76 OEM638 and OEM638V Keep Out Z...

Page 10: ...encouraged to try to correct the interference by one or more of the following measures Reorient or relocate the receiving antenna Increase the separation between the equipment and the receiver Connect the equipment to an outlet on a circuit different from that to which the receiver is connected Consult the dealer or an experienced radio TV technician for help Industry Canada FlexPak6 Class B digit...

Page 11: ...ning strike into the ground causes an increase in the earth s potential which results in a high voltage potential between the center conductor and shield of the coaxial cable This high voltage develops because the voltage surge induced onto the center conductor lags in time behind the voltage surge induced onto the shield Hazard Impact A lightning strike causes the ground potential in the area to ...

Page 12: ...xample TUV VDE and so on for lightning surge protection The primary device must be capable of limiting an incoming surge to 10 kV 5 The shield of the coaxial cable entering the building should be connected at a grounding plate at the building s entrance The lightning protection devices should have their chassis grounded to the same ground near to the building s entrance 6 The primary and secondary...

Page 13: ...or metal cold water pipe within five feet 1 5 m of the point where it enters the building Grounded metallic service raceway Grounded electrical service equipment enclosure Eight foot grounding rod driven into the ground only if bonded to the central building ground by 6 or heavier bonding wire Information that supplements or clarifies text A caution that actions operation or configuration may lead...

Page 14: ...ta file to NovAtel Customer Support using either the NovAtel FTP site at ftp ftp novatel ca or through the support novatel com e mail address 3 Also issue a FRESET command to the receiver to clear any unknown settings If a hardware problem is encountered send a list of the troubleshooting steps taken and the results Contact Information Contact NovAtel Customer Support using one of the following me...

Page 15: ...M638 Receiver on page 17 for details 1 1 2 OEM6 Receiver Enclosure FlexPak6 Refer to 1 4 1 FlexPak6 on page 21 for details 1 2 Related Documents and Information After the OEM6 hardware is operational the OEM6 Family Firmware and Reference Manual OM 20000129 becomes the primary source for command and log information Each receiver has a specific set of features such as L Band or GLONASS support so s...

Page 16: ...Receiver The OEM628 has the same form and fit as NovAtel s OEMV 2 receivers with the following additional features Dual antenna dual frequency L1 L2 and L2C for GPS and GLONASS Smallest form factor Multi constellation E1 for Galileo and B1 and B2 for BeiDou Low power consumption Primary and Secondary antennas UART LVTTL and USB communications port RTK with precise ALIGN heading pitch roll Triple f...

Page 17: ... same form and fit as NovAtel s OEMV 3 receivers with the following additional features Figure 4 OEM638 Receiver Board OEM638 technical specifications are provided in Appendix E on page 145 Triple frequency Multi constellation GPS L1 L2 L2C L5 GLONASS L1 L2 Galileo E1 E5a E5b AltBOC BeiDou B1 B2 UART RS 232 RS 422 and LVTTL USB device and host and Ethernet communications port L Band capability Ter...

Page 18: ...the following Enclosure and wiring harness Power supply Data communications equipment GNSS antenna and optional Low Noise Amplifier LNA power supply The overall OEM6 receiver systems are illustrated in Figure 5 OEM615 OEM617D and OEM628 Receiver System on Page 18 Figure 6 OEM638 Receiver System on Page 19 and described in the sections that follow Figure 5 OEM615 OEM617D and OEM628 Receiver System ...

Page 19: ...al section digitizes and processes the IF signals to obtain a GNSS solution position velocity and time It also processes the system I O shown in Figure 5 OEM615 OEM617D and OEM628 Receiver System on Page 18 and Figure 6 OEM638 Receiver System on Page 19 1 3 2 Enclosure An enclosure is necessary to protect the OEM6 family card from environmental extremes and high levels of RF interference Antenna L...

Page 20: ...A Appendix B Appendix C and Appendix E for details 1 3 5 Optional External Frequency Reference When applications require greater precision than the OEM628 or OEM638 internal clock connect the OEM628 or OEM638 to an external high stability oscillator See External Oscillator on page 64 for more information 1 3 6 Data Communications Equipment A computer or other data communications device is necessar...

Page 21: ...NASS L1 L2 BeiDou B1 B2 and Galileo E1 E5a E5b Alt BOC signals Table 1 FlexPak6 Features on page 21 lists the features available on the FlexPak6 Table 1 FlexPak6 Features For technical specifications on the FlexPak6 see Appendix D on page 137 Figure 7 FlexPak6 Feature FlexPak6 OEM card OEM628 Serial ports 2 DB9 connectors USB 2 0 Yes Ethernet Yes Strobe port DB HD15 connector Input DC voltage 6 to...

Page 22: ...cluded with the receiver Optional NovAtel OEM6 Development Kit 01018849 contact www novatel com support for instructions on using the OEM6 Development Kit with the OEM638 receiver card 2 3 Selecting a GNSS Antenna An active antenna with an LNA is required to boost the power of the incoming signal to compensate for the line loss between the antenna and the receiver NovAtel offers a variety of anten...

Page 23: ... 2 3 Selecting a GNSS Antenna on page 22 for more information When installing the antenna Choose an antenna location with a clear view of the sky so each satellite above the horizon can be tracked without obstruction For more information on RF signal propagation and multipath refer to the NovAtel application note APN 008 Discussions on RF Signal Propagation and Multipath at www novatel com support...

Page 24: ...A to a connected antenna based on a 5 V input supply Higher input voltages should follow the derating curve refer to Appendix A for details The typical current draw for a NovAtel antenna is less than 40 mA For the OEM617D an interconnect adapter cable is required to convert the end of the coaxial cable to the card s MMCX female RF input connector The RF connector location for the OEM617D is shown ...

Page 25: ...re with a wiring harness refer to Section 2 5 1 Installing an OEM6 Family Card with Wiring Harness and Enclosure on page 26 2 Mount the GNSS antenna to a secure stable structure 3 Connect the GNSS antenna to the receiver using an antenna RF cable refer to the information in Section 2 3 3 Connecting the Antenna to the Receiver on page 24 4 Apply power to the receiver as described in Section 2 5 2 A...

Page 26: ...ibility in creating a mounting environment to suit particular product and marketing requirements The mounting and enclosure should provide for the following Mounting of external connectors Protection from hostile physical environments rain snow sand salt water extreme temperatures etc Electromagnetic shielding to protect from hostile RF environments e g nearby transmitters Electromagnetic shieldin...

Page 27: ...erefore must be designed to mate with this connector s 615 For proper grounding and mechanical integrity the OEM615 and OEM617D are mounted with four screws when used in a custom assembly 628 For proper grounding and mechanical integrity the OEM628 and OEM638 are mounted with six screws when used in a custom assembly 617D 638 638 CAN transceivers are integrated on the OEM638 card 615 LNA power sup...

Page 28: ...ale connector An external oscillator input is available also through an MMCX female connector The pin outs for all connectors and manufacturers part numbers are specified in Appendix E NovAtel recommends biasing unused inputs to their default states BOTTOM VIEW TOP VIEW LED Status Indicator J1101 20 pin dual row male connector with a 2 mm straight 2 x 10 header used for power data and signaling J1...

Page 29: ...for power data and signaling Primary RF signal input and LNA power output MMCX female connector Secondary RF signal input and LNA power output MMCX female connector TOP VIEW BOTTOM VIEW P1500 24 pin dual row male connector with a 2 mm straight 2 x 12 header used for power data and signaling P1502 16 pin dual row male connector with a 2 mm straight 2 x 8 header J100 RF signal input and LNA power ou...

Page 30: ...ain logs connect the receiver to a data communications device The default configuration for OEM6 receivers is shown in Table 3 On some receivers the serial ports can be factory configured for RS 232 RS 422 or LVTTL operation Refer to Section 4 1 1 Serial Ports on page 43 for instructions TOP VIEW BOTTOM VIEW P4001 40 pin dual row male connector with a 2 mm straight 2 x 20 header used for power dat...

Page 31: ... and XXX for details Model COM1 COM2 COM3 COM4 COM5 IMUCOM COM6 LVTTL with no flow control LVTTL with no flow control LVTTL with no flow control N A N A N A LVTTL with no flow control LVTTL with no flow control LVTTL with no flow control N A N A N A User configurable as RS 232 with flow control or RS 422 without flow control LVTTL with no flow control LVTTL with no flow control N A N A N A User co...

Page 32: ...nd EVENT1 are enabled by default Figure 12 COM3 and USB Multiplexed on OEM615 and OEM617D To enable COM3 issue the following commands 1 INTERFACEMODE USB1 NONE NONE 2 INTERFACEMODE USB2 NONE NONE 3 INTERFACEMODE USB3 NONE NONE 4 MARKCONTROL MARK1 DISABLE 5 INTERFACEMODE COM3 NOVATEL NOVATEL 6 SAVECONFIG optional To enable USB issue the following commands 1 INTERFACEMODE COM3 NONE NONE 2 INTERFACEM...

Page 33: ...RXD and pin 19 TXD By default COM3 is enabled COM3 is multiplexed with both EVENT2 and USER0 To enable COM3 1 If a user application is running make sure it does not initialize GPIO_USER0 2 Issue the following command MARKCONTROL MARK2 DISABLE 3 Issue the following command INTERFACEMODE COM3 NOVATEL NOVATEL ON Use any interface mode except NONE Refer to the OEM6 Family Firmware Reference Manual OM ...

Page 34: ... command can be used to override the protocol selected at boot time or choose between RS 232 default and RS 422 Figure 14 OEM638 Multiplexed Pin Options Refer to the OEM6 Family Firmware Reference Manual OM 20000129 for further command information None of the COM port pins are multiplexed with other I O functions All COM port pins have a dedicated function EVENT_OUT3 EVENT_IN2 input nRESETOUT outp...

Page 35: ...e FTP server is disabled by default The IPSERVICE FTP_SERVER command is issued to enable or disable the FTP server port For security purposes the IPSERVICE SECURE_ICOM command can also be used to enable password security on the ICOM ports When security is enabled the port refuses incoming commands until a valid User Name and Password are entered using the LOGIN command Once logged in to an ICOM po...

Page 36: ...ntenna with an LNA is required to boost the power of the incoming signal to compensate for the line loss between the antenna and the receiver NovAtel offers a variety of antennas including single and dual frequency triple band and wide band reference GNSS antennas refer to our web site www novatel com antennas for details of available antennas All antennas include band pass filtering and an LNA Th...

Page 37: ...a Choose an antenna location with a clear view of the sky so each satellite above the horizon can be tracked without obstruction For more information on RF signal propagation and multipath refer to the NovAtel application note APN 008 Discussions on RF Signal Propagation and Multipath at www novatel com support Mount the antenna on a secure stable structure capable of safe operation in the specifi...

Page 38: ...The FlexPak6 enclosure is a Data Terminal Equipment DTE so that TXD and RTS are outputs while RXD and CTS are inputs A null modem cable supplied with the receiver is required to connect to another DTE like a terminal or a computer while a straight through cable is used to connect to another receiver COM1 I O COM2 Using a coaxial cable connect the antenna to the port which is found on the front fac...

Page 39: ... 24 V or above systems Since the 12 V car adapter on the supplied adapter cable incorporates a 6 A fuse a user supplied 6 A slow blow fuse in a suitable holder must be used at the alternate power source to protect both the power supply and your warranty The car adapter is not recommended for use if your power source is greater than 12 V The FlexPak6 provides an output voltage on pin 4 of COM2 POUT...

Page 40: ...s and defines the connectors Figure 16 FlexPak6 Connectors Table 5 FlexPak6 Status Indicators and Connector Labels Vehicle Main Battery Auxiliary Battery Isolator from Vehicle Alternator to Vehicle Electrical System Battery FlexPak6 Connector Description Antenna Position Valid Solid GREEN with valid position Solid RED indicates a board error COM1 Flashing GREEN when transmitting data from COM1 Fla...

Page 41: ... contains complete instructions for installation and use of the NovAtel PC utilities Model COM1 COM2 COM3 FlexPak6 RS 232 RS 422a a Mode selected via software commands RS 232 RS 422b b Selected via MODE pin on the I O connector Not available Download the latest PC Utilities software including NovAtel Connect along with the necessary user documentation from the PC Software section of www novatel co...

Page 42: ... enter commands directly from the terminal or through terminal emulation software such as NovAtel Connect or HyperTerminal on a computer To maximize the application of the receiver s capabilities become familiar with the commands and logs described in the OEM6 Family Firmware Reference Manual OM 20000129 Note the figure above does not show all necessary hardware Also see Figure 18 Basic Differenti...

Page 43: ...st applications Use the SERIALCONFIG command to change settings as required for all OEM6 family receivers The following ports are supported and can be configured using the commands listed Refer to the commands listed in the OEM6 Family Firmware Reference Manual OM 20000129 for detailed instructions Although the receiver can operate at data transfer rates as low as 300 bps this is not desirable For...

Page 44: ...e 14 for contact information 4 1 2 Communicating with a Remote Terminal One method of communicating with the receiver is through a remote terminal The receiver is pre wired to allow RS 232 interface with a data terminal To communicate with the terminal the receiver requires only the RX TX and GND lines be used Handshaking is not required but is an option Ensure the terminal s communications set up...

Page 45: ...ick on icon or select the NovAtel button Help Ensure the Console and ASCII Messages windows are displayed select from the View menu if necessary When the receiver is first turned on no data is transmitted from the COM ports except for the port prompt The Console window displays a port name COM1 if connected to com1 port COM2 if connected to com2 port or COM3 if connected to com3 port Any of the CO...

Page 46: ...the OEM6 family receiver use a different COM port to communicate with the receiver When communication has been established issue a FRESET STANDARD command The original communications port should be ready for use 3 XCOM1 XCOM2 and XCOM3 virtual ports can be generated by the receiver However they are unlikely to appear as a port prompt as you cannot connect to these types of ports using NovAtel Conn...

Page 47: ...d requires correction messages from a base station to calculate differential GNSS positions An example of a differential setup is shown in Figure 18 Figure 18 Basic Differential Setup ROVER BASE GNSS Antenna GNSS Antenna Radio COM2 Power Computer USB shown Base Enclosure Radio COM2 Rover Enclosure Power COM1 Data Storage Rover Setup Base Setup 1 Mount and connect a GNSS antenna 1 Mount and connect...

Page 48: ...opbits handshak ing break interfacemode port rx_type tx_type responses fix position latitude longitude height enter your own lat long and hgt values log port message trigger period port COM2 refer to Figure 18 above saveconfig optional For example RTK Automated Correction Generation fix position lat lon hgt enter your own lat lon hgt generatertkcorrections rtmcv3 com2 RTCA serialconfig com2 9600 N...

Page 49: ...ntime 10 log com2 rtcm1019 ontime 120 log com2 rtcm1020 ontime 120 saveconfig optional CMRPLUS CMR serialconfig com2 9600 N 8 1 N on interfacemode com2 none cmr off fix position lat lon hgt enter your own lat lon hgt log com2 cmrobs ontime 1 log com2 cmrgloobs ontime 1 log com2 cmrplus ontime 1 important to use ontime 1 with cmrplus saveconfig optional CMR serialconfig com2 9600 N 8 1 N on interfa...

Page 50: ...eading Master and Remote Configurations This section provides instructions for setting up a master station with an ALIGN capable rover receiver for applications that require heading output Refer to APN 048 ALIGN Overview and Setup available at www novatel com support Automatic Set Up for Direct Wire Connection between Master and Rover via COM2 alignautomation enable or alignautomation enable com2 ...

Page 51: ...lity helps mitigate the discontinuities that often occur when a GNSS receiver changes positioning modes The effect is especially evident when a receiver transitions from an RTK position mode solution to a lower accuracy fall back solution such as NovAtel CORRECT PPP DGPS WAAS GLIDE or even autonomous GLIDE Smooth transitions are particularly important for agricultural steering applications where s...

Page 52: ... accurate mode to a more accurate mode e g GLIDE to RTK the receiver uses the Transition option For example a receiver is configured to do both RTK and GLIDE If this receiver has a fixed RTK position and experiences a loss of correction data causing the loss of the RTK solution it will immediately apply the offset between the two position modes and uses the GLIDE position stability to maintain the...

Page 53: ... 4 Steadyline UAL Warning Limit Example on page 53 and Figure 5 Steadyline UAL Out of Bounds Example on page 54 show an examples of Steadyline using the UAL mode Figure 4 Steadyline UAL Warning Limit Example UAL mode will not function unless UALCONTROL is enabled using the UALCONTROL command A Position type is OPERATIONAL Higher accuracy corrections are lost The receiver changes to a lower accurac...

Page 54: ...8013 1059 4105 log com2 rtcaobs2b ontime 2 At the rover leave the interface mode default settings interfacemode com2 novatel novatel The rover recognizes the default and uses the corrections it receives with a NovAtel header A The position type is OPERATIONAL Higher accuracy corrections are lost The receiver changes to a lower accuracy solution Steadyline operates in Maintain mode while solution a...

Page 55: ... available at www novatel com support 4 5 2 Enabling L Band L Band equipped receivers can achieve sub metre position accuracy using correction data received from geostationary satellites To use the L Band corrections an L Band capable receiver model and antenna are required refer to our web site www novatel com products gnss antennas for information on NovAtel L Band capable antennas For more info...

Page 56: ... ASSIGNLBANDBEAM command to configure the receiver to track the Veripos satellite OmniSTAR A subscription is required to use the OmniSTAR service To obtain a subscription contact OmniSTAR at 1 888 883 8476 or 713 785 5850 Provide the receiver s OmniSTAR serial number which is different from the NovAtel serial number To obtain the OmniSTAR serial number enter the following command log lbandinfo The...

Page 57: ...nd It is typically used when the receiver is not adjusting its own clock and is using an external reference frequency The TIMESYNC log is also used to synchronize time between receivers It contains a time status field that may show COARSE or FINE among others For a complete list of the time status values and definitions refer to the GPS Time Status section in Chapter 1 of the OEM6 Family Firmware ...

Page 58: ...nd is indicated by COARSE in the time status field of the TIMESYNC log Fine Time When at least four satellites are acquired to calculate the antenna position a more accurate estimate of the receiver clock offset is calculated The new receiver clock offset is used to synchronize the receiver clock even closer to GPS time This is referred to as fine time and appears as FINE or FINESTEERING in the ti...

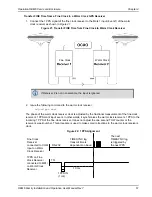
Page 59: ... receiver to the cold clock receiver for example COM2 on the fine clock receiver to COM3 on the cold clock receiver as shown in Figure 19 Configure both ports to the same baud rate and handshaking configurations Figure 19 Transfer COARSE Time from Fine Clock to Cold Clock Receiver 2 Issue the following command to the fine clock receiver log com2 timesyncb ontime 1 3 Issue the following command to ...

Page 60: ...d handshaking configurations Figure 20 Transfer FINE Time from Fine Clock to Cold Clock Receiver 2 Issue the following command to the fine clock receiver log com2 timesyncb ontime 1 3 Connect the 1PPS signal of the fine clock receiver to the Mark 1 input Event1 of the cold clock receiver 4 Issue the following command to the cold clock receiver adjust1pps markwithtime When the cold clock receiver r...

Page 61: ...tional measurement of the fine clock receiver s 1 PPS mark input event In other words it synchronizes the warm clock receiver s 1 PPS to the incoming 1 PPS of the fine clock receiver It does not adjust the one second TOW counter or the receiver s week number This procedure is used to make small corrections to the warm clock receiver s clock Figure 22 1 PPS Alignment If Receiver 2 is not in coarset...

Page 62: ...and COM5 to USB3 The NovAtel USB Configuration Utility installed with the NovAtel USB drivers is used to change the COM port numbers assigned to the virtual serial ports Refer to the PC Utilities manual for instructions You can also check for updates to the drivers or release notes at www novatel com support The examples shown in Figure 19 Figure 20 and Figure 21 are for the transfer of time If a ...

Page 63: ...e to damage from ESD NovAtel recommends that conductors attached to the USB D and D signal pins are terminated There are no CAN transceivers on the OEM615 OEM617D or OEM628 The cards require external CAN transceivers and proper bus terminations 615 The OEM615 and OEM617D have two CAN ports CAN1 and CAN2 support up to 1 Mbps CAN1 is multiplexed with user VARF and EVENT2 so the following commands mu...

Page 64: ...use the EXTERNALCLOCK command refer to the OEM6 Family Firmware Reference Manual OM 20000129 for details to set the clock type e g cesium rubidium or ovenized crystal and frequency 4 7 6 Antenna LNA Power NovAtel antennas and coaxial cables meet receiver RF input gain requirements NovAtel antennas are equipped with built in LNAs that provide 26 dB of gain to the satellite signal received The power...

Page 65: ...ovide 5 VDC 5 at a maximum of 100 mA The amount of voltage the OEM615 receiver can provide to the antenna depends upon the input voltage provided to pin 1 on the P1101 connector The output current in all instances is limited to 100 mA and above an input voltage of 6 V the output current limit is further reduced derated according to iout 0 1w vin 5v where vin is greater than 6v OEM628 provides sele...

Page 66: ...re is a limitation of one connection at any given time This not only means that only one user can access the FTP server at a time but the FTP Client software must be set to only use one connection Use the LOG command to specify the logs to send to the onboard memory For example a standard logging configuration for GPS INS only post processing applications would be LOG FILE RANGECMPB ONTIME 1 LOG F...

Page 67: ...r changed data becomes available or at regular intervals Data can be collected through NovAtel Connect using the Logging Control Window Refer to the NovAtel Connect Help available from within the utility Help or the chm file bundled with the software comprehensive logging instructions 4 8 9 Pass Through Logging The pass through logging feature enables the GNSS receiver to redirect any ASCII or bin...

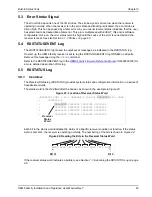
Page 68: ...disabled but command and log processing continues to allow error diagnosis Even if the source of the error is corrected the receiver must be reset to resume normal operation Two scenarios describe factory default behavior These behaviors can be customized to better suit an individual application RXSTATUSEVENT logs can be disabled completely with the UNLOG command RXSTATUSEVENT logs can be generate...

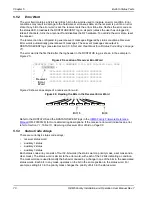
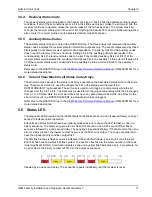
Page 69: ...sage using the UNLOG command Refer to the RXSTATUSEVENT log in the OEM6 Family Firmware Reference Manual OM 20000129 for a more detailed description of this log 5 5 RXSTATUS Log 5 5 1 Overview The Receiver Status log RXSTATUS provides system status and configuration information in a series of hexadecimal words The status word is the third field after the header as shown in the example in Figure 23...

Page 70: ...example of a receiver error word Figure 26 Reading the Bits in the Receiver Error Word Refer to the RXSTATUS and the RXSTATUSEVENT logs in the OEM6 Family Firmware Reference Manual OM 20000129 for more detailed log descriptions If the receiver error word indicates an error refer to Section 7 1 Table 10 Resolving a Receiver Error Word on Page 86 5 5 3 Status Code Arrays There are currently 4 status...

Page 71: ...ays The other two mask words in the status code arrays operate on the associated status word in the same way These mask words are used to configure the bits in the status word that result in a RXSTATUSEVENT log broadcast The set mask is used to turn logging on temporarily while the bit changes from the 0 to 1 state The clear mask is used to turn logging on temporarily while the bit changes from a ...

Page 72: ...word is set indicating a problem with the supply voltage of the receiver s power circuitry Figure 27 Status LED Flash Sequence Example Reference Description 1 Red 2 Yellow 3 1 Second Pause 4 Word Identifier Flash 5 Bit Identifier Flashes 6 End of Sequence 7 End of Previous Sequence 8 Beginning of Sequence 9 Most Significant Bit of Binary Value 10 Least Significant Bit of Binary Value 11 Start of N...

Page 73: ... USB cable one or two CAT5 Ethernet cables a user supplied Ethernet network hub or wired router optional one or two GNSS antennas one or two standard 5 meter 50 ohm TNC to TNC antenna cables 6 2 Static IP Address Configuration For a static IP address configuration unique IP addresses are assigned to both the OEM6 receiver and the computer TCP IP is used for the connection in this simple network Th...

Page 74: ...hapter 6 Ethernet Configuration Figure 28 Cross Over Ethernet Cable Configuration OEM628 and OEM638 Figure 29 Cross Over Ethernet Cable Configuration FlexPak6 on Page 75 FPk6 Antenna Cable Cross over Ethernet Cable Antenna OEM6 Board in a Development Kit Computer ...

Page 75: ...n this procedure to the receiver 3 Enable the Ethernet port on the receiver by entering ethconfig etha auto auto auto auto 4 Assign the TCP IP port number used for the connection by entering icomconfig icom1 tcp 2000 5 Assign the receiver IP address subnet mask and default gateway by entering ipconfig etha static 192 168 74 10 255 255 255 0 192 168 74 1 6 Save the new Ethernet settings by entering...

Page 76: ...he Local Area Connection Properties window appears 7 Click the Close button 8 Proceed to Section 6 2 4 Confirming Ethernet Setup on page 78 6 2 3 Static IP Address Configuration Windows 7 Follow these steps to set up a static IP address on a computer 1 Click Start Control Panel 2 Click Network and Sharing Center 3 Click the Local Area Connection link The Local Area Connection Status window appears...

Page 77: ...ppears 8 Click the Close button The Local Area Connection Status window appears 9 Click the Close button 10 Proceed to Section 6 2 4 Confirming Ethernet Setup on page 78 Ensure the Ethernet settings used for the computer are compatible with the Ethernet settings on the OEM6 receiver For example the following settings are compatible with the OEM6 receiver settings used in Section 6 2 1 Static IP Ad...

Page 78: ...ovAtel Connect with the example Ethernet settings used in Section 6 2 1 6 3 Dynamic IP Address Configuration For this configuration a direct connection is made from the OEM6 receiver to a Dynamic Host Communication Protocol DHCP network and into a computer The DHCP server automatically assigns an IP addresses to the OEM6 receiver based on its predetermined available IP addresses Use this configura...

Page 79: ...guration through a DHCP Server OEM628 and OEM638 Figure 31 Dynamic IP Address Configuration through a DHCP Server FlexPak6 Antenna Cable Ethernet Antenna OEM6 Board in a Development Kit Computer Cable Ethernet Cable DHCP Server Antenna Cable Ethernet Antenna FlexPak6 Computer Cable Ethernet Cable DHCP Server I O Breakout Cable ...

Page 80: ...log ipconfig once 6 Assign the TCP IP port number by entering icomconfig icom1 tcp 2000 7 Confirm the port number assigned to ICOM1 by entering log icomconfig once 8 Connect to the receiver using NovAtel Connect or any third party terminal program that supports TCP IP connections Use the IP address obtained from the IPSTATUS log in Step 4 and port number assigned in Step 6 The figure below shows t...

Page 81: ... base and rover receiver Figure 32 Base Rover Ethernet Setup OEM628 and OEM638 on Page 81 and Figure 33 Base Rover Ethernet Setup FlexPak6 on Page 82 show the connections when a base and rover OEM6 receiver are connected using Ethernet Figure 32 Base Rover Ethernet Setup OEM628 and OEM638 USB Cable USB Cable Antenna Antenna Antenna Cable Antenna Cable Ethernet Cable Ethernet Cable Server OEM6 Boar...

Page 82: ...s Refer to Section 6 2 Static IP Address Configuration on page 73 or Section 6 3 Dynamic IP Address Configuration on page 78 for more information 6 Send the following commands to each receiver either through serial or USB ports Base fix position lat long height interfacemode icom1 none rtca off log icom1 rtcaobs2 ontime 1 log icom1 rtcaref ontime 10 log icom1 rtca1 ontime 5 saveconfig Rover icomco...

Page 83: ...n data over the internet An OEM6 receiver can be configured as either an NTRIP server or an NTRIP client For more information about NovAtel s NTRIP refer to www novatel com products firmware options ntrip Figure 34 NTRIP System The NTRIP caster is an HTTP internet service that acts as a communication medium between NTRIP servers and NTRIP clients The NTRIP caster is provided by third party sources...

Page 84: ...obs2 ontime 1 log ncom1 rtcaref ontime 10 log ncom1 rtca1 ontime 1 saveconfig 5 Use the following commands to enable the rover receiver as an NTRIP Client ethconfig etha auto auto auto auto ntripconfig ncom1 client v1 endpoint mountpoint username password etha The following is an NTRIP Client configuration example without the use of a Network RTK system interfacemode ncom1 rtca none off rtksource ...

Page 85: ...structed view of the sky from horizon to horizon Check the RXSTATUS error states See Section 7 1 Examining the RXSTATUS Log page 86 If the receiver is in error mode it does not track Check for and replace a faulty antenna cable See Section 2 3 Selecting a GNSS Antenna page 22 Section 2 3 1 Choosing a Coaxial Cable page 23 Section 2 3 3 Connecting the Antenna to the Receiver page 24 No data is bein...

Page 86: ...ver away from any possible jamming sources The receiver s Automatic Gain Control AGC is not working properly See Section 2 3 1 Choosing a Coaxial Cable page 23 and the jamming symptom in this table Bit Set Action to Resolve 0 2 Issue a FRESET command for bit 1 reload new firmware 4 Contact Customer Support on Page 14 5 Check the VERSION log The VERSION log will indicate Invalid authcode Upgrade th...

Page 87: ...0000129 21 None This bit indicates if clock steering has been manually disabled Refer also to the FRESET command in the OEM6 Family Firmware Reference Manual OM 20000129 22 None This bit only indicates if the clock model is valid Refer also to the FRESET command in the OEM6 Family Firmware Reference Manual OM 20000129 23 None This bit indicates if the phase lock loop is locked when using an extern...

Page 88: ...ion Averaging is ON 4 6 Reserved bits 7 Connect the receiver via USB 8 10 Reduce the amount of logging on the USB ports 11 13 Reserved bits 14 17 AGC error on RF1 through RF4 respectively To resolve ensure the antenna cable is connected and signal input level is within specification 18 Connect the receiver via Ethernet See Section 4 7 7 Ethernet on page 65 19 21 Reduce the amount of logging on the...

Page 89: ... all the information needed to upgrade or update a receiver Refer to www novatel com where to buy for contact information or contact sales novatel com or support novatel com directly 8 1 1 Firmware Updates Firmware updates are firmware releases that include fixes and enhancements to the receiver functionality Firmware updates are released occasionally on the NovAtel web site as they become availab...

Page 90: ...re version use the AUTH command with the issued auth code as outlined in Upgrading Using the AUTH Command To upgrade to a new model with a new firmware version the new firmware needs to be loaded into the OEM6 receiver Refer to 8 3 Updating or Upgrading Using the WinLoad Utility on page 91 for use instructions or to 8 4 Updating Using SoftLoad Commands on page 93 There are two types of auth codes ...

Page 91: ...rsion For convenience copy the update file to a GNSS sub directory for example C GNSS LOADER If the firmware update file is password protected NovAtel Customer Support provides the required password After copying the file to a computer perform the following steps to extract the files Syntax filename password if required where filename is the name of the compressed file but not including the EXE ex...

Page 92: ...en Window When a file is selected the filename appears in the main WinLoad display area and in the title bar Figure 36 Figure 36 Open File in WinLoad Communications Settings To set the communications port and baud rate select Settings COM Settings Choose the computer port to use from the Com Port drop down list and the baud rate from the Download Baudrate drop down list Set the baud rate as high a...

Page 93: ... the main display area Figure 40 Upgrade Process Complete 7 Close WinLoad 8 4 Updating Using SoftLoad Commands Firmware can be updated on a running receiver using a process called SoftLoad Any available communication ports on the receiver COM USB ICOM XCOM etc can be used The SoftLoad process is made up of a set of commands and logs that are used to send new firmware data to a receiver and check t...

Page 94: ...ing with S3 contain the actual firmware image data Aside from the header each pair of characters forms the ASCII representation of a binary byte The format is as follows Command Description SOFTLOADRESET Initiate a new SoftLoad process SOFTLOADSREC Send an S Record to the receiver for the SoftLoad process SOFTLOADDATA Send firmware image data to the receiver for the SoftLoad process SOFTLOADCOMMIT...

Page 95: ...S3 record follows immediately after the previous record That is the address from the current S3 record must equal the address from the previous S3 record plus the data length of the previous S3 record If the data is not consecutive then the SOFTLOADDATA command can be sent with the amount of data it has packaged up to that point Subsequent data can be packaged in a new SOFTLOADDATA command Within ...

Page 96: ...ECORD Data within S0 records can also be sent to the receiver by converting them to SOFTLOADSETUP commands Refer to the OEM6 Family Firmware Reference Manual OM 20000129 for details on how to convert from S0 S Records to SOFTLOADSETUP commands B S3 S Records should be parsed and packaged into a SOFTLOADDATA command 6 Send the SOFTLOADCOMMIT command after all data from the hex or shex file has been...

Page 97: ... receiver Once the receiver resets the new version of firmware is active The SoftLoad process can be cancelled safely at any time using the SOFTLOADRESET command or by otherwise resetting the receiver Once the COMPLETE status is reported by SOFTLOADSTATUS the new firmware image will be run after the receiver is reset ...

Page 98: ...ort on the receiver COM USB ICOM or XCOM with the input and out put INTERFACEMODE set to NOVATEL 2 Request the SOFTLOADSTATUSA log using the following command LOG SOFTLOADSTATUSA ONCHANGED 3 Initiate the firmware update using one of the following commands where firmwarefilename hex is the name of the hex or shex file A If using internal flash use this command SOFTLOADFILE INTERNAL_FLASH firmwarefi...

Page 99: ...stomer Support The upgrade can be performed directly through the NovAtel Connect command line or from any other communications program 8 5 1 Upgrade Procedure 1 Power up the OEM6 family receiver and establish communications refer to the Quick Start Guide included with the product for instructions 2 Issue the LOG VERSION command to verify the current model firmware version and serial number refer t...

Page 100: ...Sb b GPS only 0 6 m RMS DGPS 0 4 m RMS NovAtel CORRECT RT 2 1 cm 1 ppm RMS Time to First Fix Hot 35 s Almanac and recent ephemeris saved and approximate position and time entered Cold 50 s No almanac or ephemeris and no approximate position or time Reacquisition 0 5 s L1 typical 1 0 s L2 typical Data Rates Measurements up to 20 Hz Position up to 20 Hz Time Accuracyac c Time accuracy does not inclu...

Page 101: ...25 x 2 Ø3 6 0 14 x 4 45 7 1 80 71 1 2 80 4 45 0 175 13 84 0 545 Pin 1 Pin 20 Pin 19 Pin 2 J1101 J101 0 00 0 00 0 00 0 00 3 18 0 125 x 2 67 95 2 675 x 2 69 20 2 724 1 57 0 062 11 05 0 30 0 435 0 012 6 00 0 236 3 60 0 142 3 60 0 142 Notes 1 Dimensions are in millimeters inches 2 Connectors a J101 MCX jack receptacle straight Johnson P N 133 3711 202 or SAMTEC P N MCX J P H ST SMI or equivalent b J11...

Page 102: ...one 3 7 0 14 64 9 2 56 66 2 2 61 64 9 2 56 7 5 0 30 0 00 0 00 6 2 0 24 6 2 0 24 0 0 0 00 3 7 0 14 12 8 0 50 32 9 1 30 0 0 0 00 0 0 0 00 8 7 0 34 27 5 1 08 33 7 1 33 37 0 1 46 8 7 0 34 37 0 1 46 Note 1 Dimensions are in millimeters inches 2 Keep out areas are intended for NovAtel circuitry ...

Page 103: ...J1101 3 18 0 125 x2 0 00 0 000 0 00 0 000 69 20 2 724 6 0 0 236 PIN 20 PIN 19 PIN 1 PIN 0 1 57 0 062 3 60 0 142 6 00 0 236 Ø3 6 0 14 x4 11 80 0 30 0 440 0 012 Notes 1 Dimensions are in millimeters inches 2 Connectors a J101 MCX jack receptacle straight Johnson P N 133 3711 202 or SAMTEC P N MCX J P H ST SMI or equivalent b J1101 2X10 header 2 mm pitch SAMTEC P N TMM 110 03 G D 3 Mounting holes are...

Page 104: ...Zone 32 9 1 30 12 8 0 50 37 0 1 46 33 7 1 33 27 5 1 08 8 7 0 34 0 0 0 00 0 0 0 00 0 0 0 00 0 0 0 00 6 2 0 24 8 7 0 34 37 0 1 46 6 2 0 24 7 5 0 30 64 9 2 56 66 2 2 61 64 9 2 56 3 7 0 14 6 1 0 24 Note 1 Dimensions are in millimeters inches 2 Keep out areas are intended for NovAtel circuitry ...

Page 105: ...onsumption 6 0 A for less than 60 s typical RF INPUT LNA POWER OUTPUT Antenna Connector MCX female 50 nominal impedance See Figure on page 101 Acceptable RF Input Level L1 122 to 87 signal dBm 161 to 141 noise dBm Hz L2 126 to 93 signal dBm 161 to 141 noise dBm Hz RF Input Frequencies GPS L1 1575 42 MHz GPS L2 1227 60 MHz GLONASS L1 1593 1610 MHz GLONASS L2 1237 1253 MHz Galileo E1 1575 42 MHz Bei...

Page 106: ...determined by slowest device on the bus Signals supported CAN1 and CAN2 USB Electrical format Conforms to USB 2 0 Bit rates Full speed USB Signals supported USB D USB D ETHERNET Physical Layer None a Baud rates higher than 115 200 bps are not supported by standard PC hardware Special computer hardware may be required for higher rates including 230400 bps 460800 bps and 921600 bps b COM3 is disable...

Page 107: ...ates a valid GNSS position solution is available A high level indicates a valid solution or that the FIX POSITION command has been set refer to the FIX POSITION command VDD is 3 3 V VARF Variable Frequency Multiplexed pin Output Active low A programmable variable frequency output ranging from 0 5 MHz refer to the FREQUENCYOUT command RESETIN Dedicated pin Input Active low Reset LVTTL signal input ...

Page 108: ... CAN1RX IO Variable frequency output CAN1 receive data These pins are internally multiplexed see Section 2 5 3 Connecting Data Communications Equipment on page 30 7 EVENT2 CAN1TX IO Event 2 Input CAN1 transmit data 8 CAN2RX I CAN2 receive data 9 EVENT1 TXD3a IO Event1 input COM3 transmit data This pin is internally multiplexed see Section 2 5 3 Connecting Data Communications Equipment on page 30 1...

Page 109: ... These I O require additional ESD protection if they are routed to connectors The same ESD protection circuit shown below should be used on any OEM615 Logic level signal that attaches to an enclosure connector The ferrite bead and small value capacitor provide some immunity to electrostatic discharge events but also reduce radiated and conducted emissions from the enclosure A 1 2 1 EVENT PPS and P...

Page 110: ...de performance for all CAN devices on the bus The slew rate adjustment resistor R101 value in Figure 48 on page 110 sets the slew rate for applications for SAE J1939 agricultural applications Other applications may require a different slew rate Refer to the transceiver product sheet for more information Designator Manufacturer Manufacturer Part Number FB100 FB101 TDK MMZ1005B800C U101 Semtech Bour...

Page 111: ...elow may improve the radiated emissions performance The common mode choke and ESD protection should be placed as close as possible to the USB connector Figure 49 OEM615 USB Implementation Schematic Table 17 Bill of Materials Designator Manufacturer Manufacturer Part Number FB100 FB101 TDK MMZ1005B800C U100 Texas Instruments SN65HVD231 U101 Semtech Bourns OnSemi LC03 6 TBT CDNBS08 PLC03 6 LC03 6R2G...

Page 112: ...1 only 1 5 m RMS L1 L2 1 2 m RMS SBASb b GPS only 0 6 m RMS DGPS 0 4 m RMS NovAtel CORRECT RT 2 1 cm 1 ppm RMS Time to First Fix Hot 35 s Almanac and recent ephemeris saved and approximate position and time entered Cold 50 s No almanac or ephemeris and no approximate position or time Reacquisition 0 5 s L1 typical 1 0 s L2 typical Data Ratesc c Rates are model dependant Measurements up to 20 Hz ma...

Page 113: ...BER Generic assembly OEM617D 01019268 MECHANICAL DRAWINGS Figure 50 OEM617D Board Dimensions Notes 1 Dimensions are in millimeters inches 2 Connectors a Primary and Secondary MMCX jack receptacle straight Johnson P N 135 3711 201 or Molex P N 73415 2063 or equivalent b J1101 2x10 header 2 mm pitch Samtec P N TMM 110 03 G D 3 Mounting holes are symmetrical ...

Page 114: ...OEM6 Family Installation and Operation User Manual Rev 7 114 Figure 51 OEM617D Keep Out Zone Note 1 Dimensions are in millimeters inches 2 Keep out areas are intended for NovAtel circuitry ...

Page 115: ...n page 113 Acceptable RF Input Level L1 122 to 87 signal dBm 161 to 141 noise dBm Hz L2 126 to 93 signal dBm 161 to 141 noise dBm Hz RF Input Frequencies GPS L1 1575 42 MHz GPS L2 1227 60 MHz GLONASS L1 1593 1610 MHz GLONASS L2 1237 1253 MHz Galileo E1 1575 42 MHz BeiDou B1 1561 098 MHz BeiDou B2 1207 140 MHz LNA POWER OUTPUT LNA Voltage 5 V range 4 5 to 5 25 to each antenna supplied by card throu...

Page 116: ...n the OEM6 Family Installation and Operation User Manual OM 20000128 Signals supported COM3_Tx and COM3_Rx Electrostatic discharge protection No CAN BUSd Electrical format LVTTL requires external CAN transceiver Bit rates 1 Mbps maximum CAN Bus throughput is determined by slowest device on the bus Signals supported CAN1 and CAN2 USB Electrical format Conforms to USB 2 0 Bit rates Full speed USB Si...

Page 117: ...cates a valid GNSS position solution is available A high level indicates a valid solution or that the FIX POSITION command has been set refer to the FIX POSITION command VDD is 3 3 V VARF Variable Frequency Multiplexed pin Output Active low A programmable variable frequency output ranging from 0 5 MHz refer to the FREQUENCYOUT command RESETIN Dedicated pin Input Active low Reset LVTTL signal input...

Page 118: ...y Installation and Operation User Manual OM 20000128 5 RESETIN I Reset input Active low reset 6 USERVARF CAN1RX IO Variable frequency output CAN1 receive data These pins are internally multiplexed See Section 2 5 3 Connecting Data Communications Equipment in the OEM6 Family Installation and Operation User Manual OM 20000128 7 EVENT2 CAN1TX IO Event 2 Input CAN1 transmit data 8 CAN2RX I CAN2 receiv...

Page 119: ... they are routed to connectors The same ESD protection circuit shown below should be used on any OEM617D Logic level signal that attaches to an enclosure connector The ferrite bead and small value capacitor provide some immunity to electrostatic discharge events but also reduce radiated and conducted emissions from the enclosure B 1 2 1 EVENT PPS and PV Signal Protection Use the following circuit ...

Page 120: ...ovides ESD protection Figure 55 OEM617D CAN Transceiver Implementation Schematic Only use a 120 Ω termination resistor when the CAN device is used at one end of the CAN bus Multiple terminations along the length of the CAN bus will degrade performance for all CAN devices on the bus The slew rate adjustment resistor R101 value in Figure 55 on page 120 sets the slew rate for applications for SAE J19...

Page 121: ...elow may improve the radiated emissions performance The common mode choke and ESD protection should be placed as close as possible to the USB connector Figure 56 OEM617D USB Implementation Schematic Table 22 Bill of Materials Designator Manufacturer Manufacturer Part Number FB100 FB101 TDK MMZ1005B800C U100 Texas Instruments SN65HVD231 U101 Semtech Bourns OnSemi LC03 6 TBT CDNBS08 PLC03 6 LC03 6R2...

Page 122: ...ns are available from NovAtel 6 cm Veripos Apex2d d Veripos Apex2 marine subscriptions are available directly from Veripos www veripos com RT 2 1 cm 1 ppm Time to First Fix Hot 35 s Almanac and recent ephemeris saved and approximate position and time entered Cold 50 s No almanac or ephemeris and no approximate position or time Reacquisition 0 5 s L1 typical 1 0 s L2 and L5 typical Data Rates Measu...

Page 123: ...PART NUMBER Generic Assembly OEM628 01018410 Figure 57 OEM628 Board Dimensions Note 1 Dimensions are in millimeters inches 2 Connectors a J100 and J101 MMCX jack receptacle Johnson P N 135 3701 201 or SAMTEC P N RSP 149374 01 or equivalent b P1500 2x12 header 2 mm pitch SAMTEC P N TMM 112 03 G D c P1502 2x8 header 2 mm pitch SAMTEC P N TMM 108 03 G D ...

Page 124: ...allation and Operation User Manual Rev 7 Figure 58 OEM628 Keep Out Zone 57 3 2 26 2 6 0 10 4 9 0 19 Keepout Zone Shield 86 3 4 Note 1 Dimensions are in millimeters inches 2 Keep out areas are intended for NovAtel circuitry ...

Page 125: ... 64 2 230 x3 2 54 0 100 x2 P1502 J101 J100 P1500 35 34 1 391 9 32 0 367 98 03 3 859 x2 49 02 1 930 x2 0 00 0 000 0 00 0 000 PIN 16 PIN 2 PIN 23 PIN 2 PIN 24 PIN 1 PIN 15 PIN 1 Note 1 Dimensions are in millimeters inches 2 Connectors a J100 and J101 MMCX jack receptacle straight Johnson P N 135 3701 201 or SAMTEC P N RSP 149374 01 or equivalent b P1500 2x12 header 2 mm pitch SAMTEC P N TMM 112 03 G...

Page 126: ... g RMS Random Vibration OEM628V only MIL STD 810G Method 514 6 Category 24 20 g RMS Sinusoidal Vibration IEC 60068 2 6 Bump ISO 9022 31 06 25 g Shock Operating MIL STD 810G Method 516 6 Procedure I 40 g Non operating MIL STD 810G Method 516 6 Procedure V 1000 g Acceleration MIL STD 810G Method 513 6 Procedure II 4 g 8 g 12 g 16 g 57 3 2 26 2 6 0 10 6 1 0 24 Keepout Zone Shield 86 5 3 41 Note 1 Dim...

Page 127: ...PUT LNA POWER OUTPUT Antenna Connector MMCX female 50 nominal impedance see Figure 57 on page 123 Acceptable RF Input Level L1 122 to 87 signal dBm 161 to 141 noise dBm Hz L2 126 to 93 signal dBm 161 to 141 noise dBm Hz L Band 125 to 102 signal dBm 161 to 151 noise dBm Hz L5 E5 119 to 84 signal dBm 161 to 141 noise dBm Hz RF Input Frequencies GPS L1 1575 42 MHz GPS L2 1227 60 MHz GPS L5 1176 45 MH...

Page 128: ...rotection No CAN Busd Electrical format LVTTL requires external CAN transceiver Bit rates 1 Mbps maximum CAN Bus throughput is determined by slowest device on the bus Signals supported CAN1 and CAN2 USB Electrical format Conforms to USB 2 0 Bit rates Low 1 5 Mbps and full speed 12 Mbps USB Signals supported USB D USB D ETHERNET Physical Layer 10 100BASE T a Baud rates higher than 115 200 bps are n...

Page 129: ...ctive high Indicates a valid GNSS position solution is available A high level indicates a valid solution or that the FIX POSITION command has been set VDD is 3 3 V VARF Variable Frequency Dedicated pin Output Active low A programmable variable frequency output ranging from 0 100 MHz refer to the FREQUENCYOUT command RESETIN Dedicated pin Input Active low Reset LVTTL signal input from external syst...

Page 130: ...RXD2 Input COM2 Receive Data 2 7 V CMOS levels 3 3 V compatible 15 CTS1 RXD1 Input COM1 Clear to Send RS 232 COM1 Receive Data RS 422 CTS1 RS232 levels 25 V tolerant RXD1 RS422 levels 2 V differential typical 16 TXD2 Output COM2 Transmit Data 2 7 V CMOS levels 4 mA drive 3 3 V compatible 17 RTS1 TXD1 Output COM1 Request to Send RS 232 COM1 Transmit Data RS 422 RTS1 RS232 levels 5 4 V typical TXD1 ...

Page 131: ...ematic may be used to limit the drive strength of the PPS output if required This buffer has a propagation delay of approximately 5 to 6 nanoseconds The same ESD protection circuit shown below should be used on any OEM628 CMOS level signal that will be routed to an enclosure connector The ferrite bead and small value capacitor provide some immunity to electrostatic discharge events but also serve ...

Page 132: ...ation The combination of ferrite beads and small value capacitors are not necessarily required but may provide improved EMI performance A low capacitance TVS device provides ESD protection EVENT1 OEM628_EVENT1 PPS C102 22pF U100 74LVC1G86 C101 22pF R103 0 Optional PPS Buffer P1500 pin 8 OEM628_PPS P1500 pin 4 FB100 3V3 3V3 3V3 R100 NNP R102 0 R101 NNP FB101 U101 PLC03 6 IO1 GND1 GND2 IO2 IO4 GND4 ...

Page 133: ... external pull resistors are required on the data lines to set host or device modes There is an ESD protection device on the receiver card for the USB differential pair An additional device may be added near the USB connector but care should be taken not to cause a mismatch on the differential pair stubs or large capacitance ESD protection should be avoided The OEM628_VBUS trace should be capable ...

Page 134: ...abled by default and must be configured See the OEM6 Family Firmware Reference Manual OM 20000129 for instructions on Ethernet device configuration The PHY layer is based on the Micrel KSZ8851 Ethernet controller PHY terminations are provided on the OEM628 card and a 3 3 V output is presented to bias the Ethernet magnetics The 3 3 V power supplied by the OEM628 card is not to be used for any purpo...

Page 135: ...t in Ethernet magnetics In that case run 100 Ω differential pairs over unbroken reference planes directly to the jack Ensure the integrated magnetics in the jack meet the specifications in the table below Ensure that the jack is no more than 15 cm 6 inches from the OEM6 connector Shorter runs are better Ethernet cable type Cat5 Cat5e Cat6 does not affect the OEM628 emissions profile with a properl...

Page 136: ...ion Turns ratio 1 CT 1 CT Open CCT inductance minimum 350 uH 100 mV 100 kHz 8 mA Leakage inductance maximum 0 4 uH 1 MHz minimum Inter winding capacitance minimum 12 pF DC resistance maximum 0 9 Ω Insertion loss maximum 1 0 dB 0 MHz 65 MHz HIPOT minimum 1500 Vrms Designator Manufacturer Manufacturer Part Number FFB100 FB101 FB102 TDK MMZ1005B800C U100 Halo TG110 E050N5RL U101 U102 Semtech Bourns O...

Page 137: ...ght 337 g maximum Mounting System Integral flange with two 7 mm 9 32 inch diameter mounting holes 133 mm 5 25 inches apart ENVIRONMENTAL Operating 40 C to 75 C Storage Temperature 40 C to 85 C Humidity MIL STD 810G Method 507 5 Procedure II 95 Immersion IEC 60529 IPX7 Random Vibration MIL STD 810G Method 514 6 Category 24 20 to 2000 Hz 7 7 g RMS Sinusoidal Vibration SAE J1211 10 Hz to 1000 Hz 4 g ...

Page 138: ...Reference Manual OM 20000129 RS 232 RS 422b b COM2 can be can be dynamically changed to RS 422 by grounding I O pin 9 Connect pin 5 ground to pin 9 to switch COM2 to RS 422 mode Refer to Table 31 FlexPak6 I O Port Pin Out Descriptions on Page 139 for details 1 N C N C N C N C 2 Rx Rx Rx Rx 3 Tx Tx Tx Tx 4 N C N C POUT c c Current is limited to 1 A POUTc 5 GND GND GND GND 6 N C N C N C N C 7 RTS Tx...

Page 139: ... Output 3 CAN1 Input Output 4 No connect 5 GND Digital ground 6 ETH_TD Input Output 7 ETH_RD Input Output 8 CAN1 Input Output 9 MODE Input When grounded e g connected to pin 5 enables RS 422 mode for COM2 RS 232 is the unconnected default 10 EVENT2 Input Mark 2 input This input has in internal pull down and buffers the input to the OEM628 card 11 EVENT1 Input Mark 1 input This input has in interna...

Page 140: ...cess to the I O line signals see Table 32 are available on the DB HD15 male connector and the DB9 access I O strobe port cable see Section D 1 1 2 on page 141 The breakout cable is approximately 40 cm in length see Figure 70 and is RoHS compliant Figure 70 I O Breakout Cable Table 32 I O Breakout Cable Wiring Signal DB HD15 Female DB9 Male DB HD15 Male Ethernet Signal ground 5 3 5 5 CAN1 8 2 CAN1 ...

Page 141: ... to provide flexibility The jacket insulation is cut away slightly from the end but the insulation on each wire is intact The cable is approximately 2 m in length See Figure 71 This cable is RoHS compliant Figure 71 I O DB HD15 Strobe Port Cable Table 33 I O Strobe Port Cable Wiring I O Port Pin I O Port Signal I O Port Cable Wire Color Not connected Blue 5 Ground White Grey 9 MODE Red 10 EVENT2 G...

Page 142: ...nnector at the receiver end The male DB9 connector at the other end is provided to plug into your user supplied equipment please refer to your modem or radio transmitter user guide for more information on its connectors The cable is approximately 2 m in length See Figure 72 This cable is RoHS compliant Figure 72 Straight Through Serial Cable Reference Description 10 DB9P male connector 11 DB9S fem...

Page 143: ...The cable is equipped with a 9 pin connector at the receiver end which can be plugged into the COM or COM2 port At the PC end a 9 pin connector is provided to accommodate a PC serial RS 232 communication port This cable is RoHS compliant Figure 73 Null Modem Cable Table 34 Null Modem Cable Wiring Note Cables may contain DEHP Connector Pin Number To DB9S 10 2 3 8 7 4 5 1 6 To DB9S 11 3 2 7 8 1 6 5 ...

Page 144: ...he accessory plug is not used the alternative wiring must also include a fuse Input is provided through the standard 12 V power outlet The output from the power adapter utilizes a 4 pin LEMO connector LEMO part number FGG 0B 304 CLAD52Z and plugs directly into the power input located on the front of the FlexPak6 This cable is RoHS compliant For alternate power sources see FlexPak6 Alternative Powe...

Page 145: ...re available from NovAtel 6 cm Veripos Apex2d d Veripos Apex2 marine subscriptions are available directly from Veripos www veripos com RT 2 1 cm 1 ppm Time to First Fix Hot 35 s Almanac and recent ephemeris saved and approximate position and time entered Cold 50 s No almanac or ephemeris and no approximate position or time Reacquisition 0 5 s L1 typical 1 0 s L2 typical 1 0 s L5 typical Data Rates...

Page 146: ...2 76 34 01 8 00 0 00 6 99 77 90 ø3 45 x14 70 16 J3201 Pin 1 J302 Pin 1 J4101 Pin 1 J201 69 45 49 45 38 99 P4001 33 43 0 00 Keepout Area Connector Side 75 05 67 15 65 33 64 71 51 59 47 32 35 77 31 30 13 37 2 85 3 56 0 00 0 00 68 81 2 41 110 17 111 13 Notes 1 Dimensions are in millimeters 2 CONNECTORS a J201 J302 MMCX receptacle Johnson P N 135 3711 201 or 135 3711 202 or equivalent b J3201 2X5 rece...

Page 147: ...Humidity MIL STD 810G Method 507 5 Procedure II 95 Random Vibration MIL STD 810G Category 24 20 Hz to 2000 Hz 7 7 g RMS and MIL STD 810G Method 514 6 Category 4 5 Hz to 500 Hz 2 3 g RMS Random Vibration OEM638V only MIL STD 810G Category 24 20 Hz to 20000 Hz 20 g RMS and MIL STD 810G Method 514 6 Category 4 5 Hz to 500 Hz 2 3 g RMS Sinusoidal Vibration IEC 60068 2 6 10 Hz to 2 kHz 5 g Bump ISO 902...

Page 148: ...e version Use only as a guide and not as absolute values In Rush Power Consumption 12 0 A for less than 60 s typical Antenna Connector MMCX female 50 nominal impedance see Figure 75 on page 146 Acceptable RF Input Level L1 122 to 87 signal dBm 161 to 141 noise dBm Hz L2 126 to 93 signal dBm 161 to 141 noise dBm Hz L Band 125 to 102 signal dBm 161 to 151 noise dBm Hz L5 E5 119 to 84 signal dBm 161 ...

Page 149: ...0 460800 or 921600 bps See Section 4 1 1 Serial Ports on Page 43 Signals supported TXD3 RXD3 RTS3 CTS3 Electrostatic discharge protection Yes COM4 Electrical format LVTTL Bit ratesb 2400 4800 9600 default 19200 38400 57600 115200 230400 460800 or 921600 bps See Section 4 1 1 Serial Ports on Page 43 Signals supported TXD4 RXD4 RTS4 CTS4 Electrostatic discharge protection Yes COM5 Electrical format ...

Page 150: ...ntrol for external VBUS switch ETHERNET Physical Layer 10 100BASE T a On power up if USERIO1 pin30 is pulled LOW or not connected COM1 will be configured as RS 232 at boot If USERIO1 pin 30 is pulled high then COM1 will be configured as RS 422 at boot as described in Section 4 1 1 Serial Ports on Page 43 b Baud rates higher than 115 200 bps are not supported by standard PC hardware Special PC hard...

Page 151: ...ulse greater than 150 ns triggers certain logs to be generated Refer to the MARK4POS and MARK4TIME logs Polarity is configurable using the MARKCONTROL command The mark inputs have pull up resistors to 3 3 V PV Position Valid Dedicated pin Output Active high Indicates a valid GNSS position solution is available A high level indicates a valid solution or that the FIX POSITION command has been set re...

Page 152: ...ent_In3 Mark3 Event_In4 Mark4 PPS VIL 0 8 VCC 3 3 V 85 C VIH 2 0 VCC 3 3 V 85 C PV VARF VOL 0 4 24 VCC 3 3 V 85 C VOH 3 0 24 VCC 3 3 V 85 C RESETIN VIL 0 8 VCC 3 3 V 85 C VIH 2 3 VCC 3 3 V 85 C A number of pins on the OEM638 card can have multiple functions Refer to the IOCONFIG EVENTINCONTROL and EVENTOUTCONTROL commands in the OEM6 Family Firmware Reference Manual OM 20000129 for details ...

Page 153: ...0 12 1 5Mbps data transfers 4 GND GND 5 USB0_D Analog IO USB0 D differential signal USB0 supports 480 12 1 5Mbps data transfers 6 GND GND 7 PPS 3 3V CMOS Output Active High b 8 Pulse Per Second Outputs one pulse per second synchronized to GNSS time 8 GND GND GND 9 VARF EVENT_OUT1 3 3V CMOS Output 8 Variable Frequency Output Outputs a user specified timing signal Can be synchronized with PPS Weak p...

Page 154: ...ntrol 25 V tolerant 21 RXD3 3 3V CMOS Input COM3 UART Signaling 3 3 V CMOS logic 22 RTS3 3 3V CMOS Output 2 COM3 UART Signaling 3 3 V CMOS logic 23 DTR2 RS232 Output DTR2 RS232 Flow Control 25 V tolerant 24 CTS2 RXD2 RS232 RS422 Input CTS2 RS232 Flow Control 25 V tolerant RXD2 RS422 Signaling 2 V differential typical 25 TXD2 TXD2 RS232 RS422 Output TXD2 RS232 Flow Control 15 V tolerant TXD2 RS422 ...

Page 155: ...GND 37 FR 3 3V CMOS Input Reserved Do not use 10 kohm pull down resistor internal to OEM638 38 ERROR EVENT_IN4 3 3V CMOS Output Input Active High 2 Error indicator Multiplexed with EVENT_IN4 software selectable pin functions 39 5V Power Output Onboard 5V supply Here for legacy support only This supply should be left floating unless used for reverse compatibility with the OEMV 3 40 EXT_LNA_PWR Powe...

Page 156: ...100 Ω differential pair 7 GNDa GND 8 ETH_LED_ACT 3 3V Open Drain Sink Active Low 8 Ethernet Activity LED indicator Connect to LED supplied from 3 3 V Do not use the ETH_BIAS to supply the LED 9 ETH_LED_SPD 3 3V Open Drain Sink Active Low 8 Ethernet Speed LED indicator Connect to LED supplied from 3 3 V Do not use the ETH_BIAS to supply the LED 10 ETH_LED_LNK 3 3V Open Drain Sink Active Low 8 Ether...

Page 157: ...ial Signal 13 CAN1 CAN IO CAN1 Differential Signal 15 CAN2 CAN IO CAN2 Differential Signal 17 CAN2 CAN IO CAN2 Differential Signal 19 GND 21 SPI1_nCS0 3 3V CMOS Output Active Low 2 Serial Peripheral Interface 1 Chip Select 0 23 SPI1_SCLK 3 3V CMOS Output 2 Serial Peripheral Interface 1 Serial Clock 25 SPI1_MOSI 3 3V CMOS Output 2 Serial Peripheral Interface 1 Master Out Slave In 27 SPI1_MISO 3 3V ...

Page 158: ...face Reserved for internal use only Not available through API These pins are NOT 3 3 V tolerant Connection to 3 3 V signals will damage the receiver 59 SDIO1_CLK 1 8V 3 0V MMC Output 12 61 SDIO1_DAT0 1 8V 3 0V MMC IO 12 63 SDIO1_DAT1 1 8V 3 0V MMC IO 12 65 SDIO1_DAT2 1 8V 3 0V MMC IO 12 67 SDIO1_DAT3 1 8V 3 0V MMC IO 12 69 GND 71 HSUSB0_UID USB IO USB0 IDentification Leave floating for normal oper...

Page 159: ...ame Signal Type Signal Direction Polarity Drive Strength mA Description The expansion connector on the OEM638 card is a Samtec BSH 050 01 L D A TR It mates with Samtec ASP 166000 01 this is a semi custom part from Samtec that provides a mated height of 14 mm The standard mating height for the OEM638 card is 14 mm Pin Signal Name Signal Type Signal Direction Polarity Drive Strength mA Description 2...

Page 160: ...NT_OUT6 3 3V CMOS Output Rising Falling Edge 8 Event Output Outputs a user specified timing signal Can be synchronized with PPS 22 GND 24 Reserved 26 EVENT_IN3 3 3V CMOS Input Rising Falling Edge Event Input Mark Input A transition on this pin is logged and time stamped Weak pull up internal to OEM638 28 nRESETOUT EVENT_IN2 3 3V CMOS Output Input Rising Falling Edge nRESETOUT output Outputs an act...

Page 161: ...CMOS IO 2 General Purpose IO no internal pull if resistor used as input 58 USERIO16 3 3V CMOS IO 2 General Purpose IO no internal pull if resistor used as input 60 USERIO17 3 3V CMOS IO 2 General Purpose IO no internal pull if resistor used as input 62 USERIO18 3 3V CMOS IO 2 General Purpose IO no internal pull if resistor used as input 64 USERIO19 3 3V CMOS IO 2 General Purpose IO no internal pul...

Page 162: ...connect to an external wide range supply input This is the preferred supply input for the wide range supply see also P4001 If 4V5_36V_INPUT is used do not connect to 3V3_EXT 96 4V5_36V_INPUT 98 4V5_36V_INPUT 100 4V5_36V_INPUT Pin Signal Name Signal Type Signal Direction Polarity Drive Strength mA Description The expansion connector on the OEM638 card is Samtec s BSH 050 01 L D A TR It mates with S...

Page 163: ...upply must self limit to 125 mA max to avoid damage to the OEM638 receiver There is no over current protection on the external LNA supply input E 1 4 Logic Level I O The OEM638 provides a number of 3 3 V Logic level I O pins for status indication communication and timing PPS Pulse Per Second VARF Variable Frequency a software configurable clock output ERROR Error indication PV Position Valid Used ...

Page 164: ... on enclosure products to show the current status of the receiver These signals may require a buffer to drive an LED An example of a suitable buffer circuit is shown below Figure 81 Example LED Drive Buffer for PV and ERROR Signals Table 39 Bill of Materials critical components Designator Manufacturer Manufacturer Part Number U202 Texas Instruments SN74LVC1G86DCK D214 D215 Semtech uClamp3304A TCT ...

Page 165: ... again additional ESD protection near the connectors for any signals leaving an enclosure is recommended A combination of a series ferrite bead and small value shunt capacitor is recommended on any RS232 RS422 lines that leave the enclosure similar to the arrangement used on the I O ports and CAN interfaces below The TVS recommended for 3 3 V CMOS level I O is unsuitable for RS232 level I O An add...

Page 166: ...should only be used when the CAN device is used at one end of the CAN bus Multiple terminations along the length of the CAN bus will degrade performance for all CAN devices on that bus Table 40 Bill of Materials critical components Designator Manufacturer Manufacturer Part Number FB204 FB207 FB215 FB218 TDK MMZ1608S800A D220 D225 NXP Semiconductor PESD1CAN 215 ...

Page 167: ...n mode choke as shown in Figure 83 Example Connecting HSUSB0 to a Micro B Type USB Connector on Page 167 may improve the radiated emissions performance Small ferrite beads ESD protection are shown on VBUS and UID lines as a contingency against radiated emissions The HSUSBx_VBUS signals are only present so that the PHY on the OEM638 may monitor activity on each bus and are required for operation al...

Page 168: ...net interface is not enabled by default and may require configuration refer to details that follow and consult the OEM6 Family Firmware Reference manual OM 20000129 for instructions on configuring the Ethernet interface and the SAVEETHERNETDATA command PHY terminations are provided on the OEM638 card and a 3 3 V output is presented to bias the Ethernet magnetics This 3 3 V bias output from the OEM...

Page 169: ...single layer routing is best and care must be taken to ensure reference planes do not change when changing layers If in doubt contact your PCB vendor for appropriate dimensions for the differential pairs Alternately discrete Ethernet magnetics may be used Ensure that the Ethernet magnetics selected meet the specifications in the table below Ensure the magnetics are no more than 15 cm 6 inches from...

Page 170: ... or antenna falls into one of these bands there are a few things that integrators can do to ensure good system performance Place radio transmitters and their associated antennas at least one meter from the GNSS antenna and OEM638 card for example a cellular radio antenna Provision for RF shielding over all high speed digital logic circuitry even if the design meets the required emissions regulatio...

Page 171: ...144 01017663 USB A to mini B Cable 60323078 Part Description NovAtel Part Optional NovAtel Antennas Model 702 L1 L2 GPS 702 Model 701 L1 only GPS 701 Model 702L L1 L2 L Band B1 BeiDou GPS 702L Model 702GG L1 L2 GLONASS GPS 702 GG Model 701GG L1 GLONASS GPS 701 GG Model 703GGG L1 L2 L5 GPS L1 L2 L3 GLONASS B1 B2 BeiDou E1 E5a b Galileo GPS 703 GGG Model GPS 704 GPS L1 L2 L5 Galileo E1 E5a E5b E6 an...

Page 172: ... ST SM1 P1101 2 x 10 header 2 mm pitch Samtec TMM 110 03 G D OEM617D card Figure 9 on page 29 J100 J101 MMCX jack receptacle Johnson 135 3701 201 Samtec RSP 149374 01 OEM628 card Figure 10 on page 29 J100 J101 MMCX jack receptacle Johnson 135 3701 201 Samtec RSP 149374 01 P1500 2x12 header 2 mm pitch Samtec TMM 112 03 G D P1502 2x8 header 2 mm pitch Samtec TMM 108 03 G D OEM638 card Figure 11 on p...

Page 173: ...nded themselves via wrist straps and mats Boards or components should never come in contact with clothing because normal grounding cannot dissipate static charges on fabrics A circuit board must be placed into a static shielding bag or clamshell before being removed from the work location and must remain in the protective enclosure until it arrives at a static controlled repair test center Circuit...

Page 174: ...placement circuit board from the static shielding bag or clamshell and insert it into the equipment 3 Place the original board into the shielding bag or clamshell and seal it with a label 4 Do not put repair tags inside the shielding bag or clamshell 5 Disconnect the wrist strap Work Surfaces formica waxed or highly resistive finished wood synthetic mats writing materials note pads and so on Floor...

Page 175: ...OM 20000128 Rev 7 May 2014 ...

Reviews: