background image

Connector Pin Assignments     B-3

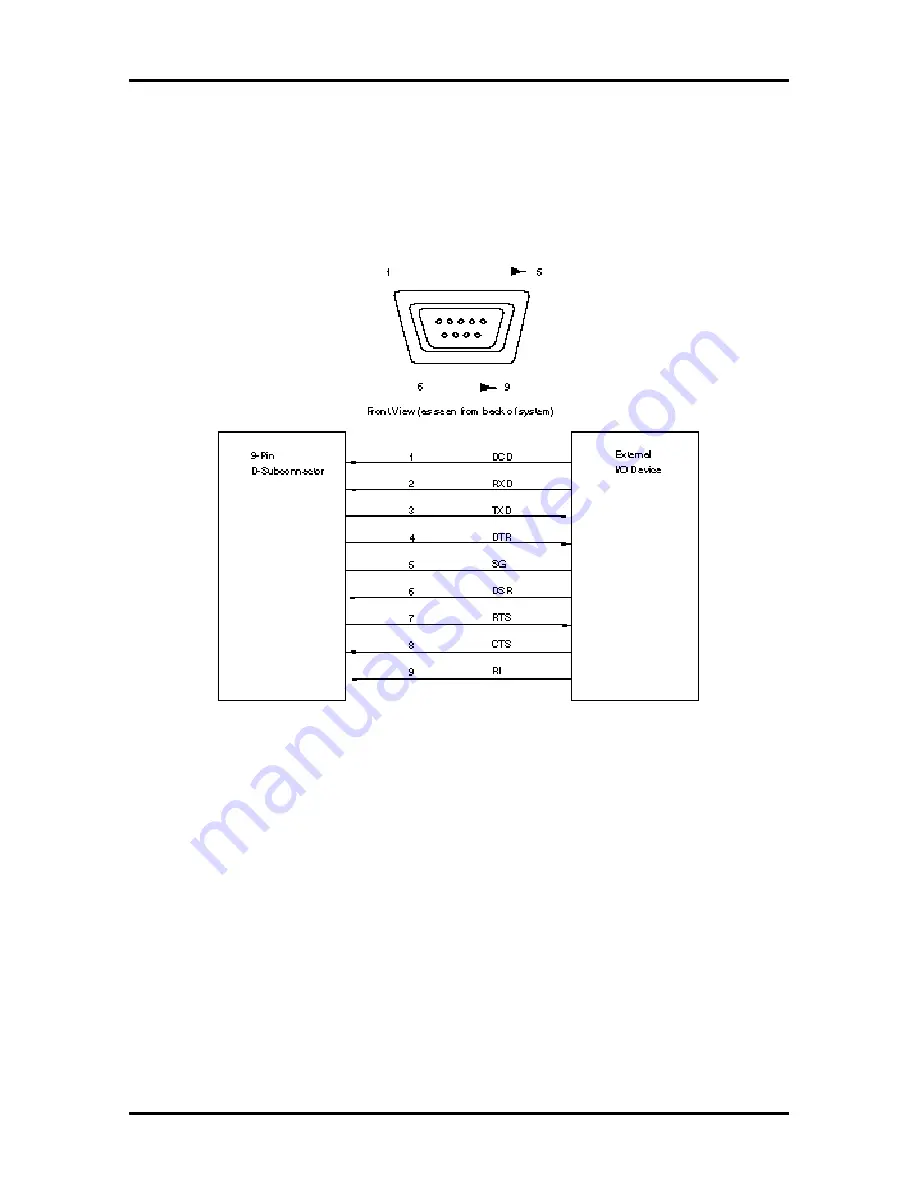
SERIAL INTERFACE CONNECTORS

Serial interface signals are output from the system board through two 9-pin COM port
connectors. The 9-pin, D-subconnectors are located at the rear of the system unit. Pin
locations and pin assignments for the two serial interface connectors are shown in
Figure Appendix B-2.

 Figure Appendix B-2   Serial Interface (P3/P5)


Summary of Contents for IMAGE P100E - SERVICE

Page 1: ...warranted in accordance with the terms of the Warranty Statement accompanying each product However actual performance of each such product is dependent upon factors such as system configuration customer data and operator control Since implementation by customers of each product may vary the suitability of specific product configurations and applications must be determined by the customer and is no...

Page 2: ...ure 1 7 Host Bus 1 8 PCI Bus 1 9 EISA Bus 1 9 XD Bus 1 9 System Memory Bus 1 9 Processor 1 9 Secondary Cache 1 10 Flash ROM 1 10 On Board Peripherals 1 12 SCSI Circuitry 1 12 IDE Controller 1 12 Video Circuitry 1 12 EISA SRAM 1 12 Real Time Clock RTC 1 13 System I O Controller 1 13 I O Mapping 1 13 NEC Proprietary Ports 1 15 Keyboard Controller Ports 1 20 System Memory 1 21 Interrupt Controller 1 ...

Page 3: ...OM Reader 1 29 Keyboard 1 29 Mouse 1 30 Section 2 Setup and Operation Unpacking and Repacking 2 1 Setup 2 2 Power On 2 4 Setting System Parameters 2 5 Setup Utility 2 6 How to Start Setup 2 7 How to Use Setup 2 7 Menu Bar 2 8 Legend Bar 2 9 Item Specific Help Window 2 10 General Help Window 2 10 Main Menu Options 2 10 IDE Adapters 2 12 Memory Cache 2 14 Memory Shadow 2 14 Boot Sequence 2 15 Numloc...

Page 4: ...guring Expansion Devices 2 29 EISA Configuration Utility 2 32 The ECU 2 32 When to Use the ECU 2 33 How to Load the ECU 2 33 How to Use the ECU 2 34 Configure Computer or Peripheral Devices 2 35 Advanced Menu 2 41 PCI IDE Controller 2 42 PCI SCSI Controller and SCSI Termination 2 43 Shadowing and Caching Features 2 43 Set Date and Time 2 44 Maintain System Configuration Diskette 2 44 Exit 2 45 PCI...

Page 5: ... Installation 3 7 Dual Processor Troubleshooting 3 12 SIMM Configurations 3 12 SIMM Installation 3 16 SIMM Troubleshooting 3 19 Installing Optional Storage Devices 3 20 Device Slots 3 20 Diskette Drive Options 3 21 Diskette Drive Settings 3 21 Hard Disk Drive Options 3 22 Hard Disk Drive Settings 3 22 IDE Hard Disk Settings 3 22 SCSI Device Settings 3 24 5 1 4 Inch Device Installation 3 28 Front P...

Page 6: ...OS Update Utility 4 3 Error Messages 4 5 Asset Management Identification 4 5 Maintenance 4 7 Routine Checks 4 7 System Unit Cleaning 4 7 Keyboard Cleaning 4 8 Mouse Cleaning 4 9 Troubleshooting 4 10 Diagnosing and Solving Problems 4 10 Diagnostic Output and Beep Codes 4 14 Disassembly and Reassembly 4 18 Top Cover Removal 4 19 Expansion Board Removal 4 21 Front Panel Assembly Removal 4 22 Power Bu...

Page 7: ...ions A 5 CD ROM Specifications A 7 Appendix B Connector Pin Assignments Serial Interface Connectors B 3 Parallel Interface Connector B 4 VGA Interface Connector B 5 Power Supply Connectors B 5 Speaker Connector B 6 Keyboard and Mouse Connectors B 6 Power Lamp Connector B 6 Hard Disk Drive Busy Lamp Connector B 7 Fan Connector B 7 Reset Button Connector B 7 Diskette Drive Interface Connector B 8 ID...

Page 8: ...r 3 10 3 8 Installing the Heat Sink 3 11 3 9 Memory Expansion Board SIMM Banks 3 13 3 10 Memory Expansion Board Removal 3 16 3 11 Notched End of SIMM 3 16 3 12 Inserting the SIMM 3 17 3 13 Memory Expansion Board Installation 3 18 3 14 Accessible Storage Device Slot Locations 3 20 3 15 3 1 2 Inch 1 44 MB Diskette Drive 3 21 3 16 5 1 4 Inch 1 2 MB Diskette Drive 3 22 3 17 1 GB IDE Hard Disk Drive Ju...

Page 9: ... Screws 4 22 4 7 Power Button Tabs 4 23 4 8 Slot Cover Removal 4 24 4 9 Metal Cover Plate Removal 4 25 4 10 Speaker Tabs 4 26 4 11 Memory Expansion Board Removal 4 27 4 12 SIMM Removal 4 28 4 13 Removing the Device Cage Screws 4 29 4 14 5 1 4 Inch Device Screws 4 30 4 15 3 1 2 Inch Hard Disk Drive Cables 4 31 4 16 Removing 3 1 2 Inch Drive Cage Screws 4 32 4 17 3 1 2 Inch Hard Disk Drive Screws 4 ...

Page 10: ...mory Cache Parameters 2 14 2 5 Memory Shadow Parameters 2 15 2 6 Boot Parameters 2 15 2 7 Numlock and Keyboard Parameters 2 16 2 8 Integrated Peripherals Parameters 2 18 2 9 Monitor Types 2 19 2 10 Advanced Chipset Control Parameters 2 20 2 11 Plug and Play Parameters 2 22 2 12 PCI Device Parameters 2 22 2 13 Large Disk Parameters 2 23 2 14 System Security Parameters 2 24 2 15 Edit Supervisor Info...

Page 11: ...100E Options 4 42 4 9 Image P90E P100E Documentation and Packaging 4 43 A 1 System Unit Specifications A 1 A 2 Power Supply Input Requirements A 3 A 3 Power Supply Output Specifications A 3 A 4 Specifications for Diskette Drives A 3 A 5 Specifications for 1 GB Hard Disk Drives A 5 A 5 Specifications for 2 GB Hard Disk Drives A 6 A 7 Quad Speed IDE CD ROM Specifications A 7 B 1 System Board Connect...

Page 12: ...B 10 IDE Connector J30 J32 Pin Assignments B 9 B 11 SCSI 2 Port J14 Pin Assignments B 10 B 12 SIMM Socket Pin Assignments B 11 B 13 IMA Connector J38 Pin Assignments B 12 B 14 PCI Expansion Slot Pin Assignments B 12 ...

Page 13: ... configuration system password and the computer s jumper settings including the factory default settings Section 3 Options provides the user with installation and troubleshooting information for each specific option Section 4 Troubleshooting and Repair includes a list of NEC service information and telephone numbers that provide access to the NEC Bulletin Board System BBS FastFacts and Technical I...

Page 14: ...wledge DC direct current DIP dual in line package DLAB Divisor Latch Address bit DMA direct memory access DMAC DMA controller DOS disk operating system DRAM dynamic RAM DTE data terminal equipment ECC error checking and correction EGA Enhanced Graphics Adapter EISA Extended Industry Standard Architecture E mail electronic mail EPA Environmental Protection Agency EPROM erasable and programmable ROM...

Page 15: ...uit board PCI Peripheral Component Interconnect PFP plastic flat package PIO programmable input output pixel picture element PLCC plastic lead chip carrier PLL phase lock loop p p peak to peak PPI programmable peripheral interface PPB PCI to PCI Bridge PROM programmable ROM QFP quad flat pack RAM random access memory RAMDAC RAM digital to analog RAS row address strobe RGB red green blue RGBI red g...

Page 16: ...Abbreviations xix ...

Page 17: ...s and five expansion slots The storage device slots accommodate a standard 3 1 2 inch diskette drive plus two internal 3 1 2 inch slots configured as follows n one 3 1 2 inch x 1 0 inch device bay n one 3 1 2 inch x 1 6 inch device bay In addition the system unit supports three 5 1 4 inch accessible storage devices 1 6 inch height System configurations are available with a 3 1 2 inch diskette driv...

Page 18: ...rd contains the computer s processing and peripheral control circuitry as well as the sockets for connecting memory and peripheral devices Features of the system board are listed as follows n Pentium 90 MHz Image P90E or 100 MHz Image P100E processor n support for dual processor option System Unit Mouse Power Cord Keyboard ...

Page 19: ... KB instructions integrated on the Pentium processor n 256 KB synchronous secondary cache in single processor configurations n high bandwidth PCI local bus supports burst modes that send large chunks of data across the bus allowing fast displays of high resolution images eliminates data bottlenecks maintains maximum performance at high clock speeds provides clear upgrade path to future technologie...

Page 20: ...econd 32 bit wide data transfers on the high performance PCI local bus n high performance EISA bus with full bus mastering capability supports 33 MB per second burst mode data transfer rate increasing the speed of I O operations which is very important for configurations with multiple storage devices supports up to four EISA devices installed in system board s EISA expansion slots allows maximum s...

Page 21: ... of the system board s switches and jumpers See Appendix B Connector Pin Assignments for a list of the system board connectors Table Section 1 1 System Board Chips Chip Description Intel Pentium 90 or 100 MHz processor 28F020 256k x 8 flash ROM Intel Neptune II PCI EISA Chip Set S82434NX PCI cache and memory controller PCMC S82433NX Local bus accelerators LBXs S82375SB PCI EISA bridge component PC...

Page 22: ...rol and PCI bus control An integrated cache controller supports 256 KB of synchronous SRAM The PCMC supports up to 256 MBs of cacheable system memory The PCI controller enhances system memory performance by allowing for concurrency between the CPU bus and the PCI bus For further details refer to the Intel Neptune II PCMC and LBX Component Specification Local Bus Accelerators LBXs Two LBXs are used...

Page 23: ...PCEB by implementing such system functions as the Timer Counter DMA and interrupt controllers and EISA subsystem control functions such as the Bus Controller and Bus Arbiter Interrupt level assignments are provided later in this section see Interrupt Controller For further details refer to the Intel EISA System Component ESC Specification Bus Architecture The interconnection of the major system co...

Page 24: ...trol circuitry The host bus interfaces the processor to the PCI cache and memory controller PCMC the local bus accelerators LBXs and the secondary L2 cache Host bus cycles are initiated by ADS signals from the processor and terminated by BRDY signal from the PCMC All host bus cycles are monitored by the PCMC and directed to the cache system memory or the PCI bus ...

Page 25: ...the XD bus instead of the EISA bus In this case the access still occurs on the EISA bus but if the access is a read I O or memory the ESC enables the XD bus peripheral to drive the lower 8 bits of the EISA data bus SD 7 0 System Memory Bus The system memory bus consists of 11 bits of row column addresses MA 10 0 that are buffered to address banks 0 1 2 and 3 Each bank consists of two SIMMs The PCM...

Page 26: ...on cacheable portions of memory are defined by software The cache can be cleared by software instructions Flash ROM Machine language programs known as the system s basic input output system BIOS are stored in a 256K x 8 Flash ROM chip 28F020 PLCC mounted on the system board The system BIOS EISA extensions PCI extensions Automatic Configuration Unit ACU loader and Video BIOS reside in the upper 64K...

Page 27: ...e EC5B7 FFFFF remainder of BIOS Subject to change without notice May be reclaimed for DOS UMB s include E000 E4FF Flash ROM supports the reprogramming of the system and built in video BIOS The Flash part can be accessed in 128K granularity for ROM reads and 64K granularity for flashing NEC Port 0C12h bits 6 and 7 map each of the four 64K byte chunks of the ROM to the FXXXX range ACU access is cont...

Page 28: ...ows connection to SCSI compatible peripherals such as high capacity floppy drives tape drives and CD ROMs The AIC 7850 can support data transfer rates of up to 10 MBs per second For further information refer to the Adaptec AIC 7850 data manual IDE Controller The CMD PCIO640B IDE controller supports up to four IDE hard disks The PCIO640B supports both primary and secondary IDE devices Automatic sen...

Page 29: ...iskette drives is sensed automatically The existence of an EISA floppy controller is also automatically sensed If the BIOS detects an EISA floppy controller the on board floppy controller is disabled The on board floppy controller can also be disabled via Setup for diskless workstations However if there is no bootable device available the system BIOS will attempt to boot from the built in floppy e...

Page 30: ...Keyboard controller R W 0061 0070 NMI mask Real time clock RTC ESC R W W 0071 007F RTC RTC bq4287 R W 0080 008F DMA page register ESC RW W 00A0 00A1 Interrupt controller 2 ESC 00A0 00A1 R W 00C0 00DE DMA controller 2 ESC R W 00F0 Reset IRQ13 ESC W 01F0 01F7 Hard disk control System I O controller R W 0278 027A Parallel port 3 System I O controller R W 02F8 02FF Serial port 2 System I O controller ...

Page 31: ...ol TRC PCMC R W 0CFA Forward register PCMC R W 0CFB PCI mechanism control PMC PCMC R W 0CFC Configuration data PCMC R W Determined by PCEB BTMR configuration register BIOS timer PCEB R W 0C00 Configuration SRAM page register ESC R W NEC Proprietary Ports The ESC is programmed to drive the GPCS0 output active when a read or write is done to I O 0C40h 0C41h 0C42h or 0C43h NEC ports are accessed by g...

Page 32: ...AEN4 Off R W 0 Disables AEN4 1 Enables AEN4 4 AEN5 Off R W 0 Disables AEN5 1 Enables AEN5 5 AEN6 Off R W 0 Disables AEN6 1 Enables AEN6 6 Vclock R W Used to clock data to from video monitor per I2 C protocol 7 VData_In R VData_Out W Data read written from to the monitor per I2 C protocol 0 1 2 3 4 5 6 7 VDATA_IN VDATA_OUT VCLOCK AEN6 OFF AEN5 OFF AEN4 OFF AEN3 OFF AEN2 OFF AEN1 OFF ...

Page 33: ...second serial port 1 Disables second serial port 5 Second Serial Port IRQ Select R W 0 Selects IRQ 3 1 Selects IRQ 11 6 First Serial Port Enable R W 0 Enables first serial port 1 Disables first serial port 7 First Serial Port IRQ Select R W 0 Selects IRQ 4 1 Selects IRQ 10 NEC port 0C12h 0 1 2 3 4 5 6 7 1st Serial Port IRQ Select 1st Serial Port Enable 2nd Serial Port IRQ Select Parallel Port IRQ ...

Page 34: ...isables the ability to write to port 0C12h until machine has power cycled off and on 3 Floppy Write Off R W 0 Disables writing to floppy drive 1 Enable writing to floppy drive default 4 Password Read only Connected to a switch 0 Disables password security 1 Enables password security default 5 VEN R W 0 Enables the DDC video circuitry 1 Disables the DDC video circuitry 0 1 2 3 4 5 6 7 RPG0 RPG1 VEN...

Page 35: ...000 to FFFFF NEC port 0C13h 0 CMOS Clear Read only Connected to a switch SW4 1 0 Requests BIOS to clear CMOS 1 Normal read of CMOS 1 CPU Speed Read only Connected to a switch SW4 2 0 equals 60 MHz host bus frequency default for Image P90E 1 equals 66 MHz host bus frequency default for Image P100E 2 Not Used Read only Connected to a switch SW4 3 3 and 4 Not Used Read only 0 1 2 3 4 5 6 7 Cache Modu...

Page 36: ...hoenix Technologies Limited PTL extended commands Bit 0 Output buffer full A byte is present in the output buffer when this bit is set Bit 1 Input buffer full A byte is present in the keyboard controller input buffer when this bit is set Bit 2 System flag When this bit is set the system is in a run time state When clear hardware reset the system is in a cold boot state The BIOS uses this bit to se...

Page 37: ... single in line memory modules SIMMs installed in SIMM sockets on the memory expansion board The memory expansion board consists of eight SIMM connectors organized into four banks All system memory supports parity Memory shipped with the system is comprised of two 2 MB x 36 bit DRAM SIMM modules which is 2 x 8MB The first megabyte includes the standard 640 KB of base memory The remaining memory is...

Page 38: ...gured at any time during system operations The interrupt levels are listed in Table Section 1 5 Interrupt level assignments 0 through 15 are in order of decreasing priority See Section 2 Setup and Configuration for information on changing the interrupts using Setup Table Section 1 5 Interrupt Level Assignments Interrupt Priority Interrupt Device IRQ00 Counter Timer IRQ01 Keyboard IRQ02 Cascade INT...

Page 39: ...or transferring data between the processor and I O peripherals and expansion boards EISA connectors J22 through J25 allow installation of both EISA and ISA expansion boards The EISA architecture is fully downward compatible with ISA hardware and EISA boards unlike ISA boards require no jumper settings They are configured through software A 6264LP 8K x 8 SRAM is used to configure the EISA bus This ...

Page 40: ...erformance EISA DMA devices can be programmed for high performance data transfers using one of four DMA cycle types Compatible cycles the default supply a higher data transfer than ISA The improvement is the result of EISA faster bus arbitration Type A and type B cycles permit some ISA compatible DMA devices to achieve an even higher performance level The Burst DMA cycle type C provides the highes...

Page 41: ...and ISA compatible devices to communicate EISA data and control signals are generated by the bus master or slave This lets the system board copy the data to the appropriate byte lanes and translate the control signals Automatic translation is provided by the system board for DMA devices and 16 and 32 bit EISA devices EISA s centralized arbitration scheme allows efficient bus sharing among multiple...

Page 42: ...t can can be configured as EPP ECP or PS 2 compatible The BIOS has automatic EISA printer port sensing If the BIOS detects an EISA printer port mapped to the same address the built in printer port is disabled The BIOS also sets the first parallel interface port it finds as LPT1 and the second port it finds as LPT2 The interrupt is selected to either IRQ5 or IRQ7 via the Setup Interrupt levels for ...

Page 43: ...the I O controller supports the mapping of any of these logical ports to either physical port Additionally each serial port can be independently disabled It is the responsibility of the system BIOS to ensure that the base address or interrupt request line used by a serial port is not used by the EISA bus or conflicts will result Table Section 1 8 Serial Port Addressing and Interrupts Base I O Addr...

Page 44: ... cable To install a second optional diskette drive a single ribbon cable with two drive connectors must be installed in place of the single connector cable The dual connector cable option is available from NEC see Section 4 The system refers to the diskette drives as A and B Drive A is for the first drive B is for the second optional diskette drive Typically both diskette drives are terminated See...

Page 45: ...OM Reader KEYBOARD The PS 2 style keyboard is standard equipment for the system The keyboard provides a numeric keypad separate cursor control keys and 12 function keys capable of up to 48 functions Status lamps on the keyboard indicate Num Numeric Lock Caps Capital Lock and Scroll Lock key status The keyboard s six pin connector is plugged into the rear of the base unit The PS 2 style keyboard co...

Page 46: ...PACKING AND REPACKING Find an area away from devices that generate magnetic fields electric motors transformers etc Place the carton on a sturdy surface and carefully unpack the system The carton contents include the system unit keyboard mouse power cord user documentation and system setup utility diskette s Repack the system using the original shipping carton and packing material Part numbers for...

Page 47: ... switch to 115V or 230V and insert the power cord into the power socket see Figure Section 2 1 CAUTION The correct AC input voltage must be properly set Select the appropriate voltage with the voltage selector switch located at the rear of the system Figure Section 2 1 Voltage Selector Switch System Power Socket Voltage Selector Switch ...

Page 48: ... 2 3 Connect the monitor and any other peripherals to the rear panel see Figure Section 2 2 Detailed monitor connections are given in Section 3 Options Figure Section 2 2 Peripheral Connections Mouse Port Keyboard Port Serial Port 1 Serial Port 2 VGA Monitor Connector External SCSI 2 Connector Parallel Printer Port ...

Page 49: ...s may occur If this happens repeatedly after powering on the system power off the system and see Section 4 for troubleshooting NOTE If the system displays a message indicating that system settings have changed run Setup see Setting System Parameters If a problem occurs and is not indicated by beeps check the following items then turn to Section 4 for troubleshooting Check that n the power switch f...

Page 50: ... ships from the factory with the correct system parameters for your configuration Unless you add optional hardware you do not need to run the Setup ECU or SCSI Select utilities to operate your system However you might wish to run Setup to set features that customize your system such as time date and security The system ships from the factory with the correct system configuration for each system Sy...

Page 51: ... n check or update the system s boot sequence n check or update keyboard settings n check the installation of optional memory by comparing the amount of memory installed with the amount of memory displayed by Setup n customize your system with security features such as Supervisor and user login IDs and passwords n correct a hardware discrepancy when the Power On Self Test POST displays an error me...

Page 52: ...e the top line of the Main Menu This line displays the Setup utility name and copyright message n The menu bar the line under the Setup title line The menu bar contains five top level menus for setting system parameters PhoenixBIOS Setup Copyright 1985 94 Phoenix Technologies Ltd Main Advanced Security Exit System Time 10 19 20 Item Specific Help System Date 11 12 1994 Diskette A 1 44 MB 3 Tab Shi...

Page 53: ...enu bar at the top of the Main Menu window lists these menus n Main Use this menu for basic system configuration For example select Main to set the system time system date diskette drives and video parameters Use this menu to check memory parameters n Advanced Use this menu to set serial port and printer port addresses and interrupts to enable disable the system s diskette drive controller and dua...

Page 54: ...next or previous page F5 or Selects the Previous Value for the field F6 or or Space Selects the Next Value for the field F9 Loads the Default Configuration values for this menu F10 Loads the Previous Configuration values for this menu Enter Executes Command or Selects submenu Alt R Refreshes screen n Selecting a Menu Item To select a menu item use the arrow keys to move the cursor to the desired f...

Page 55: ...indow Use Page Up and Page Down to display all the pages Pressing Home and End displays the first and last page Press Esc to exit the current window and return to the main menu Main Menu Options Table Section 2 2 lists and describes the available parameters when the Main menu is selected in the legend bar Parameters that can be changed directly from the Main Menu have a right pointing triangle nex...

Page 56: ...nfigures the IDE adapter This submenu is described in detail in the following subsections IDE Adapter 1 Slave Autotype fixed disk Type Multi sector transfers Configures the IDE adapter This submenu is described in detail in the following subsections Video System Monochrome EGA VGA default CGA 80x25 Selects the default video monitor Memory Cache External cache Cache system BIOS area Cache video BIO...

Page 57: ...sters 2 Masters 1 Slave 2 Masters 2 Slaves The master slave combination for configurations with an IDE hard disk is 1 Master If adding a hard disk to the primary IDE port the combination becomes 1 Master 1 Slave Jumper settings on the IDE device set the device to master or slave see the documentation that comes with the device Select the IDE Adapter option configuration directly from the Main Menu...

Page 58: ...eometry at power on Cylinders 1 to 2099 Specifies number of cylinders Heads 1 to 16 Specifies number of read write heads Sectors Track 1 to 63 Specifies number of sectors per track Write Precomp 0 to 512 None Specifies number of the cylinder at which to change the write timing Multi Sector Transfers 2 4 8 16 Sectors Specifies number of sectors in multi sector transfers 8 is recommended LBA Mode Co...

Page 59: ...bled Controls caching of system BIOS area Cache Video BIOS Area Enabled default Disabled Controls caching of video BIOS area Cache Memory Regions C800 CBFF CC00 CFFF D000 D3FF D400 D7FF D800 DBFF DC00 DFFF Enabled Enabled Disabled Disabled Disabled Disabled Determines configuration of specified block in upper memory Disabled default shadow memory not cached for this region Enabled shadow memory is...

Page 60: ... and exit to the Main Menu Use Table Section 2 6 to select the boot sequence parameters Table Section 2 6 Boot Parameters Parameters Options Description Boot sequence A then C default C then A C only The BIOS attempts to load the operating system from the disk drives in the sequence selected here Setup prompt Enabled default Disabled Displays Press F2 for Setup during bootup POST errors Enabled de...

Page 61: ...ns NumLock on if it finds a numeric keypad Key click Enabled Disabled default Turns audible key click on or off Keyboard auto repeat rate 30 sec default 26 7 sec 21 8 sec 18 5 sec 13 3 sec 10 sec 6 sec 2 sec Selects key repeat rate Keyboard auto repeat delay 1 4 sec 1 2 sec default 3 4 sec 1 sec Sets the delay time after the key is held down and before it begins to repeat the keystroke ...

Page 62: ...f you have UNIX Novell Netware or other operating system The following subsections describe Advanced Menu options NOTE Accessing the Advanced menu might require a Supervisor password Parameters that can be modified directly from the Advanced menu do not have the right pointing triangle to the left of the parameter name These parameters can be modified by pressing the F5 F6 or keys Parameters with ...

Page 63: ...rated Peripherals Parameters Feature Options Description Serial port 1 Serial port 2 Disabled User selectable settings Auto Defaults COM1 3F8 IRQ4 COM2 2F8 IRQ3 Selects a unique address and interrupt request for the listed COM ports Auto selects the next available combination Use the and key to move between fields Parallel port Disabled 378 IRQ 7 default User selectable settings Auto Selects a uni...

Page 64: ...use of the VGA connector When enabled VGA DAC writes Go to the option board s DAC and not to the onboard VGA s DAC Be sure to connect the monitor to the option board s video connector Table Section 2 9 Monitor Types Type 1 Default Type 2 Type 3 Type 4 Resolution NOTE When setting the monitor resolution in Windows the Auxiliary Windows Drivers force default refresh rates equivalent to a Type 1 moni...

Page 65: ...PCI Write Buffer Enable Disable Enables CPU to PCI Write Buffer allowing data to be temporarily stored in buffer before writing data PCI to DRAM Write Buffer Enable Disable Enables PCI to DRAM Write Buffer allowing data to be temporarily stored in buffer before writing data CPU to DRAM Write Buffer Enable Disable Enables CPU to DRAM Write Buffer allowing data to be temporarily stored in buffer bef...

Page 66: ...g and play operating system O S With this support the system automatically configures newly added ISA Plug and Play cards You only need to install the board and boot the system The system automatically allocates resources to the board Plug and Play boards are industry standard architecture ISA boards with Plug and Play capability You can enable Plug and Play directly from the Advanced menu using t...

Page 67: ... Plug and Play operating systems PCI Device Parameters Select the PCI Devices parameter if you need to allocate I O resources see Table Section 2 12 The combed I O resource allocation parameter default setting is disabled The parameter should be enabled only when a non plug and play board is not working due to I O space resource conflicts This is particuliarly true for older boards using 10 bit I ...

Page 68: ...e than 1024 cylinders more than 16 heads or more than 63 tracks per sector Security Menu Selecting Security from the Main Menu displays a menu with system security options NOTE The Setup program can be entered with either a User or Supervisor password However more Setup choices are available with the Supervisor password Parameters that can be modified directly from the Security menu do not have th...

Page 69: ...e Table Section 2 15 Selects security options associated with user login Unattended Boot Enabled Disabled default Selecting enabled allows the system to enter the network mode if no login ID is typed within 15 seconds Diskette Access User default Supervisor User Write Protected Sets access privileges to the diskette drive Fixed Disk Boot Sector Normal default Write Protect Enables or write protect...

Page 70: ...equired in Password Yes No Defines if numbers are required in password Password Lifetime 1 to 511 days Sets maximum permitted lifetime of password Minimum Password Change 0 to 255 days Sets minimum period between password changes Expired Password Life 0 to 127 days Sets maximum period that an expired password may be used Pressing Enter at the Edit Supervisor Login parameter on the menu displays a ...

Page 71: ...s the number of characters allowed in the password Numbers Required in Password Yes No Defines if numbers are required in password Password Lifetime 1 to 511 days Sets maximum permitted lifetime of password Minimum Password Change 0 to 255 days Sets minimum period between password changes Expired Password Life 0 to 127 days Sets maximum period that an expired password may be used Pressing Enter at...

Page 72: ...mory CMOS is sustained by an onboard battery and stays on after the system is powered off After saving the selections the program displays this message Changes have been saved continue Pressing Enter at Continue exits Setup and reboots your system A prompt appears if you attempt to exit without saving During bootup Setup attempts to load the values saved in CMOS If the values saved in CMOS cause t...

Page 73: ...ult values already loaded into the menus Other changes can be made before saving the values to CMOS Load Previous Values During a Setup session if a mistake has been made and has not yet been saved to CMOS the previously saved CMOS values can be restored Selecting Load Previous Values on the Exit menu updates all the selections and displays this message Previous values have been loaded continue Sa...

Page 74: ...heck or change your configuration see Configure Computer or Peripheral Devices Step 3 View or Edit Details in this section 6 Save your changes and exit the ECU utility see Configure Computer or Peripheral Devices Step 5 Save and Exit in this section PCI Expansion Device 1 Install move or remove the device in your system see Section 3 for procedures 2 If you need to allocate I O resources open the ...

Page 75: ...uration see Configure Computer or Peripheral Devices Step 3 View or Edit Details in this section 6 Save your changes and exit the ECU utility see Configure Computer or Peripheral Devices Step 5 Save and Exit in this section Non Plug and Play ISA Board 1 Load the ECU utility see How to Load the ECU in section Note do not install move or remove the non Plug and Play board in your system until after ...

Page 76: ...SI 2 expansion device in your system see Chapter 3 for procedures 3 Open the SCSI utility see the SCSI Select Utility subsection at the end of this section 4 Select SCSI Disk Utilities to review what SCSI devices are currently installed and to set the SCSI ID on any optional device you installed 5 Select Configure View Host Adapter Settings from the SCSI Select utility menu see SCSI Select Utility...

Page 77: ...scribes the characteristics and the required system resources of the board to create a conflict free configuration Once you complete the configuration process configuration information is saved to the system s nonvolatile memory for use any time you power on the system The ECU includes the following features n Supports EISA and ISA boards PCI devices and Plug and Play boards n Automatically detect...

Page 78: ...plays an Invalid EISA Configuration Storage RUN ECU error message and prompts you to run the ECU program n boot the system and check parameters when you have a problem booting the system n change functions and resources of boards installed in the system n resolve a resource conflict when adding a board or changing a board function or resource n lock and unlock boards in the configuration n maintai...

Page 79: ...of Main Menu options and how to use them Options are described in the sequence that they appear on the Main Menu NOTE For your system configuration you might not need to use all of the selections listed under each Main Menu option Read the infor mation in the following subsections to select the options you need NOTE It is strongly recommended that you make a backup copy of the ECU diskette and any...

Page 80: ...SA board and you select Configure Computer or Peripheral Devices the ECU might display an Automatic Add screen with a request for a configu ration CFG file The ECU displays this screen if it needs a configuration CFG file for the installed board If the screen appears remove the ECU diskette and insert the diskette containing the CFG file Press Enter and follow the screen prompts to automatically a...

Page 81: ...e the system configuration and exit the utility NOTE If you are setting up the system for the first time you must select Step 3 even if you did not install an expansion board This step config ures the system board in your system The following subsections describe each of the configuration steps in sequence 1 Step 1 Important EISA Configuration Information Select Step 1 for information about using ...

Page 82: ...rated on board PCI SCSI IDE and VGA controllers are listed as Embedded controllers at the bottom of the list of expansion slots You cannot move or remove an embedded feature but you can enable or disable the feature see Step 3 View or Edit Details To complete the Step 2 configuration process use the following steps 1 Select Step 2 Add or remove boards from the Configure Computer or Periph eral Dev...

Page 83: ...ot use the next step to add ISA boards without configuration files To add an ISA board without configuration files see ISA Boards without CFG Files 2 Highlight the slot location of the installed board and press Insert to add the board The Add screen appears 3 Remove the ECU diskette from the diskette drive and insert the diskette with the board s CFG file 4 Press Enter The Add configuration CFG fi...

Page 84: ...iguration procedure Before you exit note information you might need to change settings or install boards To print out any configuration information about the board select Step 4 Examine Required Switches Repeat steps 1 through 9 in the above procedure to add another board 3 Step 3 View or Edit Details Select Step 3 to configure your system when you are setting up the system for the first time and ...

Page 85: ...ory Region DC00 Shadow Video BIOS area Shadow Memory Region 800 Shadow Memory Region CC00 Shadow Memory Region D000 Shadow Memory Region D400 Shadow Memory Region D800 Shadow Memory Region DC00 Enabled Enabled Enabled Disabled Disabled Disabled Disabled Enabled Disabled Disabled Disabled Disabled Disabled Disabled Embedded PCI SCSI Controller Adaptec 7850 PCI SCSI Controller Disabled enabled for S...

Page 86: ...w and in some cases to edit parameter re sources for example interrupts I O addresses or I O ports press F6 4 When you are through viewing and changing parameter settings press F10 to exit the Step 3 View or edit details procedure NOTE Print options for printing the required settings of a particular board or option are avail able through Step 4 on the Configure Computer or Peripheral Devices menu ...

Page 87: ...g submenu to display detailed information about system specifications and resources Board specification System specification Used resources Available resources n Set verification mode menu allows you to specify whether the computer s con figuration must be checked each time you make a change or only when you choose NOTE Selecting Manual Mode may cause conflicts that prevent the system from booting...

Page 88: ...Utility later in this section Shadowing and Caching Features The shadowing and caching features should be left enabled 4 Step 4 Examine Required Switches Select Step 4 to view any required switch and jumper settings on installed boards To view the required settings highlight the board you wish to view and press Enter NOTE To check the current settings of a board you must physically verify the sett...

Page 89: ...ystem Configuration Diskette Select this option to create load copy or delete any necessary system configuration in formation SCI files You can also use this option to copy and delete configuration CFG files Depending on the system configuration you might want to modify the system board SCI file Before configuring the system you must copy configuration files for the EISA boards and in some cases I...

Page 90: ...U diskette 7 Repeat Steps 5 and 6 to copy all the configuration files you need onto the ECU diskette Exit Select this option to exit the EISA Configuration Utility If you are setting up the system for the first time and you have a SCSI device such as a SCSI hard disk see SCSI Setup Utility later in this section PCI Devices and Plug and Play ISA Boards Whenever you install a PCI device or Plug and ...

Page 91: ... manually create a configuration file see Using the Create CFG File Facility NOTE The ECU provides only one Generic ISA CFG file If you already used the Generic ISA CFG file see the next subsection Using the Create CFG File Facility Before you use the Generic ISA CFG file determine if a CFG file exists for the ISA board If you cannot locate a CFG file use the following procedure to configure your ...

Page 92: ...t Step 3 View or edit details Scroll through the menu items until you find the Generic ISA Adapter board 11 Using the information provided by the board manufacturer select the appropri ate Generic ISA Adapter board function For example if the board requires an IRQ setting select ISA IRQ Resource Allocation Press F6 to edit the resource When you are done editing the resource press F10 12 Repeat ste...

Page 93: ...th an arrow An arrow indicates that the boards might have jumpers and switches that you must physically verify or that a software statement with additional information about the board is provided NOTE Locking system resources for the Ge neric ISA Adapter board can cause changes to the switch and jumper settings of other boards in the system 16 Press F7 to select a print option to print the configu...

Page 94: ...A message appears telling you to locate the CFG file for the board you want to install 4 Press Enter The Select a Configuration CFG file to add screen appears 5 Press F5 to select Not Listed The Add a board without a CFG file screen ap pears 6 Select Look for CFG file The Look for CFG file screen appears Read through the information and press Enter when done The Add a board without a CFG file scre...

Page 95: ...e starting address in hexadecimal format and the length of the address in kilobytes Press Enter when you are done The Select Memory Ad dresses screen appears You can add or delete another memory address You must limit your selec tion to nine memory addresses Press F10 when you are done The New Board Setup screen reappears 10 Press F10 when you finish selecting the resources used by the board The V...

Page 96: ...ou printed any configura tion settings to a file install the diskette in a computer attached to the printer so you can print a hard copy 16 Compare the settings of the boards installed to the printout Make any changes necessary The settings on the board s must match the settings on your printout for the system to operate correctly You might need to remove a board to access its switches and or jump...

Page 97: ...vices At the SCSI Select utility opening screen position the cursor to Configure View Host Adapter Settings and press Enter to display the Configure View Host Adapter menu A screen similar to the following displays NOTE The screen shown is typical of your system The actual items on the menu depend upon the hardware installed in your system AIC 7850 at Bus Device 00 03h Configure View Host Adapter ...

Page 98: ...ze the SCSI Device Configuration Option and Table Section 2 20 summarizes the Advanced Configuration Option submenu parameters Table Section 2 19 SCSI Device Configuration Options PARAMETERs Options Description Initiate Sync Negotiation Yes default No Enables or disables the sync negotiation for each SCSI device Maximum Sync Transfer Rate 10 0 default 8 0 6 7 5 0 Sets maximum sync transfer rate fo...

Page 99: ...S support for 1 GB or larger drives BIOS Support For More Than 2 Drives MS DOS 5 0 and above Enable defualt Disable Enables or disables BIOS support for more than two drives SCSI Disk Utilities Use the SCSI Disk Utilities option to check what SCSI devices are currently installed in your system and to set the SCSI ID number on any optional SCSI devices that you may in stall At the SCSI Select utili...

Page 100: ...ecurity features that guard the system against unauthorized use These features include n asset management information at boot n audit log n login IDs during power up Asset Management Every time the system is powered up the serial number of the unit system board revision and ownership information is displayed on the screen until the operating system loads The information can be updated when the sys...

Page 101: ...being compromised The password is configurable for a term of 1 to 511 days or may be valid indefinitely Passwords can be added or deleted at boot time or while using Setup Follow the password entry with a to change the password The password can be a maximum of 14 characters can contain numbers but cannot be blank and cannot be the same as the previous password Once the login ID and password are en...

Page 102: ...jumper setting explanations follow the figure Figure Section 2 5 System Board Switches and Jumpers Switch Settings Table Section 2 21 shows the factory settings of the system configuration switch SW4 and explains the function of each position Switch SW4 System Configuration O F F 1 4 J39 VRE Enable Disable J34 Pipeline Enable disable J33 Primary Cache Write Back Write Through ...

Page 103: ...eters stored in Setup Once the setup parameters have been cleared parameters such as the date and time must be re entered Clear the CMOS as follows NOTE Clearing the CMOS is equivalent to disconnecting the battery with the power off letting the saved Setup parameters clear then re connecting the battery 1 Turn off and unplug the system and any external options CAUTION The system power must be off ...

Page 104: ...d 3 This sets the primary cache to write t0hrough Instruction Pipeline Jumper J34 J34 is used to enable or disable the instruction pipelining ability of the processor s When one processor is installed the jumper must connect pins 1 and 2 This enables the processor s ability to pipeline instruction fetching When two processors are installed the jumper must connect pins 2 and 3 This disables the pro...

Page 105: ...ipeline and Voltage Regulator Settings Configuration SW4 2 Setting J33 Cache Setting J34 Pipeline Setting J39 VRE Setting 90 MHz VR 1 CPU ON 1 2 1 2 2 3 90 MHz VR 2 CPUs ON 2 3 2 3 2 3 100 MHz VRE 1 CPU OFF 1 2 1 2 1 2 100 MHz VRE 2 CPUs OFF 2 3 2 3 1 2 ...

Page 106: ...for option installation follow these general rules n Disconnect all peripherals n When handling boards or chips touch the system unit frame to discharge static n Do not disassemble parts other than those specified in the procedure n All screws are Phillips head unless otherwise specified n Label any removed connectors Note where the connector goes and in what position it was installed WARNING Unpl...

Page 107: ...t the monitor Remove the top cover as follows 1 Power off and unplug the keyboard mouse power cord and all other peripheral cables attached to the system unit 2 Unlock the system unit top cover if locked 3 Remove the four cover screws shown in Figure Section 3 1 Figure Section 3 1 Cover Screws Screws Keylock Screws ...

Page 108: ...Options 3 3 4 Slide the top cover toward the rear about one inch see Figure Section 3 2 5 Lift the top cover up and off the system unit Figure Section 3 2 Removing the Cover ...

Page 109: ...pansion slot screw and cover see Figure Section 3 3 Save the expansion slot cover in the event the expansion board is removed in the future Figure Section 3 3 Expansion Slots 3 Install the expansion board into an expansion slot connector When installing a full size expansion board make sure that the expansion board slides into the guide rail at the front of the system unit 4 Reinstall the expansio...

Page 110: ...ged into a live properly grounded AC power outlet 2 Systematically eliminate possible shorted PCBs by removing cables and expansion boards Operating system does not boot An invalid configuration message is displayed 1 Press F2 to run the Setup and view parameters Expansion board malfunction Expansion board is not recognized 1 Reseat expansion board and cables 2 Check that pin one on cables and con...

Page 111: ...I IDE Connector Drive Diskette Power Supply Connector J17 J21 J31 Speaker J10 Fan J6 J7 Reset J4 Cache SIMM J3 SW4 Keyboard Mouse Serial Parallel SCSI Serial VGA Monitor Feature Port P1 PCI Connector 1 JA1 PCI Connector 2 JA2 EISA Connector 1 J22 EISA Connector 2 J23 EISA Connector 3 J24 EISA Connector 4 J25 RTC Battery J30 primary Connector J2 Port P2 Port 1 P5 Port 2 P3 Port P4 Connector J8 Inte...

Page 112: ... first you cannot for example install a 90 MHz upgrade kit into the Image P100E CAUTION Heatsinks are required for dual processors Heatsinks are available through NEC Install a dual processor into the system board as follows 1 Remove the top cover and any expansion boards covering the dual processor socket as previously described Turn the system unit on its side for easier access to the interior o...

Page 113: ...sor Upgrade ZIF Socket and Jumpers 3 Reset configuration jumpers J33 and J34 on the system board see Figure Section 3 6 Set the jumper blocks over pins 2 and 3 on J33 and J34 Jumper J34 Jumper J33 Processor Upgrade Socket Socket Secondary Cache ...

Page 114: ...ction 3 6 CAUTION The speed of the upgrade processor must match the speed of the factory installed processor 90 or 100 MHz n Carefully release the socket s lever by pulling it slightly away from the socket and up see Figure Section 3 7 CAUTION Before picking up the upgrade processor reduce static discharge by touching the metal frame on the system unit J34 J33 Upgrade Socket Socket Secondary Cache...

Page 115: ...Section 3 7 Figure Section 3 7 Aligning the Upgrade Processor n Insert the processor into the socket n Lock the processor in place by swinging the socket lever down towards the socket until it locks in place Dot Notched Corner of Chip Alignment Mark on System Board Locking Lever ...

Page 116: ... Heat Sink n Press down on the heat sink until the spring clip on the opposite end of the heat sink is aligned with the two tabs on the socket n Firmly press down on the heat sink until the spring clip snaps over the two tabs on the socket 6 Reconnect any cables that you may have disconnected 7 Replace any removed expansion boards 8 Turn the system unit upright and replace the top cover Tabs Sprin...

Page 117: ... 1 Press F2 to run Setup and view parameters Dual Processor malfunction Software does not see Dual Processor 1 Reseat the Dual Processor 2 Check the Setup parameters 3 Check the switch settings see Section 2 4 Replace dual processor 5 Replace system board Keyboard or mouse malfunction Monitor has prompt but cannot input data 1 Check that the keyboard and mouse are plugged in SIMM Configurations Th...

Page 118: ...Options 3 13 Figure Section 3 9 Memory Expansion Board SIMM Banks Table Section 3 3 provides valid SIMM configurations for the computer Bank 0 Bank 1 Bank 2 Bank 3 ...

Page 119: ...IMM 2Mx36 SIMM 4Mx36 SIMM 8Mx36 SIMM 16 4 72 2 4 16 2 72 4 2 2 24 6 80 2 2 24 2 2 80 4 2 32 8 80 2 4 32 4 2 80 4 4 32 4 80 6 2 32 2 88 2 2 40 2 4 88 6 2 40 2 2 88 2 2 4 40 6 2 96 2 2 48 2 2 96 6 48 6 96 4 2 48 4 2 96 4 2 2 56 2 2 2 96 4 4 56 6 2 104 2 2 2 64 2 104 2 4 2 64 4 104 2 6 64 4 2 112 2 2 2 64 8 112 4 2 2 72 2 2 112 6 2 ...

Page 120: ...92 4 4 144 2 4 200 2 6 144 4 4 208 2 6 144 2 4 2 224 2 6 256 8 SIMM Installation Install SIMM sticks into the memory expansion board as follows CAUTION Before handling a SIMM discharge any static electricity by touching the metal frame on the system unit Always hold a SIMM by its edges Avoid touching the components on the SIMM 1 Remove the top cover as previously described 2 Remove the two screws ...

Page 121: ...y expansion board connector at location J9 see Figure Section 3 4 4 Set the memory expansion board on a non conductive surface 5 Install the SIMM as follows n Locate the notched end of the SIMM see Figure Section 3 11 Figure Section 3 11 Notched End of SIMM Screws Memory Expansion Board Bracket Bar Underside of Bracket Bar Notch ...

Page 122: ...SIMM to be installed 7 With the SIMMs facing down install the memory expansion board in the system unit as follows n Position the memory expansion board under the bracket bar see n Align the memory expansion board edge connector with the memory expansion board connector J9 on the system board see Figure Section 3 4 n Carefully insert the memory expansion board into the connector You may have to ge...

Page 123: ...re Section 3 13 Memory Expansion Board Installation 8 Replace any removed expansion boards 9 Check that all cables are out of the way of the top cover then replace the top cover Screws Memory Expansion Board Bracket Bar ...

Page 124: ...ms and Solutions Problem Symptom Solution No power Power lamp on computer status panel will not light 1 Check that the power cord is plugged into the AC connector on the computer Check that the other end of the cord is plugged into a live properly grounded AC power outlet Operating system does not boot An invalid configuration message is displayed 1 Press F2 to run Setup and view parameters Memory...

Page 125: ... reader in hard disk configurations n two internal 3 1 2 inch device slots for 1 6 inch or 1 0 inch high devices one slot contains the standard IDE or SCSI 2 hard disk in hard disk configurations You can install accessible storage devices such as a diskette drive or tape drive with a 5 1 4 inch form factor frame in the 5 1 4 inch slots Figure Section 3 14 shows the location the accessible storage ...

Page 126: ...2 inch is drive A while the second optional diskette drive is drive B See the 5 1 4 inch device installation instructions later in this section when installing an optional diskette drive See Section 4 for information on ordering optional equipment Diskette Drive Settings Specifications for the standard 3 1 2 inch 1 44 MB and the optional 5 1 4 inch 1 2 MB diskette drive are given in Appendix A Spe...

Page 127: ...n height 1 inch x 3 1 2 inch drives that mount in a 5 1 4 inch bracket See 5 1 4 Inch Device Installation later in this section for installation procedures Hard Disk Drive Settings The following subsections provide configuration settings for optional IDE and SCSI 2 storage options IDE Hard Disk Settings A 3 12 inch x 1 inch 1 GB IDE hard disk drive is available for installation in the system IDE h...

Page 128: ...er Settings Spare factory settings Dual Drive Emulation Mode Power Connector Signal Connector One Drive Only Spare factory settings Drive is Slave Drive is Master With Slave Present Cable Select Pins 6 and 8 of J8 must also be jumperd J6 Dual Drive Emulation Jumper Block 4 2 3 1 Board Circuit J8 Circuit Board J5 Master Slave Jumper Block 3 1 4 2 13 14 1 2 ...

Page 129: ...low n If attaching devices to the internal or external SCSI bus but not both terminate the device connected at the end of the bus i e the device attached to the last connector on the SCSI cable remove the terminators from all other devices enable the termination for the system board SCSI 2 host adapter through the SCSI Select utility program see Section 2 Use the internal termination factory setti...

Page 130: ...rminations for Internal and External Configurations Terminated SYSTEM BOARD SCSI 2 Host Adapter Internal SCSI Devices Terminated Not Terminated External SCSI Devices Not Terminated SYSTEM BOARD SCSI 2 Host Adapter Termination Through Setup Internal SCSI Cable Internal SCSI Devices Terminated Not Terminated ...

Page 131: ...e SCSI identification number 0 to 6 See Table Section 3 5 Figure Section 3 20 2 GB SCSI Hard Disk Jumper Settings J1 Termination power to SCSI bus and drive Termination power to SCSI bus Termination power from SCSI bus Termination power from drive default Enable SCSI termination default Power Connector Signal Connector J4 Reserved Disable SCSI parity J2 Reserved Write protect Enable motor start de...

Page 132: ... in the 5 1 4 inch accessible device slot and cable connects to the secondary PCI IDE connector J32 on the system board To add a CD ROM reader see the next subsection for 5 1 4 inch device installation procedures See Section 4 if you need to remove and reinstall the CD ROM reader Use the following jumper setting information to set your CD ROM reader configuration NOTE The CD ROM reader jumpers are...

Page 133: ...r and 5 1 4 inch blank panel must first be removed If a device option kit comes with rails preattached remove the drive rails and reuse the screws to secure the drives to the drive bracket NOTE The 3 1 2 inch hard disk drive must be mounted in a 5 1 4 inch bracket to fit in a 5 1 4 inch accessible storage device slot When installing any accessible storage device install the device in the lowest em...

Page 134: ...as follows 1 Remove the top cover as previously described 2 Remove the front panel assembly from the system unit as follows n Remove the four screws holding the front panel to the system two screws on each side see Figure Section 3 22 Figure Section 3 22 Removing the Front Panel Screws Screws ...

Page 135: ...the slot covers for possible reuse if the storage device option is removed Figure Section 3 23 Removing the Slot Covers n Remove the two screws holding each metal cover plate to the drive cage see Figure Section 3 24 Remove and store the plates for possible reuse if the storage device option is removed Cover Tab 1 of 2 Slot Cover ...

Page 136: ...Options 3 31 Figure Section 3 24 Cover Plate Removal Cover Plate Screws ...

Page 137: ...to the 3 1 2 inch hard disk drive 2 Remove the five device cage screws shown in Figure Section 3 25 Figure Section 3 25 Removing the Device Cage Screws 3 Tag and unplug the power and signal cables from the CD ROM reader if previously installed in hard disk configurations 4 Pull the device cage out of the chassis If there is a device already installed in the cage tag and unplug the device s power a...

Page 138: ...e device install the device in the lowest empty bay If you do not you cannot reinstall the blank slot cover plates over any remaining empty bays 2 Slide the rear of the device into the 5 1 4 inch slot Be sure that the load release button on the diskette drive is on the right if sliding a diskette drive into the device cage Align the holes on the 5 1 4 inch device with the holes in the device cage ...

Page 139: ...ch diskette drive and connector J2 on the system board Remove the standard signal cable from the diskette drive and system board 2 Plug one end of the optional dual connector signal cable into connector J2 on the system board Plug the other end the A connector of the signal cable option into the signal cable connector on the standard 3 1 2 inch diskette drive 3 Plug the middle connector connector ...

Page 140: ...evices if installed 6 Continue to Finishing Up 5 1 4 Inch Storage Device Installation 5 1 4 Inch Device Cabling Cable an optional 5 1 4 inch IDE or SCSI storage device as follows 1 Connect an unused connector on the SCSI cable or IDE cable and power cable into the device see Figure Section 3 28 Use care to prevent bending drive connector pins Align the SCSI or IDE cable connector as shown in Figur...

Page 141: ...ing a CD ROM reader plug in one of the available power cables coming from the power supply to the power connector on the rear of the CD ROM reader Connect one end of the PCI IDE signal cable to the signal connector on the rear of the reader Connect the other end of the signal cable to connector J32 on the system board SCSI or IDE Cable Red Edge Power Cable SCSI or IDE Cable Red Edge Power Cable ...

Page 142: ...u installed a hard disk in the 5 1 4 inch slot install a slot cover over the metal cover plate 4 Install the front panel to the chassis with the four previously removed screws two to a side 5 If you have installed a 1 2 MB diskette drive remove the protective cardboard insert from the drive 6 Replace the system unit cover Be sure you do not pinch any cables or wires when you replace the cover 7 Co...

Page 143: ...l drive cage 3 Remove the three screws holding the internal drive cage to the rear of the chassis see Figure Section 3 29 4 Remove the two screws holding the internal drive cage to the chassis support bracket Figure Section 3 29 Removing 3 1 2 Inch Drive Cage Screws 5 Remove the 3 1 2 inch drive cage from the chassis 3 1 2 Inch Drive Placement Install the hard disk drive into the 3 1 2 inch drive ...

Page 144: ...k drive signal cable connectors may be used for the hard disk drives The hard disk drives are configured by jumpers as master drive C and slave drive D The hard disk drive connectors are identified in Figure Section 3 31 Cable the hard disk drive as follows 1 Locate the IDE hard disk signal cable and connect it as follows see Figure Section 3 31 n If this is the first hard disk drive locate the si...

Page 145: ...gnal cables are keyed to fit only in the correct position 2 Locate one of the larger power connectors coming from the power supply and plug it into the hard disk drive power connector see Figure Section 3 31 Figure Section 3 31 Hard Disk Drive Cables SCSI Hard Disk Drive Cabling Connect an unused connector on the power cable and on the SCSI signal cable into the device see Figure Section 3 32 Posi...

Page 146: ... 2 Replace the top cover and connect external peripherals and power cables 3 Run the Setup ECU or SCSI utility to reconfigure the computer for the hard disk drive see Section 2 Setup and Operation If a fault occurs at power on verify that the reassembly was performed correctly Reconfigure the computer for the hard disk drive by selecting hard disk drive Installed in Setup Setup will automatically ...

Page 147: ... grounded AC power outlet Operating system does not boot An invalid configuration message is displayed 1 Press F2 to run setup and view parameters 2 Check installation of the operating system on the hard disk 3 Check to see if the system will boot from a diskette drive Keyboard or mouse malfunction Monitor has prompt but cannot input data 1 Check that the keyboard is plugged in 2 Check that the mo...

Page 148: ...correct for the drive 4 Check power supply and replace hard disk cable 5 Replace hard disk 6 Replace system board MONITOR OPTION This subsection explains how to connect a monitor Because each system board has an integrated video controller the monitor does not require a video controller board Use the following guidelines to set up the monitor n Place the monitor in a dry clean dust free location n...

Page 149: ...connectors are keyed to fit only in the correct position Secure the connection by tightening the two screws on either side of the signal cable 3 Connect one end of the power cord to the monitor Plug the other end into the AC wall outlet Figure Section 3 33 Monitor Connections Voltage Selector Switch Selector Switch Voltage Screws Monitor Signal Cable Monitor Power Cable Monitor System Unit Power C...

Page 150: ...2 If an ISA video controller board is used check that the controller board is completely seated into the ISA slot connector Review the instructions provided with the controller board 3 The power switch for both the monitor and computer should be on 4 Check the connector ends for bent or pushed in pins Screen image is not centered too small or too large 1 Adjust size and position controls Fuzzy scr...

Page 151: ...stem Parameters in Section 2 NEC Service In the U S call 1 800 632 4525 Listen to the voice prompt and select the appropriate menu to reach one of the following departments Information Center literature dealer locations sales leads response to ads NASC National Authorized Service Centers Administration new dealer service authorization warranty claims NSRC National Service Response Center questions...

Page 152: ...electronic information service used to obtain up to date product application notes installation procedures troubleshooting tips data sheets techni cal information bulletins price lists and other information Information can obtained from the FastFacts service 24 hours a day 7 days a week Using a touch tone telephone call the FastFacts number order the desired information through the automated atten...

Page 153: ...to your fax machine Please wait for document before calling to order more documents If FastFacts attempts to send the second order before the first order is completed the order could be canceled After three tries FastFacts assumes that the line is busy and will not process the order BIOS CUSTOMIZE UTILITY Each system unit ships with a BIOS Customize Utility BCU on the Auxiliary Diskette The BCU cr...

Page 154: ...re 1 From the Windows Program Manager select Accessories and double click on Terminal 2 From the Settings menu select Communications and check that the settings match the following BBS parameters n Baud rate 2400 bps n Parity none n Data bits 8 n Stop bits 1 3 Log onto the BBS n Click on the Phone menu item n Enter the BBS phone number 508 635 4706 n Click on OK 4 Press Enter twice 5 Enter your fi...

Page 155: ...t enabled or possibly that no Flash ROM is installed The utility cannot be used A message indicates that the update is in progress Do not disturb the system in any way while this screen appears The system resets after the update completes An error notes that the system does not have enough RAM available Make sure you boot the system from the BIOS Update Utility diskette A message states that the d...

Page 156: ...6 In the directory where ASSETMGT EXE resides type ASSETMGT 1 2 3 at the prompt and press the Enter key Input the new information pressing Enter after each item The numbers in the command line indicate the following n Item number 1 Sets the model number of the system unit Input the model number of the system unit This input may be up to 13 characters in length n Item number 2 Sets the serial numbe...

Page 157: ...RNING Unplug all power cords before performing any maintenance Voltage is present inside the system unit and monitor even after the power button is off All voltage is removed only when the power cord is unplugged System Unit Cleaning Use the following procedure for cleaning the system 1 Power off the system and unplug all power cables 2 Periodically wipe the outside of the system unit keyboard mou...

Page 158: ...aceable as sembly Therefore disassembly of the keyboard is necessary only when cleaning the inside Figure Section 4 1 Removing the Keyboard Enclosure 2 Separate the two halves of the enclosure Clean the enclosure and keys with a damp cloth A small soft bristle brush may be used to clean between the keys Do not wet or dampen the keyboard s printed circuit board PCB If the PCB ac cidentally gets wet...

Page 159: ... unit 2 Turn the mouse upside down and locate the mouse ball cover see Figure 4 2 3 Turn the ball cover counterclockwise and remove the cover Figure Section 4 2 Removing the Mouse Ball Cover 4 Turn the mouse over and remove the ball 5 Clean the mouse as follows n Clean the mouse ball with tap water and a mild detergent then dry it with a lint free cloth n Remove any dust and lint from the mouse so...

Page 160: ...ts see Table Section 4 5 Table Section 4 3 summarizes problems that may develop during com puter operation and lists in sequential order suggested corrective actions Table Section 4 3 Problems and Solutions Problem Symptom Solution No power Power lamp on computer status panel will not light 1 Check that the power cord is plugged into the AC connector on the computer Check that the other end of the...

Page 161: ...power on Computer beeps more than once and is unable to complete boot up 1 Check system configuration 2 Check all jumper settings and verify that drives are enabled refer to Section 2 3 Reseat SIMMs and option boards in their connectors Inspect system board for dropped objects 4 Remove option boards and reboot 5 Replace system board Invalid Configuration message displayed 1 Press the F2 key to run...

Page 162: ... disk drive can be accessed 1 Check cable connections between lamp and system board Hard disk controller failure message displayed 1 Check that the IDE port and hard disk drives are enabled in setup Cannot access hard disk 1 Check signal and power connections between hard disk PCB and power supply 2 Check drive jumper settings refer to Section 3 3 Check power supply and replace hard disk cable 4 R...

Page 163: ...the driver used matches the capabilities of the built in video controller and DRAM Wavy display 1 Check that the computer and monitor are not near motors or electric fields Blank display 1 Check that the built in VGA is enabled see Section 2 2 Check that the monitor power ON OFF switch is ON 3 Check cable connections between the AC power supply and monitor 4 Be sure the system has completely boote...

Page 164: ... occurs power off the computer and try again If the beeping persists see Table Section 4 5 for diagnostic outputs and beep codes The diagnostic port output codes are placed at the diagnostic status port port 80 to indi cate tests in progress and failed tests to someone with hardware that can detect the output If the FAILBEEP option is selected the Beep codes are announced on the speaker only if a ...

Page 165: ...ble interrupt controller 20 3 1 1 test DRAM refresh 22 3 1 3 test 8742 keyboard controller 24 set ES segment register to 4 GB 28 autosize DRAM 2A clear 512k base RAM 2C 3 4 1 test 512k base address lines 2E 3 4 3 test 512k base memory 32 test CPU bus clock frequency 34 test CMOS RAM 37 reinitialize the chipset 38 shadow system BIOS ROM 39 reinitialize the cache 3A autosize cache 3C configure advan...

Page 166: ...caches 6A display external cache size 6C display shadow message 6E display non disposable segments 70 display error messages 72 check for configuration errors 74 test real time clock 76 check for keyboard errors 7C set up hardware interrupt vectors 7E test coprocessor if present 80 disable on board I O ports 82 detect and install external RS 232 ports 84 detect and install external parallel ports ...

Page 167: ...2 prompt AA scan for F2 key stroke AC enter Setup AE clear in POST flag B0 check for errors B2 POST done prepare to boot operating system B4 one beep B6 lock password information B8 clear global description table BC clear parity checkers BE clear screen BF check virus and backup reminders C0 try to boot with INT 19 D0 interrupt handler error D2 unknown interrupt error D4 pending interrupt error D6...

Page 168: ... follow the disassembly order listed in Table Section 4 5 To reassemble follow the table in reverse order Individual removal procedures do not require the total disassembly of the computer Each of the following subsections lists the parts that must be removed before beginning the removal procedure To reassemble follow the procedure in reverse order Table Section 4 5 Image P90 P100E Disassembly Seq...

Page 169: ...eassembly perform a power on test see Check in Section 2 If a fault occurs verify that the reassembly was performed correctly CAUTION When handling boards or chips ground yourself to release static Top Cover Removal Remove the top cover as follows NOTE Unplug the power cord before disassembling the system unit Voltage is present inside the system unit even after the power is off All voltage is rem...

Page 170: ...gure Section 4 3 Cover Screws 4 Slide the top cover toward the rear about one inch see Figure Section 4 4 5 Lift the top cover up and off the system unit Figure Section 4 4 Removing the Cover Screws Keylock Screws Screws Keylock Screws ...

Page 171: ...the following steps 1 Remove the top cover as previously described 2 Disconnect any cables leading from the expansion board s The multimedia configuration has an audio cable attach sound board 3 Remove the screw from the expansion slot bracket see Figure Section 4 5 Figure Section 4 5 Expansion Slot Screw Board Option Screw ...

Page 172: ... from the chassis as follows 1 Remove the top cover as previously described 2 Remove the seven front panel screws from inside the top cover 3 Remove the four screws holding the front panel to the system two screws on each side see Figure Section 4 6 Figure Section 4 6 Front Panel Screws Screws ...

Page 173: ...Remove the top cover and front panel as previously described 2 Release the four power button tabs from the inside of the front panel and push the tabs through the front panel see Figure Section 4 7 3 Remove the power button from the front of the panel Figure Section 4 7 Power Button Tabs Power Button Tabs Inside Front Panel ...

Page 174: ...ows 1 Remove the top and front covers as previously described 2 Release the slot cover tabs and remove the slot covers from the metal cover plate see Figure Section 4 9 Figure Section 4 8 Slot Cover Removal 3 Remove the two screws holding each metal cover plate to the device cage see Figure Section 4 9 Remove the plates Cover Tab 1 of 2 Slot Cover ...

Page 175: ...Troubleshooting and Repair 4 25 Figure Section 4 9 Metal Cover Plate Removal Cover Plate Screws ...

Page 176: ...op cover as previously described 2 Unplug the speaker connector from J10 on the system board 3 Slide the speaker over the raised spot and out from the speaker tabs see Figure Section 4 10 4 Remove the speaker from the system unit Figure Section 4 10 Speaker Tabs Raised Spot 1 of 3 Tabs To Connector J10 on System Board ...

Page 177: ...emove the two screws holding the memory expansion board to the underside of the bracket bar see Figure Section 4 11 Figure Section 4 11 Memory Expansion Board Removal 3 Remove the memory expansion board from the system board s memory expansion board connector at location J9 see Appendix B for connector locations 4 Set the memory expansion board on a non conductive surface Screws Memory Expansion B...

Page 178: ...o slide out of the hole in the SIMM stick see Figure Section 4 12 Figure Section 4 12 SIMM Removal 2 Remove the SIMM stick from the system board Repeat step 1 and 2 for each SIMM to be removed NOTE Depending on which SIMM you are removing you may have to release one or more SIMMs in front of the SIMM being removed If more detailed information is needed on SIMM removal installation and memory confi...

Page 179: ...e top cover front panel as previously described 2 Remove the five device cage screws shown in Figure Section 4 13 holding the cage to the chassis If there is a device installed in the cage label and unplug the power and signal cables 3 Pull the device cage out of the chassis Figure Section 4 13 Removing the Device Cage Screws Screws Screws ...

Page 180: ... follows 1 Remove the top cover front panel and 5 1 4 inch device cage as previously de scribed 2 Remove the four 5 1 4 inch hard disk drive screws two on each side see Figure Section 4 15 3 Remove the device out of the 5 1 4 inch device cage Figure Section 4 15 5 1 4 Inch Device Screws 2 of 4 Device Screws Device Cage ...

Page 181: ...hard disk drive power cable and signal cable from the hard disk drive see Figure Section 4 17 NOTE When reinstalling the drives note that all power cables are keyed to fit only in the cor rect position Figure Section 4 17 3 1 2 Inch Hard Disk Drive Cables 3 Remove the three screws holding the drive cage to the rear of the chassis see Figure Section 4 19 IDE Cable Power Cable ...

Page 182: ...Removing 3 1 2 Inch Drive Cage Screws 5 Remove the 3 1 2 inch drive cage from the chassis 6 Remove the hard disk drive from the 3 1 2 inch drive cage two on each side see Figure Section 4 21 Figure Section 4 21 3 1 2 Inch Hard Disk Drive Screws Screws Screws 3 1 2 Inch Drive Cage Chassis Support Bracket 2 of 4 Screws 3 1 2 Inch Drive Cage Hard Disk Drive ...

Page 183: ...r cable and signal cable from the diskette drive see Figure Section 4 23 NOTE When reinstalling the diskette drive note that all power cables are keyed to fit only in the correct position The red edge of the diskette drive signal cable is positioned as shown Figure Section 4 23 3 1 2 Inch Diskette Drive Cables 3 1 2 Inch Diskette Drive Connector Power Cable Diskette Drive 3 1 2 Inch Red Edge ...

Page 184: ...ive Bracket Screws 4 Slide the 3 1 2 inch diskette drive bracket out of the system unit 5 Remove the four 3 1 2 inch diskette drive screws two on each side see Figure Section 4 27 6 Remove the diskette drive from the bracket Figure Section 4 27 Diskette Drive Screws 3 1 2 Inch Diskette Drive Bracket Screws 2 of 4 Screws 3 1 2 Inch Diskette Drive Bracket ...

Page 185: ...ables attached to the system board s connectors 3 Unplug the power cables from all installed devices 4 Remove the two screws securing the power button to the front of the system unit see Figure Section 4 21 Figure Section 4 21 Power Button Screws 5 Remove the four screws securing the power supply to the system unit see Figure Section 4 22 Power Button Screws ...

Page 186: ...ard follow these steps 1 Remove the top cover 2 Cut the strap securing the RTC battery to the system board 3 Using a small flat edged object such as tweezers or the tip of a small regular screw driver carefully remove the RTC battery from the socket on the system board see Figure Section 4 23 Gently use the flat object as a wedge to partially remove the pins on one end of the battery then repeat t...

Page 187: ...system board revision should be restored in the NVRAM Refer to the Asset Management Identification subsection earlier in this section for instructions Remove the system board from the chassis as follows 1 Remove the following components as previously described n top cover n expansion slot boards n memory expansion board n 5 1 4 inch device cage n 3 1 2 inch drive cage n 3 1 2 inch diskette drive b...

Page 188: ...ed to the system board Appendix B provides the locations of the connectors 3 Remove the nine screws that hold the system board to the system unit chassis Remove the system board out the side of the system unit Figure Section 4 24 System Board Connectors and Screws 1 of 9 ...

Page 189: ... CPU for Dual CPU only with heatsink 90 MHz Pentium CPU for Dual CPU only with heatsink Option only see Table 4 7 6a 6b System Board with 90 MHz CPU with heat sink System Board with 100 MHz CPU with heat sink 158 026174 000A 158 026174 100A 7 Memory expansion board 158 026175 000A 8 Memory expansion board bracket 158 030640 000 9 2MB x 36 70 ns tin SIMM 8MB capacity 158 082376 070 10 Chassis Suppo...

Page 190: ...050562 002 24 3 1 2 inch x 1 inch 1 44 MB Diskette Drive 808 870954 101A 25 Card Guide 158 050705 021 26 Power button 158 050705 006 27a 27b Image P90E Logo Image P100E Logo 158 030597 003 158 030597 007 28 5 1 4 inch Drive Cage 158 050705 013 29 3 1 2 inch Diskette Drive Bracket 158 050705 009 30 Fan Assembly 158 050705 014 31 Speaker Assembly 158 050705 005 32 Front Panel Bezel 158 030596 000 33...

Page 191: ... 41 Figure Section 4 25 Image P90E P100E Illustrated Parts Breakdown ____________ This data was prepared February 1995 For an up to date listing of spare parts please call FastFacts 800 366 0476 and order document number 42181048 ...

Page 192: ...PU 90 MHz with heatsink 158 053796 000 Dual CPU 100 MHz with heatsink 158 053796 001 Diskette drive signal cable dual connector supports two devices 158 050561 000 1 2 MB Diskette Drive Kit 158 053476 000 540 MB Hard Disk Drive Kit 158 053408 011 1 GB IDE Hard Disk Drive Kit 158 053407 017 Master Key 158 050705 000 VGA Feature Connector Cable 158 050835 000 All Image P90E P100E SIMM kits have tin ...

Page 193: ...047 000 EZSCSI User s Guide 819 181184 000 Image P90E P100E Video Training Kit 158 056099 024 Image P90E P100E Service and Reference Manual 819 181048 000 Image P90E P100E Shipping Carton 158 040455 010 Keyboard Folder 158 040456 000 Shipping Carton Inserts 8 158 040395 004 ____________ This data was prepared February 1995 For an up to date listing of spare parts please call FastFacts 800 366 0476...

Page 194: ...216 mm Depth 17 5 inches 445 mm Height 15 25 inches 387 mm Weight 26 5 lb 12 kg dependent upon options Keyboard Width 18 3 inches 464 mm Depth 6 7 inches 170 mm Height 1 6 inches 41 mm Weight 3 5 to 4 0 lb 1 6 to 1 8 kg Front Panel Power button Power indicator lamp Hard disk drive busy indicator lamp Reset button Device Slots Three 5 1 4 inch front access slots One 3 1 2 inch front access slots Tw...

Page 195: ...d in the processor 256 KB secondary cache Flash ROM 256 KB 28F020 Flash ROM Chip Set Intel Neptune Chip set System Memory Expandable to 256 MB Standard configuration 16 MB on system board two 8 MB SIMM sticks Optional SIMMs 4 8 16 and 32 MB 36 bit 70 ns SIMMs Video Interface Tseng ET4000 W32P PCI bus video 2 MB video DRAM standard Maximum resolution 1280 x 1024 pixels Battery 3 6V Power Supply 260...

Page 196: ...utput power specifications for the power supply Table Appendix A 4 Power Supply Output Specifications Pin 200 W 1 5V 23A Max 2 5V 5A Max 3 12V 8A Max 4 12V 5A Max DISKETTE DRIVE SPECIFICATIONS Table Appendix A 6 lists the specifications for the diskette drives Table Appendix A 6 Specifications for Diskette Drives Features OSDA 90C 1 44 MB FD1158C 1 2 MB Optional Storage Capacity Unformatted 2 0 MB...

Page 197: ...ght 1 0 in 25 4 mm 1 0 in 25 4 mm Width 4 9 in 101 6 mm 5 7 in 146 mm Depth 5 9 in 150 mm 7 4 in 190 mm Weight 1 0 lb 0 63 kg 1 5 lb 0 67 kg Operating Temperature 41 to 113 F 5 to 45 C 39 to 115 F 4 to 46 C Relative Humidity Tolerance Range 20 to 80 20 to 80 Power 12 Vdc Not Used 1 19 A start up 5 Vdc 0 87 A start up 0 09 A start up Power Consumption 1 5 W operating 2 6 W operating Error Rate Reco...

Page 198: ...ysical Configuration Formatted Capacity 1 083 2 MB Actuator Type Rotary voice coil Number of Disks 3 Data Heads 6 Servo Embedded Tracks per Inch tpi 4250 tpi Bytes per Sector 512 Cylinders per Drive 3 876 Dimensions 1 0 x 4 02 x 5 77 in Weight 1 5 lb Performance Track to track Average seek Maximum seek 3 5 ms 12 ms 25 ms Average Latency 6 67 ms Rotation Speed 4500 rpm Data Rate Transfer buffer to ...

Page 199: ...ta Heads 11 data 1 servo Servo Dedicated Tracks per Inch tpi 4048 tpi Bytes per Sector 512 Cylinders per Drive 3 510 Dimensions 1 0 x 4 02 x 5 75 in Weight 1 2 lb Performance Track to track Average seek Maximum seek 0 6 ms 8 ms 17 ms Average Latency 4 17 ms Rotation Speed 7200 rpm Data Rate Transfer buffer to host 10 MB s Start Stop Cycles 10 000 CSS Buffer Size 512 KB Interface 50 pin SCSI single...

Page 200: ...rst Mode 1 600 KB sec Mode 2 700 KB sec 3 34 MB sec IDE 16 bits PIO mode Access Time 1 3 stroke Full stroke Normal speed 0 28 sec Quadruple speed 0 25 sec Normal speed 0 45 sec Quadruple speed 0 42 sec Error Rates Symbol ECC On ECC Off Seek Less than 1 in 10E12 Less than 1 in 10E9 Less than 1 in 10E6 Audio Section Channels 2 Sampling frequency 44 1 KHz Quantization 1 bit 16 bits linear equivalent ...

Page 201: ...n General Specifications Power Supply Current 5V average 12V average 12V peak Stop mode 0 25 A Play mode 0 45 A Stop mode 0 4 A Play mode 0 4 A Seek mode 1 2 A Seek mode 1 5 A Dimensions Half Height Drive Height 1 65 in 4 2 cm Width 5 83 in 14 8 cm Depth 7 95 in 20 2 cm Weight 1 936 lb 0 88 kg ...

Page 202: ...d Layout Connector IMA J32 secondary PCI IDE Connector PCI IDE Connector Drive Diskette Power Supply Connector J17 J21 J31 Speaker J10 Fan J6 J7 Reset J4 Cache SIMM J3 SW4 Keyboard Mouse Serial Parallel SCSI Serial VGA Monitor Feature Port P1 PCI Connector 1 JA1 PCI Connector 2 JA2 EISA Connector 1 J22 EISA Connector 2 J23 EISA Connector 3 J24 EISA Connector 4 J25 RTC Battery J30 primary Connector...

Page 203: ...in header Video feature connector J8 2 x 13 pin header Memory card connector J9 120 pin vertical plug connector Speaker J10 4 pin header Hard disk drive busy lamp J11 4 pin header Power lamp J12 1 x 4 pin header Internal SCSI J14 2 x 25 pin header Power J17 J21 J31 6 pin vertical connector LED display J19 2 x 10 header EISA connectors J22 J25 188 pin vertical connector PCI IDE interface primary J3...

Page 204: ...e output from the system board through two 9 pin COM port connectors The 9 pin D subconnectors are located at the rear of the system unit Pin locations and pin assignments for the two serial interface connectors are shown in Figure Appendix B 2 Figure Appendix B 2 Serial Interface P3 P5 ...

Page 205: ...has a 25 pin parallel port on the system board Parallel interface specifications for this port conform to the IBM PC interface Pin locations and pin assignments for the parallel interface connector are shown in Figure Appendix B 3 Figure Appendix B 3 Parallel Interface P2 ...

Page 206: ... Blue 4 Monitor ID bit 2 not used 5 Ground 6 Red return ground 7 Green return ground 8 Blue return ground 9 Key no pin 10 Sync return ground 11 Monitor ID bit 0 not used 12 Monitor ID bit 1 not used 13 Horizontal sync 14 Vertical sync 15 Not used POWER SUPPLY CONNECTORS Voltages from the power supply are input to the system board through the power supply connector Figure Appendix B 4 shows the con...

Page 207: ... mouse use standard PS 2 connectors Pin assignments are given in Table Appendix B 4 Table Appendix B 4 Keyboard Mouse P4 Connector Pin Assignments Pin Keyboard Connector Mouse Connector 1 Keyboard Data Mouse Data 2 N C N C 3 GND GND 4 5V fused 5V fused 5 Keyboard Clk Mouse Clk 6 N C N C POWER LAMP CONNECTOR Power connector pin assignments are given in Table Appendix B 5 Table Appendix B 5 Power La...

Page 208: ...n Assignments Pin Signal 1 5V 2 Hard disk busy 3 Hard disk busy 4 5V FAN CONNECTOR Fan connector pin assignments are given in Table Appendix B 7 Table Appendix B 7 Fan Connector J6 J7 Pin Assignments Pin Signal 1 Ground 2 12V RESET BUTTON CONNECTOR Reset button connector pin assignments are given in Table Appendix B 8 Table Appendix B 8 Reset Button Connector J4 Pin Assignments Pin Signal 1 Ground...

Page 209: ...Diskette Drive Connector J2 Pin Assignments Ground Pin Signal Pin I O Signal Name 1 2 O FDHDIN 3 4 Not used 5 6 FDEDIN 7 8 INDEX 9 10 MOTEN1 11 12 O DS2 13 14 O DS1 15 16 O MOTEN2 17 18 O DIR 19 20 O STEP 21 22 O WRT DATA 23 24 O WRT EN GATE 25 26 I TRK0 27 28 I WRT PROT 29 30 I READ DATA 31 32 O HS SEL 33 34 I DSKT CHG Pin 5 is reserved for connector polarization ...

Page 210: ... prefixed with a designation All positively active signals are prefixed with a designation Table Appendix B 10 IDE Connector J30 J32 Pin Assignments Pin Signal Pin Signal 1 HOST RESET 2 GND 3 HOST DATA 7 4 HOST DATA 8 5 HOST DATA 6 6 HOST DATA 9 7 HOST DATA 5 8 HOST DATA 10 9 HOST DATA 4 10 HOST DATA 11 11 HOST DATA 3 12 HOST DATA 12 13 HOST DATA 2 14 HOST DATA 13 15 HOST DATA 1 16 HOST DATA 14 17...

Page 211: ...CSI 2 Port J14 Pin Assignments Pin Signal Pin Signal 1 35 Ground thru Ground 36 Ground 12 37 Ground 13 N C 38 Termpwr 14 39 Ground thru Ground 40 Ground 25 41 Attention 26 Data bit 0 42 Ground 27 Data bit 1 43 BUSY 28 Data bit 2 44 Acknowledge 29 Data bit 3 45 Reset 30 Data bit 4 46 Message 31 Data bit 5 47 Select 32 Data bit 6 48 CD 33 Data bit 7 49 Request 34 Parity 50 IO ...

Page 212: ... D25 5 D17 29 N C 53 D10 6 D2 30 5V 54 D26 7 D18 31 A8 55 D11 8 D3 32 A9 56 D27 9 D19 33 N C 57 D12 10 5V 34 RAS2 58 D28 11 N C 35 MP2 59 5V 12 A0 36 MP0 60 D29 13 A1 37 MP1 61 D13 14 A2 38 MP3 62 D30 15 A3 39 GND 63 D14 16 A4 40 CAS0 64 D31 17 A5 41 CAS2 65 D15 18 A6 42 CAS3 66 N C 19 N C 43 CAS1 67 PD0 N C 20 D4 44 RAS0 68 PD1 N C 21 D20 45 N C 69 PD2 N C 22 D5 46 N C 70 PD3 N C 23 D21 47 WE 71 ...

Page 213: ... DB10 5 12V 18 GND 31 MEMW 44 DB11 6 GND 19 IDAT4 32 GND 45 DB12 7 IXCMD 20 IXRDY 33 RESET 46 DB13 8 GND 21 IDAT5 34 GND 47 DB14 9 IXMSK 22 GND 35 DB2 48 DB15 10 IXAEN 23 IDAT6 36 DB3 49 GND 11 IDAT0 24 IXOF 37 DB4 50 GND 12 GND 25 IDAT7 38 DB5 13 IDAT1 26 IXRW 39 DB6 PCI EXPANSION BUS CONNECTOR The PCI bus backboard connectors are given in Table Appendix B 14 Table Appendix B 14 PCI Expansion Slo...

Page 214: ...nection A12 GND B12 GND A13 GND B13 GND A14 Reserved B14 Reserved A15 SPCIRST B15 GND A16 VCC B16 PCLKE A17 AGNT B17 GND A18 GND B18 REQA A19 Reserved B19 VCC A20 AD30 B20 AD31 A21 3 3V B21 AD29 A22 AD28 B22 GND A23 AD26 B23 AS27 A24 GND B24 AD25 A25 AD24 B25 3 3V A26 AD22 IDSEL B26 CBE3 A27 3 3V B27 AD23 A28 AD22 B28 GND A29 AD20 B29 AD21 A30 GND B30 AD19 A31 AD18 B31 3 3V A32 AD16 B32 AD17 A33 3...

Page 215: ...39 PLOCK A40 SDONE B40 PERR A41 SB0 B41 3 3V A42 GND B42 SERR A43 PAR B43 3 3V A44 AD15 B44 CBE1 A45 3 3V B45 AD14 A46 AD13 B46 GND A47 AD11 B47 AD12 A48 GND B48 AD10 A49 AD9 B49 GND A50 Key B50 Key A51 Key B51 Key A52 CBEO B52 AD8 A53 3 3V B53 AD7 A54 AD6 B54 3 3V A55 AD4 B55 AD5 A56 GND B56 AD3 A57 AD2 B57 GND A58 AD0 B58 AD1 A59 VCC B59 VCC A60 SREQ64 B60 SACK64 A61 VCC B61 VCC A62 VCC B62 VCC ...

Page 216: ... 2 port B 10 Image Memory Access IMA B 12 keyboard port B 6 mouse B 6 parallel port B 4 PCI bus expansion B 12 power lamp B 6 power supply B 5 reset button B 7 serial port B 3 SIMM B 11 speaker B 6 VGA monitor port B 5 Cover removal 4 19 D Device cage removal 4 29 Device installation 3 20 Diagnosing problems 4 10 Disassembly 4 18 3 1 2 inch diskette drive 4 33 3 1 2 inch hard disk drive 4 31 5 1 4...

Page 217: ...7 Interrupts 1 22 J Jumpers See Switch settings CD ROM reader 3 27 clear CMOS 2 58 diskette drives 3 21 hard disk drives 3 22 system board 2 57 K Keyboard 1 29 L Lamps 2 3 Legend bar 2 9 Locking card resources 2 41 Login ID 2 24 2 55 M Main Menu 2 7 2 12 Maintenance 4 7 Memory 1 3 1 21 SIMM configurations 3 12 Menu bar 2 8 Microprocessor See Processor Monitor 3 43 Mouse 1 30 N Network boot 2 24 2 ...

Page 218: ...A 3 system unit A 1 Switch settings 2 57 System board 1 2 cache 1 3 1 10 components 1 5 connectors B 1 Flash ROM 1 10 I O addressing 1 13 interrupts 1 22 layout 3 6 B 1 memory 1 3 1 21 3 12 option sockets 3 6 B 1 processor 1 2 1 9 removal 4 37 switch 2 57 video 1 23 System components 1 1 System configuration 2 5 System memory bus 1 9 System memory map 1 11 System security 2 55 T Technical support ...

Page 219: ... However there is no guarantee that interference will not occur in a particular installation If this equipment does cause harmful interference to radio or television reception which can be determined by turning the equipment off and on the user is encouraged to try to correct the interference by one or more of the following measures n Reorient or relocate the receiving antenna n Increase the separ...

Page 220: ...ar le constructeur Mettre au rébut les batteries usagées conformément aux instructions du fabricant BATTERY DISPOSAL Do not place used batteries in your regular trash The nickel cadmium or nickel metal hydride batteries must be collected recycled or disposed of in an environmentally approved manner The incineration landfilling or mixing of batteries with the municipal solid waste stream is prohibi...

Reviews: