104
Chapter 8 - LAN Client Settings
Multi-Tech Systems, Inc. RouteFinder RF802EW User G
uide
Accessing a Novell Server
Novell NetWare products are used on up to 70 percent of PC-based local area networks (LANs).
Perform the following procedures when you need to connect your PC workstation to a remote Novell
Server.
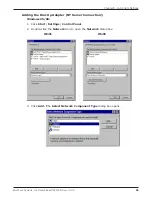
Adding the dial-up adapter (Novell Server Connection)
Windows 95/98:
1. Click
Start
|
Settings
|
Control Panel
.
2. Double-click the
Network
icon to open the
Network
dialog box.
3. Click
Add
. The
Select Network Component Type
dialog box opens.
4. Select
Adapter
, then click
Add
. The
Select Network adapters
dialog box opens.
5. In the
Manufacturers
list, select
Microsoft
. In the
Network Adapters
list select
Dial-up adapter
.
6. Click
OK
twice to return to, and then close, the
Network
dialog box.
Windows NT:
Dial-up Networking adds PPP and SLIP protocol support, enabling your workstation to gain access to
a remote computer or network, even if your computer is not on a network.
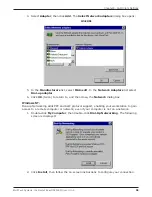
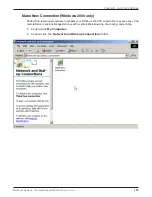
1. Double-click
My Computer
, then double-click
Dial-Up Networking
. The following
screen is displays:
2. Click
Install
, then follow the on-screen instructions to configure your connection.
Adding IPX/SPX (Novell Server Connection)
Windows 95/98:
1. In the
Network
dialog box,
Configuration
tab, click
Add
. The
Select Network
Component
Type
dialog box opens.
2. Select
Protocol
and click
Add
. The
Select Network Protocol
dialog box opens.
3. In the
Manufacturers
list, select
Microsoft
. In the
Network Protocols
list, select
IPX/SPX-compatible Protocol
.
4. Click
OK
twice to return to, and then close, the
Network
dialog box.
Windows NT:
Note:
NWLink IPX/SPX Compatible Transport is probably already installed, along
with NWLink NetBIOS and TCP/IP Protocol. However, if NWLink IPX/SPX Compatible
Transport does not appear on the
Protocols
tab of the
Network
dialog box,
perform the following steps:
1. In the
Network
dialog box,
Protocol
tab, click
Add
. The
Select Network Protocol
dialog box opens.
2. Select
NWLink IPX/SPX Compatible Transport
,
then click
OK
to return to the
Network
dialog box.
3. Click
Close
to close the
Network
dialog box and return to the Desktop.
Summary of Contents for RouteFinder RF802EW
Page 1: ...Model RF802EW Wireless Router Access Point User Guide ...
Page 5: ...Chapter 1 Introduction ...
Page 10: ...Chapter 2 Hardware Installation ...
Page 13: ...Chapter 3 Software Installation and Configuration ...
Page 24: ...Chapter 4 Web Browser Configuration and Management ...
Page 47: ...Chapter 5 Telnet ...
Page 54: ...Chapter 6 RouteFinder Manager ...
Page 84: ...Chapter 7 RouteFinder Monitor ...
Page 93: ...Chapter 8 LAN Client Settings ...
Page 116: ...Chapter 9 LAN to LAN Settings ...
Page 119: ...Chapter 10 Troubleshooting ...
Page 123: ...Chapter 11 Service Warranty and Technical Support ...
Page 130: ...Appendixes Appendix A Appendix B Appendix C ...
Page 135: ...Glossary ...


