


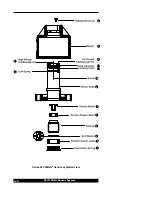


937A Multi-Sensor System
A.2
Managing Contamination in a Cold
Cathode Sensor
Do not operate at pressures above 10
-3
Torr for extended periods as this will
increase the likelihood of contamination.
If pressure readings appear to be erratic, the Sensor tube may be
contaminated. Inspect it visually. If contamination is visible, you should
replace the internal components with an Internal Rebuild Kit (see
Accessories, p.67).
Depending on the degree of contamination and application, the internal parts
may be cleaned (see Cleaning the I-MAG Sensor, page A.3).
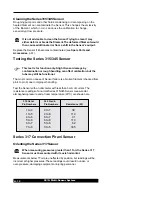
Testing a Cold Cathode Sensor
HPS cold cathode sensors contain the anode and cathode (collector)
electrodes. Test the sensor with an ohmmeter. There should be no shorts
between the electrodes or from the electrodes to the sensor body.
Series 423 I-MAG
®
Cold Cathode Sensor
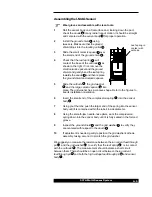
Connecting the I-MAG Sensor
Mount the Sensor to a grounded vacuum system.
If the I-MAG Sensor has a CF flange, remove the magnet first to allow
clearance for bolt installation. When replacing the magnet, note that it is
keyed to the sensor body to protect the feedthrough pins from damage. The
pins should be straight and centered.
For grounding, use a conductive, all-metal clamp to mount a KF 25 or KF 40
flanged sensor body.
Connect the cable to the Sensor and to the Series 937A Controller before
turning on your system. Tighten the thumb screw on top of the cable to make
sure it is securely in place.
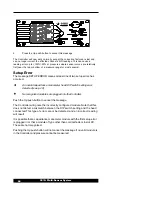
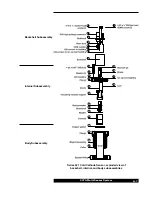
For the following section, please refer to the figure shown on
page A.4.
Disassembling the I-MAG Sensor
Tools required: clean tweezers; clean smooth-jaw, needle-nose pliers
1
Turn Power off to the Series 937A Controller.
2
Loosen the thumb screw on top of the sensor cable and
remove the cable.
3
Loosen the two
flat head screws .
15