background image

 SmartTime Static Timing Analyzer User Guide 


16 


Components of the SmartTime Timing Analyzer 

Use the SmartTime Timing Analyzer to visualize and identify timing issues in your design for the selected 
scenario. In this view, you can evaluate how far you are from meeting your timing requirements, create 
custom sets to track, set timing exceptions to obtain timing closure, and cross-probe paths with other tools. 

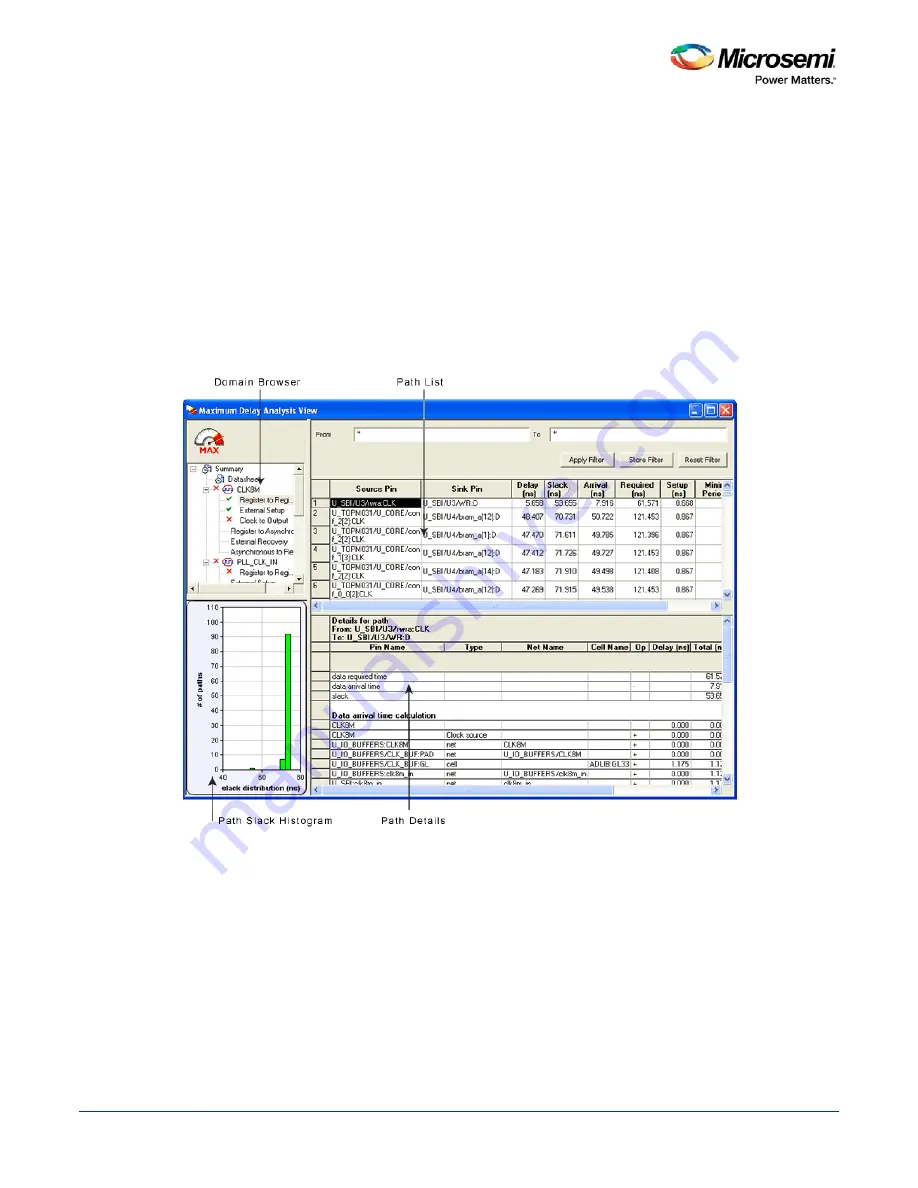
The timing analysis view includes: 

  Domain Browser: Enables you to perform your timing analysis on a per domain basis. 

  Path List: Displays paths in a specific set in a given domain sorted by slack. 

  Path Details: Displays detailed timing analysis of a selected path in the paths list. 

  Analysis View Filter: Enables you to filter the content of the paths list. 

  Path Slack Histogram: When a set is selected in the Domain Browser, the Path Slack Histogram 

displays a distribution of the path slacks for that set. Selecting one or multiple bars in the Path Slack 
Histogram filters the paths displayed in the Path List. 
You can copy, change the resolution and the number of bars of the chart from the right-click menu. 


Figure 4 · SmartTime Timing Analyzer Components 

Summary of Contents for SmartTime

Page 1: ...O2 RTG4 and PolarFire NOTE PDF files are intended to be viewed on the printed page links and cross references in this PDF file may point to external files and generate an error when clicked View the online help included with software to enable all linked content ...

Page 2: ......

Page 3: ...described by such information Information provided in this document is proprietary to Microsemi and Microsemi reserves the right to make any changes to the information in this document or to any products and services at any time without notice About Microsemi Microsemi Corporation Nasdaq MSCC offers a comprehensive portfolio of semiconductor and system solutions for aerospace defense communication...

Page 4: ...on 26 Using Filters 28 Advanced Timing Analysis 31 Understanding Inter Clock Domain Analysis 32 Activating Inter Clock Domain Analysis 33 Displaying Inter Clock Domain Paths 34 Deactivating a Specific Inter Clock Domain 35 Changing Output Port Capacitance 36 Generating Timing Reports 37 Types of Reports 38 Generating a Timing Report 39 Understanding Timing Reports 40 Generating a Timing Violation ...

Page 5: ...ns Dialog Box 99 Set False Path Constraint Dialog Box 100 SmartTime Options Dialog Box SmartFusion2 IGLOO2 RTG4 and PolarFire 102 Store Filter as Analysis Set Dialog Box 105 Timing Bottleneck Analysis Options Dialog Box 106 Timing Datasheet Report Options Dialog Box 110 Timing Report Options Dialog Box 111 Timing Violations Report Options Dialog Box 115 Data Change History SmartTime 117 Tcl Comman...

Page 6: ......

Page 7: ...l possible paths including false paths in the design False paths are timing paths in the design that do not propagate a signal To get a true and useful timing analysis you need to identify those false paths if any as false path constraints to the STA tool and exclude them from timing considerations The SmartTime user interface provides efficient user friendly ways to define these critical false pa...

Page 8: ...SmartTime and Cross Probing into Constraints Editor From SmartTime you can cross probe into the Constraints Editor Select a Timing Path in SmartTime s Analysis View and add a Timing Exception Constraint False Path Multicycle Path Max Delay Min Delay The Constraint Editor reflects the newly added timing exception constraint The Constraints Editor must be running for Cross Probing to work See Also S...

Page 9: ...ing analysis and adjust timing constraints In the Libero SoC Design Flow window expand Implement Design Verify Post Layout Implementation You can Double click Verify Timing to generate Timing Reports Right click Open SmartTime Open Interactively to run SmartTime During Back Annotation SmartTime runs in the background to generate the SDF file for timing simulation You can also run SmartTime wheneve...

Page 10: ...out Implementation right click Open SmartTime Open Interactively SmartTime reads your design and displays post or pre layout timing information To close SmartTime from the File menu choose Exit SmartTime Components The Maximum Delay Analysis View and the Minimum Delay Analysis View enable you to analyze your design With SmartTime you can Browse through your design s various clock domains to examin...

Page 11: ...play the options you can modify in the Analysis view 6 Enter a number greater than 1 to specify the maximum number of paths to include in a path set during timing analysis 7 Check or uncheck whether to filter the paths by slack value If you check this box you must then specify the slack range between minimum slack and maximum slack 8 Check or uncheck whether to include clock network details 9 Ente...

Page 12: ...SmartTime Static Timing Analyzer User Guide 12 Figure 2 SmartTime Options Dialog Box Analysis Options Figure 3 SmartTime Options Dialog Box Advanced Options See Also SmartTime Options Dialog Box ...

Page 13: ...he changes Prints the contents of the constraints editor Copies data to the clipboard Pastes data from the clipboard Modifies the selected object from the constraints editor Deletes the selected object from the constraints editor Undoes previous changes Redoes previous changes Opens the maximum delay analysis view Opens the minimum delay analysis view Opens the manage clock domains manager Opens t...

Page 14: ... 14 SmartTime Timing Analyzer The SmartTime Timing Analyzer is an interactive Static Timing Analysis tool Click Open SmartTime in the Design Flow Window to invoke the SmartTime Timing Analyzer Design Flow Window Open SmartTime Open Interactively ...

Page 15: ...SmartTime Static Timing Analyzer User Guide 15 SmartTime Timing Analyzer ...

Page 16: ...orm your timing analysis on a per domain basis Path List Displays paths in a specific set in a given domain sorted by slack Path Details Displays detailed timing analysis of a selected path in the paths list Analysis View Filter Enables you to filter the content of the paths list Path Slack Histogram When a set is selected in the Domain Browser the Path Slack Histogram displays a distribution of t...

Page 17: ...for Maximum Delay Analysis or the icon for Minimum Delay Analysis from the SmartTime window Note When you open the Timing Analyzer from Designer the Maximum Delay Analysis window is displayed by default Figure 5 Maximum Delay Analysis View 2 In the Domain Browser select the clock domain Clock domains with a indicate that the timing requirements in these domains were met Clock domains with an x ind...

Page 18: ...um pulse width of one element on the critical path limits the maximum frequency for the clock SmartTime displays an icon for the clock name in the Summary List Click on the icon to display the name of the pin that limits the clock frequency 5 Repeat the above steps as required ...

Page 19: ...h to display for bottleneck information and click OK The Bottleneck Analysis View appears in a separate window see image below Figure 6 Bottleneck Analysis View A bottleneck is a point in the design that contributes to multiple timing violations The Bottleneck Analysis View contains two sections Device Description Bottleneck Description Device Description The device section contains general inform...

Page 20: ... of the bottleneck information for the bar selected in the chart above If no bar is selected the grid lists all bottleneck information Click the controls on the right to zoom in or out the contents in the chart Right click the chart to export the chart or to copy the chart to the clipboard The list is divided into two columns Instance name refers to the output pin name of the instance Bottleneck c...

Page 21: ...lick the icon in the SmartTime window bar to display the Manage Clock Domains dialog box Figure 7 Manage Clock Domains Dialog Box 2 To add a new domain select a clock domain from the Available clock domains list and click either Add or New Clock to add a non explicit clock domain 3 To remove a displayed domain select a clock domain from the Show the clock domainin this order list and click Remove ...

Page 22: ...e in the Domain Browser and choose Add Set The Add Path Analysis Set Dialog Box dialog box appears as shown below Tip You can click the icon in the SmartTime window bar to display the Add Path Analysis Set dialog box Figure 8 Add Path Analysis Set Dialog Box 2 Enter a name for the path set 3 Select the source and sink pins You can use the filters to control the type of pins displayed 4 Click OK Th...

Page 23: ...omain Browser 2 Right click the set to delete and then choose Delete Set from the right click menu To rename an existing path set 1 Select the path set from User Set in the Domain Browser 2 Right click the set to rename and then choose Rename Set from the right click menu 3 Edit the name directly in the Domain Browser See Also Add Path Analysis Set Dialog Box Using Filters ...

Page 24: ... for each type of set Register to Register Clock Source Clock Edge Destination Clock Edge Logic Stage Count Max Fanout Clock Constraint Maximum Delay Constraint and Multicycle Constraint External Setup Clock Destination Clock Edge Logic Stage Count Max Fanout Clock Constraint Input Delay Constraint Required External Setup Maximum Delay Constraint and Multicycle Constraint Clock to Out Clock Source...

Page 25: ... 5 To remove one or more columns select the fields to remove from the Show these fields in this order list and click Remove 6 Click OK to add or remove the selected columns SmartTime updates the Timing Analysis View See Also Customize Analysis View ...

Page 26: ...e 11 Expanded Path View The Path List displays all parallel paths in your design The Path Details grid displays the path details for all parallel paths To display the Expanded Path View From the Path List double click the path or right click a path and select expand selected paths From the Expanded Path View double click the path or right click the path and select expand path ...

Page 27: ...f time taken by cells and nets for the selected path If no parallel path is selected in this view the Path Profile shows the percentage for all paths By default SmartTime only shows one path for each Expanded Path You can change this default in the SmartTime Options dialog box The Expanded Path View also includes a schematic of the path and a path profile chart for the paths selected in the Expand...

Page 28: ...wser to display a given number of paths depending on your SmartTime Options settings 100 paths by default 2 Enter the filter criteria in both the From and To fields and click Apply Filter This limits the display to the paths that match your filter criteria Figure 13 Maximum Delay Analysis View 3 Click Store Filter to save your filter criteria with a special name The Create Filter Set dialog box ap...

Page 29: ...martTime Static Timing Analyzer User Guide 29 Figure 15 my_filter01 Figure 16 Updated Maximum Delay Analysis View Repeat the above steps and cascade as many sets as you need using the filtering mechanism ...

Page 30: ...rename a set created with filters 1 Select the set that uses filters 2 Right click the set and choose Rename Set from the shortcut menu 3 Edit the name directly in the Domain Browser To edit a specific filter in the set 1 Select the filter to edit 2 Right click the filter and choose Edit Set from the shortcut menu See Also SmartTime Options Store Filter as Analysis Set Edit Set dialog box ...

Page 31: ...SmartTime Static Timing Analyzer User Guide 31 Advanced Timing Analysis ...

Page 32: ...al clock domains that are subset of a single clock such as if you want to measure clock tree delay from an input clock to a generated clock you must configure Generated Clock Constraints for each of the clock domains in order for SmartTime to do execute the calculation and show timing for each of the inter clock domain paths Once you include the inter clock domains for timing analysis SmartTime an...

Page 33: ... Options The SmartTime Options Dialog Box dialog box appears as shown below 2 In the general category check the Include inter clock domains in calculations for timing analysis Figure 18 SmartTime Options Dialog Box 3 Click OK to save the dialog box settings See Also Inter Clock Domain Analysis Deactivating a Specific Inter Clock Domain Displaying Inter Clock Domain Paths ...

Page 34: ...en clock domain and CK1 To display an inter clock domain set 1 Expand the receiving clock domain of the inter clock domain in the Domain Browser to display its related sets For the inter clock domain CK1 to CK2 expand clock domain CK2 2 Select the inter clock domain that you want to see expanded from these sets Once selected all paths between the related two domains are displayed in Paths List in ...

Page 35: ...om the Pin Type drop down list 6 Type the inter clock domain name for example Clk2 in the filter box and click Filter 7 Click OK to begin filtering the pins by your criteria In this example get_clocks Clk2 appears in the From text box in the Set False Path Constraint dialog box 8 Repeat steps 3 to 7 for the To option in the Set False Path Constraint dialog box and type Clk2 in the filter box 9 Cli...

Page 36: ...itance and view the effect of this change in SmartTime Timing Analyzer refer to the following example The figure below shows the delay from FF3 to output port OUT2 It shows a delay of 6 603 ns based on the default loading of 35 pF Figure 21 Maximum Delay Analysis View If your board has output capacitance of 75pf on OUT2 you must perform the following steps to update the timing number 1 Open the I ...

Page 37: ...SmartTime Static Timing Analyzer User Guide 37 Generating Timing Reports ...

Page 38: ...ontribute to the most timing violations Datasheet report This report describes the characteristics of the pins I O technologies and timing properties in the design Constraints Coverage report This report displays the overall coverage of the timing constraints set on the current design Combinational Loop report This report displays loops found during initialization See Also Generating a Timing Repo...

Page 39: ...y from input I O to internal registers Maximum delay from internal registers to output I O Maximum delays for each clock network Maximum delays for interactions between clock networks To generate a timing report 1 From the SmartTime Max Min Delay Analysis View choose Reports Timer The Timing Report Options Dialog Box appears 2 Select the options you want to include in the report and then click OK ...

Page 40: ...o view the stored filter sets in the generated report using the timing report options The filter sets are listed by name in their appropriate section and the number of paths reported for the filter set is the same as for the main sets By default the filter sets are not reported Clock domains The paths are organized by clock domain Register to Register set This set reports the paths from the regist...

Page 41: ...t lists input to output paths and user sets Input to output paths are reported by default To see the user defined sets use the Timing Report Options Dialog Box Input to output set This set reports the paths from the top level design input ports to top level design output ports Expanded Paths Expanded paths can be reported for each set By default the number of expanded paths to report is set to 1 Y...

Page 42: ...SmartTime Static Timing Analyzer User Guide 42 Figure 23 Timing Report See Also Generating a Timing Report Timing Report Options Dialog Box ...

Page 43: ...ations To generate a timing violation report 1 From the SmartTime Max Min Delay Analysis View window choose Tools Reports Timing Violations The Timing Violations Report Options Dialog Box appears 2 Select the options you want to include in the report and then click OK The timing violations report appears in a separate window See Also Understanding Timing Violation Reports ...

Page 44: ...tion lists the timing information for the violated paths in the design The number of paths displayed is controlled by two parameters A maximum slack threshold to report A maximum number or path to report By default the slack threshold is 0 and the number of paths is limited The default maximum number of paths reported is 100 All clocks domains are mixed in this report The paths are listed by decre...

Page 45: ...SmartTime Static Timing Analyzer User Guide 45 Figure 24 Timing Violations Report See Also Generating a Timing Violation Report Timing Violations Report Options Dialog Box ...

Page 46: ...ints coverage report contains information about the constraints in the design To generate a constraints coverage report from the SmartTime Max Min Delay Analysis View choose Tools Reports Constraints Coverage The report appears in a separate window See Also Understanding Constraints Coverage Reports ...

Page 47: ...report either from within Designer or within SmartTime Analyzer The report contains three sections Coverage Summary Results by Clock Domain Enhancement Suggestions Figure 25 Constraints Coverage Report Coverage Summary The coverage summary gives statistical information on the timing constraint in the design For each type of timing checks Setup Recovery Output Hold and Removal it specifies how many...

Page 48: ...clock domain Enhancement Suggestions The enhancement suggestion reports per clock domain a list of constraints that can be added to the design to improve the coverage It also reports if some options impacting the coverage can be changed Detailed Stats This section provides detailed suggestions regarding specific clocks or I O ports that may require to be constrained for every pin port that require...

Page 49: ...report provides a list of the bottlenecks in the design To generate a bottleneck report from the SmartTime Max Min Delay Analysis View choose Tools Reports Bottleneck The report appears in a separate window See Also Understanding Bottleneck Reports Timing Bottleneck Analysis Options Dialog Box ...

Page 50: ...e bottleneck can only be computed if and only a cost type is defined There are two options available Path count This cost type associates the severity of the bottleneck to the count of violating critical paths that traverse the instance Path cost This cost type associates the severity of the bottleneck to the sum of the timing violations for the violating critical paths that traverse the instance ...

Page 51: ...ing Analyzer User Guide 51 Instance name refers to the output pin name of the instance Path Count Displays the number of violating paths which include the instance pin See Also Timing Bottleneck Analysis Options Dialog Box ...

Page 52: ...rts information about the external characteristics of the design To generate a datasheet report from the SmartTime Max Min Delay Analysis View choose Tools Reports Datasheet The report appears in a separate window See Also Understanding Datasheet Reports Timing Datasheet Report Options Dialog Box ...

Page 53: ...ics AC Electrical Characteristics Figure 27 Datasheet Report Pin Description Provides the port name in the netlist location on the package type of port and I O technology assigned to it Types can be input output inout or clock Clock ports are ports shown as clock in the Clock domain browser DC Electrical Characteristics Provides the parameters of the different I O technologies used in the design T...

Page 54: ...ximum frequency For each input it includes the external setup external hold external recovery and external removal for every clock where it applies For each output it includes the clock to out propagation time This section also displays the input to output propagation time for combinational paths See Also Generating a Datasheet Report Timing Datasheet Report Options Dialog Box ...

Page 55: ...ion where the loop is broken To generate the combinational loop report from the Tools menu choose Reports Combinational Loops Select either the Plain Text or Comma Separated Values option in the Combinational_Loops Report Options dialog box and click OK The plain text report will pop up in a new window you will be prompted to save the CSV in a directory of your choosing See Also Understanding Comb...

Page 56: ...national Loop Reports The combinational loop report displays all loops found during initialization and reports pins associated with the loop s and the location where the loop is broken Figure 28 Combinational Loop Report See Also Generating a Combinational Loop Report ...

Page 57: ...SmartTime Static Timing Analyzer User Guide 57 Timing Concepts ...

Page 58: ...nects SmartTime uses this information to check for timing violations Traditionally timing paths are presented by static timing analysis tools in four categories or sets Paths between sequential components internal to the design SmartTime displays this category under the Register to Register set of each displayed clock domain Paths that start at input ports and end at sequential components internal...

Page 59: ... at CK taken as a time reference instant zero It follows the clock network along the blue line until the clock pin on FF1 delay d1 Then it continues along the data path always following the blue line until the data pin D on FF2 Therefore Arrival_TimeFF2 D d1 d2 The required time represents when the data is required to be present at the same pin FF2 D Assume in this example that in the presence of ...

Page 60: ... the shortest insertion delay to the launching sequential component and the largest insertion delay to the receiving component SmartTime makes this distinction automatically Cross Probing Design objects displayed in SmartTime can be cross probed into other Libero SoC tools Libero SoC allows cross probing from SmartTime to the Constraints Editor but not vice versa and from SmartTime to Chip Planner...

Page 61: ...ay False Path and Multicycle Path Constraint menu items are grayed out if the Constraint Editor is not open Add the Constraint in the Add Constraint dialog box Note that the source from pin and destination to pin field are populated with the correct pin names captured from the SmartTime reported path Source Pin and Sink Pin you have clicked ...

Page 62: ...application Because Libero SoC allows you to cross probe design objects from SmartTime to Chip Planner you can better understand how the two applications interact with each other With cross probing a timing path not meeting timing requirements can be fixed with relative ease when you see the less than optimal placement of the design object in terms of timing requirements in Chip Planner Cross prob...

Page 63: ...w in Chip Planner displays the properties of Q 2 Note Show in Chip Planner is grayed out if Chip Planner is not already open Note You may need to zoom in to view the highlighted Q2 Macro in the Chip Canvas Figure 32 Cross Probing Macro Timing Path Example 1 Make sure that the design has successfully completed the Place and Route step 2 Open the SmartTime Maximum Minimum Analysis View 3 Open Chip P...

Page 64: ...y Analysis View Table Port Example 1 Make sure that the design has successfully completed the Place and Route step 2 Open the SmartTime Maximum Minimum Analysis View 3 Open Chip Planner 4 In the SmartTime Maximum Minimum Analysis View right click the Port CLK in the Path and choose Show in Chip Planner Note that the Port CLK is selected and highlighted in the Chip Planner Port View Note Show in Ch...

Page 65: ... Probing Port From the Properties View inside Chip Planner you will find useful information about the Port CLK you are cross probing Port Type Port Placement Location X Y coordinates I O Bank Number I O Standard Pin Assignment Figure 36 Properties View of Port CLK ...

Page 66: ...SmartTime Static Timing Analyzer User Guide 66 ...

Page 67: ...martTime Timing Analyzer Figure 37 32 bit Shift Register Use the links below to go directly to a topic Add a Clock Constraint Run Place and Route Maximum Delay Analysis with Timing Analyzer Minimum Delay Analysis with Timing Analyzer Changing Constraints and Observing Results To set up your project 1 Invoke Libero SoC From the Project menu choose New Project 2 Enter shift32 for your new project na...

Page 68: ...e Make the following selection from the pull down menu Family SmartFusion2 Die M2S090TS Package 484FBGA Speed STD Core Voltage 1 2 V Range COM 6 Click the M2S090TS 1FG484 part number and click Next 7 Accept the default settings in the Device Settings page and click Next 8 Accept the default settings in the Design Template page and click Next ...

Page 69: ...oject creation the source Verilog file you import will appear in the project s hdl folder under the File tab 10 Click Next to go to the Add Constraints Page 11 We are not adding any constraints Click Finish to exit the New Project Creation wizard 12 Click Use Enhanced Constraint Flow in the New Project Information dialog box Figure 39 New Project Information Dialog Box 13 After you have created th...

Page 70: ...me Static Timing Analyzer User Guide 70 Figure 40 HDL File shift_reg32 v in the Libero SoC File Window 14 Confirm that the shift_reg32 design appears in the Design Hierarchy window as shown in the figure below ...

Page 71: ...gure 41 shift_reg32 in the Design Hierarchy Window 15 In the Design Flow window double click Synthesize to run Synplify Pro with default settings A green check marks appears next to Synthesize when Synthesis is successful as shown in the figure below ...

Page 72: ...it Shift Register with Clock Enable Add a Clock Constraint 32 Bit Shift Register To add a clock constraint to your design 1 In the Design Flow window double click Manage Constraints The Constraint Manager appears as shown in the figure below Figure 43 Constraint Manager 2 Click the Timing tab ...

Page 73: ... Constraints Editor right click Clock under Requirement and select Add Clock Constraint The Create Clock Constraint Dialog Box appears Figure 45 Create Clock Constraint Dialog Box 5 From the Clock Source drop down menu choose the CLK pin 6 Enter my_clk in the Clock Name field 7 Set the Frequency to 250 MHz as shown in the figure below and leave all other values at the default settings Click OK to ...

Page 74: ... is listed and displayed in the Constraint Manager It is named user sdc and is designated as Target Note A target file is used to store newly added constraints from the Constraint Editor When the Constraint Editor is invoked and no SDC timing constraint file is present Libero SoC creates the user sdc file and marks it as target to store the timing constraints you create in the Constraint Editor 10...

Page 75: ...e and Route and choose Configure Options 2 Click the checkbox to enable Timing Driven layout in Layout Options and leave the other values at the default settings as shown in the figure below Click OK to continue Figure 49 Layout Options Dialog Box 3 Double click Place and Route inside the Design Flow window to start the Place and Route ...

Page 76: ...iming violations for that clock domain The Summary page displays a summary of the clock domain timing performance The Maximum Delay Analysis Summary displays Maximum operating frequency for the design External setup and hold requirements Maximum and minimum clock to out times In this example the maximum clock frequency for CLK is 609 75 MHz Figure 50 Maximum Delay Analysis Summary 2 Expand my_clk ...

Page 77: ...of the path as shown in the figure below Note The Timing Numbers in these reports may vary slightly with different versions of the Libero Software and may not be exactly the same as what you will see when you run the tutorial Figure 52 Register to Register Expanded Path View 5 Select External Setup to display the Input to Register timing Select Path 3 The Input Arrival time from the EN pin to Q_in...

Page 78: ...igure 53 SmartTime Input to Register Path Analysis 6 Select Clock to Output to display the register to output timing Select Path 1 The maximum clock to output time from Q_int 16 CLK to Q 16 is 9 486ns Figure 54 SmartTime Clock to Output Path Analysis ...

Page 79: ... below Figure 55 SmartTime Minimum Delay Analysis View Summary 2 Expand my_clk to display Register to Register External Hold Clock to Output Register to Asynchronous External Removal and Asynchronous to Register path sets 3 Click Register to Register to display the reg to reg paths The window displays a list of register to register paths and detailed timing analysis for the selected path Note that...

Page 80: ...0 MHz that you entered earlier Figure 57 Clock Constraint Set to 250 MHz 2 Select the second row Right click and choose Edit Clock Constraint This opens the Edit Clock Constraint dialog box Change the clock constraint from 250 MHz to 800 MHz and click the green check mark to continue 3 Click Open SmartTime Open Interactively 4 Choose Maximum Delay Analysis View to view the max delay analysis 5 Exp...

Page 81: ...rce file from the design shown below After routing the design you will analyze the timing set false path constraints and observe the maximum operating frequency in the SmartTime Timing Analysis window Figure 59 Example Design with False Paths Set Up Your False Path Example Design Project 1 Open Libero and create a new project from the Project menu choose New Project 2 Name the project false_path a...

Page 82: ...ilog File and Add Constraints You must import the false_path v Verilog source file into your design for this tutorial Cut and paste the Verilog program from false_path v to a file of the same name in a local directory Then run Libero SoC To import the Verilog Source File 1 From the File menu choose Import HDL Source Files 2 Browse to the location of the false_path v you saved and select it Click O...

Page 83: ...b pull down the Edit with Constraint Editor sub menu and select the Edit Place and Route Constraints The Constraints Editor will open 7 Double click on the Requirements Clock and the Create Clock Constraint dialog box will open 8 Double click the browse button for Clock Source and select CLK name it clk or whatever you want 9 Set the frequency to be 100 MHz Figure 62 Create 100 MHz clock 10 Click ...

Page 84: ...and Timing Verification Place and Route Your FALSE_PATH Design To run Place and Route on false_path design 1 In Libero SoC right click Place and Route and choose Configure Options Figure 64 Layout Options Dialog Box 2 Click the checkbox to enable Timing Driven layout in Layout Options and leave the other values unchecked Click OK to close the Layout Options dialog box 3 Right click Place and Route...

Page 85: ...s To perform Maximum Delay Analysis 1 Expand Verify Post Layout Implementation Right click Open SmartTime and choose Open Interactively to open SmartTime The Maximum Delay Analysis View appears as shown in the figure below The Maximum Delay Analysis View displays a summary of design performance and indicates that the design will operate at a maximum frequency of 442 48 MHz Note You may see a sligh...

Page 86: ...ip flop Q_reg Note that the path goes through the S input of multiplexer un1_MUX2 Figure 67 Expanded Path Looking at the code in false_path v we can see on lines 51 and 52 that D0_reg and D _inv_reg are always the inverse of each other in operational mode ie except for when RST is active Line 56 says that XOR2 is the XOR of these two signals and hence always 1 again except for when RST is active A...

Page 87: ...straint Manager tab Timing sub tab and again pull down the Edit with Constraint Editor and choose Edit Timing Verification Constraints 6 Leave this running and go back to SmartTime From the Tools menu select Max Delay Analysis 7 To set the path from D0_inv_reg CLK to Q_reg D as false select the row containing this path in the Register to Register path set right click and choose Add False Path Cons...

Page 88: ...ve the file and exit the Constraints Editor and SmartTime Figure 71 False Path Constraints in the SmartTime Constraint Editor 13 Place and Route is now invalidated and needs to be re run before we can do timing analysis again This is because we have changed the constraint file that we are using for both P R and for Timing Analysis It is possible to use different constraint files in which case we w...

Page 89: ...software Figure 72 Maximum Delay Analysis View Summary 16 Select the Register to Register set for my_clk Observe that only one path is visible from D2_reg CLK to Q_reg D This is the only path that propagates a signal as shown in the figure below Figure 73 Maximum Delay Analysis View Register to Register 17 Close SmartTime 18 Close Libero SoC ...

Page 90: ...put Q reg D0_reg reg D0_inv_reg reg D1_reg reg D2_reg reg Q_reg wire XOR2 synthesis syn_keep 1 wire AND2 synthesis syn_keep 1 wire OR2 synthesis syn_keep 1 wire MUX2 synthesis syn_keep 1 wire NOT1 synthesis syn_keep 1 wire NOT2 synthesis syn_keep 1 assign Q Q_reg synthesis syn_keep 1 always posedge CLK or posedge RST begin if RST begin D0_reg 1 b0 D0_inv_reg 1 b0 end else begin D0_reg D0 D0_inv_re...

Page 91: ...SmartTime Static Timing Analyzer User Guide 91 Q_reg NOT2 end not u1 NOT1 MUX2 not u2 NOT2 NOT1 endmodule ...

Page 92: ...SmartTime Static Timing Analyzer User Guide 92 Dialog Boxes ...

Page 93: ...box shown below from the SmartTime Max Min Delay Analysis View right click a path group in the Domain Browser and select Add Set Tip You can also click the icon in the SmartTime window bar to display the Add Path Analysis Set dialog box Figure 74 Add Path Analysis Set Dialog Box Name Enter the name of your path set Trace from Select whether you want to trace connected pins from Source to sink or f...

Page 94: ...ou can specify any string value for the Filter If you change the pin type the Source Pins shows the updated list of available source pins Sink Pins Displays list of available and valid pins You can select multiple pins To select all source pins click the Select All button beneath the Sink Pins list Select All Selects all the pins in the Sink Pins list to include in the path analysis set Filter Sin...

Page 95: ... right click any user created set in the Domain Browser and choose Properties from the shortcut menu Figure 75 Analysis Set Properties Dialog Box Name Specifies the name of the user created path set Parent Set Specifies the name of the parent path set to which the user created path set belongs Creation filter From Specifies a list of source pins in the user created path set To Specifies a list of ...

Page 96: ...Analysis view right click an existing filter set in the clock domain browser and then choose Edit Set from the shortcut menu Figure 76 Edit Path Analysis Set Dialog Box Name Specifies the name of the path you want to edit Creation filter Source Pins Displays a list of source pins in the user created path set Sink Pins Displays a list of sink pins in the user created path set See Also Using filters...

Page 97: ...ay Analysis View Figure 77 Customize Table Button The Customize Paths List Table Dialog Box appears Figure 78 Customize Paths List Dialog Box Available Fields Displays a list of all the available fields in the timing analysis grid Show These Fields in This Order Shows the list of fields you want to see in the timing analysis grid Use Add or Remove to move selected items from Available fields to Sh...

Page 98: ...SmartTime Static Timing Analyzer User Guide 98 Restore Defaults Resets all the options in the General panel to their default values ...

Page 99: ...Domains Dialog Box Available Clock Domains Displays alphanumerically sorted list of available clock pins The first clock pin is selected by default Show the Clock Domains in this Order Shows the clock pins you want to see in the Expanded Path view Use Add or Remove to move selected items from Available clock domains to Show the clock domains in this order or vice versa You can change the order in ...

Page 100: ...aint disables setup and hold checking for the specified paths Note The false path information always takes precedence over multiple cycle path information and overrides maximum delay constraints To open the Set False Path Constraint dialog box shown below from the SmartTime Constraints Editor choose Constraints False Path Figure 80 Set False Path Constraint Dialog Box From Specifies the starting p...

Page 101: ...User Guide 101 To Specifies the ending points for false path A valid timing ending point is a clock a primary output an inout port or a data pin of a sequential cell Comment Enables you to provide comments for this constraint See Also ...

Page 102: ...minimum delay analysis based on the Best Typical or Worst case By default maximum delay analysis is based on WORST case and minimum delay analysis is based on BEST case Clock Domains Include inter clock domains in calculations for timing analysis Enables you to specify if SmartTime must use inter clock domains in calculations for timing analysis By default this option is unchecked Enable recovery ...

Page 103: ... slack range between minimum slack and maximum slack This option is unchecked by default Show clock network details in expanded path Displays the clock network details as well as the data path details in the Expanded Path views Limit the number of parallel paths in expanded path to For each expanded path specify the maximum number of parallel paths that SmartTime displays The default number of par...

Page 104: ... Enables you to specify if you need to use loopback in bi directional buffers bibufs and or break paths at asynchronous pins Scenarios Enables you to select the scenario to use for timing analysis and for timing driven place and route Restore Defaults Resets all the options in the Analysis View panel to their default values ...

Page 105: ...o specify a filter To open the Store Filter as Analysis Set dialog box shown below from the SmartTime Timing Analyzer select a path and click the Store Filter button in the Analysis View Filter Figure 84 Store Filter as Analysis Set Dialog Box Name Specifies the name of the filtered set See Also Using filters ...

Page 106: ... Timing Bottleneck Analysis Options dialog box shown below from the SmartTime tool choose Tools Bottleneck Analysis General Pane Figure 85 Timing Bottleneck Report General Pane Dialog Box Slack Lets you specify whether the reported paths will be filtered by threshold and if so what will be the maximum slack to report By default the paths are filtered by slack and the slack threshold is 0 Restore D...

Page 107: ...ng violations for the violating critical paths that traverse the instance Limit the number of paths per section to Specify the maximum number of paths per set type that SmartTime will include per section in the report The default maximum number of paths reported is 100 Limit the number of parallel paths per section to For each expanded path specify the maximum number of parallel paths that SmartTi...

Page 108: ...ns Only cells that lie on these violating paths are reported Type This option can only be used in conjunction with clock The acceptable values are Value Description Register to Register Paths between registers in the design Asynchronous to Register Paths from asynchronous pins to registers Register to Asynchronous Paths from registers to asynchronous pins External Recovery The set of paths from in...

Page 109: ...orts only cells that lie on violating paths that start at locations specified by this option To Reports only cells that lie on violating paths that end at locations specified by this option Filter defaults to all outputs Restore Defaults Resets all the options in the Paths panel to their default values See Also Bottleneck Analysis ...

Page 110: ...in Delay Analysis view choose Tools Reports Datasheet You can generate your report in one of two formats Plain Text Select this option to save your report to disk in plain ASCII text format Comma Separated Values Select this option to save your report to disk in comma separated value format CSV format which you can import into a spreadsheet Figure 88 DataSheet Report Options Dialog Box Restore Def...

Page 111: ...ure 89 Timing Report Options General Dialog Box Format Specifies whether or not the report will be exported as a Comma Separated Value CSV file or a plain text file By default the Plain Text option is selected Summary Specifies whether or not the summary section will be included in the report By default this option is selected Analysis Specifies the type of analysis to be included in the timing re...

Page 112: ... to include the detailed path information in the timing report Limit the number of reported paths per section to Specify the maximum number of paths that SmartTime will include per section in the report Limit the number of expanded paths per section to Specify the maximum number of expanded paths that SmartTime will include per section in the report Limit the number of parallel paths in expanded p...

Page 113: ... either filters that you have created and stored on the default paths sets Register to Register Inputs to Register etc or Pin to Pin user sets By default the paths for these sets are not reported In addition specify whether the Inputs to Output sets will be included in the report By default the Input to Output sets are reported Restore Defaults Resets both options in the Sets panel to their defaul...

Page 114: ... be reported Include Clock Domains Enables you to include or exclude clock domains in the report Click the checkbox to include clock domains Limit reporting on clock domains to specified domains Lets you include one or more of the clock domain names in the box or include additional clock domain names using Select Domains Restore Defaults Resets all options in the Clock Domains panel to their defau...

Page 115: ...neral Dialog Box Format Specifies whether or not the report will be exported as a Comma Separated Value CSV file or a plain text file By default the Plain Text option is selected Analysis Lets you specify what type of analysis will be reported in the report By default the report includes Maximum Delay Analysis Slack Lets you specify whether the reported paths will be filtered by threshold and if s...

Page 116: ...maximum number of paths reported is 100 Limit the number of expanded paths per section to Specify the maximum number of expanded paths that SmartTime will include per section in the report The default number of expanded paths is 0 Limit the number of parallel paths in expanded path to For each expanded path specify the maximum number of parallel paths that SmartTime will include in the report The ...

Page 117: ...y lists features enhancements and bug fixes for the current software release that may impact timing data of the current design To generate a data change history from the Help menu choose Data Change History This opens a data change history in text format Figure 95 SmartTime Data Change History Report ...

Page 118: ...SmartTime Static Timing Analyzer User Guide 118 Tcl Commands ...

Page 119: ... type argument type value Specifies the predefined set type on which to base the new path set You can only use this argument with the clock argument not by itself Value Description reg_to_reg Paths between registers in the design async_to_reg Paths from asynchronous pins to registers reg_to_async Paths from registers to asynchronous pins external_recovery The set of paths from inputs to asynchrono...

Page 120: ...tern Specifies a filter on the sink pins of the parent set If you do not specify a parent set this option filters all pins in the current design Examples create_set name my_user_set source C sink D create_set name my_other_user_set parent_set my_user_set source CL create_set name adder source ALU_CLOCK type REG_TO_REG sink ADDER create_set name another_set source_clock EXTERN_CLOCK sink_clock MY_G...

Page 121: ...heck or min delay hold check Valid values max or min format csv text Specify the list format It can be either text default or csv comma separated values The former is suited for display the latter for parsing set name Displays a list of paths from the named set You can either use the set option to specify a user set by its name or use both clock and type to specify a set clock clock name Displays ...

Page 122: ...nalysis name Specifies the analysis for the paths to be listed The following table shows the acceptable values for this argument Value Description maxdelay Maximum delay analysis mindelay Minimum delay analysis index list_of_indices Specifies which paths to display The index starts at 1 and defaults to 1 Only values lower than the max_paths option will be expanded format value Specifies the file f...

Page 123: ...clock domain This option requires the type option type set_type Specifies the type of paths to be included It can only be used along with clock Valid values are reg_to_reg Paths between registers external_setup Path from input ports to data pins of registers external_hold Path from input ports to data pins of registers clock_to_out Path from registers to output ports reg_to_async Path from registe...

Page 124: ... Timing Analyzer User Guide 124 Example The following command displays the list of register to register paths of clock domain clk1 puts list_paths clock clk1 type reg_to_reg See Also create_set expand_path set_options ...

Page 125: ...ommand removes a set of paths from analysis Only user created sets can be deleted remove_set name name Parameters name name Specifies the name of the set to delete Example The following command removes the set named my_set remove_set name my_set See Also create_set ...

Page 126: ...de_user_sets yes no include_clock_domains yes no select_clock_domains clock name list limit_max_paths yes no include_pin_to_pin yes no bottleneck options cost_type path_count path_cost max_instances number from port pin pattern to port pin pattern set_type set_type set_name set name clock clock name from_clock clock name to_clock clock name in_to_out Arguments type Value Description timing Timing ...

Page 127: ...s This value is in nanoseconds ns By default there is no threshold all slacks reported print_paths yes no Specifies whether the path section clock domains and in to out paths will be printed in the timing report Yes to include path sections default and no to exclude path sections from the timing report max_expanded_paths number Specifies the max number of paths to expand per set This value is a po...

Page 128: ...by this option clock clock name This option allows pruning based on a given clock domain Only instances that lie on these violating paths are reported set_name set name Displays the bottleneck information for the named set You can either use this option or use both clock and type This option allows pruning based on a given set Only paths that lie within the named set will be considered towards bot...

Page 129: ...lating paths that end at locations specified by this option in_to_out Reports only instances that lie on violating paths that begin at input ports and end at output ports Example The following example generates a timing violation report named timing_viol txt The report considers an analysis using maximimum delays and does not filter paths based on slack threshold It reports two paths per section a...

Page 130: ...s changes made on constraints options and sets save Arguments None Example The following script sets the maximum number of paths reported by list_paths to 10 reads an SDC file and save both the option and the constraints into the design project set_options limit_max_paths 10 read_sdc somefile sdc save See Also set_options ...

Page 131: ...e tdpr_scenario value reset Arguments max_opcond value Sets the operating condition to use for Maximum Delay Analysis The following table shows the acceptable values for this argument Default is worst Value Description worst Use Worst Case conditions for Maximum Delay Analysis typical Use Typical conditions for Maximum Delay Analysis best Use Best Case conditions for Maximum Delay Analysis min_opc...

Page 132: ...ue Specifies whether or not timing analysis is allowed to cross asynchronous pins clear reset of sequential elements Default is no Value Description yes Enables breaking paths at asynchronous ports no Disables breaking paths at asynchronous ports filter_when_slack_below value Specifies a minimum slack value for paths reported by list_paths Not set by default filter_when_slack_above value Specifies...

Page 133: ...nt scenario to be used for timing driven place and route Default is Primary the default scenario reset Reset all options to the default values except those for analysis and TDPR scenarios which remain unchanged Examples The following script commands the timing engine to use best operating conditions for both max delay analysis and min delay analysis set_options max_opcond best min_opcond best The ...

Page 134: ...The standard method for verifying design functionality and performance Both pre layout and post layout timing analysis can be performed via the SDF interface exception See timing exception explicit clock Clock sources that can be traced back unambiguously from the clock pin of the registers they deserve including the output of a DLL or PLL filter A set of limitations applied to object names in tim...

Page 135: ...they are is enabled sources or clock sources This type of clock is generally associated with the use of gated clocks pre layout The state of the design before you run Layout In pre layout the placement and routing information are not available recovery time The amount of time before the active clock edge when the de activation of asynchronous signals is not allowed removal time The amount of time ...

Page 136: ...sure that all timing requirements are met It is well suited for traditional synchronous designs The main advantages are that it does not require input vectors and it exclusively covers all possible paths in the design in a relatively short run time synopsys design constraint SDC A standard file format for timing constraints Synopsys Design Constraints SDC is a Tcl based format used by Synopsys too...

Page 137: ... no source associated to it It is used to describe clocks outside the FPGA that have an impact on the timing analysis inside the FPGA For example if the I Os are synchronous to an external clock WLM Wire Load Model A timing model used in pre layout to estimate a net delay based on the fan out n ...

Reviews: