81
Starter Set Super-MP-3D (NIA and IA)
The steps below describe the very first time you set up the system in NIA.
and
This Set can bused in IA and NIA. Use NIA Software for Non-Inverse Architecture and
IA Software for Inverse Architecture.
6.3.1. Unpack the system. Look at a similar unpacking video of HW v4.9. The
videos have certain differences but the basic are the same:
Marvelmind Precise (+-2cm) Indoor "GPS"
6.3.2. Charge all the beacons using USB cable. Full charging takes about 1-2 hours
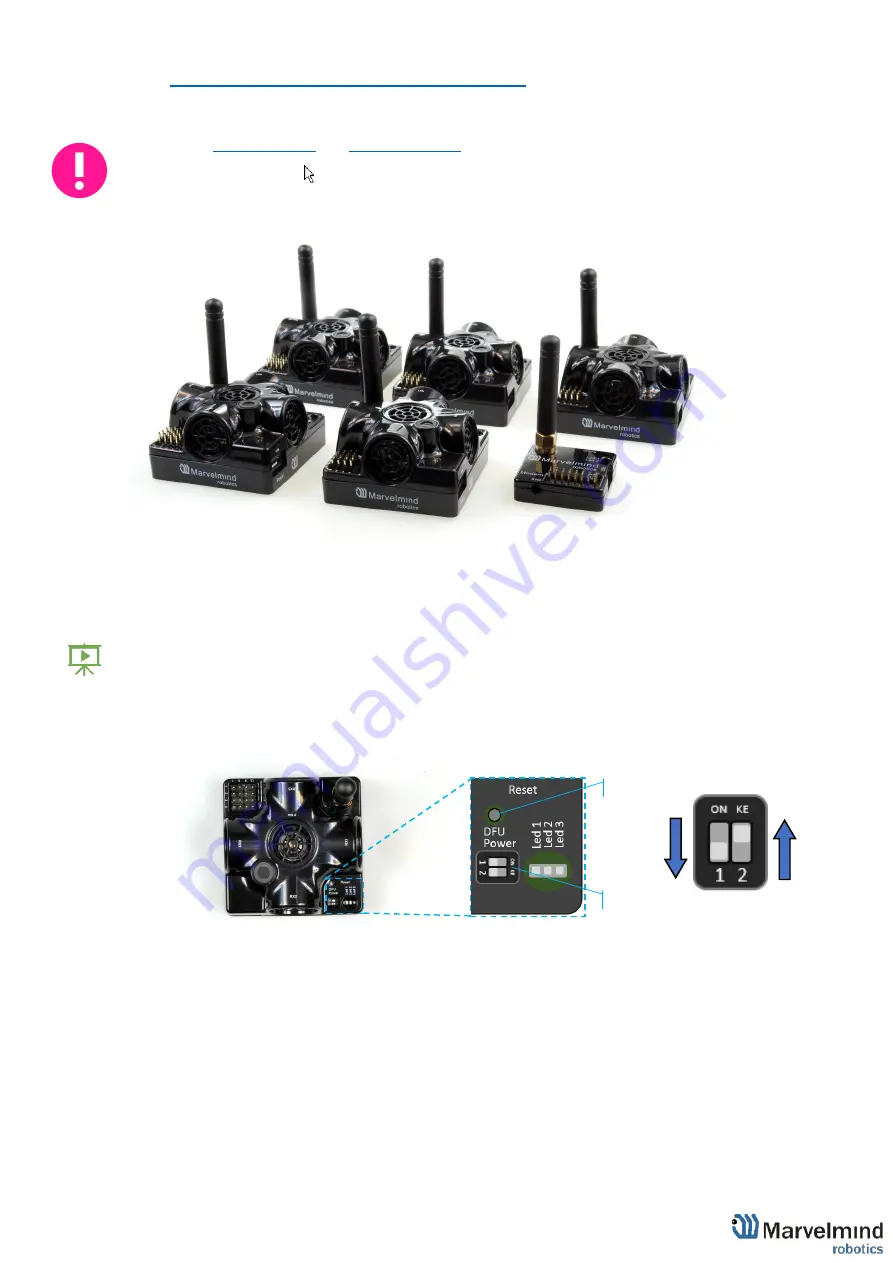
6.3.3. Turn the beacons on: Place DIP switches as shown on the picture below
6.3.4. Download SW Pack
6.3.5. Update all the beacons (HEX programming):
6.3.6. Run the Dashboard and update the SW for all beacons and modem using
Dashboard => Firmware => Choose the file => Program
6.3.7.
If you see the message “Not found modem connection to computer through
USB” in the Dashboard or your PC does not recognize beacons/modem, it
usually means that the STM32 driver is not installed. To install the driver,
download it with link at top window in the Dashboard and run the installation
file, then click on the link under and install the driver
Reset button
DIP switches
Summary of Contents for IA-04-2D-Badge
Page 1: ...Marvelmind Indoor Navigation System Operating manual v2022_08_24 www marvelmind com ...
Page 21: ...21 Beacon Mini TX Beacon Industrial RX Beacon Industrial TX Metal ...
Page 22: ...22 Industrial Super Beacon Plastic ...
Page 39: ...39 Figure 7 One External Microphone connection Figure 8 Two External Microphone connection ...
Page 44: ...44 Figure 3 One external microphone soldering Figure 4 Two external microphones soldering ...
Page 46: ...46 Figure 7 Two External Microphones final view Figure 8 Two External Microphones final view ...
Page 118: ...118 6 6 28 The system is now fully operational ...
Page 180: ...180 Floor 5 is enabled Floor 4 is enabled ...
Page 190: ...190 Z X ...
Page 207: ...207 Choose color and press OK Color applied Now background matches floorplan ...
Page 214: ...214 9 24 IMU axis positioning Super Beacon IMU axis positions HW v4 9 IMU axis positions ...
Page 215: ...215 Mini TX IMU axis positions Mini RX beacon IMU axis positions ...
Page 219: ...219 Real time player turned on ...
Page 223: ...223 10 2 Beacon HW v4 9 external interface 4x4 pinout top view ...
Page 224: ...224 10 3 Modem HW v4 9 external interface pinout top view ...
Page 232: ...232 If everything done correctly Own IP address will change Static IP settings completed ...
Page 238: ...238 How to change modes Choose hedge Go to Ultrasound TDMA mode Left Click to change ...


