background image

F5 3D Imaging System User Manual 


115


NOTE 

The Compact Installation option only installs the KaplaVision 
application and does not install either of the two Visual Studio 
options shown above. 
The Custom Installation option enables you to select which of the 
Visual Studio options to install. 

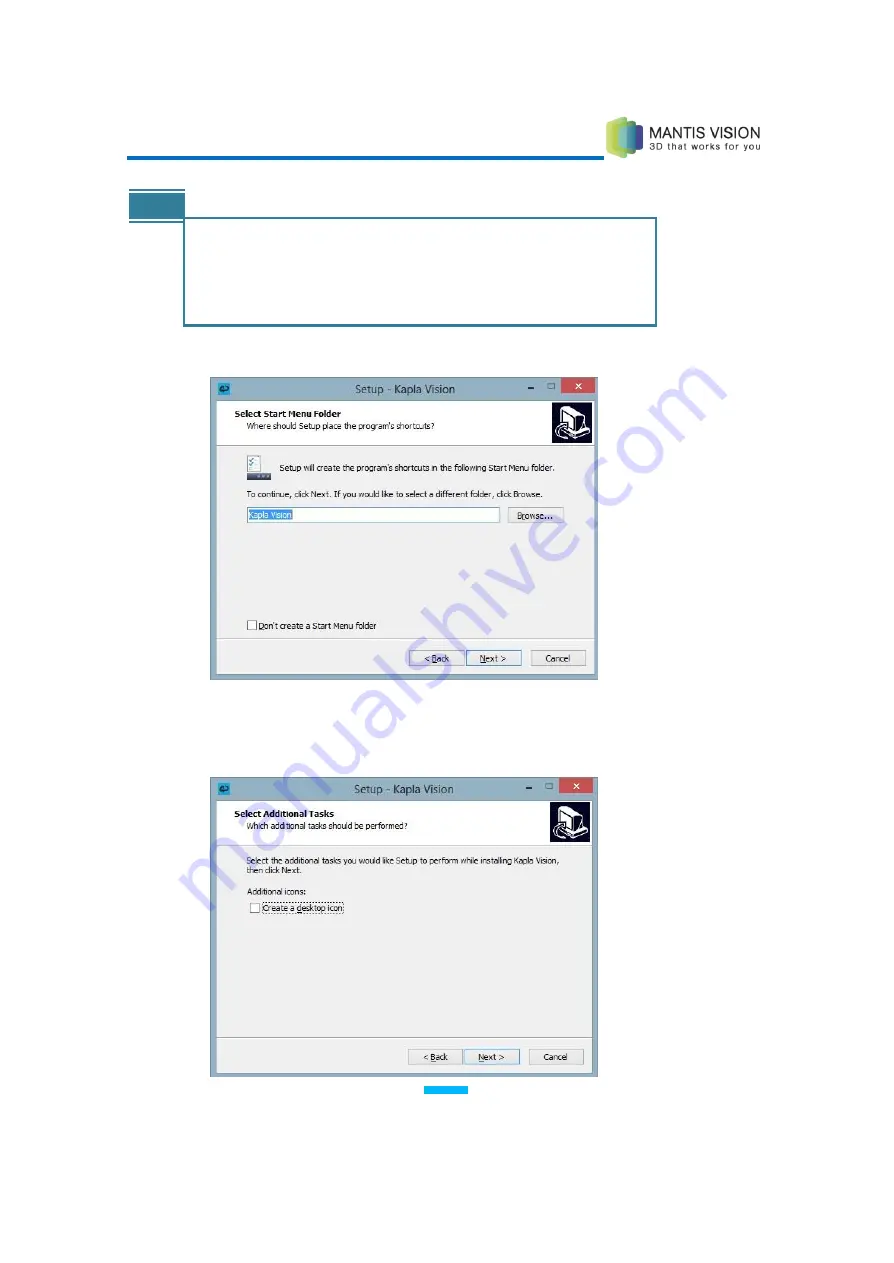
Click the Next button. The following window displays:  


Figure 108: KaplaVision Installation – 4 

We recommend that you select the Shortcut On Desktop option to add the 
KaplaVision icon to your desktop: 


Summary of Contents for F5-B

Page 1: ...F5 3D Imaging System User Manual 1 D Imaging System User Manual F5 3 Version 1 0 F5 B3DImagingSystem UserManual ...

Page 2: ...Mantis Vision LTD reserves the right to revise this publication and or make improvements or changes in the product s and or the program s described in this documentation at any time without prior notice The information in this document is provided in good faith However it is provided without any warranty that it is accurate or complete and on the express understanding that Mantis Vision LTD shall ...

Page 3: ...rovided by the KaplaVision application for decoding the video scanned by the F5 B Scanner in order to produce 3D point cloud files MPC files KaplaVision also enables you to stitch visualize and export the captured 3D data Chapter 4 Advanced Stitching Tool page 53 describes how to use the advanced KaplaVision Manual Stitching Tool Chapter 5 Advanced Measurement Tool page 75 describes how to use the...

Page 4: ...s 12 System Requirements 13 F5 B 3D Imaging System Overview 14 3D Camera Imager 15 TheKaplaVision Application 17 Workflow Using the F5 B 3D Imaging System 18 2 GETTING READY TO SCAN 28 Scanning Technique Guidelines 28 Preparing for Your First Scan 31 Disassembling After Scanning 31 3 KAPLAVISION APPLICATION 32 Live View Player View 34 Live View 34 KaplaVision Live View Toolbar 36 Recording Informa...

Page 5: ... Stitching Window Toolbar 56 Main Tab 56 Edit Segment Tab 57 Segment Registration Tab 57 Point Filter Tab 58 Point Removal Tab 58 Point Cloud Viewing Area 58 Controlled Stitching 62 Starting Automatic Registration 63 Segment Registration 63 Deleting Segments by Minimum Frame Size 70 Additional Features tab 72 Denoise 72 Mesh 73 Measurement tool 73 5 ADVANCED MEASUREMENT TOOL 75 Introducing the Mea...

Page 6: ...to a Point 98 Measuring the Angle Between Two Lines 100 Measuring the Angle Between Two Planes 101 Defining a Point at a Specific Angle from a Projected Line 102 Measuring the Diameter of a Projected Circle or Cylinder 104 Measuring the Diameter of a Free form Circle 106 Defining Missing Geometry Points Lines and Planes 108 Finding Missing Points 108 Finding Missing Lines 109 Finding Missing Plane...

Page 7: ...r practices that could result in death or serious injury It may also describe potential serious adverse reactions and safety hazards Caution indications relate to conditions or practices that are potentially hazardous that may result in minor or moderate injury to the user or damage to the equipment or other property Caution indications may also be used to indicate practices necessary for effectiv...

Page 8: ... exceeded when viewing a laser with the naked eye or with the aid of typical magnifying optics such as a telescope or microscope A Class 1M laser product does not pose any risk for the naked eye but may cause retinal injury for people using optical magnifiers M As the use of the MVC is in areas where magnifiers are not intended to be used there is no eye hazard and no need for protective eyewear I...

Page 9: ...adiation in excess of the AEL of Class 1M Controls The controls are located so that operation does not require exposure to radiation in excess of the AEL of Class 1M Labels The MVC F5 carries the following identification and classification labels Identification The figure below shows the identification label and its location on the F5 B device Figure 1 Location of the Identification Label on the F...

Page 10: ...e following basic safety guidelines must be adhered to at all times Do not modify any F5 B components Do not use a damaged Imager Do not remove the lens of the projector or camera Do not aim the laser output through optical instruments such as eye loupes magnifiers or microscopes within a distance of 100 mm 4 Do not remove the laser assembly access cover There are no user serviceable parts inside ...

Page 11: ...tis Vision Mantis Vision is the international leading developer and producer of user centric 3D model creation solutions Mantis Vision has a vision of a world enhanced through the use of 3D technology in which everyone has the access and tools to imagine create and experience in 3D Mantis Vision was founded in 2005 by a team of experts in 3D imaging graphics digital video animation computer graphi...

Page 12: ...rame Projector Wavelength 808 nm Infrared Projector Light Source VCSEL ARRAY Laser Class 3B Laser Product Eye Safety Rating Class 1M Laser Product see the Laser Safety Precautions section on page 8 for more details Ambient Operating Temperature Range 10 Celsius to 50 Celsius 14 to 122 Fahrenheit Ambient Charging Mode Range 10 Celsius to 40 Celsius 14 to 104 Fahrenheit Lighting Conditions Total dar...

Page 13: ...Requirements The following are the minimum system requirements for the KaplaVision workstation Windows 8 and above 64 bit 16 GB RAM Intel Quad Core Processor i7 recommended The following are the minimum system requirements for a Measurement Tool standalone installation Windows XP 32 bit Windows 7 32 bit Windows 7 64 bit Windows 8 64 bit Beta Any resolution monitor 4 GB RAM Any x86 x64 processor GP...

Page 14: ...e is a breakthrough single frame coding method for structured light imaging The F5 B Handheld Imager is capable of automatically capturing a dense 3D point cloud model of the environment in each frame Tens of thousands of points are decoded while maintaining high accuracy Figure 3 F5 B 3D Imaging System Suitcase Rugged Case Imager Power Supply USB Imager Cable Diffuser ...

Page 15: ... 3D point cloud or a single 3D frame 3D Camera Imager The 3D Camera Imager is a handheld 3D scanning unit for capturing 3D scenes Figure 4 Imager The handheld Imager combines a small video camera 1 3 Megapixel angular field of view 38 x 44 H x W and a laser based infrared light projector The camera and projector are mounted on the ends of an anodized aluminum dowel coated with an ergonomic rubberi...

Page 16: ...brating process see pg 117 The Laser button allow you to enable disable the connection between the scanner and the KaplaVision software see figure 4 The F5 B Imager has one socket that allows you to either connect it with USB 3 0 to the workstation or charge it to using a power source The scanned videos are stored on the workstation In order to operate it must be connected via a USB 3 0 cable to a...

Page 17: ... the captured scene viewing the 3D data from all angles Create 3D point cloud models of objects from the scene and export them to various file formats compatible with standard third party 3D processing software tools Figure 5 KaplaVision Main Window The KaplaVision application also includes the following Mantis Vision Advanced Stitching Tool page 53 which allows you to combine align register and m...

Page 18: ... Equipment Step 2 Scanning Step 3 reviewing the scan in KaplaVision Step 4 Registration Various Step 5 Point Cloud Processing Step 6 Additional Options Step 7 Exporting Figure 7 Workflow Using the F5 B 3D Imaging System 1 Connecting Scanning Equipment Connect the handheld Imager to the windows based Workstation on which the KaplaVision application has been installed 2 Scanning Before you start sca...

Page 19: ...ow Figure 2 KaplaVision Main Window 4 If this is the first time you are using KaplaVision or the first time you are using a specific F5 B Imager then you must check that the correct path to the configuration file and the calibration files is specified as described on page 51 5 Click the Live Decoding button in the KaplaVision toolbar to select whether the images scanned by the F5 B are decoded imm...

Page 20: ... KaplaVision window to specify the type of decoding that the F5 B performs as shown below Figure 4 Selecting the Decoding Mode Point Cloud The F5 B scanner records the captured object as a point cloud in the specified option from the decoding list Depth Map The F5 B scanner records the captured object as a depth map in the specified option from the decoding list only relevant if the recording mode...

Page 21: ...ut1 mis You can start the decoding after you finish recording by right clicking one of these files and selecting Decode Figure 5 Recording 2D Decoding Recording 3D The F5 B scanner records the raw 2D data of the color and infrared scanned images and as you finish recording KaplaVision automatically decodes the scanned video This option generates an mpc file name mpc You can start the registration ...

Page 22: ...e scanned video and then stitches its frames segments together This option generates a MPC file Point Cloud Specifies that the F5 B scanner records the raw data of the color and infrared scanned images After you finish scanning KaplaVision automatically decodes stitches and runs global registration on the captured scene This option generates a MPC_stitched file Clean Point Cloud The F5 B scanner r...

Page 23: ...e of tasks such as decoding stitching and then denoising using default settings Each of these tasks can be performed separately and with more control using the relevant tools as described in the Toolbars section on page 56 7 Click the Rec recording button at the bottom of the KaplaVision window to start scanning according to the selected Recording Mode Alternatively you can press the F5 B Record S...

Page 24: ... the File Explorer TIP When scanning large objects you may want to capture the object in a few scanning sessions instead of a single large session For example you can scan one side stop recording and then scan another side This method may improve scanning quality NOTE Each time the Imager is stopped a new video file is created These files are viewable in the KaplaVision application and can later b...

Page 25: ...step is only relevant if you selected 2D Recording mode as described on page 20 Each video created by the F5 B scanner must be processed in order to create a point cloud If you selected one of the following recording modes then this process has already been automatically performed In this case you can skip this step and go directly to step 11 Recording 3D Point Model Clean Point Cloud Sequential p...

Page 26: ...gistered and merged to re create the 3D structure of the scanned scene If you selected one of this recording modes Point cloud Sequential Point Cloud Clean Point Cloud then this process is performed automatically In this case you can skip this step and go directly to step 12 To stitch an MPC file in KaplaVision Right click the MPC file in the File Explorer and select the Registration option A new ...

Page 27: ...file is created in the same folder as the MPC file and the string _denoise is appended to the end of the file name If you selected the Clean Point Cloud Recording mode then the denoising process is performed automatically In this case you can skip this step and go directly to step 13 13 Optional Surfacing Meshing You can surface an MPC file by clicking the Surfacing Meshing button This can also be...

Page 28: ...ideo taken while the projector is turned off or blocked Angles Rotate the Imager around the object to cover it from all sides and directions Try to include shots where the Imager is parallel to the object s surfaces from all angles for optimal accuracy Avoid covering any facet with only acute angled shots Distance Record specific objects from a distance of 1 0 m 1 5 m 40 60 for the best accuracy D...

Page 29: ...ake it more difficult in later stages for the software to determine the correct alignment between frames during the stitching process Scene Size The Imager was designed to work optimally for objects between the size of a computer mouse and a small room meaning approximately 3m x 3m x 3m 10 x 10 x 10 Such scenes may be acquired in up to a minute As scenes become larger they become more complicated ...

Page 30: ...pture transparent or translucent objects for example bottles windows and so on However some transparent materials reflect IR light at certain angles and may yield some limited results Lighting Conditions The system can operate under any lighting condition including direct sunlight but works best in darkness or low light conditions Performance is decreased in direct sunlight Therefore the maximum r...

Page 31: ...NOTE The F5 B Scanner is provided pre calibrated Typically there is no need to calibrate it again unless you notice that KaplaVision has produced a few bad point clouds meaning when point clouds that do not properly represent the shape of the scanned object environment are produced To calibrate the F5 B Scanner click the Calibration button at the top right of the KaplaVision window and follow the ...

Page 32: ... and export the captured 3D data Figure 9 KaplaVision Main Window This chapter describes the following parts of the main KaplaVision window Viewers page 34 describes the two views Live View and 3D View that appear in center of KaplaVision s main window Start Recording Button page 23 describes how to start recording Toolbar page 41 describes the buttons in the various KaplaVision toolbars Calibrati...

Page 33: ...guration Button page 51 describes how to configure KaplaVision decoding Run Live 3D View Button Click this button to display what is currently seen by the F5 B 3D Camera Module Live In this mode you can start recording Calibration Button Click this button to calibrate the F5 B scanner as described in Appendix B Calibrating the F5 B scanner on page 117 ...

Page 34: ...e in full screen simply double click it in the viewer To return to the previous view simply double click the image again Live View The Live View is the default view that shows what is currently seen by the F5 B Camera Module Figure 10 Live View The right side of Live View displays the live Infrared image The left side of Live View displays either the live 2D image or the live decoded frame by fram...

Page 35: ...display view If the Player View is displayed then click the Run Live 3D View button at the top right corner of the window as shown below Figure 11 Displaying Live View To zoom in and out Click the image and scroll the mouse forward or backwards To rotate the color and infrared image 90 Click one of the rotation buttons in the toolbar to rotate the displayed infrared and color image 90 left or righ...

Page 36: ...e of these buttons rotates the displayed color and infrared image 90 left or right AWB Auto White Balance White balance is a Camera Module setting that adjusts for lighting in order to make white objects appear white in photos and video this feature is not relevant for the F5 B Scanner C 3D Resets the center and orientation of the displayed 3D image so that it is the same as is currently seen by t...

Page 37: ...ode from the dropdown menu in the top center of the KaplaVision window in order to specify the type of decoding that the F5 B scanner performs as described on page 20 Configuration page 51 This option enables you to specify the path to the files that define KaplaVision decoding configuration and device calibration files Camera Configuration Settings This option enables you to control camera parame...

Page 38: ...of the laser Indicates that the F5 B scanner is ready to scan or is scanning Player View The F5 B Scanner Player View displays either a Previously recorded 2D video OR Previously recorded 3D model or video as either a 3D Model Frame by frame 3D image To play a 2D recorded video 1 Double click Output0 mis infrared image or its associated Output1 mis color image in the File Explorer 2 Click the Play...

Page 39: ... option enables you to view all aspects of a 3D model that was decoded from a F5 B scanner recording 1 Double click an MPC file in the File Explorer Any file in which MPC is part of the file extension can be played 2 Move flip the 3D data as needed using the mouse Live Infrared Image Live Infrared Image ...

Page 40: ...oving the mouse or roll the mouse wheel The center of the point cloud always remains in the center of this view window holding ALT and roll the mouse wheel will enable you to enlarge reduce the size of the pixels which create the pointcloud To center the display of the 3D image in the window This option resets the center and orientation of the displayed 3D image so that it is the same as was seen ...

Page 41: ...bar is displayed in Player View which is described on page 38 To display the toolbar double click output0 mis or output1 mis Figure 17 KaplaVision 2D Live View Toolbar Convert to AVI Converts the video recorded in the selected infrared image file Output0 mis and its associated color image file Output1 mis into AVI video format Simply select either the Output0 mis or the Output1 mis file and then c...

Page 42: ... shown below Figure 18 KaplaVision 3D Image Folder Pane Each folder is automatically named according to the timestamp of when it stopped recording Searching for a Folder File To search for a KaplaVision folder file In the Search field at the top of the File Explorer enter any part of the name of the folder file for which you are searching A list of the folders files that match the specified string...

Page 43: ... File Explorer and another toolbar on the bottom that affects the selected file as shown below Figure 20 File Explorer Toolbars File Explorer Toolbar Top Figure 21 File Explorer General Top Toolbar Open file Enables you to import any MPC file to 3D live viewer Detailed View Enables you to view the files along with their details Large Icon View Displays the files using large icons ...

Page 44: ...es You can open a KaplaVision folder to display its files You can then view the file play the file or process decode stitch or denoise the file To process a file 1 Double click a folder in the File Explorer The folder expands to show the KaplaVision files that it contains Output0 mis Infrared Video Mantis Vision s proprietary format representing the scanned infrared video before it has been decode...

Page 45: ... see its full name 2 You can double click an icon to display it in the center of the KaplaVision window OR Right click a file icon to display a menu of options that can be executed on this file as described on page 45 Figure 24 File Explorer Right click Menu Options File Explorer Right click Menu The File Explorer enables you to right click any file or folder icon to display a menu of options as s...

Page 46: ...age For MPC files this opens the point cloud Open in T4 Opens the selected file in the Stitching window as described in the Chapter 4 Advanced Stitching Tool This option is only available for MPC files meaning files that have already been decoded by KaplaVision Open in Measurement Tool opens the selected file in measurement tools as described in chapter 5 Advanced Measurement tool This option is o...

Page 47: ...ode which contains X Y Z Nx Ny Nz R G and B Each scene can be exported as a single XYZ file containing all frames or as an XYZ file for each frame for dynamic motion and registration in third party software packages PTS The PTS is a Point cloud file format designed to simply store point clouds Each point is stored as several values in one line of the PTS file One line contains at least three value...

Page 48: ...the altered file Export MPC File to Select the format to which to export the MPC file Fill in the other fields in the window These fields differ according to the format to which you are exporting Camera space saves each point in the dimensions taken by the camera Single File per Frame when checked generate for each frame a single file Ignore normal less points 3 Click the Start button to start exp...

Page 49: ... in order to minimize the noise around the captured scene Neighbor Number set the number of proximate points for each point in the captured scene Denoise Percent adjusts the percentage of points to be included in the point cloud model Apply Average adjusts point positions according to the average point distances for its neighbor group Cast Average to Normal setting the mesh cast for matching accor...

Page 50: ...eate a mesh STL from a point cloud MPC file To surface a point cloud 1 Click the Meshing button at the bottom of the File Explorer The following window displays Figure 27 Setting the Meshing Configuration 2 Fill out the fields of this window as follows Select Location for Mesh Files Specify the destination to which to save the message file Select base file name specify the name of the altered file...

Page 51: ...hen KaplaVision is launched the first time If this is the first time you are using KaplaVision or the first time you are using a specific F5 B scanner then you must check that the correct path is specified to the decoding configuration file and the calibration files These files will be provided to you KaplaVision is provided with a configuration file in ZIP format that contains an RIG file suited ...

Page 52: ...h F5 B 3D video All subsequent processing of this raw data is saved in the same subfolder You can leave the default value Import Each device is provided by Mantis Vision preinstalled with this decoding configuration file navigate to the ZIP that was provided by Mantis Vision Config choose the correct imager number from the dropdown list 3 Click the OK button to save this configuration which is imp...

Page 53: ... on page 20 Manual Stitching KaplaVision provides an advanced Stitching Tool for manually stitching together various MPC files and or segments of the 3D point cloud that could not be stitched automatically by KaplaVision Why Stitch Together Multiple MPC Files Each time the F5 B Scanner is stopped a new video file is created These files are viewable in the KaplaVision application and can later be s...

Page 54: ...ing options to open the Stitching window Right click a 3D video that has already been decoded meaning an MPC file or a saved stitch file in the File Explorer as described on page 42 and select the Open T4 option You must specify the path of the T4 the first time you use this option Select an MPC file in the File Explorer and click the T4 tool in the toolbar at the bottom of the File Explorer as sh...

Page 55: ...ng Area page 58 Displays the point cloud scene and enables you to manipulate it Side Panel page 62 Displays the files segments and frames of the 3D video files being stitched Tabs and Options The Stitching window provides the following tabs and features Figure 31 Stitching Window Tabs and Options Stitching Window Toolbar page 56 Main Tab page 56 Edit Segment Tab page 57 Point Cloud Viewing Area Ta...

Page 56: ...erent file Save As PLY saves the changes made to the current file as a PLY file Main Tab The Main tab is the default viewing tab in which you can activate the Automatic Registration process Figure 32 Stitching Window Main Tab The Main tab provides the following options Sequential Registration Activates the automatic stitching process of the current scene Sequential devel Registration Activates the...

Page 57: ...The Edit Segment tab is used to view toggle between frames in the scene to split segments and to re register frames within a segment Figure 33 Stitching Window Edit Segment Tab The Edit Segment tab provides the following options Frame Counter Use the arrows to move through the scene or selected segment frame by frame Split Segment Enables you to split a segment manually for example where frames ar...

Page 58: ...nt Filter tab enables you to filter out unwanted points in the frames by adjusting distance and accuracy thresholds Figure 35 Stitching Window Point Filter Tab Point Removal Tab The Point Removal tab enables you to manually delete unwanted points within a selected area Square noise removal selection allow you to surround the unwanted points and delete them Eraser noise removal selection allow you ...

Page 59: ...are currently selected and displayed in the viewing area as shown below Figure 39 Selection Display The Selection segment includes the following viewing options Show Selected Frame Displays a single frame as selected in the frame selection counter slider in the Edit Segment tab or in the Side Panel Frame tab Show Selection and Previous Displays a single frame as selected in the frame selection cou...

Page 60: ...ayed in the Segments tab of the Side Panel Camera Settings Tools The Camera Settings tool group provides the following options Figure 40 View Options Toolbar Camera Settings Camera View toggle Two camera view modes are provided as follows Free Camera View Mode default Enables you to change the current perspective or fly through the scene To rotate the scene change its perspective hold down the lef...

Page 61: ...ing away Top View Views the point cloud from above with the Y Axis towards the viewer the X Axis pointing to the right and the Z Axis pointing up Isometric View Views the point cloud so that the angles between the projection of the X Y and Z axes are all the same or 120 Viewer Settings Tools The Viewer Settings tool group provides the following options Figure 41 View Options Toolbar Viewer Setting...

Page 62: ...the following tabs Files Displays a numbered list of composite files included in the point cloud model including the number of frames in each file Frames Displays a numbered list of all frames in the point cloud their associated segment number and number of points included in each frame Segments Displays a numbered list of all segments in the point cloud the number of frames included in each segme...

Page 63: ...idn t provide the sufficient result you can click the Segment Registration button Segment Registration During the Automatic Registration stitching process the KaplaVision aligns each frame to the frame preceding it When the KaplaVision recognizes a possible misalignment between frames it breaks into a new segment grouping This results in one or more segments Segment Registration is the process of ...

Page 64: ...tails about Three point Alignment mode you may refer to the Three point Alignment section on page 67 Adjusting Point Filters The adjustment of point filters is optional To discard unwanted or problematic points before starting Segment Registration 1 In the Stitching window select the Point Filter tab 2 Set the preferred values in the Distance in millimeters and Accuracy Thresholds by either enteri...

Page 65: ... page 67 NOTE Once a file is saved the point filters are saved with it and cannot be changed or removed Manual Alignment Sometimes it is necessary to manually manipulate position two segments into alignment for registration To perform manual alignment 1 Manipulate the selected segment Blue using the Ctrl button and the mouse to roughly align it with the reference frame The Shift button moves the s...

Page 66: ...ete the registration and combine the segments Figure 47 Merge Ready If the Merge icon on the toolbar is yellow as shown below align the segments more precisely and try again Figure 48 Merge Try Again If the Merge icon on the toolbar is red as shown below align the segments more precisely and try again or try to register different segments Figure 49 Segment Registration Failed TIP You can try to cl...

Page 67: ...e point alignment 1 Manipulate the reference segment Blue using the Ctrl button and the mouse and the selected segment Yellow using the Shift button and the mouse so that the two segments are placed side by side not overlapping Mouse manipulation controls operate as follows Rotate a segment by holding down the left mouse button while moving it over the scene Move pan segments in the scene by holdi...

Page 68: ...ot on the Segment Registration toolbar and repeat the previous step of this procedure for the second corresponding pair of points 4 Repeat with the third blue dot Figure 51 Stitching Window Three point Alignment 5 To clear all selections click Clear 6 Click Align to align the two point clouds based on the six defined points 7 Double click within the Viewing Area or click Register on the Segment Re...

Page 69: ...displayed align the segments more precisely and try again Figure 54 Toolbar Display Registered vs Not Registered NOTE An override option enables you to merge two segments should segment registration fail If Not Registered is displayed but you want to merge segments anyway click Merge A window opens Click Yes to continue or No to cancel Figure 55 Segment Registration Failed 9 Repeat this procedure ...

Page 70: ...most impossible to register them manually We recommend deleting them To delete segments by frame size 1 Select the Main tab of the Stitching window 2 To delete segments smaller than X frames adjust the number by clicking the up down icons until reaching the required minimum frame size 3 Click Delete Figure 56 Segment Deletion by Frame Size 4 Click Yes to proceed or No to cancel This action cannot ...

Page 71: ...F5 3D Imaging System User Manual 71 Figure 58 Stitching Window and Side Panel Segment Tab ...

Page 72: ...t the number of proximate points for each point in the captured scene Denoise Percent adjusts the percentage of points to be included in the point cloud model Apply Average adjusts point positions according to the average point distances for its neighbor group Cast Average to Normal setting the mesh cast for matching according to normal of the surface Erosion Number sets the number of points to be...

Page 73: ...nalyzed frames The higher the number the Octree Depth parameter is set the more importance is put on each point This will also mean exponentially longer mesh times The lower the Octree Depth number the less importance each individual point has Surface Trim Cut and delete selected portions of the captured scene Measurement tool The Measurement tool tab enables you to measure the distance or the ang...

Page 74: ...he designated point Measure the shortest distance between point and plane by pressing double click on two desired points in order to define a line and another double click to the designated point Measure the angle between two lines by pressing double click on two desired points in order to define a line and another double click to another point measure the angle between the line and the point Meas...

Page 75: ...me of a file This tool can be used together with the KaplaVision software package or as a standalone application 3D point clouds from the KaplaVision application can be opened in the Measurement Tool in order to analyze various types of measurements You can use it of the measure distances angles and diameters of planes cross sections circles points and so on To open the Measurement Tool Select an ...

Page 76: ...rts Figure 61 Measurement Tool User Interface Main Viewing Area Enables you to view and navigate through the scene in the Main Viewing Area Points lines planes and angles can be measured in this area Toolbar The Measurement Tool toolbars provide various tools for viewing and measuring the point cloud Figure 62 Measurement Tool Toolbars ...

Page 77: ...de various tools for viewing and measuring the point cloud Open Opens the Open File window Measurement Units Selects a measurement unit from the dropdown list mm in Measurement The Measurement toolbar provides various tools for measuring Figure 63 Measurement Toolbar Measures the distance between a point and a plane Measures the distance between two points Measures the distance between a point and...

Page 78: ...o points Creates a line by two planes Plane Toolbar Figure 66 Plane Toolbar Creates a plane by point sets Creates a plane with two planes Radius Defines the preferred radius of point selections Offset Adjusts a selected plane s position Circle Toolbar Figure 67 Circle Toolbar Selects a circle by three points Selects a circle by a point and a diameter Defines the diameter of a circle using the Circ...

Page 79: ...s specific plane NOTE Selecting this option automatically accesses the last plane defined using the Define Snap Plane tool To reset the snap plane create a new one using the Define dropdown list refer to the Defining a Snap Plane Using Point Sets section on page 81 for details Snap Line When this option is selected a permanent line is created using the Define Snap Line option Therefore all measure...

Page 80: ...ines a coordinate system Defines a cut plane Point Size Defines the size of the points in the point cloud display Show Frames Toolbar Figure 70 Show Frames Toolbar Shows all frames Views a single frame Shows the Frame field Texture Toolbar Figure 71 Texture Toolbar Adjusts the contrast mixer Adjusts the brightness mixer Toggles the Texture button Reset View Re centers the point cloud in the Viewin...

Page 81: ... plan using point sets 1 Click the Define button and select Define Snap Plane If you are creating a free form non snap plane for a measurement then skip this step and begin with step 2 2 Select the Choose Plane by Point Set option on the Plane toolbar 3 Double click a point in the point cloud from which to start defining the plane The software automatically detects and highlights neighboring co pl...

Page 82: ...on 5 Repeat steps 3 and 4 over different regions of the plane until the required points are selected NOTE The minimum number of selections is two More selections result in a more accurate plane If the preferred plane is very small decrease the value of the Radius parameter to ensure that the highlighted points are within the plane Including points that are not located on the plane reduces accuracy...

Page 83: ...n Existing Plane To define a snap plane using an existing plane 1 Click the Define button and select Define Snap Plane If you are creating a free form non snap plane for a measurement skip this step and begin with step 2 2 Select a previously defined plane by double clicking its entry in the Primitives or History panes The plane is displayed in the Viewing Area Figure 75 Selecting an Existing Plan...

Page 84: ...ints in the plane located at a distance smaller than defined in the Radius field refer to the Managing Measurements and Views section on page 110 OR Instead of defining a new point select a previously defined point by double clicking the entry in the Primitives or History panes 4 Press Shift Enter to accept the co planar selection 5 Repeat steps 3 and 4 of this procedure over different regions of ...

Page 85: ...nter The cut plane is defined and all points behind it are hidden The cut plane is recorded in the Primitives Plane Figure 78 Cut Plane View 7 To flip the cut plane so that all points in front of the plane are hidden select the Flip Cut Plane option in the Cut Plane dropdown list ...

Page 86: ...d select Define Cut Plane 2 Select a previously defined plane by double clicking its entry in the Primitives or History panes The plane is displayed in the Viewing Area Figure 80 Selecting an Existing Plane in the Primitives Pane 3 Press Enter The cut plane is defined and displayed in the Main Viewing Area 4 To flip the cut plane so that all points in front of the Plane are hidden select the Flip ...

Page 87: ...ble clicking a point in the point cloud The software automatically detects and highlights neighboring co planar points in the plane located at a distance smaller than defined in the Radius field refer to the Managing Measurements and Views section on page 110 OR Instead of defining a new point select a previously defined point by double clicking the entry in the Primitives or History panes 3 Press...

Page 88: ...adius parameter to ensure that the highlighted points are within the plane Including points that are not located on the plane reduces accuracy Figure 82 Defining the Second Plane 5 Press Enter to define the second plane The new cut plane is defined and displayed in the Main Viewing Area and all points behind it are hidden The entry is recorded in the Primitives Plane Figure 83 Cut Plane View ...

Page 89: ...ing Previously Defined Planes To use previously defined planes 1 Click the Define button and select Define Cut Plane 2 Click the Choose Plane by Two Planes option on the Plane toolbar 3 Select a previously defined plane by double clicking the entry in the Primitives or History panes the plane appears in the Viewing Area 4 Press Enter to define the first plane 5 Select another previously defined pl...

Page 90: ...pdown list 8 Click the icon to toggle the cut plane view on and off NOTE You can combine the two options described in the preceding sections For example you can create one plane by points and the second plane using a previously defined plane Defining a Snap Line by Two Points To define a snap line by two points 1 Click the Define button and select Define Snap Line If creating a free form non snap ...

Page 91: ... line OR Instead of defining a new point select a previously defined point in the Primitives pane NOTE Double click repeatedly until the required points are selected 5 Press Enter The line is defined and entered into the Primitives pane Figure 86 Defining a Snap Line Defining a Snap Line Perpendicular to Two Planes This option defines a snap line that intersects between two planes Using Points to ...

Page 92: ... and highlights neighboring co planar points in the plane located at a distance smaller than defined in the Radius field refer to the Managing Measurements and Views section on page 110 OR Instead of defining a new point select a previously defined point by double clicking the entry in the Primitives or History panes 4 Press Shift Enter to accept the co planar selection Figure 87 Defining the Firs...

Page 93: ...e within the plane Including points that are not located on the plane reduces accuracy Figure 88 Defining the Second Plane 6 Press Enter to define the second plane The intersection between the two planes is defined as a line that is displayed in the main Viewing Area The entry is recorded in the Primitives Plane Figure 89 Defining a Snap Line by Two Planes ...

Page 94: ...try from the Primitives or History panes 6 Press Enter to define the second plane The intersection between the two planes is defined as a line that is displayed in the Main Viewing Area The entry is recorded in the Primitives Plane NOTE You can combine the two options described in the preceding sections For example you can create one plane by points and the second plane using a previously defined ...

Page 95: ...s pane and then press Enter Figure 90 Defining a Plane for a Point Plane Measurement 4 Double click a point not on the plane by double clicking repeatedly until the preferred point is selected OR Instead of defining a new point select a previously defined point in the Primitives pane 5 The perpendicular distance from the defined plane is displayed in the Main Viewing window and in the Information ...

Page 96: ...click a point in the scene measurement s start point OR Instead of defining a new point select a previously defined point in the Primitives pane by double clicking the point in the Primitives pane 3 Double click a different point in the scene measurement s end point OR Instead of defining a new point select a previously defined point in the Primitives pane by double clicking the point in the Primi...

Page 97: ... 3D Imaging System User Manual 97 Figure 92 Distance Between Two Points 4 Press Enter The Plane to Point measurement is entered into the History pane and the subparts are entered into the Primitives pane ...

Page 98: ...ne to a Point To measure the distance between a line and a point 1 Make sure that either the Free Snap or Snap Plane option is selected The measurement returns a value of zero if used with the Snap Line option 2 Click the icon on the Measurement toolbar 3 Double click a point in the scene line s start point ...

Page 99: ...ine select a previously defined line by double clicking the line in the Primitives pane The line appears in the Viewing Area Figure 94 Defining the Line 6 Double click a point OR Instead of defining a new point select a previously defined point by double clicking the point in the Primitives pane The line appears in the Viewing Area The perpendicular distance from the line appears in the selected m...

Page 100: ...suring the Angle Between Two Lines To measure the angle between two lines 1 Make sure that either the Free or Snap Plane option is selected 2 Click the icon on the Measurement toolbar 3 Double click a point in the scene vertex point OR Instead of defining a new point select a previously defined point in the Primitives pane 4 Double click another point in the scene first line s end point OR Instead...

Page 101: ... Primitives pane Figure 96 Measuring the Angle Between Two Lines Measuring the Angle Between Two Planes To measure the angle between two planes 1 Click the icon on the Measurement toolbar 2 Define the first plane as described in the Defining a Snap Plane Using Point Sets section on page 81 and the Defining a Snap Plane Using an Existing Plane section on page 83 and then press Enter 3 Define the se...

Page 102: ... and the Defining a Snap Plane Using an Existing Plane section on page 83 2 Click the icon on the Measurement toolbar 3 Select the Choose a Line by Two Points option on the Line toolbar The cursor point now has a corresponding point which is its projection onto the snap plane NOTE All points or lines defined while in the Snap to Plane mode are based on the cursor s projected points and not on the ...

Page 103: ...ne by double clicking the point in the Primitives pane Figure 97 Defining the First Line 6 Press Enter The application displays the point and ray at the angle defined in the Angle field Figure 98 Defining the Second Line When changing the value the application adjusts the display accordingly ...

Page 104: ... the diameter of a circle or cylinder 1 Select the Snap Plane option on the Snap toolbar The last snap plane created appears 2 The snap plane used in this measurement must be perpendicular orthogonal to the cylinder s circle s axis point If necessary define a new snap plane using the Define Snap Plane option as described in the Defining a Snap Plane Using Point Sets section on page 81 and the Defi...

Page 105: ...he cursor s projected points and not on the actual position of the cursor 5 Double click three points on the circle s perimeter for a cylinder click the cylinder s walls as the points are projected onto the snap plane The circle is visible with its measurement OR Select a previously defined point s by double clicking the point in the Primitives pane 6 Double click repeatedly until the required poi...

Page 106: ...ter of a Free form Circle To measure the diameter of a free form circle not projected on a snap plane or line 1 Click Free Mode on the Snap toolbar 2 Click the Diameter of a selected circle icon on the Measurement toolbar 3 Select a circle creation option on the Circle toolbar 4 When the Choose a Circle by 3 Points option is selected Double click three points on the circle s perimeter The circle i...

Page 107: ...Primitives pane The circle s information in the History and Primitives panes is defined as the center point of the circle Figure 102 Diameter of a Free form Circle 5 When the Choose a Point and a diameter option is selected Adjust the Circle field value to reflect the preferred diameter Select a point in the point cloud the center point of the circle Press Enter The circle measurement is entered i...

Page 108: ...lies exactly at the intersection of the walls within the cloud is difficult and impossible when the specific point is missing To overcome such difficulties the Measurement Tool enables you to define points lines and planes using the intersections of other geometric primitives as described below Finding Missing Points To find the ceiling s corner based on the example above 1 Click the icon on the M...

Page 109: ...two planes To find the edge of an object 1 Click the icon in the Measurement toolbar 2 Click the Choose a Line by two planes option on the Line toolbar 3 Define the tabletop as a plane 4 Press Enter The first plane is defined 5 Define the tabletop s thickness 6 Press Enter The second plane is defined The intersection between the two planes is defined as a line 7 Double click a point on the far sid...

Page 110: ...eld Adjust the step size by typing in a different value Use a minus sign negative value to move in the opposite direction Managing Measurements and Views This section describes how to save or discard a measurement To save a measurement After performing any of the measurements before selecting a new function press Enter to save the measurement in the History and Primitives panes It is possible to u...

Page 111: ...fine button and select Define coordinate system 2 Double click the point where the origin of the coordinate system should be the center of the axis 3 Define a line by double clicking two points or using the line mode options described in the Defining a Snap Line by Two Points section on page 90 and the Defining a Snap Line Perpendicular to Two Planes section on page 91 This is the line that runs a...

Page 112: ... The defined coordinate system is only visible within the Measurement Tool Figure 103 Flip the Coordinate System 7 If necessary click File and Save to assign new coordinates to the saved stitch file MPC file The Save As window opens Figure 104 Save Option 8 Browse to the relevant location 9 Enter a file name 10 Click Save ...

Page 113: ...ce 3D point cloud files MPC files The F5 B Scanner installation files will be provided to you by Mantis Vision The installation files consist of a setup exe file and a file named Prerequisites that describes the requirements for the computer laptop on which you will install the F5 B Scanner application Installing How To To install KaplaVision 1 Run the provided setup exe file The following window ...

Page 114: ...tallation 2 3 Click the Next button The following window displays Figure 107 KaplaVision Installation 3 4 From the dropdown menu select Full Installation as shown above This option installs KaplaVision in addition to the two Visual Studio prerequisites shown above ...

Page 115: ...er of the two Visual Studio options shown above The Custom Installation option enables you to select which of the Visual Studio options to install 5 Click the Next button The following window displays Figure 108 KaplaVision Installation 4 We recommend that you select the Shortcut On Desktop option to add the KaplaVision icon to your desktop ...

Page 116: ...F5 3D Imaging System User Manual 116 Figure 109 KaplaVision Desktop Icon ...

Page 117: ... fields pointing to these files To calibrate the F5 B Scanner 1 Launch KaplaVision by double clicking the KaplaVision desktop icon shown below Figure 110a KaplaVision Desktop Icon On the Decoding Configuration Setting window select Default in the Config list as shown in figure 110b Figure 110b Decoding Configuration Setting Window 2 Check that the KaplaVision main window is then displayed showing ...

Page 118: ...ndow 3 Click the Calibration button at the top right corner of the window as shown above 4 Start recording according to the instructions displayed in the wizard Camera EPI and RIG as follows Perform the following Imager re calibration steps Camera Calibration page 121 ...

Page 119: ...F5 3D Imaging System User Manual 119 Figure 112 Calibration Camera Calibration Wall EPI Calibration page 123 ...

Page 120: ...F5 3D Imaging System User Manual 120 Figure 113 Calibration EPI Calibration RIG Calibration page 123 ...

Page 121: ...114 Calibration RIG Calibration 5 Compress the three files created during the calibration process into a ZIP file and save it under the name of the device Step 1 Camera Calibration To calibrate the camera 1 Put the Diffuser on Figure 115 Diffuser ...

Page 122: ...3 Cover the entire screen s image with the board by moving the Imager as shown below Figure 116 Covering the Calibration Board 1 Continue the covering movement for all four angles You must cover the calibration board from all angles within one minute as shown below Figure 117 Covering the Calibration Board 2 Start Here ...

Page 123: ...4 Start walking slowly toward the wall Walk very slowly until the screen starts to become shaded 5 After the screen starts to shade walk back at the same pace until within 2 meters 74 5 of the wall 6 Press the Stop button Step 3 RIG Calibration RIG calibration is similar to camera calibration with minor differences To perform rig calibration 1 Without using the Diffuser stand at an angle to the bo...

Page 124: ...rt at 70 cm 27 5 and move the Imager higher up to 95 cm 37 4 until one minute has elapsed You should first move to a distance of 70 cm 27 6 then to 95 cm 37 4 and then to 120 cm 47 2 Pay special attention to cover the entire screen including the corners 3 After completing step 3 click the Calibrate button located at the lower right of the window Figure 119 Standing at an Angle to the Board ...

Page 125: ...F5 3D Imaging System User Manual 125 Blank page for double sided printing ...

Page 126: ...F5 3D Imaging System User Manual 126 Contact Information 24 Imber St Petah Tikva 4951158 Israel Tel 972 35611 660 Fax 972 35611 126 support mantis vision com info mantis vision com www mantis vision com ...

Reviews: