Laser Technology TruPoint 200h User Manual Download Page 7

LTI TruPoint 200h User’s Manual • Section 1 - Introducing the LTI TruPoint™ 200h

 Page 5

Copyright (c)[2020] Laser Technology, Inc. All Rights Reserved. Unauthorized duplication, in whole or in part is strictly prohibited.

Section 1 - Introducing the LTI TruPoint™ 200h

Introducing the TruPoint 200h with Hybrid Measurement Technology (HMT) 

the world's first 

laser to provide accurate long-range outdoor measurements PLUS short-range high accuracy indoor 
measurements. The laser combines a traditional laser rangefinder which uses pulse technology, with 
a tape laser that uses phase technology. 

Features of the TruPoint 200h: 

Obtains extremely high accuracy at long ranges.

Captures highly accurate short-range measurements, indoors or outdoors.

Ensures targeting in every situation with bright a HUD LED display.
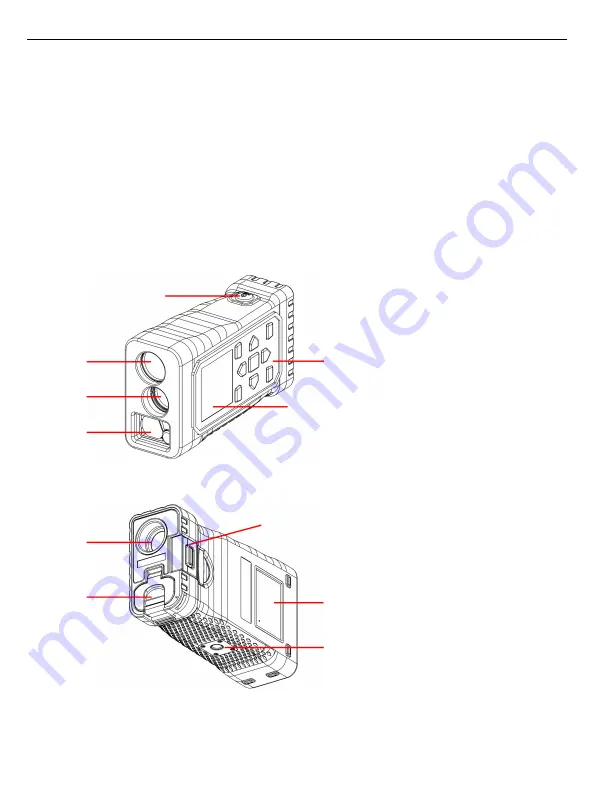
 Figure 3

Front / Top

Rear / Bottom

7

8

10

9

11

1

6

5

4

3

2

1

Phase Laser Lenses 

and Laser Pointer

2

Pulse Laser Transmit Lens

3

Pulse Laser Receive Lens

4

On/Fire Button

5

Key Pad: Navigation, On/Fire, 

Soft Keys, and Menu Buttons

6

Main Display (LCD)

7

Battery Door

8

Heads-Up Display (HUD),

2X Optics

9

End Piece

10

Product and Laser Class 

Information Labels

11

¼-20 Tripod Mount

**Draft B**

Summary of Contents for TruPoint 200h

Page 1: ... LTI 2020 TruPoint 200h 0144966 Laser Technology Inc TruPoint 200h User s Manual Draft B ...

Page 2: ...nology Inc Copyright Laser Technology Inc 2020 All rights reserved Patents This product is covered by the following issued U S Patents 9 354 051 Trademarks Criterion Impulse TruPoint and TruPulse are trademarks of Laser Technology Inc LTI Contact Information Laser Technology Inc 6912 South Quentin St Suite A Centennial CO 80112 3921 USA Phone 1 303 649 1000 1 800 790 7364 USA and Canada Fax 1 303 ...

Page 3: ...ting 7 Tilt Sensor 7 Section 2 Quick Start 8 Section 3 Basic Operations 10 Battery 10 Installation 10 Battery Voltage Level 10 TruPoint 200h Orientation 11 Screen Rotated View 12 Buttons 13 Powering OFF the TruPoint 200h 14 Backlight on Main Display 15 Brightness in HUD 15 Main HUD Display Indicators 17 Display Indicator Test 22 HUD 22 Error Codes 23 Measurement Point of Reference 24 Section 4 Set...

Page 4: ... Main Display Routine 49 HUD Routine 50 Addition Subtraction Routine 51 To Add Subtract a Measurement 51 Add Subtract a Function Routine Height Missing Line Area or Volume Values 52 Min Max Routine 53 Section 6 Units Menu 54 Units of Measure 54 Percent Slope 54 Section 7 Targeting Menu 55 Targeting Modes 56 Standard Single Shot Mode 56 Closest 56 Farthest 56 Range Gate 57 Filter 59 Continuous 59 T...

Page 5: ...tant paragraphs which must be adhered to in practice as they enable the product to be used in a technically correct and efficient manner Precautions Laser Classifications the TruPoint 200h is designed with two different laser technologies to make distance measurements Phase Technology A technique for measuring distances that uses a laser beam with sinusoidally modulated optical power being sent to...

Page 6: ...ions As with any laser device however reasonable precautions should be taken in its operation It is recommended that you avoid staring into the transmit aperture while firing the laser The use of optical instruments with this product may increase eye hazard Never attempt to view the sun through the scope Looking at sun through the scope may permanently damage your eyes Never point the unit directl...

Page 7: ...al laser rangefinder which uses pulse technology with a tape laser that uses phase technology Features of the TruPoint 200h Obtains extremely high accuracy at long ranges Captures highly accurate short range measurements indoors or outdoors Ensures targeting in every situation with bright a HUD LED display Figure 3 Front Top Rear Bottom 7 8 10 9 11 1 6 5 4 3 2 1 Phase Laser Lenses and Laser Pointe...

Page 8: ...geting Menu Closest Farthest Range Gate Filter Continuous Timer Settings Menu Bluetooth Vibrate Pointer HUD Brightness Rotation Lock Systems System Menu Data Recall HUD Aiming Favorites About Configuration Configuration Factory Defaults Firmware Upgrade Functions Menu Height 2D Missing Line Area Add Subtract Min Max Volume Units of Measurement Menu Feet Degrees Feet Percent Meters Degrees Meters P...

Page 9: ...rnal measurement path the light pulses reflected on a target and received from the TruPoint 200h have experienced a phase shift in relation to the light pulses received through the internal reference path That phase difference between those two signals is proportional to the distance between instrument and target Targets When selecting a target you should consider the following Color The brighter ...

Page 10: ...n internal systems check In the HUD all segments will be displayed for 3 seconds Figure 5B 2 The main display will be in the ready state Figure 5C The default display rotational lock is Automatic To change this option see Page 12 3 Adjust HUD Brightness Long press to activate the HUD Short press to increase brightness level Continue to short press the button to cycle through the brightness setting...

Page 11: ...f once a measurement has been acquired 6 Choose one of the following options Press the button to clear the measurement or error message Short press the button to clear the last measurement and activate the laser pointer Press and hold the button to clear the last measurement activate the laser pointer and acquire the next measurement Figure 6 These values will be saved in the Data Recall Page 26 T...

Page 12: ...t is recommended to use Lithium AA batteries vs Alkaline AA batteries The battery configuration is located on the lid of the battery compartment at the back of the instrument Battery Voltage Level The TruPoint 200h continuously monitors its power source LTI has defined an acceptable voltage range to ensure that the instrument has sufficient battery voltage to guarantee correct operation Battery Ic...

Page 13: ...e or in part is strictly prohibited TruPoint 200h Orientation This user s manual describes two display modes that can be used to hold the TruPoint 200h Horizontal mode LCD screen is normal HUD is not powered on Vertical mode HUD is powered on and LCD screen is 90 degree rotated Figure 8 HUD is enabled only when the unit is in vertical mode Figure 9 Draft B ...

Page 14: ...m Vertical to Horizontal Rotational Lock modes Automatic Vertical and Horizontal The Rotation Lock option is available in the Settings Menu Page 30 The icon will be displayed in the lower status area on the left side of the battery icon Figure 10 shows the screen display with the rotation icon highlighted V Vertical Orientation Only H Horizontal Orientation Only HUD will not be displayed A Automat...

Page 15: ... 11 The table below lists the buttons and the function of each NOTE Short press 0 1 1 second Long press 2 seconds Figure 11 FIRE Measurement Modes From the off state Short press to power ON the TruPoint 200h Measurement screen Short press turns on the laser pointer Distance Measurement Short press to fire the laser Settings Systems Function Targeting Units Menus Short press to select options in th...

Page 16: ...ing Reference Backlight Short press Change the measuring reference Long press Turn the LCD backlight on off Menu Short press to navigate up Function Settings Short press Enter the Function menu Long press Enter the Settings menu Targeting Units Short press Enter the Targeting menu Long press Enter the Units menu Right Navigation Short press Navigate right to next tile in a menu Long press HUD brig...

Page 17: ...d two different ways In the Settings menu 1 Long press the button 2 Navigate to the HUD Bright icon The current brightness level will be displayed Example HUD BRIGHT 2 3 Short press the button to change the level 4 Once the brightness level is selected press the Right Soft Key to accept To exit and not save the selected level press the Left Soft Key When the TruPoint 200h is powered OFF and then b...

Page 18: ...rt is strictly prohibited If the HUD is enabled by either fixed Vertical mode or Automatic mode with vertical position 1 Long press the 2 Short press the button to enter the setting mode within the HUD Display button to change the brightness value 1 5 3 Short press the button or button to accept brightness level and exit the brightness setting A B C Figure 12 Draft B ...

Page 19: ...to the figure and the table below for information about each indicator Main Display Top Message Status Line Indicates what Function is active or what Menu you are in Lower Status Line Indicates the Rotation Lock battery status Bluetooth activated and name of the icons Left and Right Soft Keys In the Measurement Screen the icons are the favorites selected to return to previous screen to select or a...

Page 20: ...measurement units Selection available in the Units of Measurement Menu Page 54 Percent Slope Feet Distance measurement units Selection available in the Units of Measurement Menu Page 54 Meters N A Battery Status In the main display indicates battery power N A Crosshair Serves as the aiming point reference both horizontally and vertically Laser Status Visible and Flashing Laser is firing Visible an...

Page 21: ...n the vertical Z plane a k a Rise Missing Line Measurement Routine ML Two step Missing Line Routine finds the connecting vector or missing line between two points HeightMeasurement Routine HT Three step height routine The final calculation represents the vertical distance between the points on the target represented by ANG1 and ANG2 or Closest Target Mode The unit logs multiple targets while is he...

Page 22: ...a rectangle or square Volume Uses three shots to determine the volume of a room Addition Subtraction Equal Add multiple shots together or subtract a negative space from a measurement This function can be used is horizontal measurement height 2D ML area and volume N A Min Max You sweep the laser pointer into a corner The longest measurement is recorded Very useful for accurate diagonal room or wind...

Page 23: ...Although the TruPoint 200h does not use this indicator it does appear during the Display Indicator Test Icon Location Farthest Closest Filter Continuous Timer TOP right Range Gate Battery Rotation Lock Lower Status Line Icon Highlights Explanation White background The icon is not selected Grey background The icon is selected and active White background with outer frame The icon is highlighted and ...

Page 24: ...horized duplication in whole or in part is strictly prohibited Display Indicator Test HUD 1 Start with the TruPoint 200h powered OFF press and hold the button 2 Look through the HUD and compare the in scope display to Figure 15 to verify that all indicators are working properly 3 Release to start normal operation Figure 15 Draft B ...

Page 25: ...r 06 E 06 Tilt Error Tilt data out of expected range Error 09 E 09 Rejected The acquired target is not in the user Range Gate values settings Error 52 E 52 Too Cold The temperature is too low displayed when the user tries to start a measurement Error 53 E 53 Too Hot The temperature is too high displayed when the user tries to start a measurement Error 54 E 54 Battery The battery voltage is too low...

Page 26: ...rt pressing the button The TruPoint 200h has a back Endpiece Figure 17 for taking measurements from corners or edges It is best to have the measurement reference point selected for the back of the instrument when taking measurements with the Endpiece Main Display HUD Description Measurement Reference is from the front of the unit Measurement reference is located at the center point of the unit the...

Page 27: ... will be displayed in the lower message area Short press the button to select the desired icon Bluetooth BLE BT Off Page 26 Vibrate On Off or Page 27 Aiming Laser On Off or Page 28 HUD Brightness Page 29 Rotation Lock or Page 30 System Menu Page 31 At any time while in one of the menu screens the user can go to the other menus by following the button presses explained in Figure 18 Figure 18 Short ...

Page 28: ...d buttons to highlight the Wireless Bluetooth icon BLUETOOTH will be displayed in the lower message area 2 Press the button to toggle Bluetooth from Off On BT ON BLE 3 Press the Left Soft Key to return to the main measurement screen This does not select an option and exits without saving the Bluetooth setting option The unit will return to the last saved option 4 Press the Right Soft Key to accept...

Page 29: ...te setting on off ON Turns the Vibrate feature on OFF Turns the Vibrate feature off 3 Press the Left Soft Key to return to the main measurement screen This does not select an option and exits without saving the Vibrate setting option The unit will return to the last saved option 4 Press the Right Soft Key to accept the Vibrate setting option and will exit to the main measurement screen 5 When a ta...

Page 30: ...otection is normally afforded by aversion responses including the blink reflex WARNING Looking directly into the beam with optical aids e g binoculars telescopes can be hazardous CAUTION Looking into the laser beam may be hazardous to the eyes To use the Aiming Laser 1 Long press the button and use the and buttons to highlight the Aiming Laser icon AIMING LASER will be displayed in the lower messa...

Page 31: ... Left Soft Key to return to the main measurement screen This does not select an option and exits without saving the HUD Brightness setting option The unit will return to the last saved option 4 Press the Right Soft Key to accept HUD Brightness setting option and will exit to the main measurement screen Option 2 1 When the unit is the in the main measurement screen in the vertical orientation viewi...

Page 32: ... options Automatic Allows the display orientation change from horizontal to vertical automatically Vertical Locks the display orientation for the vertical configuration Horizontal Locks the display orientation for the horizontal configuration 3 Press the Left Soft Key to return to the main measurement screen This does not select an option and exits without saving the HUD Brightness setting option ...

Page 33: ...sage area 2 Press the button to enter the System menu SYSTEM will be displayed in the upper message area Use the and buttons to highlight the desired icon The icon description will be displayed in the lower message area Short press the button to select the desired icon The System Menu includes five options used to set up the TruPoint 200h Data Recall HUD Aiming Favorites About Configuration 3 Pres...

Page 34: ...isplayed in the lower message area 2 Press the button to enter the System menu 3 Navigate to the Data Recall icon DATA RECALL will be displayed in the lower message area 4 Press the button to select Data Recall 5 Use the and buttons to scroll through the last measurements collected 6 Press the Left Soft Key to return to System Menu screen 7 Press the Right Soft Key or to return to the main measure...

Page 35: ...ns to highlight the System icon SYSTEM will be displayed in the lower message area 1 Press the button to enter the System menu 2 Navigate to the HUD Aiming icon HUD AIMING will be displayed in the lower message area 3 Press the button to select the HUD Aiming reticle options 4 Use the and buttons to scroll through the options Press the button to select the desired option 5 Press the Left Soft Key ...

Page 36: ...e button 3 Navigate to the Favorites icon FAVORITES will be displayed in the lower message area 4 Press the button to enter the Favorites menu It will show the same tile selections as the FUNCTION menu ie Height Area Volume Min Max etc 5 Use the and buttons to scroll through the options highlight the desired Function to make a Soft Key Favorite and press either the Left or Right Soft Key to make t...

Page 37: ...are Version Date of Manufacture Serial Bluetooth 5 Press the Left Soft Key to return to the System Menu screen 6 Press the Right Soft Key to return to the main measurement screen Configuration The Configuration menu includes 2 options Factory Defaults and Firmware Upgrade 1 Long press the button and use the and buttons to highlight the System icon SYSTEM will be displayed in the lower message area...

Page 38: ...ft Key to return to the main measurement screen 3 Long press button 2 seconds to restore factory settings the unit will restart with the TruPoint 200h splash screen By selecting Yes to the Factory Reset the following settings are restored to the factory default Only perform the Factory Reset if you want all settings to return to the original values The table below lists the parameters and the asso...

Page 39: ...ade or downgrade laser firmware Batteries are new or nearly new in the TruPoint 200h Android device is charged to at least half power or more TruPoint 200h is configured to receive a firmware upgrade TruPoint 200h is connected to WorkSite and the laser connection indicator is green Configure the Laser Before getting started confirm the current firmware version number on the TruPoint 200h To do so ...

Page 40: ...e the TruPoint 200h Firmware 1 Long press the button and use the and buttons to highlight the System icon and press the button 2 Navigate to the icon then press the button 3 Select Firmware Upgrade then press the button 4 Press the button The LCD on the laser should display the message shown in Figure 21 To Perform the Firmware Upgrade Using the WorkSite Android App see next page Figure 21 Draft B...

Page 41: ... laser Figure 22 In this example My laser is ready was chosen 3 Tap to select the newest firmware version in the list of available options and then tap Install Figure 23 A A progress bar will be displayed Figure 23 B The upgrade process can take up to 5 minutes DO NOT turn off the laser or the Android device until the upgrade completes 4 The TruPoint 200h will shut off upon upgrade completion The ...

Page 42: ...tton to select the Function icon Each option is described separately in the following sections Height Missing Line Area Volume Add Sub Min Max Height Routine Height measurements involve a simple routine that prompts you to take 3 shots to the target Horizontal Distance Inclination Angle base and Inclination Angle top The TruPoint 200h uses these results to calculate the height of the target Figure...

Page 43: ...ANG 1 prompting you to measure the inclination to base or top of the target 3 Press and hold the button and aim to the base or top of the target The measured inclination appears in the main display and is updated as long as us you continue to hold the button The measured inclination is locked when you release button The measured inclination appears briefly in the main display and then HT icon Incl...

Page 44: ...op 5 Press and hold the button and aim to the base or top of the target The measured inclination appears in the main display and is updated as long as us you continue to hold the button The measured inclination is locked when you release the button The measured inclination appears in the main display along with the Horizontal Distance measurement 6 Shot 3 is displayed in lower message area and the...

Page 45: ...rement Pressing the button soft key it will exit the HEIGHT Function and goes to main measurement screen Press the button to clear last measurement and to re shoot the previous point The laser is not active while measuring the ANG1 and ANG2 values As long as you hold the button the inclination reading is displayed and updated as the aiming point changes The measured inclination is based upon the a...

Page 46: ...distance and vertical distance as shown in Figure 25 If you were to actually stand at the location of Shot 1 and take a measurement to Shot 2 the calculated values would be from Shot 1 to Shot 2 If the first shot is father away and higher than the second shot the measurement values HD SD will be positive values and INC VD will be negative values If the first shot is closer than second shot the mea...

Page 47: ...stance appears briefly 2 seconds in the main display 3 Select your second target and look through the eyepiece using the crosshair to aim to your target The ML icon HD icon and Shot 2 will appear in the display which is prompting you to measure the Horizontal Distance to the target 4 Press and hold button The laser indicator is displayed while the laser is active The laser will remain active for a...

Page 48: ... is displayed in lower message area prompting you to take the seconds measurement using the laser pointer aim to the second target 4 Press and hold the button the laser will remain active for a maximum of 10 seconds while acquiring data about the target The measured horizontal slope vertical distance and inclination appears in the main display once the target is acquired for 2 seconds 5 The laser ...

Page 49: ...rget and press the button the laser pointer is active and the laser indicator will be displayed while the laser pointer is on Aim the laser pointer to the target Shot 1 is displayed in lower message area prompting you to measure the Slope Distance to the face of the target 4 Press and hold the button the laser will remain active for a maximum of 10 seconds while acquiring data about the target The...

Page 50: ...ough the eyepiece using the crosshair to aim to your target The Area icon SD icon and Shot 2 will appear in the display The SD icon is flashing which is prompting you to measure the Slope Distance to the face of the target 4 Press and hold the button The laser indicator is displayed while the laser is active The laser will remain active for a maximum of 10 seconds while acquiring data about the ta...

Page 51: ...ser pointer is active and laser indicator will be display the pointer is on Aim the laser pointer to the target Shot 1 is displayed in lower message area prompting you to measure the Distance to the face of the target 4 Press and hold the button the laser will remain active for a maximum of 10 seconds while acquiring data about the target The measured slope distance appears in the main display onc...

Page 52: ...indicator is displayed while the laser is active The laser will remain active for a maximum of 10 seconds while acquiring data about the target The measured Slope distance appears briefly 2 seconds in the main display 5 Select your second target and look through the eyepiece using the crosshair to aim to the target The Volume icon SD icon and Shot 3 will appear in the display The SD icon is flashi...

Page 53: ...Subtract Function menu 2 SELECT is displayed in the lower message area prompting you to use the arrow keys to select the measurement type for Addition Subtraction or 3 Use the and buttons to move the arrow to the measurement that you want to Add Subtract 4 Select your target and press the button the laser pointer is active and laser indicator pointer is on 5 Press and hold the button the laser wil...

Page 54: ...lowing is the addition sequence The subtraction sequence would be the same except for subtracting the measurements from one another If a larger value is subtracted from a smaller value a negative value will be calculated 7 The first Area is displayed with a and symbols to the left of the value the Left Soft Key is symbol and the Right Soft Key is the Area icon Short press the Left Soft Key to chan...

Page 55: ...the Min Max measurement routine 3 Select the first target and press the button the laser pointer is active and the laser indicator will be displayed when the pointer is on Aim the laser pointer to the target 4 Press and hold the button to measure to the target then pan to a new target The minimum and maximum targets measured will be displayed Button sequence during the Min Max routine Pressing the...

Page 56: ... units of measurements and to return to the main measurement screen Press the Left Soft Key or the right soft key to return to the main measurement screen without changing saving the units of measurement selection Percent Slope Percent slope indicated by Per is a calculation equal to 100 times the tangent of the inclination angle It is a variant way of expressing the inclination You can get percen...

Page 57: ...to the basic Measurement screen and have Targeting mode icon in upper right segment 3 To change the Targeting mode repeat step 1 4 To cancel the Targeting mode Short press the button Press the Right Soft Key OFF to cancel any targeting mode and the Standard single shot mode will be active Press the Left Soft Key back arrow to return to the Main Measurement screen to keep the selected targeting mod...

Page 58: ...There is no icon in the upper right of the main display when selected Closest The Closest icon is displayed in the upper right in the main measurement screen when selected Once the initial target is acquired the TruPoint can acquire additional targets by continuing to press the button The multi measurement indicator LCD HUD denotes that additional targets have been acquired The closest acquired ta...

Page 59: ...n you are getting the right target when objects near or just beyond the intended target present a danger of giving you false readings Range Gate has 4 modes Range Gate is disabled Short Gate is disabled Long Gate is disabled Short Gate only The Short Gate artificially extends the instrument s minimum range The gate window extends from the Short Gate value to the maximum range of the instrument Lon...

Page 60: ...e repeat steps to set the other gate if necessary Short press the right soft key to set and return to the main measurement screen Short press the Left Soft Key to cancel and exit to Targeting Menu screen If a gate is set the gate icon will be displayed in the lower status bar section of the main measurement screen Limits Short and Far gate limit 1 500 m 1 1 500 ft EXAMPLE The gate window is restri...

Page 61: ... will reject pulses from a non reflective target 1 Short press the button Use the and buttons to the to highlight the Filter icon 2 Press the button to turn on the Filter Mode and return to the Measurement screen Continuous The Continuous icon is displayed in the upper right in the main measurement screen and in the HUD when selected 1 Short press the button Use the and buttons to the to highlight...

Page 62: ...select the timer function 3 Use the and buttons to select the desired timer value in seconds and press the button to return to the Measurement screen with the Timer icon active Press the Left Soft Key to go back to Target menu with no change to the timer Press the right soft key to exit to the Measurement screen with no timer active 4 Press the button to activate laser pointer then press again The...

Page 63: ...sporting the TruPoint the unit should be secured in the provided carrying case The provided neck strap can be used when carrying the TruPoint in the field Cleaning Clean the TruPoint after each use before returning it to its carrying case Check all of the following items Excess moisture Towel off excess moisture and air dry the instrument at room temperature with the batteries removed and the batt...

Page 64: ...suse Abuse Non LTI modification Batteries or damage caused by batteries used in our products In no event will LTI be liable to you for any damages including any lost profits lost savings or other incidental or consequential damages arising out of the use or inability to use such product Furthermore LTI shall not be held responsible if an LTI authorized dealer has been advised of the possibility of...

Page 65: ...arranty Validation Card It must be completed and received by LTI in order to benefit from this limited warranty If an LTI software product requires registration this must also be completed to benefit from this limited warranty Receipt of the warranty validation card not only activates the limited warranty it also allows LTI to contact you directly when hardware or software upgrades become availabl...

Page 66: ...rmation Bluetooth Classic Interface The TruPoint 200h includes wireless Bluetooth communication The measurement data downloaded from the TruPoint is in ASCII Hex format and duplicates LTI s Criterion 400 CR400 communication protocol and download messages Download Message Format The CR400 data format follows the guidelines of the NMEA Standard for interfacing Marine Electronic Navigational Devices ...

Page 67: ...ication Display External LCD with Backlight Internal LED reticle with 2X magnification Laser Power Pulse Technology 1100 µW Phase Technology 950 µW maximum Pulse Beam Divergence 3 mrads Measurement Range Max Distance 500 m 1 640 ft Pulse Technology 100 m 328 ft Phase Technology Inclination 90 Accuracy Distance 2 5 cm 0 8 2 in Pulse Technology 1 5 mm 0 05 in Phase Technology Inclination 0 1 typical...

Page 68: ...with phase laser 0 00 m ft with pulse laser to high quality targets 0 0 m ft with pulse laser to low quality targets Hybrid Targeting Modes Closest Farthest Continuous Filter Range Gate Timer Units of Measurement Feet Meters Degrees Percent Slope Communication Bluetooth Classic and Bluetooth SMART Low Energy BLE wireless technology Onboard Memory Recall up to 50 measurements Power 2 AA batteries M...

Reviews: