


6-57
Using Various Functions > Functions
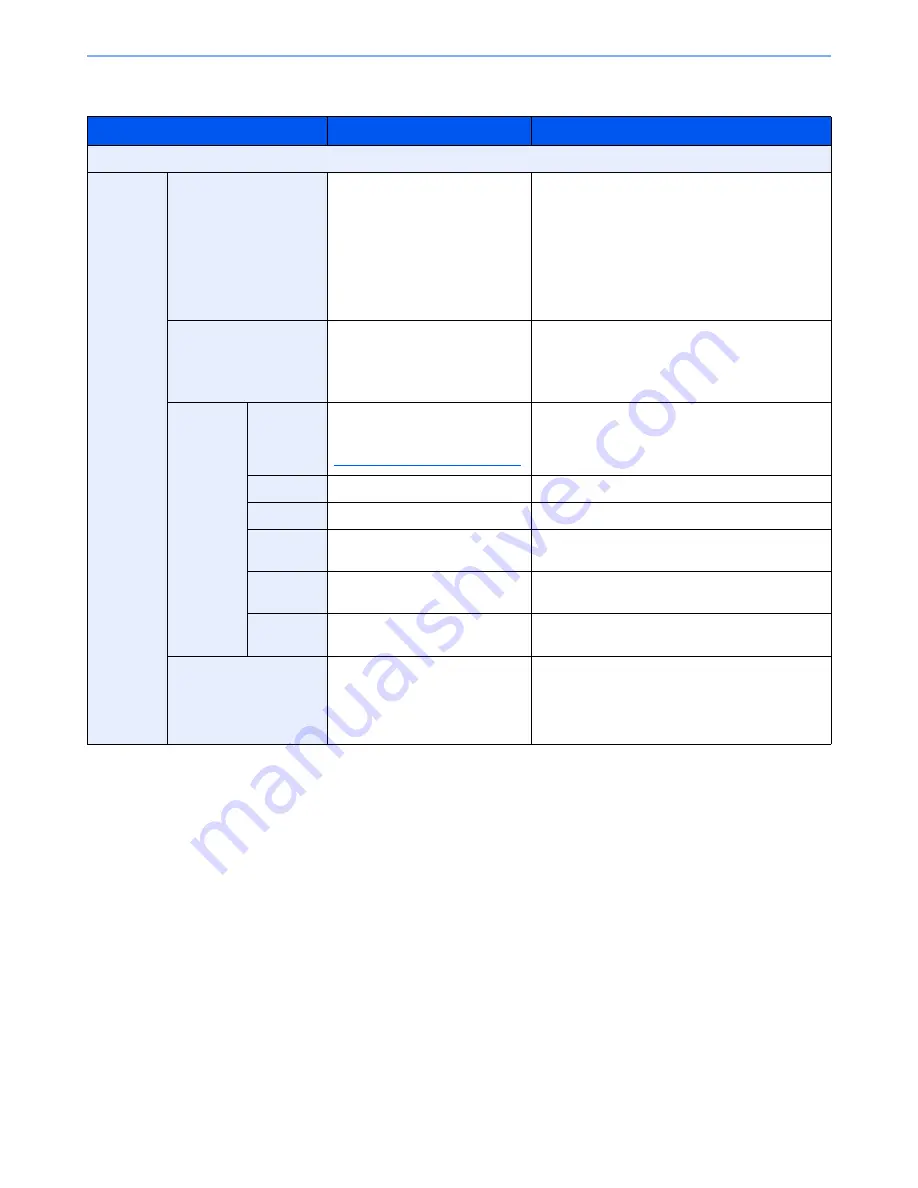
Sending/Storing
Item
Value
Description
Off
On
Stamp
Date, User Name, Serial Number,
Numbering, Text 1, Text 2
Set the stamp to be printed.
When [Text 1] or [Text 2] is selected, press
[Change] below and enter the text string.
If you selected [Date], press [Date Format] and
select [MM/DD/YYYY], [DD/MM/YYYY], or
[YYYY/MM/DD] to set the date format.
To set [Numbering], press [Numbering Default] and
set the starting sequence number (1 to 9999999).
Position
Top Left, Top Middle, Top Right,
Middle Left, Center, Middle Right,
Bottom Left, Bottom Middle,
Bottom Right, Detail
Set the stamp position to be printed.
Press [Position] and select the text stamp position.
Press [Detail] to specify the stamp position using
numeric values.
Font
Size
Registered font sizes are
displayed. For details on
registering font sizes, refer to
Font (Bates Stamp) on page 8-20
.
Set the font size of bates stamp.
Style
None, Bold, Italic, Bold/Italic
Set the font style of bates stamp.
Font
Courier, Letter Gothic
Set the font of bates stamp.
Color
Black, Red, Green, Blue, Cyan,
Magenta, Yellow, White
Set the color of bates stamp.
Density
10 to 100%
(in 10% increments)
Set the density of bates stamp color.
Set the value by pressing [+] or [-].
Display
Pattern
Transparent, Clipping, Overwrite
Set the display method of bates stamp.
Original Orientation
Top Edge on Top,
Top Edge on Left
Select the orientation of the original document top
edge to scan correct direction. Press [Original
Orientation] to choose orientation of the originals,
either [Top Edge on Top] or [Top Edge on Left].
Then press [OK].
Summary of Contents for TASKalfa 3051ci
Page 1: ...3051ci 3551ci 4551ci 5551ci OPERATION GUIDE ...
Page 17: ...xvi About the Operation Guide this Guide ...
Page 44: ...xliii Menu Map ...
Page 62: ...1 18 Legal and Safety Information Notice ...
Page 108: ...2 46 Installing and Setting up the Machine Transferring data from our other products ...
Page 164: ...3 56 Preparation before Use Registering Destinations in the Address Book ...
Page 182: ...4 18 Printing from PC Printing Data Saved on the Printer ...
Page 459: ...10 7 Troubleshooting Regular Maintenance 3 4 5 6 CLICK ...
Page 462: ...10 10 Troubleshooting Regular Maintenance 4 5 6 7 1 2 CLICK CLICK ...
Page 502: ...10 50 Troubleshooting Troubleshooting Large Capacity Feeder 1 500 sheet x 2 1 2 3 4 1 2 B1 B2 ...
Page 503: ...10 51 Troubleshooting Troubleshooting Multi Purpose Tray 1 2 3 4 ...
Page 505: ...10 53 Troubleshooting Troubleshooting Duplex unit 1 2 ...
Page 506: ...10 54 Troubleshooting Troubleshooting Duplex Unit and Cassette 1 1 2 3 CLICK ...
Page 508: ...10 56 Troubleshooting Troubleshooting Fixing unit 1 2 3 A1 ...
Page 510: ...10 58 Troubleshooting Troubleshooting Optional Job Separator Inner Job Separator 1 2 3 A1 ...
Page 511: ...10 59 Troubleshooting Troubleshooting Right Job Separator 1 2 3 Bridge Unit Option A1 1 2 ...
Page 512: ...10 60 Troubleshooting Troubleshooting 1 000 Sheet Finisher Option 1 2 3 D1 D2 2 1 D3 ...
Page 515: ...10 63 Troubleshooting Troubleshooting Tray B 1 2 3 Tray C 1 D2 D3 ...
Page 516: ...10 64 Troubleshooting Troubleshooting Conveyor 1 2 Mailbox Option 1 D2 D3 1 2 ...
Page 519: ...10 67 Troubleshooting Troubleshooting 5 Cassette 5 Option Side Feeder 3 000 sheet 1 2 2 1 ...
Page 526: ...10 74 Troubleshooting Troubleshooting Staple cartridge holder B C 1 2 3 4 2 1 CLICK ...
Page 574: ...Index 10 ...
Page 575: ......
Page 578: ...Rev 1 2013 6 2N4KDEN101 ...


