6-51
Using Various Functions > Functions
Memo Page
Delivers copies with a space for adding notes. You can also print two originals onto the same sheet with a space or add
lines to indicate page boundaries.
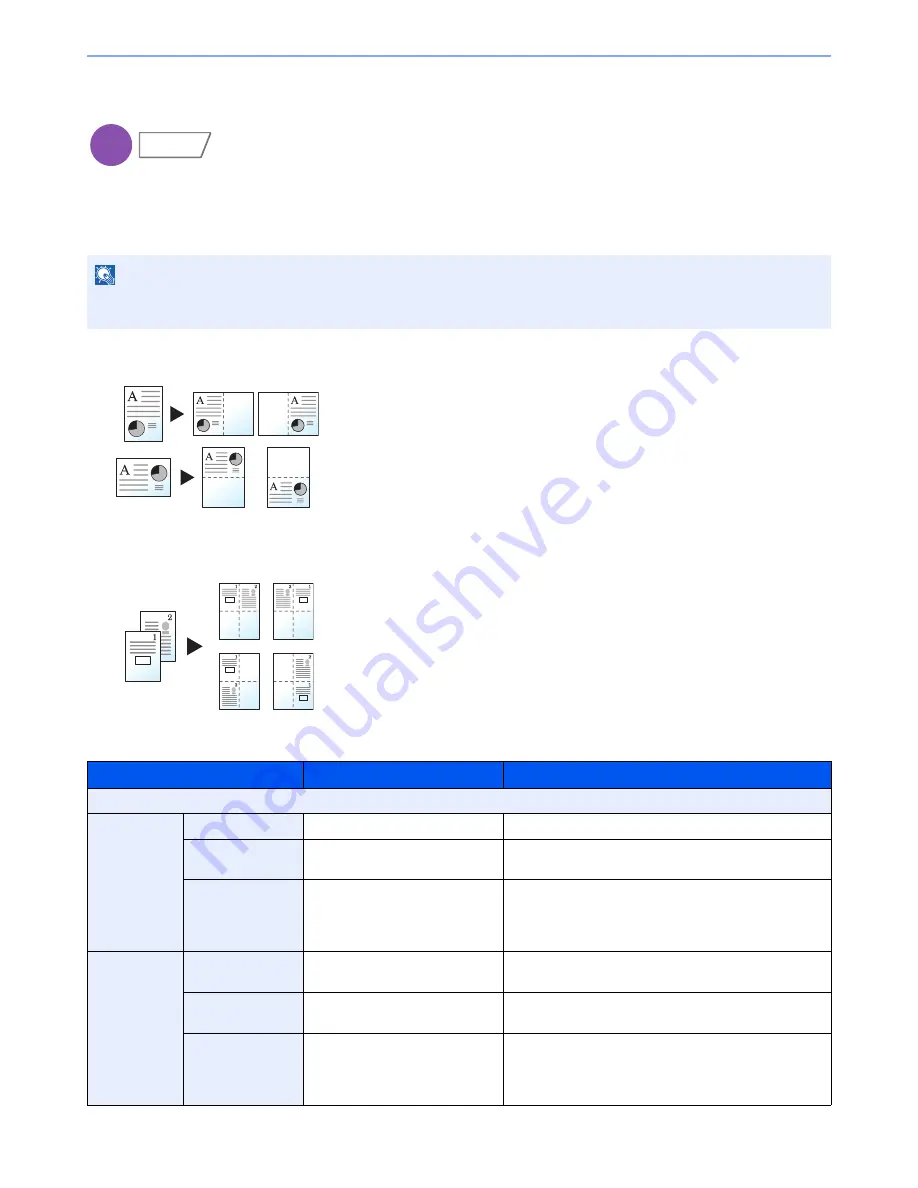
Press [Layout A] or [Layout B] and select the page layout from "Layout".
Layout A
Reduces images of each original page for printing onto half of a page,
leaving the other half blank for notes.
Layout B
Reduces images of two original pages for printing onto half of a page,
leaving the other half blank for notes.
NOTE
The paper sizes supported in Memo mode are A3, B4, A4, A4-R, B5, B5-R, A5-R, Ledger, Legal, Oficio II,
216 x 340 mm, Letter, Letter-R, Statement-R, Folio, 8K, 16K and 16K-R.
Item
Value
Description
Off
Layout A
Layout
Left/Top, Right/Bottom
Select how to lay out the pages of scanned original.
Border Line
None, Solid Line, Dotted Line,
Positioning Mark
Select the boundary line type. Press [Border Line] to
select the page boundary line, and press [OK].
Original
Orientation
Top Edge on Top,
Top Edge on Left
Select the orientation of the original document top edge
to scan correct direction. Press [Original Orientation] to
choose orientation of the originals, either [Top Edge on
Top] or [Top Edge on Left]. Then press [OK].
Layout B
Layout
Top L to R, Top R to L,
Top L to B, Top R to B
Select how to lay out the pages of scanned original.
Border Line
None, Solid Line, Dotted Line,
Positioning Mark
Select the boundary line type. Press [Border Line] to
select the page boundary line, and press [OK].
Original
Orientation
Top Edge on Top,
Top Edge on Left
Select the orientation of the original document top edge
to scan correct direction. Press [Original Orientation] to
choose orientation of the originals, either [Top Edge on
Top] or [Top Edge on Left]. Then press [OK].
Copy
Layout/Edit
Original
Copy
Original
Copy
Summary of Contents for TASKalfa 3051ci
Page 1: ...3051ci 3551ci 4551ci 5551ci OPERATION GUIDE ...
Page 17: ...xvi About the Operation Guide this Guide ...
Page 44: ...xliii Menu Map ...
Page 62: ...1 18 Legal and Safety Information Notice ...
Page 108: ...2 46 Installing and Setting up the Machine Transferring data from our other products ...
Page 164: ...3 56 Preparation before Use Registering Destinations in the Address Book ...
Page 182: ...4 18 Printing from PC Printing Data Saved on the Printer ...
Page 459: ...10 7 Troubleshooting Regular Maintenance 3 4 5 6 CLICK ...
Page 462: ...10 10 Troubleshooting Regular Maintenance 4 5 6 7 1 2 CLICK CLICK ...
Page 502: ...10 50 Troubleshooting Troubleshooting Large Capacity Feeder 1 500 sheet x 2 1 2 3 4 1 2 B1 B2 ...
Page 503: ...10 51 Troubleshooting Troubleshooting Multi Purpose Tray 1 2 3 4 ...
Page 505: ...10 53 Troubleshooting Troubleshooting Duplex unit 1 2 ...
Page 506: ...10 54 Troubleshooting Troubleshooting Duplex Unit and Cassette 1 1 2 3 CLICK ...
Page 508: ...10 56 Troubleshooting Troubleshooting Fixing unit 1 2 3 A1 ...
Page 510: ...10 58 Troubleshooting Troubleshooting Optional Job Separator Inner Job Separator 1 2 3 A1 ...
Page 511: ...10 59 Troubleshooting Troubleshooting Right Job Separator 1 2 3 Bridge Unit Option A1 1 2 ...
Page 512: ...10 60 Troubleshooting Troubleshooting 1 000 Sheet Finisher Option 1 2 3 D1 D2 2 1 D3 ...
Page 515: ...10 63 Troubleshooting Troubleshooting Tray B 1 2 3 Tray C 1 D2 D3 ...
Page 516: ...10 64 Troubleshooting Troubleshooting Conveyor 1 2 Mailbox Option 1 D2 D3 1 2 ...
Page 519: ...10 67 Troubleshooting Troubleshooting 5 Cassette 5 Option Side Feeder 3 000 sheet 1 2 2 1 ...
Page 526: ...10 74 Troubleshooting Troubleshooting Staple cartridge holder B C 1 2 3 4 2 1 CLICK ...
Page 574: ...Index 10 ...
Page 575: ......
Page 578: ...Rev 1 2013 6 2N4KDEN101 ...


