


3-32
Preparation before Use > Loading Paper
1
Display the screen.
1
Press the [
System Menu
] key.
2
Press [Cassette/MP Tray Settings].
2
Configure the settings.
1
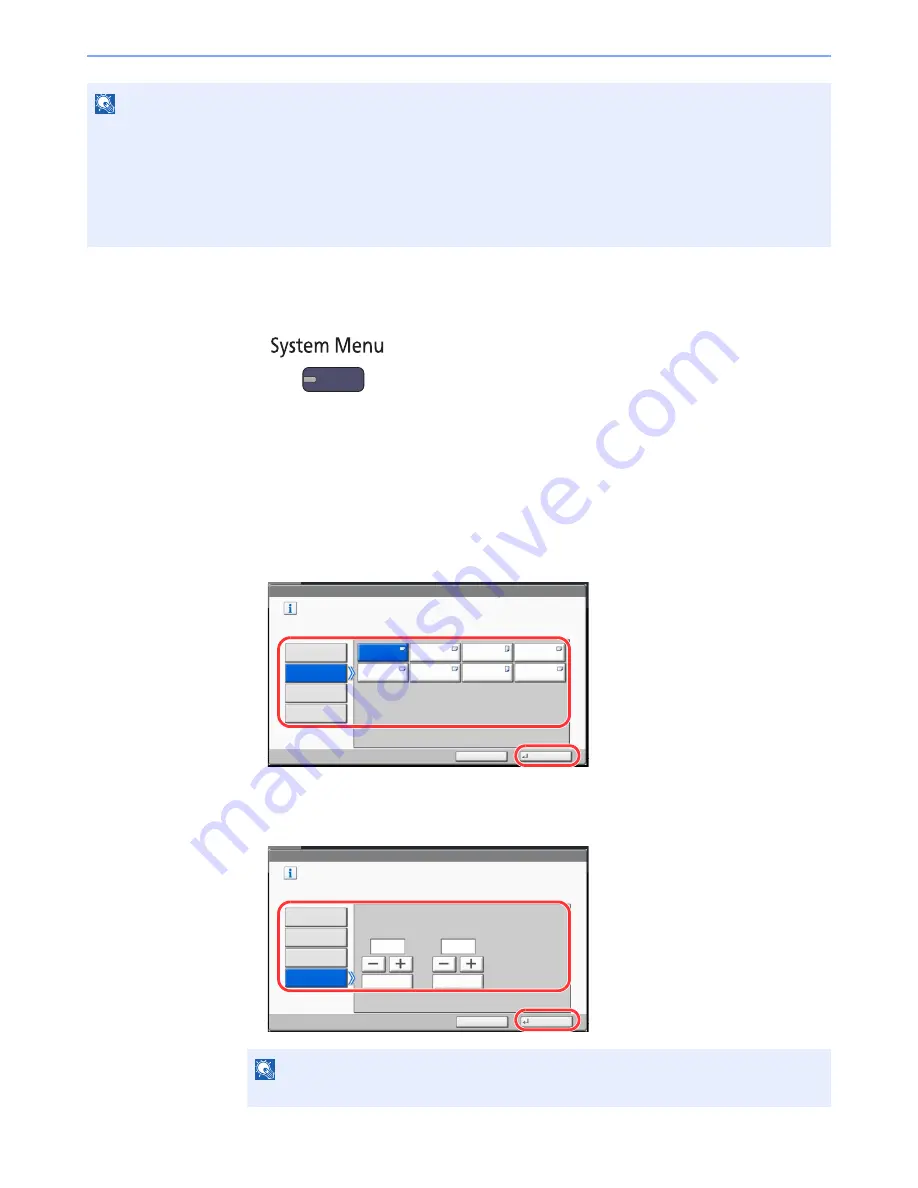
In "Cassette/MP Tray Settings", select one of [Cassette 1] - [Cassette 7], and press [Next].
Then in "Paper Size", press [Change].
2
For automatic detection of the paper size, press [Auto] and select [Metric] or [Inch] as the unit.
To select the paper size, press [Standard Sizes 1] or [Standard Sizes 2] and select the paper size.
When cassette 1 or 2 is selected, a size not displayed in the standard sizes can be set.
Select [Size Entry], press [+], [-] to enter "X" (horizontal) and "Y" (vertical) dimensions. By pressing [#
Keys], you can use the numeric keys.
NOTE
If the optional FAX Kit is installed, the available media types for printing received faxes are as shown below.
Plain, Recycled, Bond, Vellum, Color, Thick, High Quality, Rough and Custom 1 to 8
Set the paper size of the cassette used for fax reception as follows:
Inch models:
Press [Auto] and then [Inch].
Metric models: Press [Auto] and then [Metric].
If the above setting is changed, it will not be possible to print faxes.
NOTE
[Cassette 3] to [Cassette 7] are shown when the optional paper feeder is installed.
Cassette/MP Tray Settings - Paper Size
㪪㪼㫋㩷㪺㪸㫊㫊㪼㫋㫋㪼㩷㫇㪸㫇㪼㫉㩷㫊㫀㫑㪼㪅
㪪㫋㪸㫅㪻㪸㫉㪻
㪪㫀㫑㪼㫊㩷㪈
㪘㫌㫋㫆
㪘㪊
㪘㪋
㪪㫋㪸㫅㪻㪸㫉㪻
㪪㫀㫑㪼㫊㩷㪉
㪘㪋
㪘㪌
㪙㪋
㪙㪌
㪙㪌
Cancel
OK
㪉㪈㪍㫏㪊㪋㪇㫄㫄
㪪㫀㫑㪼㩷㪜㫅㫋㫉㫐
1
2
Cassette/MP Tray Settings - Paper Size
Set cassette paper size.
Standard
Sizes 1
Auto
Standard
Sizes 2
Cancel
OK
Size Entry
X(182 - 457)
Y(140 - 304)
# Keys
# Keys
mm
mm
1
2
Summary of Contents for TASKalfa 3051ci
Page 1: ...3051ci 3551ci 4551ci 5551ci OPERATION GUIDE ...
Page 17: ...xvi About the Operation Guide this Guide ...
Page 44: ...xliii Menu Map ...
Page 62: ...1 18 Legal and Safety Information Notice ...
Page 108: ...2 46 Installing and Setting up the Machine Transferring data from our other products ...
Page 164: ...3 56 Preparation before Use Registering Destinations in the Address Book ...
Page 182: ...4 18 Printing from PC Printing Data Saved on the Printer ...
Page 459: ...10 7 Troubleshooting Regular Maintenance 3 4 5 6 CLICK ...
Page 462: ...10 10 Troubleshooting Regular Maintenance 4 5 6 7 1 2 CLICK CLICK ...
Page 502: ...10 50 Troubleshooting Troubleshooting Large Capacity Feeder 1 500 sheet x 2 1 2 3 4 1 2 B1 B2 ...
Page 503: ...10 51 Troubleshooting Troubleshooting Multi Purpose Tray 1 2 3 4 ...
Page 505: ...10 53 Troubleshooting Troubleshooting Duplex unit 1 2 ...
Page 506: ...10 54 Troubleshooting Troubleshooting Duplex Unit and Cassette 1 1 2 3 CLICK ...
Page 508: ...10 56 Troubleshooting Troubleshooting Fixing unit 1 2 3 A1 ...
Page 510: ...10 58 Troubleshooting Troubleshooting Optional Job Separator Inner Job Separator 1 2 3 A1 ...
Page 511: ...10 59 Troubleshooting Troubleshooting Right Job Separator 1 2 3 Bridge Unit Option A1 1 2 ...
Page 512: ...10 60 Troubleshooting Troubleshooting 1 000 Sheet Finisher Option 1 2 3 D1 D2 2 1 D3 ...
Page 515: ...10 63 Troubleshooting Troubleshooting Tray B 1 2 3 Tray C 1 D2 D3 ...
Page 516: ...10 64 Troubleshooting Troubleshooting Conveyor 1 2 Mailbox Option 1 D2 D3 1 2 ...
Page 519: ...10 67 Troubleshooting Troubleshooting 5 Cassette 5 Option Side Feeder 3 000 sheet 1 2 2 1 ...
Page 526: ...10 74 Troubleshooting Troubleshooting Staple cartridge holder B C 1 2 3 4 2 1 CLICK ...
Page 574: ...Index 10 ...
Page 575: ......
Page 578: ...Rev 1 2013 6 2N4KDEN101 ...


