7.
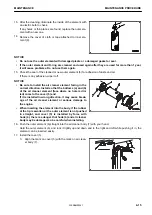
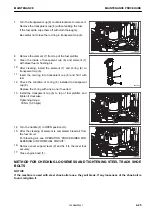
If any dust is attached to the vacuator valve (8) installed to the cover (5), remove it.
NOTICE
• Do not clean and reuse the inner element.
Replace the inner element with a new one at the same time when the outer element is replaced.
• If the outer element and cover are installed while the inner element is not installed properly, the out-
er element may be damaged.
• The sealing portion of the improper part lacks precision, and allows the entry of dust, which leads
to damage of the engine. Do not use such improper part.
• Be sure to install the air cleaner element facing in the correct direction.
Install so that the bottom of the air cleaner element (a) (face where no hole is drilled) comes to cov-
er (5) end.
If it is installed in wrong direction, it may cause breakage of the air cleaner element or serious dam-
age to the engine.
• When inserting the element into the body, if the rubber at the tip is swollen or the outer element is
not pushed in straight, and cover (5) is installed by force with hook (4), there is a danger that hook
(4) and air cleaner body may be damaged, so be careful when installing.
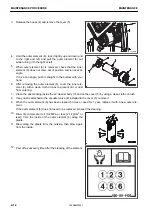
8.
Remove the inner element (9), and then quickly install the new inner element.
Install the inner element securely so that it does not move.
9.
Push the new outer element in straight with your hand to the air cleaner body (7).
Hold the outer element, and rock it lightly up and down and to the right and left while pushing it in, the ele-
ment can be inserted easily.
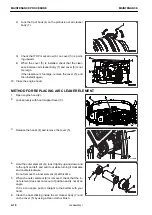
10. Install the cover (5).
1) Align the mark on cover (5) with the mark on air clean-
er body (7).
2) Lock the tip of hook (4) on the protrusion of air cleaner
body (7).
3) Check that TOP mark arrow (A) on cover (5) is point-
ing upward.
4) When the cover (5) is installed, check that the clear-
ance between air cleaner body (7) and cover (5) is not
too large.
If the clearance is too large, remove the cover (5), and
then install it again.
11. Close the engine hood.
MAINTENANCE
MAINTENANCE PROCEDURE
4-17
WENAM00241
Summary of Contents for PC80MR-5E0
Page 2: ......
Page 12: ...Do not repeatedly handle and lift loads VIBRATION LEVELS FOREWORD 1 10 WENAM00241...
Page 70: ...GENERAL VIEW MACHINE EQUIPMENT NAME RKA67920 GENERAL VIEW OPERATION 3 2 WENAM00241...
Page 76: ...11 Fusible link 12 Ashtray if equipped 13 Tool boxes GENERAL VIEW OPERATION 3 8 WENAM00241...
Page 343: ...SPECIFICATIONS 5 1 WENAM00241...
Page 394: ...WENAM00241...
Page 395: ...REPLACEMENT PARTS 7 1 WENAM00241...
Page 411: ......
Page 412: ......

