Maintenance
As necessary
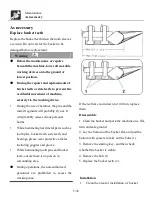
tooth. If there is any soil or mud in this
area, the bucket tooth and tooth sleeve
probably can’t be inserted completely.
2. Place the bucket tooth into the bucket.
3. If the bucket tooth is insecure, please
insert a shim to reduce the gap.
4. Insert the bolt from outer side of bucket
and tighten by nut.
•
Tightening torque: 102 N.m.
5. Rivet the bolt by a press or perform three-
point welding at the threaded portion (Nut
end).
Replacement of Bucket
Warning
●
Before the maintenance or repairs
beneath the machine, lower all working
devices onto the ground or lowest
position.
●
If the maintenance requires the running
of engine, assign two operators for
teamwork and keep contact with each
other.
•
One operator must sit in the driver seat
to get ready to stop the engine
immediately when necessary. This
operator must pay special attention not
to touch any joystick or pedal, unless it’s
absolutely necessary.
•
The other operator for the maintenance
must keep the body and clothing away
from motion parts of machine.
●
During the use of hammer, the pins and
the metal fragments will probably fly
out. It will probably cause serious
personal harms.
•
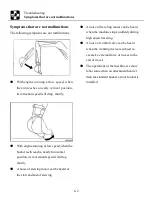
While hammering hard metal parts
such as tooth pins, bucket teeth, side
teeth, and bearings, please wear
protective articles including goggles and
gloves.
•
While hammering tooth pins and bucket
teeth, ensure there is no person in
surrounding area.
●
While aligning pinholes, always check
by visual observation. Do not insert your
finger into pinholes, otherwise
your finger will probably be lost.
5-39
Summary of Contents for XN10-8
Page 9: ...Safety 1 1...
Page 44: ...Safety Safety Signs 1 36...
Page 49: ...Controls 2 1...
Page 55: ...2 7 Records...
Page 64: ...Operations 3 1...
Page 87: ...Operations Parking of This Machine Locking Ensure to lock the following parts 3 24...
Page 93: ...Transportation 4 1...
Page 97: ...Transportation Lifting of Machine 4 5 unit mm...
Page 99: ...Maintenance 5 1...
Page 112: ...5 14 Records...
Page 120: ...5 22 Records...
Page 130: ...5 32 Records...
Page 132: ...5 34 Records...
Page 144: ...Troubleshooting 6 1...
Page 155: ...Parameters 7 1...
Page 159: ...Parameters Lifting power 7 5...
Page 160: ...7 6 Records...
Page 161: ...Optional products 8 1...
Page 170: ...8 10 Records...
Page 172: ...Optional products Canopy 8 12...
Page 173: ...Parts number position Upper frame number 20060001 8 13...

