background image

Maintenance

5-1

Summary of Contents for XN10-8

Page 1: ...XN10 8 Operation Manual Applicable model number XN10 8 Please read this manual and fully understand its content before proceeding with the operation inspection and maintenance of this machine...

Page 2: ...and maintenance of machine will result in injuries or deaths Before any operation checking or maintenance of machine please read and understand this manual Please always carry this manual with you It...

Page 3: ...0 1 Notice denotes low danger level for which the negligence will result in minor or medium injuries Important The word Importance is intended to alert the operation and maintenance personnel of the p...

Page 4: ...ils this manual probably differs from the manual attached on the machine in use Please be noted that the information contained in this manual and the parameters of machine are subject to changes witho...

Page 5: ...a variety of attachments Track width flexible machine width structure Run in period For the first 100 hours of the new machine as indicated by the timer please follow the instructions below Using the...

Page 6: ...manual are as below Prohibition Lock Unlock 0 4 Noise and vibration A Weighted emission sound pressure level at the operator s position measured according to work cycle procedures specified in ISO 639...

Page 7: ...ine 3 3 Operations of Machine 3 6 Operating Procedures 3 14 Parking of This Machine 3 23 Treatment in Cold Weather 3 25 Handling of Rubber Tracks 3 26 Transportation 4 1 Loading and Unloading 4 2 Lift...

Page 8: ...rameters 7 2 Overall Dimensions 7 3 Operating Range 7 4 Lifting power 7 5 Optional products 8 1 General Safety Measures 8 2 Precaution 8 5 Hydraulic Breaking Hammer 8 6 Optional products 8 11 Parts nu...

Page 9: ...Safety 1 1...

Page 10: ...he adverse influence of alcohol drug medicine or fatigue or under sleepy status Upon detection of machine abnormality During the operations checking or maintenance of machine upon detection of any mac...

Page 11: ...ppliances During the use of grinding miller breaking hammer or compressed air please wear appropriate protective appliances such as safety goggles and filtration mask as the splashing of metal cause s...

Page 12: ...ompletely understand all gestures The operator must respond to the gestures of designated person only However the operator must abide by the stop gesture made by anyone in all cases The signaler must...

Page 13: ...ignited cigarette match lighter and other flame or fire source Do not smoke or use open fire while handling fuel or performing the operations of fuel system Do not leave the operation site while fill...

Page 14: ...nt of looseness the hoses and pipes will be damaged due to vibration or contact with other parts during operations This will probably result in spray of high pressure oil to cause fire accident or har...

Page 15: ...e parts Before use ensure that the installed accessories will not come into contact with other parts Do not use any attachment not approved by Ken stone company Otherwise it will probably endanger the...

Page 16: ...s and electric cables together with administrator If necessary discuss with administrator to determine the detailed safety measures to be taken to ensure safety During operations on road ensure to tak...

Page 17: ...peration failure due to malfunction or engine malfunction immediately stop the engine as per stop procedure and park the machine securely till the malfunction is repaired Precautions within Cab If ins...

Page 18: ...andle or any joystick as handrail Before starting machine keep all non authorized personnel away from this zone Start the engine only after the safe start is confirmed by checking the following items...

Page 19: ...checking in a place without personnel or obstacle Upon detection of any malfunction stop the engine as per the procedure and report malfunction Warm up the engine and hydraulic oil Check all instrume...

Page 20: ...uring operations in a dark place turn on the working lamp and headlamp of machine and when necessary install additional lighting devices In event of poor visibility due to severe weathers Such as fog...

Page 21: ...veling joystick pedal ensure that the bulldozing blade is in front of the driver seat Please bear in mind that the operation direction of the traveling joystick pedal with bulldozing blade behind the...

Page 22: ...to the front position In event of an emergency lower the bucket onto the ground and stop the engine of machine When walking on slopes or ramps drive slowly Reduce engine speed when going downhill Do...

Page 23: ...autions and do not drive over road curbs or entrap in the snow For frozen soil surface the ground becomes soft when the temperature rises which will probably result in rollover of machine and entrapme...

Page 24: ...voltage cables unless all safety measures specified by local and national authorities are already taken There is a danger of electric shock and death when any person approaches to the machine that is...

Page 25: ...result in surface collapse Do not operate in any place with falling stone danger Keep a safe spacing between machine and edge of digging site Do not dig the ground ahead of machine During the operati...

Page 26: ...eneath the machine There is a possible falling danger of machine when the ground becomes unstable Before the operations on the top of any building or other structure check the strength and structure I...

Page 27: ...bucket working device is heavily loaded Especially do not laterally slew swing on a slope When the machine is equipped with breaking hammer grinder or extended bucket arm the attachment end is heavie...

Page 28: ...r to ensure the safe lifting operations The soft or uneven ground non level status lateral load dynamic or sudden load dangerous environment and personnel experience are included Before operating the...

Page 29: ...ng of rope can cause danger Use wire ropes compatible with the towing force Do not use any kinked twisted or even damaged rope Do not suddenly apply heavy load onto the rope Please wear safety gloves...

Page 30: ...hine against movement While parking the machine in a street use gratings warning signs or lamps to keep the visible even in the night in order to prevent the impact with other vehicles Complete the fo...

Page 31: ...ruck cargo body and the ramps clean without oil sand ice snow or other impurity in order to prevent the side slip of machine Clean the tracks Block the wheels of transport truck by wedges to prevent m...

Page 32: ...nformation Do not operate the lifting if there is any operator on the machine Operate slowly during lifting to prevent the rollover of machine During lifting keep all personnel away from working zone...

Page 33: ...ical Safety Parts Replace the fuel hoses periodically The fuel hoses will wear gradually along with time even if no wear symptom is visible Upon detection of any wear symptom replace the fuel hose reg...

Page 34: ...electric parts against water ingress The water ingress into the electric parts will probably result in short circuit or malfunction Do not clean the battery electronic control units sensors connector...

Page 35: ...necessary to operate beneath the lifted machine or device always fix by cushion woods jack or other firm and stable supports Do not access the area beneath the machine or working device before it s f...

Page 36: ...y If the fuel tank cap is missing replace with original cap only The use of non authorized fuel tank cap pressure in the fuel tank Do not use fuel for any cleaning purpose Use correct fuel grade based...

Page 37: ...in the hydraulic oil pipes can hold for a long time Before the maintenance thoroughly relieve the internal pressure The high pressure of hydraulic oil can penetrate skin and eyes to cause serious inj...

Page 38: ...ring pins and bucket teeth ensure there is no person in surrounding area Guard against High Pressure Grease In the track pensioner the grease is injected under high pressure If the tension is not adju...

Page 39: ...e Heavy Machinery service dealer Disconnection of Battery Cables Please disconnect the battery cables before operations or electric welding of electronic system Firstly disconnect the negative cable o...

Page 40: ...the distilled water till the level is above the upper limit Otherwise the hand feel 1 32 electrolyte will leak out The contact with such electrolyte can harm your skin or corrode the machine parts Cl...

Page 41: ...st clamp of battery charging cable to a place as far as possible from the battery To start the engine with battery charging cable always wear goggles and gloves Use the battery charging cable and clam...

Page 42: ...low idling speed to fastest speed and check for leakage of oil or water from repaired parts Operate all joysticks and check machine for normal operations Waste Disposal Ensure to collect the drained o...

Page 43: ...safety signs Please review these signs and operation instructions contained in this manual jointly with the machine driver The safety signs shall be clean clear and easily legible If any safety label...

Page 44: ...Safety Safety Signs 1 36...

Page 45: ...e of machine 4 Risk from rotating parts Please turn off before checking and maintenances 3 Danger from underbody bolts thrown from track roller adjuster To guarantee the safe and correct operations en...

Page 46: ...s only used for driving through narrow passages 8 9 10 Warning 1 The operations or maintenance of this machine by incorrect method will cause bodily injury accident 2 Before operating the machine ensu...

Page 47: ...stick or traveling joystick while getting on or off the machine otherwise the parts will be damaged Warning 15 There is a danger of electric shock during operations of cables 11 No people are allowed...

Page 48: ...the machine is lifted fix it by cushion blocks or supports Do not operate beneath the lifted machine when the machine is not fixed by any support 1 40 20 Keep the boom and bulldozing blade separated W...

Page 49: ...Controls 2 1...

Page 50: ...rack 11 Bucket 2 Engine hood 6 Drive wheel 12 Bucket cylinder 3 Hydraulic oil tank 7 Track roller 13 Arm 4 Fuel tank 8 Traveling motor 14 Arm cylinder 9 Bulldozer blade 15 Boom 10 Cylinder of blade 16...

Page 51: ...lever 5 Bulldozer blade lever 6 Boom swing lever 7 Pedal for telescopic track 8 Pedal for hydraulic circuit 9 Lighting switch 10 hour meter 11 Battery Voltmeter 12 Start switch 13 Throttle lever 14 Sa...

Page 52: ...gine is stopped When opening or closing the service cover please be careful not to pinch your hands or other parts of your body Opening 1 Insert the hood key and turn it counterclockwise to unlock the...

Page 53: ...fuse box Close 1 Unlock the limit lever and close the maintenance cover 2 Insert the hood key and turn it clockwise to lock the maintenance cover Warning place Stop the engine before refueling Any ov...

Page 54: ...and sit back on the seat 2 Adjust the backrest to the angle you want by rotating the handle 1 B Front and back adjustment 1 Pull up the adjustment lever 2 slide the seat back and forth and adjust it t...

Page 55: ...2 7 Records...

Page 56: ...1 Charging warning light When the engine is running if there is a problem with the charging system the light flashes and an alarm sounds 2 Voltage display meter After the engine starts the battery vo...

Page 57: ...n during use please timely contact service personnel 2 9 After Service Information Provided that the operations are performed normally as per the instructions of the manual the malfunctions occurred w...

Page 58: ...short time otherwise it will probably result in engine malfunction OFF This position is used to stop the engine and insert and withdraw the starter key ON Engine running position All electric devices...

Page 59: ...touch such controls accidentally While lifting up or lowering down the safety lock handle take cautions not to touch any joystick Before leaving the driver seat lower the working device onto the grou...

Page 60: ...the bulldozingblade Warning Before operating the traveling joystick ensure that the bulldozing blade is in front of the driver seat Please bear in mind that the operation direction of the traveling j...

Page 61: ...pedal is used for hammer operation Note Make sure you have and correctly installed the breaker device Step on the pedal forward the breaker will start to work release the pedal and the breaker will s...

Page 62: ...nd 2nd auxiliary switch for several times to relieve the pressure in the auxiliary hydraulic circuit Slowly loosen the bleeding plug to relieve the internal pressure of hydraulic oil tank While discon...

Page 63: ...tion for 10min b During the running of engine at low idling speed operate the hydraulic auxiliary switch repeatedly for approximately 10 times to bleed the air from hydraulic pipes c Stop the engine a...

Page 64: ...Operations 3 1...

Page 65: ...ht and maintain three point balance posture Hands and feet for your body Do not use safety lock handle or any joystick as handrail 3 2 Walk Around Checking Before the first start of engine each day fu...

Page 66: ...hen check as below All warning lamps turn on for 1s and the warning tone is issued for 2s The instruments start working Press the lamp switch and check and ensure that the boom lamp turn on 3 3 If a l...

Page 67: ...or 60s and then rotate it to START position Running the starter motor for a long time before the supply of sufficient fuel will cause start failure of starter motor Normal Start 1 Pull the accelerator...

Page 68: ...vy load or during high speed running Otherwise it will result probably in overheating or blockage of engine Do not stop the engine hastily unless in event of emergency 1 Return to the throttle lever 2...

Page 69: ...rottle control Slew rightward upper frame Dump bucket Swing leftward the boom Lower bulldozing blade Auxiliary oil circuit work stop Swing rightward the boom Lift bulldozing blade Operations Operation...

Page 70: ...tract the bucket working device and lower the boom to reduce the gravity center and face the machine towards front before traveling This machine can change the track width Normally to keep stable of m...

Page 71: ...xtend the crawler to the maximum width of 950 mm 2 Rotate the extension plate around the pins for 180 3 8 Extend Retract 3 Install the pins and tighten thebolts Change of bulldozer blade width 1 loose...

Page 72: ...machine Before operating the traveling joystick ensure that the bulldozing blade is in front of the driver seat Please bear in mind that the operation direction of the traveling joystick with bulldozi...

Page 73: ...forward Pull forward the joystick To drive backward Pull backward the joystick When the bulldozing blade is in the rear of cab To drive forward Pull backward the joystick To drive backward Pull forwa...

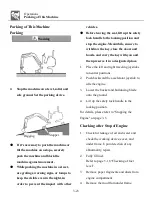
Page 74: ...d push the left traveling lever forward Park the machine on a level solid and safe ground Set the parking device If it s necessary to park the machine on a slope block the track by wedges to prevent m...

Page 75: ...ght joystick to control the boom and bucket Use the left joystick to operate the arm and slewing Return the joysticks to neutral position to stop the bucket working device Lower down the safety lock h...

Page 76: ...lever forward Swing the boom right pull this lever backward Operations of Bulldozing Blade Lower bulldozing blade Push this lever forward Raise bulldozing blade Pull this lever backward 3 13 Retract...

Page 77: ...times Do not use the slewing force for demolition or leveling operations Do not use slewing force to dismantle walls or level ground In addition do not insert the bucket teeth into the ground during...

Page 78: ...arm cylinder No Digging by Pulling or Hammering Bucket This will shorten the life of bucket working device Dig by hydraulic force Do not operate by the down force of machine Using additional tension o...

Page 79: ...h rock will damage the bulldozing blade and bulldozing blade cylinder Careful Retraction of Bucket Working Device For deep digging operations if the bulldozing blade is in the front take cautions to p...

Page 80: ...onto the machine body and damage the machine Avoid driving over obstacles whenever possible If it s necessary to drive over obstacles close the bucket working device to the ground drive the machine a...

Page 81: ...the performances of machine on a slope will be deteriorated due to severe working conditions While traveling on a slope lower the bucket to 20 30cm off the ground While climbing up a steep slope exte...

Page 82: ...dry leaves or traveling on a wet metal plate or frozen surface Do not park the machine laterally on a slope Traveling Posture on Slopes Up slope Traveling To climb up a 15 or higher slope maintain th...

Page 83: ...In Event of Track Slip In event of traveling failure due to track slip while climbing up a slope use the digging force of bucket arm to climb up the slope In Event of Engine Flame out If the engine st...

Page 84: ...nd in the front of machine 3 Pull the bucket joystick during forward traveling to slowly drive out the machine Allowed Operations of Machine Digging 1 Place the bulldozing blade to the opposite side o...

Page 85: ...ading While loading soil into the cargo body of a truck loading from the rear end of truck can load more soil easier than loading from the front end In addition the small angle slewing can be used to...

Page 86: ...nsure to withdraw the key close the doors and hoods and carry the key with you and then preserve it in a designated place 1 Place the left and right traveling joysticks to neutral positions 2 Push bac...

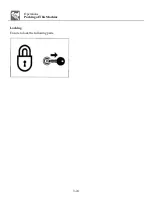
Page 87: ...Operations Parking of This Machine Locking Ensure to lock the following parts 3 24...

Page 88: ...to prevent freezing Refer to page 5 25 Water drainage from fuel tank As the battery capacity will drop remarkably in low temperature environment cover the battery or take the battery out of the machi...

Page 89: ...rocks steel beams or scrap irons or near the edges of steel plates will damage the rubber tracks Driving the machine on a riverbed or place with numerous pebbles can probably result in inclusion of p...

Page 90: ...ng the operations of this machine Do not slew the under frame The superstructure is not slewed when the bucket working device is lifted in the front of machine body Otherwise the load will be concentr...

Page 91: ...racks within 25 55 For long time storage 3 months of rubber tracks please store in an indoor place without direct sun exposure or rainfall The rubber tracks are not as stable as steel tracks as they a...

Page 92: ...rface In such case this machine is inclined by 10 or more Please drive the machine with both tracks on level surface Do not change the direction when the tracks are loose as shown in the diagram In su...

Page 93: ...Transportation 4 1...

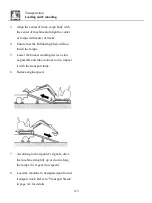
Page 94: ...uck by wedges to prevent movement While loading or unloading the machine drive the machine slowly in 1st gear low speed as per the signals of the signaler Do not change direction on ramps Do not slew...

Page 95: ...will not touch the ramps 5 Lower the bucket working device as low as possible and take cautions not to impact it with the transport truck 6 Reduce engine speed 7 According to the signaler s signals dr...

Page 96: ...erall parameters The gravity center varies depending on the installed attachments and optional devices Tounderstand more details please contact your Ken stone service dealer 4 4 Lifting 1 Slew the sup...

Page 97: ...Transportation Lifting of Machine 4 5 unit mm...

Page 98: ...lower framework of machine in order to prevent the side slip of machine 7 Fix the bucket by chains or ropes Important A wood board can be placed beneath the bucket to prevent damaging the ground by th...

Page 99: ...Maintenance 5 1...

Page 100: ...anual please ask your sales or service dealer for help Keeping Machine Clean Clean the machine before checking and 5 2 maintenance Keep the machine clean Stop the engine before cleaning the machine Co...

Page 101: ...hreads of screw plug not wrapped with seal ring Waste Disposal Ensure to collect the drained oil of machine into a container The improper treatment of waste oil will pollute the environment While disp...

Page 102: ...while adding fuel oil To replace with fuel oil of other trademark please replace completely Fuel Specified fuel The diesel shall meet the following specification This table lists some diesel specifica...

Page 103: ...r Use fuel with sulfur content volume ratio at 0 5 Use ultra low sulfur fuel especially in U S and Canada The use of fuel with high sulfur content can probably result in sulfur acid corrosion in engin...

Page 104: ...ce the gear oil ahead of the specified periods Use running water soft water Do not use well water or river water If the outside temperature is 0 add coolant antifreeze Determine the mixture ratio as p...

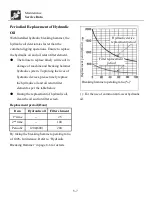
Page 105: ...c devices please timely replace the hydraulic oil and oil return filter element as per the table below During the replacement of hydraulic oil clean the oil suction filter screen Replacement period Ho...

Page 106: ...ement period Hydraulic system Ventilator Every 1000h Hydraulic system Hydraulic suction filter Filter The first 50 hours and every 500 hours Fuel system Fuel filter Filter cartridge Every 250h Air fil...

Page 107: ...e 1 20 Combination wrench 18mm Piece 1 21 Combination wrench 19mm Piece 1 22 Socket head 10mm Piece 1 23 Socket head 11mm Piece 1 24 Socket head 12mm Piece 1 25 Socket head 13mm Piece 1 26 Socket head...

Page 108: ...nuts and bolts of same dimensions and specifications Category Width across flats b Dimension a X pitch Tightening torque Common connection mm mm N m Ft lb Coarse thread 10 M6 X 1 0 9 8 0 5 7 2 0 4 12...

Page 109: ...Replacement period Fuel system Fuel pipes Every 2 years Packing on fuel tank cover Heater Heater hoses Cooling system Rubber hoses Hydraulic system Main machine Hydraulic pipe Pump outlet Hydraulic p...

Page 110: ...Please consult with your sales or service dealer for the replacement of safety parts Except the critical safety parts check and tighten the hydraulic pipes and when necessary replace During the replac...

Page 111: ...motor gears 5 24 Water drainage from fuel tank 5 25 Checking of battery electrolyte level and adding of electrolyte 5 26 Every 250h Replacement of engine oil and filter 5 28 Cleaning of air filter 5 3...

Page 112: ...5 14 Records...

Page 113: ...tely Before operations within the machine please securely fix the engine hood or machine hood Keep the engine hood and machine hood closed under windy weather or while parking the machine on a slope 5...

Page 114: ...ock and hook seat on bucket for presence of damage Optional 5 Check handrails footplates and anti slip surfaces for damage and check for any loose bolt 6 Check tracks and track shoes for presence of s...

Page 115: ...t start of engine each day Warning Before operations fulfill the daily routine checking and when necessary repair immediately Before operations within the machine please securely fix the engine hood o...

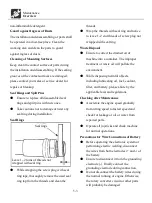
Page 116: ...pstick Both excessive and insufficient oil levels will cause malfunction 3 Tighten the oil filler cap 2 4 Start the engine run at low idling speed for 5min and then stop the engine 5 Check the oil lev...

Page 117: ...with the oil temperature Maintain the machine and check the fuel status by the posture shown in the diagram below 5 19 Posture of machine for checking of hydraulic oil level 1 Start the engine and ru...

Page 118: ...e engine hood 2 Slowly loosen the bleeding plug 2 to relieve the internal pressure and then take out the plug 3 Add hydraulic oil till the oil level is in the middle of level gauge 1 4 Pressurize the...

Page 119: ...10h Lubrication of Working Device 1 Maintain the machine under the status shown in above diagram lower the working device to the ground and then stop the engine 2 Lubricate the grease fitting by a gre...

Page 120: ...5 22 Records...

Page 121: ...high pressure If the tension is not adjusted by the following designated procedure the grease relief valve will probably fly out to cause injuries Never loosen the grease pipe fittings Slowly loosen...

Page 122: ...the grease fitting 3 of grease relief valve 2 3 Check the track tension Reduce tension 1 Remove the cover plate 2 Slowly loosen by one turn the grease relief valve 2 by a wrench to drain the grease If...

Page 123: ...earing and grease pipe Water drainage from fuel tank Warning Do not smoke or use open fire while handling fuel or performing the operations of fuel system Do not disassemble the fuel tank cap or refue...

Page 124: ...tery when the electrolyte level is below the lower limit Otherwise it will speed up the internal aging and shorten the life of battery In addition it can lead to burst explosion The battery can genera...

Page 125: ...lot of water Checking 1 Open the maintenance cover 2 Check the fluid level The fluid level must be between upper limit H and lower limit L If not add distilled water till the fluid level reaches uppe...

Page 126: ...cause scalding and injuries 5 28 2 1 Open the engine cover and remove the fuel filler 1 2 Place a tray under the oil drain plug 2 for the waste oil 3 Remove the oil drain plug 2 to drain the oil Impo...

Page 127: ...mask as the metal fragments and other objects will splash to cause accidents of serious harms Important Take cautions not to scratch the filter element Do not use any damaged filter element Important...

Page 128: ...element and perform inspection If there are small holes or stains replace it 8 Install the filter element and tighten it 9 Install the shell and tighten it Checking of accelerator control system l Th...

Page 129: ...ediately 1 Open the engine hood or the side cover 2 Rotate the filter 1 counter clockwise by a filter wrench to take it out 3 Clean the mounting surfaces of filter housing 4 Apply a thin film of fuel...

Page 130: ...5 32 Records...

Page 131: ...just stopped Touching such parts can cause scalding Important Do not use a wrinkled filter element or a filter element with damaged washer or seal ring Important Ensure to steadily install the filter...

Page 132: ...5 34 Records...

Page 133: ...Maintenance Every1500h Every 1500 hour Checking and Cleaning of Engine Fuel Injector Nozzles These operations require experiences Please ask your sales or service dealer for operations 5 35...

Page 134: ...mbling cap or filter or disconnecting pipeline before the pressure relief of hydraulic system will probably result in out spray of hydraulic oil Slowly loosen the bleeding plug to relieve the pressure...

Page 135: ...ipped 12 Install the suction filter element 2 on the flange 1 13 Install the flange 1 back to its original position 14 Tighten the oil drain plug 3 15 Remove the rubber plug 6 16 Fill the rubber tube...

Page 136: ...erious personal harms While hammering hard metal parts such as tooth pins bucket teeth side teeth and bearings please wear protective articles including goggles and gloves While hammering tooth pins a...

Page 137: ...rk and keep contact with each other One operator must sit in the driver seat to get ready to stop the engine immediately when necessary This operator must pay special attention not to touch any joysti...

Page 138: ...a hammer to knock the tooth pin 2 off the bucket 5 Remove the bucket Installation 1 Align the pin hole A on the bucket with the pin hole on the stick install the tooth pin and the fastening nut 2 2 O...

Page 139: ...is stretched and non adjustable please replace the track 1 Handle If the height A is 5mm replace 2 Wire rope 5 41 If two or more segments of the wire rope are exposed please replace If more than half...

Page 140: ...olutely necessary The other operator for the maintenance must keep the body and clothing away from motion parts of machine Disassembling 1 Completely loosen the tension of rubber tracks Refer to page...

Page 141: ...off the pensioner and then stop the rotation of sprocket 5 Slide inward the rubber track to install it onto the pensioner and then pull out the steel tube 6 Check rubber track for secure installation...

Page 142: ...f battery and cover the battery to guard against freezing During Parking Warning Do not operate the machine in an enclosed place with poor ventilation If the natural ventilation is not possible instal...

Page 143: ...brication system of engine 2 Get ready the fuel system 3 Start the engine Idle the engine for approximately 15min and then Check for normal oil pressure Check for leakage of fuel engine oil and coolan...

Page 144: ...Troubleshooting 6 1...

Page 145: ...reach a nearly horizontal position its movement speed will drop shortly A noise of slewing motor can be heard at the start and end of slewing 6 2 A noise of traveling motor can be heard when the machi...

Page 146: ...e terminal During disconnection firstly disconnect the cable from negative terminal Connect the last clamp of jumper cable to a point as far as possible from the battery cable to start engine Importan...

Page 147: ...n of Jumper Cable After the successful start of the engine of malfunctioned machine disconnect the jumper cable in reverse sequence of the connection procedure Battery ofrescue machine Battery of malf...

Page 148: ...electronic system is probably malfunctioned The improper repair will probably cause fire danger If the consultation is required please contact your sales or service dealer 3 Open the fuse case cover...

Page 149: ...ice cover and check If the fuse has blown please contact your sales or service agent Note The fuse is a large fuse used in high current applications Like ordinary fuses they function as fuses protecti...

Page 150: ...ne stops due to shortage of fuel please add fuel rotate the key to ON for 60s and then rotate it to START position Running the starter motor for a long time before the supply of sufficient fuel will c...

Page 151: ...operations park the machine in a safe place and take the following remedy measures Warning lamp Lamp name Cause and solution Charging warning lamp There is a problem with charging If the light contin...

Page 152: ...ot be performed l The safety lock lever has been raised locked l Lower release the safety lock lever Please refer to page 2 11 Not enough digging power l Hydraulic oil level is too low l The hydraulic...

Page 153: ...18 l Exclude air Please refer to pages 6 7 l Drain the water Please refer to pages 5 25 Tracks fall off l Tracks are too loose l Increase the tension Please refer to page 5 24 The engine emits black s...

Page 154: ...ortant Do not tow the machine when the engine is not started or the machine is not running Otherwise the towed machine will probably be damaged Important Please ensure to abide by the following proced...

Page 155: ...Parameters 7 1...

Page 156: ...grade ability 30 Tracks Ground pressure k Pa 30 95 Material Rubber Tension control type Tightening cylinder Hydraulic pump Type gear pump Working pressure Mpa 16 Flow L min 19 5 Hydraulic oil tank ca...

Page 157: ...b Overall length of crawler 1235 c Ground clearance of platform 460 d Tail slewing radius of platform 660 e Chassis width 800 950 f Track width 180 g Track height 320 h Transport length 2170 2850 i Gr...

Page 158: ...radius 3040 B Maximum digging radius 3135 C Maximum digging depth 1580 D Maximum digging height 2620 E Maximum Dump height 2000 F Maximum vertical digging depth 1580 G Minimum slewing radius 1510 H M...

Page 159: ...Parameters Lifting power 7 5...

Page 160: ...7 6 Records...

Page 161: ...Optional products 8 1...

Page 162: ...asures please follow the instructions of the signaler If it s necessary to place temporarily heavy weights or accessories onto the ground during disassembling or installation please ensure to place th...

Page 163: ...erations otherwise it will be extremely dangerous Driving down a steep slope with attachment lifted Driving laterally on a steep slope Slewing on a steep slope If a heavy attachment is installed while...

Page 164: ...vice is heavily loaded Especially do not slow laterally on a slope 2 For a machine with installed breaking hammer or grinder the attachment is heavier than the installed standard bucket Do not operate...

Page 165: ...ry Otherwise it will probably cause safety issues or cause adverse influence on operations or life of machine Ken stone Heavy Machinery will not be liable for any injury accident or product damage ari...

Page 166: ...800mm will probably result in rollover of machine due to poor stability If it s necessary to operate the machine with narrow track width 800mm retract the bucket working device and lower the boom to...

Page 167: ...the working face l During the crushing operations appropriately aim the hammer head at the object to be crushed and avoid the air impact l Do not pry by hammer head or pry during breaking l Do not mov...

Page 168: ...t of Hydraulic Oil With installed hydraulic breaking hammer the hydraulic oil deteriorates faster than the normal operations Ensure to replace the hydraulic oil and oil return filter element The failu...

Page 169: ...Products Hydraulic Breaking Hammer For the use of common anti wear hydraulic oil Breaking hammer operating ratio Filter element replacement period Hydraulic oil replacement period Replacement period...

Page 170: ...8 10 Records...

Page 171: ...Optional products Auger Ripper Quick hitch Thumb part Grab Rake Digging bucket 200mm 300mm 500mm 600mm 700mm 800mm 900mm Tilt bucket 600mm 800mm 8 11...

Page 172: ...Optional products Canopy 8 12...

Page 173: ...Parts number position Upper frame number 20060001 8 13...

Page 174: ...mation in this manual is subject to change without notice Version 1 Jan 2022 SHANDONG KEN STONE HEAVY MACHINERY CO LTD ADD DINGYUANZHAI INDUSTRIAL PARK GUAN COUNTY SHANDONG PROVINCE POST CODE 252512 S...

Reviews: