Maintenance
Daily routine checking (Every 10h)
Important:
While adding oil, the oil level shall
not be above the upper limit. Otherwise it will
damage the hydraulic circuit or cause oil spray.
If the oil level is too high due to carelessness,
stop the engine, wait for the hydraulic oil to
cool down, and drain the excessive oil from oil
drainage port.
Important:
Do not forget applying pressure to
the hydraulic oil tank, in order to prevent the
damage of pump due to air inhalation. (If no
ventilator is installed.)
5-20
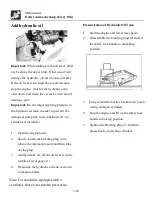
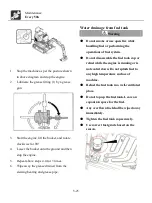
1. Open the engine hood.
2. Slowly loosen the bleeding plug (2) to
relieve the internal pressure and then take
out the plug.
3. Add hydraulic oil, till the oil level is in the
middle of level gauge (1).
4. Pressurize the hydraulic oil tank as shown
in diagram below.
Add hydraulic oil
Note: For machines equipped with a
ventilator, there is no need to pressurize.
Pressurization of Hydraulic Oil Tank
1. Start the engine and run at low speed.
2. Disassemble the bleeding plug (2) and set
the safety lock handle to unlocking
position.
3. Fully extend the bucket, bucket arm, boom,
swing, and span cylinders.
4. Stop the engine and lift up the safety lock
handle to locking position.
5. Tighten the bleeding plug (2) and then
pressurize by retracting cylinders.
Summary of Contents for XN10-8
Page 9: ...Safety 1 1...
Page 44: ...Safety Safety Signs 1 36...
Page 49: ...Controls 2 1...
Page 55: ...2 7 Records...
Page 64: ...Operations 3 1...
Page 87: ...Operations Parking of This Machine Locking Ensure to lock the following parts 3 24...
Page 93: ...Transportation 4 1...
Page 97: ...Transportation Lifting of Machine 4 5 unit mm...
Page 99: ...Maintenance 5 1...
Page 112: ...5 14 Records...
Page 120: ...5 22 Records...
Page 130: ...5 32 Records...
Page 132: ...5 34 Records...
Page 144: ...Troubleshooting 6 1...
Page 155: ...Parameters 7 1...
Page 159: ...Parameters Lifting power 7 5...
Page 160: ...7 6 Records...
Page 161: ...Optional products 8 1...
Page 170: ...8 10 Records...
Page 172: ...Optional products Canopy 8 12...
Page 173: ...Parts number position Upper frame number 20060001 8 13...


