NOTE: The ONLINE/OFFLINE button must be pressed for a minimum of 4 seconds for the
power off or power on to occur.
• Extractor clips—Control the locking system that secures the Routing Engine.
• LEDs—
"PTX5000 Routing Engine LEDs" on page 123
describes the functions of these LEDs.
NOTE: For specific information about Routing Engine components (for example, the amount of
DRAM), issue the
show chassis routing-engine
command.
RE-PTX-X8-128G Routing Engine Components
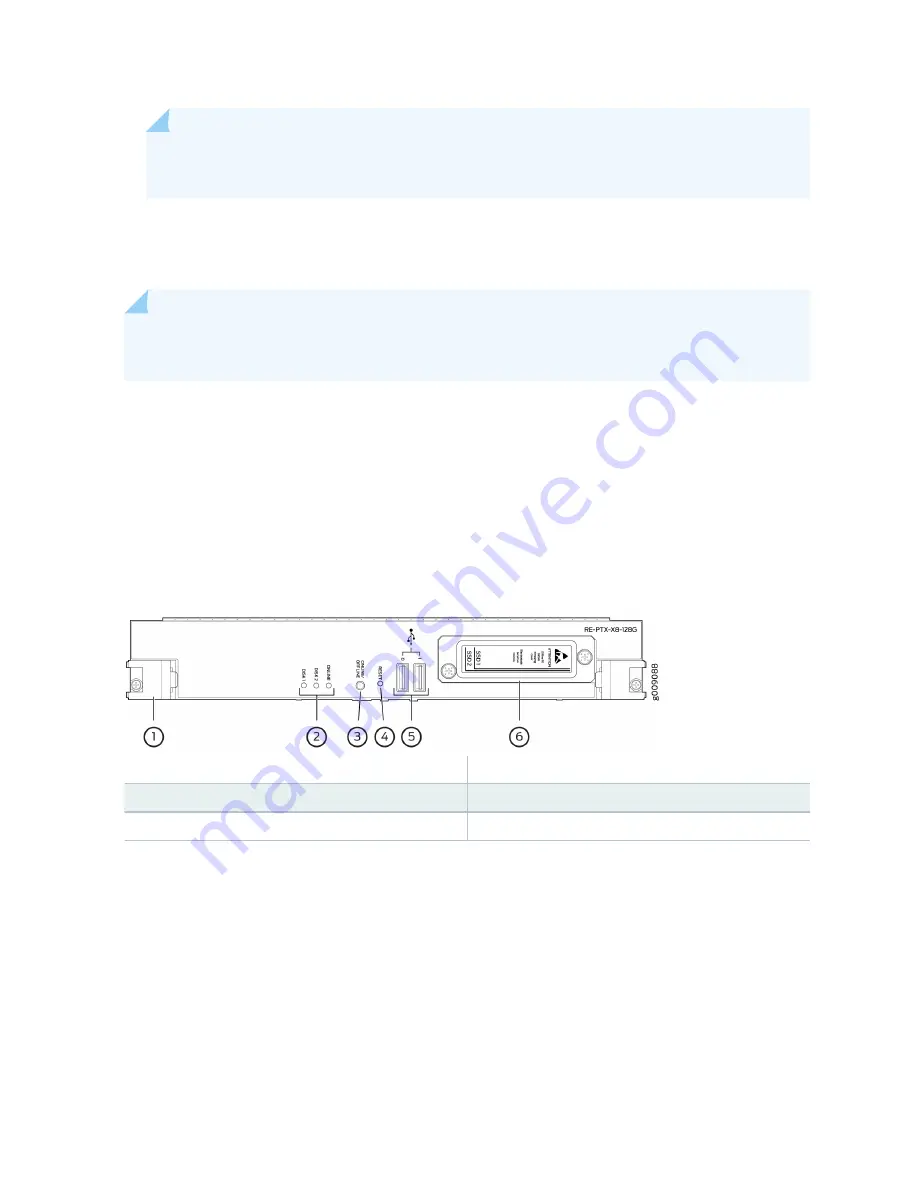
The RE-PTX-X8-128G Routing Engine has increased memory and storage to support virtualization. The
Routing Engine is equipped with an 8 Core 2.3 GHz processor, 128GB Memory, and two 200GB SSDs. It
also supports Secure Boot for enhanced boot security.
Figure 61: RE-PTX-X8-128G Routing Engine Components
1
—
Extractor clips
4
—
RESET button
2
—
LEDs—DISK1, DISK2, and ONLINE
5
—
USB0 and USB1 ports
3
—
ONLINE/OFFLINE button
6
—
SSD card slot cover
Each Routing Engine (shown in
) consists of the following components:
• CPU—Runs Junos OS to maintain the routing tables and routing protocols. The CPU is an eight-core
CPU with core frequency of 2.3 GHz.
• DRAM—Provides storage for the routing and forwarding tables and for other Routing Engine
processes.
• EEPROM—Stores the serial number of the Routing Engine.
The faceplate of the Routing Engine contains the following:
121
Summary of Contents for PTX5000
Page 1: ...PTX5000 Packet Transport Router Hardware Guide Published 2022 12 04...
Page 59: ...NOTE The PDUs contain no fans but are cooled by the fans in the power supply modules 41...
Page 63: ...NOTE The PDUs contain no fans but are cooled by the fans in the power supply modules 45...
Page 77: ...High Capacity Delta AC PDU LEDs 66 High Capacity Wye AC PDU 68 59...
Page 78: ...Three Phase Delta AC PDU LEDs Figure 29 on page 61 shows the three phase delta AC PDU LEDs 60...
Page 81: ...Three Phase Wye AC PDU LEDs Figure 30 on page 64 shows the three phase wye AC PDU LEDs 63...
Page 228: ...2 Remove each bracket Figure 81 Removing the Center Mounting Bracket 210...
Page 234: ...8 Move the lift away from the rack 216...
Page 235: ...Figure 83 Loading the PTX5000 onto the Lift 217...
Page 270: ...Figure 119 Connecting 20 A Inputs to a High Capacity Single Phase AC PDU 252...
Page 304: ...Figure 140 Installing the Front Door on a PTX5000 in a Four Post Rack 1 Side panels 2 Door 286...
Page 349: ...6 Discard the air filter Figure 154 Removing a Horizontal Air Filter Tray 331...
Page 352: ...Figure 157 Installing the Horizontal Air Filter 334...
Page 354: ...6 Discard the air filter Figure 158 Removing a Vertical Air Filter Tray 336...
Page 357: ...Figure 161 Installing a Vertical Air Filter Tray 339...
Page 428: ...Figure 216 Connecting 20 A Inputs to High Capacity Single Phase AC PDU 410...
Page 429: ...Figure 217 Connecting 30 A inputs to High Capacity Single Phase AC PDU 411...
Page 447: ...8 Insert the input power tray into the PDU Figure 228 Installing a 60 A Input Power Tray 429...
Page 448: ...Figure 229 60 A DC Input Power Terminals 430...
Page 531: ...Figure 276 Do Not Carry an FPC with Only One Hand 513...
Page 584: ...5 CHAPTER Troubleshooting Hardware Troubleshooting PTX5000 Components 567...
Page 651: ...6 CHAPTER Returning the Chassis or Components Returning the PTX5000 Chassis or Components 634...
Page 662: ...Figure 303 FPC2 PTX P1A Serial Number Label 644...
Page 663: ...Figure 304 FPC3 PTX U2 and FPC3 PTX U3 Serial Number Label 645...
Page 669: ...Figure 309 DC PDU Serial Number Label 651...
Page 670: ...Figure 310 AC PDU Serial Number Label 652...


