Cheetah Pregius Camera with 10 GigE Vision Interface – User Manual
October 8, 2020
Page
135
of
170
Rev 1.0
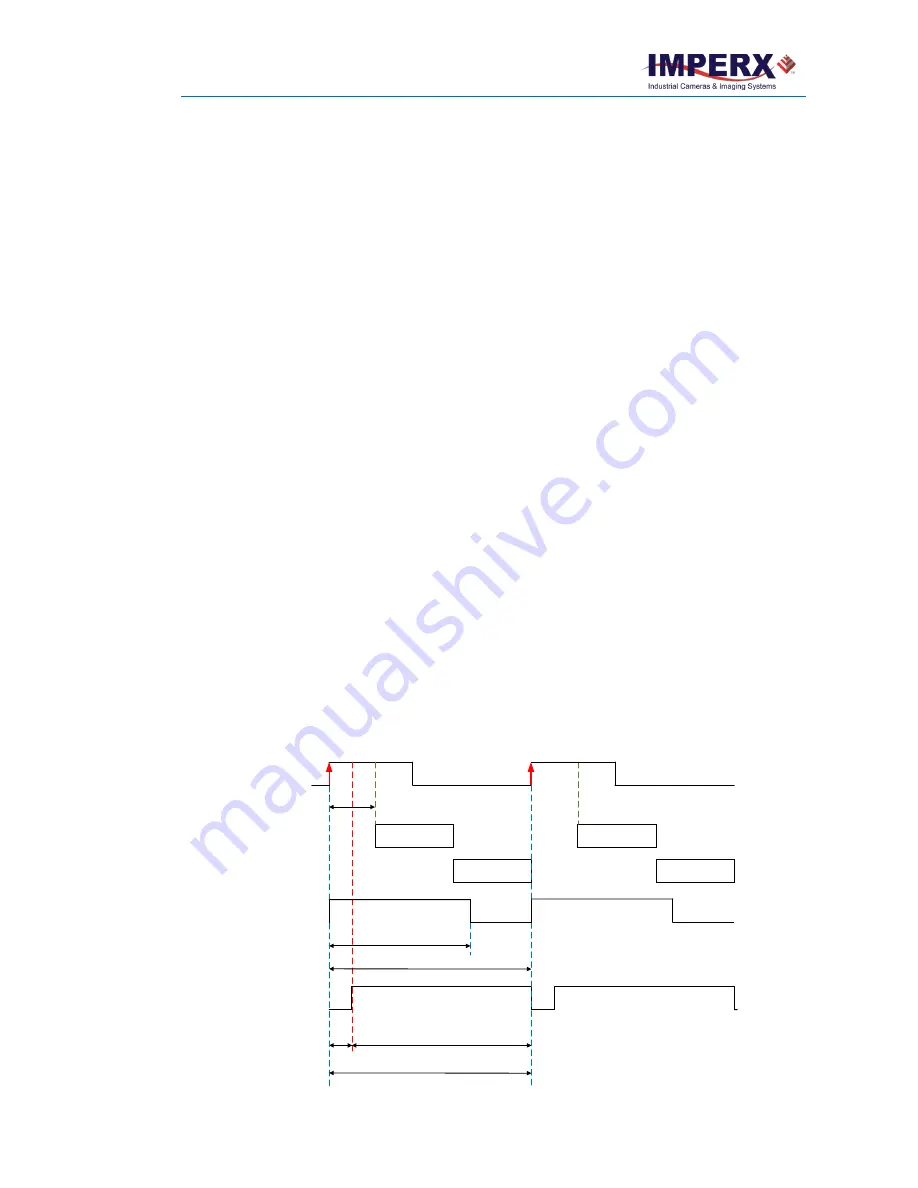
If your application requires activating a light source before the start of the exposure period, you
can use
StrobeReference
and
StrobeDelay
settings to position the strobe to occur earlier that the
exposure. To configure the strobe, follow the steps below:
1.
Make sure that
TriggerMode
is
On
and
TriggerDelay
is set to a desired value in the
Acquisition Control menu.
The Exposure starts with the delay after the trigger event
.
2.
Set
StrobeReference
to
Trigger
. The strobe occurs simultaneously with the trigger active
edge.
3.
Set
StrobeDelay
to a value lower than the
TriggerDelay
duration.
4.
Set
StrobeWidth
to a desired value.
Trigger
Exposure time
Exposure N
Exposure N+1
N
N+1
Readout N
Readout N+1
Readout time
Strobe 2
(Strobe2Reference:
Trigger)
Strobe 2
delay
Strobe 2 period = Trigger period
Strobe 2
width
Trigger delay
Strobe 1
(Strobe1Reference:
Trigger)
Strobe 1 period = Trigger period
Strobe 1
width
Trigger active
edge – Rising
GenICam controls
TriggerMode:
On
TriggerOverlap:
Off
TriggerSource:
Line 1
(or Line2, Pulse Generator)
TriggerActivation:
Rising Edge
(or Falling Edge)
TriggerDelay:
User-specified
(Min.= 10
µ
s)
TriggerFilterTime, TriggerDebounceTime:
set if applicable
LineSelector:
Output1
(or Output2)
LineSource:
Strobe1
(or Strobe2)
Strobe1Reference:
Trigger
Strobe1Enable:
On
Strobe1Width:
User-specified
(in
µ
s)
Strobe1Delay:
0
(no delay)
Strobe2Reference:
Trigger
Strobe2Enable:
On
Strobe2Width:
User-specified
(in
µ
s)
Strobe2Delay:
User-specified
(in
µ
s)
Exposure Mode:
Timed
For manual exposure control:
Exposure Time:
User-specified
(Min.= 36
µ
s; Max = Readout time)
ExposureAuto:
Off
For automatic exposure control (AEC):
ExposureAuto:
Continuous
(or Once)
Parameters of the strobe signal
Strobe period = Trigger period
Strobes Positioned with Respect to the Trigger
Standard Trigger Mode


