1–8
Company confidential. Pelican User’s Guide, Ed 1, Final. Freeze Status: frozen
This is the cyan on page 1–8 (seq: 22)
This is the black on page 1–8 (seq: 22)
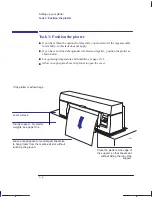
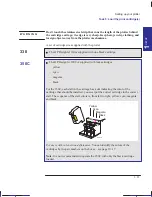
Task 3: Position the plotter
If you have fitted the optional roll-feed kit, you must also fit the legs assembly
for stability, so this task does not apply.
If you have not fitted the optional roll-feed and legs kit, position the plotter as
shown below.
For operating temperature and humidity, see page 10–5.
Allow enough space above the plotter to open the cover.
Level surface.
Sturdy support. For plotter
weights, see page 10–4.
Place the plotter at the edge of
the support, so that sheets exit
without hitting the top of the
support.
Leave enough space for your largest sheet size
to hang freely from the media exit slot without
touching the ground.
If the plotter is without legs ...
1739
Localization Note JKCT: Similar to Parrot UG, p1–9.
Setting up your plotter
Task 3: Position the plotter
Summary of Contents for Designjet 330
Page 1: ...C4699 90031 English HP DesignJet 330 and 350C Plotters User s Guide ...
Page 4: ...iv ...
Page 14: ...xiv ...
Page 92: ...4 4 ...
Page 114: ...6 12 ...
Page 124: ...7 10 ...
Page 125: ...8 1 FRONT PANEL 8 LIGHTS Front panel lights 8 ...
Page 150: ...9 20 ...
Page 170: ...10 20 ...
Page 171: ...11 1 GLOSSARY 11 Glossary 11 ...
Page 180: ......

