1–2
Company confidential. Pelican User’s Guide, Ed 1, Final. Freeze Status: frozen
This is the cyan on page 1–2 (seq: 16)
This is the black on page 1–2 (seq: 16)
Fast track
If you meet all the following requirements:
If you are happy with English as the language for the plotter’s internal plots.
If you are experienced at installing printers or plotters.
If you don’t want to add extra memory.
If you are going to connect the plotter directly to a PC.
If you are going to use a parallel connection.
... just follow the five steps on this page, and skip the rest of this chapter.
1
If the plotter is without legs, place it at the edge of a stable platform (see
page 1–10).
2
Connect the power cord and switch the plotter on.
3
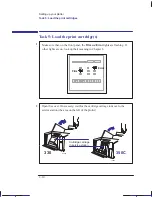
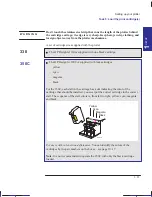
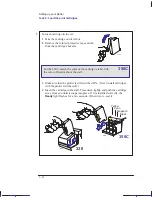
Open the cover and load the supplied print cartridge(s) into the carriage on
the left of the plotter. For help, use the label on the plotter near the carriage
and the documentation in the cartridge box. Don’t forget to remove the tape
from the cartridge(s).
4
Switch off the plotter and your computer, connect the parallel cable, and then
switch them on again.
5
Choose your driver disk(s), read the instructions on the label and follow the
printed instructions that were shipped with the driver.
That’s all!
Localization Note Similar to Loquillo UG 750C p1–2.
Setting up your plotter
Fast track
Summary of Contents for Designjet 330
Page 1: ...C4699 90031 English HP DesignJet 330 and 350C Plotters User s Guide ...
Page 4: ...iv ...
Page 14: ...xiv ...
Page 92: ...4 4 ...
Page 114: ...6 12 ...
Page 124: ...7 10 ...
Page 125: ...8 1 FRONT PANEL 8 LIGHTS Front panel lights 8 ...
Page 150: ...9 20 ...
Page 170: ...10 20 ...
Page 171: ...11 1 GLOSSARY 11 Glossary 11 ...
Page 180: ......


