background image

Honeywell 

159 


Note

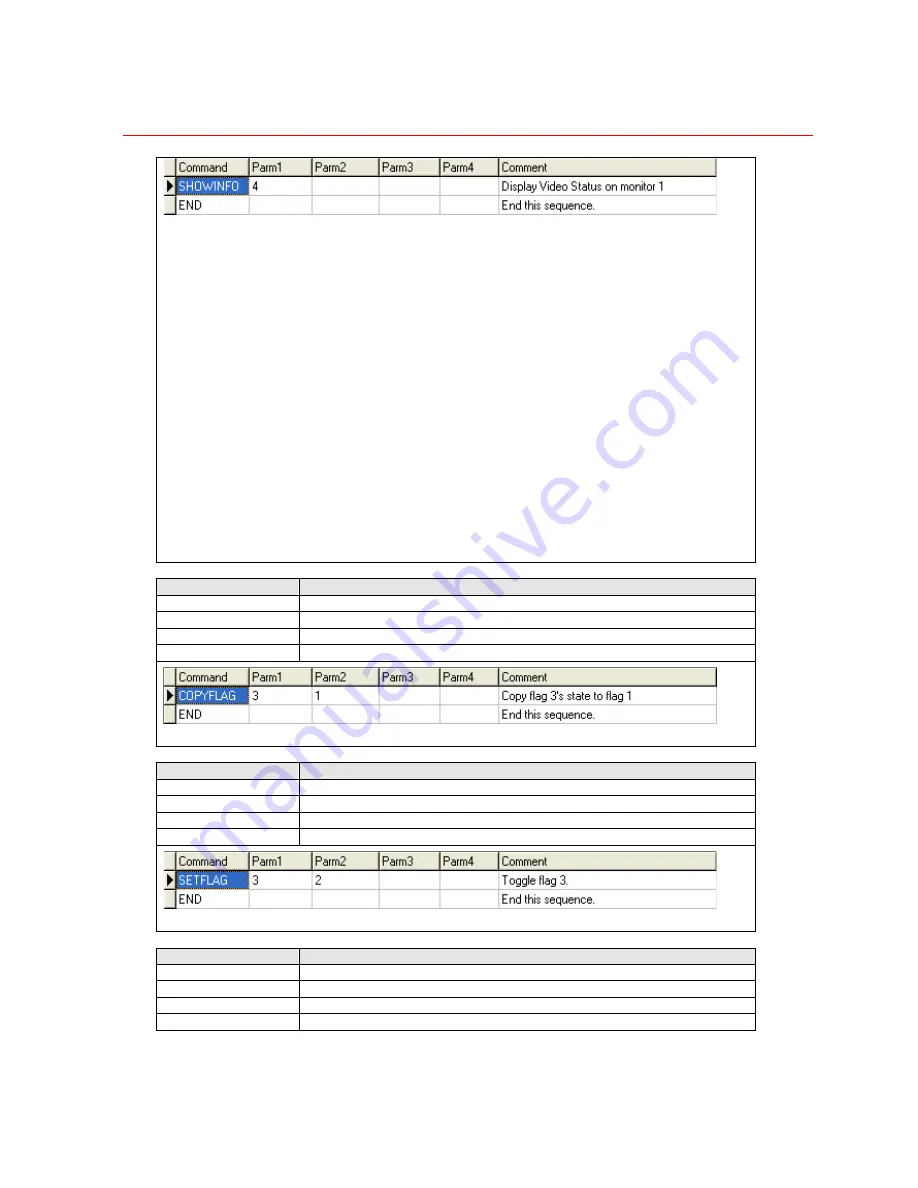
: All the diagnostic information are displayed on monitor 1. 

Diagnostic information screen number list: 
1  Start. 
2  System Overview 
3  Communications 
4  Video Status 
5  Matrix Routing 
6  Alarm Status 
7  Alarm Queue 
8  Keyboard Status 
9  Input Settings 
10  Output Settings 
11 Alarm Settings 
12 User Settings 
13 Keyboard 
14 TOD Events 
15 Messages 
16 Sequences 
17 Scenes 
18 Groups 
19 Satellites 
20 End 


COPYFLAG 

Copy a system flag 

Parm1 Source 

flag 

number 

Parm2 

Destination flag number 

Parm3 N/A 
Parm4 N/A 


Note

: Flag number is between 1 and 1024 


SETFLAG 

Set /Clear/Toggle a system flag 

Parm1 Flag 

number 

Parm2 

State (0,1 or 2 to toggle) 

Parm3 N/A 
Parm4 N/A 


Note

: Flag number is between 1 and 16 


HALTFLAG 

Halt sequence on flag set / clear 

Parm1 Flag 

number 

Parm2 

State to cause halt 

Parm3 N/A 
Parm4 N/A 

Summary of Contents for VideoBloX

Page 1: ...800 04465 April 2008 Rev A VideoBloX Matrix Switcher User Manual ...

Page 2: ...Revision History ISSUES DATE REVISIONS A Apr 2009 Initial Release ...

Page 3: ...rique de la Classe B est conforme à la norme NMB 003 du Canada Users of the product are responsible for checking and complying with all federal state and local laws and statutes concerning the monitoring and recording of video and audio signals Honeywell video systems shall not be held responsible for the use of this product in violation of current laws and statutes CAUTION Changes or modification...

Page 4: ...TRUCTIONS All operating and use instructions should be followed 5 CLEANING Unplug the unit from the outlet before cleaning Do not use liquid cleaners or aerosol cleaners Use a damp cloth for cleaning 6 ATTACHMENTS Do not use attachments not recommended by the product manufacturer as they may result in the risk of fire electric shock or injury to persons 7 WATER AND MOISTURE Do not use this unit ne...

Page 5: ...ician to replace your obsolete outlet Do not defeat the safety purpose of the polarized plug 13 OVERLOADING Do not overload outlets and extension cords as this can result in a risk of fire or electric shock 14 POWER CORD PROTECTION Power supply cords should be routed so that they are not likely to be walked on or pinched by items placed upon or against them paying particular attention to cords and...

Page 6: ... including amplifiers that produce heat 22 INSTALLATION Do not install the unit in an extremely hot or humid location or in a place subject to dust or mechanical vibration The unit is not designed to be waterproof Exposure to rain or water may damage the unit 23 WALL OR CEILING MOUNTING The product should be mounted to a wall or ceiling only as recommended by the manufacturer EXPLANATION OF GRAPHI...

Page 7: ...tons 13 LED Indications 13 Fuse 14 Connections 14 Firmware Upgrade 14 VIDEO INPUT MODULES 24 DIP Switch Settings 25 LED Indications 27 Fuse 27 Connections 27 VIDEO OUTPUT MODULES 27 TITLED VIDEO OUTPUT MODULE 27 DIP Switch Settings 28 Module Board Setting Video Outputs 1 64 29 Module Board Setting Video Outputs 1 16 29 Module Board Setting Video Outputs 17 32 30 Module Board Setting Video Outputs ...

Page 8: ...UPS 65 Groups 65 ALARMS 67 Alarm Configuration 67 Alarms Access 70 Alarm Group Names 72 ALARM Q ALARM QUEUES 73 Alarm Queue Configuration 73 USERS 77 Users Detail 77 User Keys 79 Users Access 81 Users Notes 83 KEYBOARDS 84 Keyboards Detail 84 Keyboard Keys 88 Keyboard Access 89 Keyboard Notes 91 Keyboard Group Names 92 Keyboard Functionality 94 TODS TIME OF DAY EVENTS 102 Event Configuration 102 M...

Page 9: ...tem Benefits 137 5 APPENDIX A VIDEOBLOX CHASSIS INTERLINK EXPANSION 138 INTRODUCTION 138 INTERLINK INPUT AND OUTPUT MODULES 138 CHASSIS EXPANSION CONNECTION AND DIP SWITCH SETTING 139 EXAMPLE 784 INPUT X 64 OUTPUT SYSTEM CONFIGURATION 141 HVB32LKO Jumper Setting 141 HVB32LKI Jumper and Dip Switch Setting 142 RJ45 CABLE CONNECTION 144 6 APPENDIX B BACKWARD COMPATIBLE APPLICATION 145 INTRODUCTION 14...

Page 10: ... 8 Diagnostics LED 13 Figure 2 9 Login Page 15 Figure 2 10 HVBNETCPU Homepage 15 Figure 2 11 Configuring Network Connections 16 Figure 2 12 Changing Network Connection Setting 16 Figure 2 13 Confirming Network Connections 17 Figure 2 14 Upgrading NETCPU Firmware 17 Figure 2 15 Selecting NETCPU Upgrade File 18 Figure 2 16 Upgrade in Progress 18 Figure 2 17 Upgrade Completed 19 Figure 2 18 Changing ...

Page 11: ... Different 16 Outputs Group Through Plug in Board 29 Figure 2 38 Select Video Output 1 16 Position A and B 29 Figure 2 39 Select Video Output 17 32 Position E and F 30 Figure 2 40 Select Video Output 33 48 Position C and D 30 Figure 2 41 Select Video Output 49 64 Position G and H 31 Figure 2 42 Front and Rear Views of Audio Input Module 31 Figure 2 43 Front and Rear Views of Audio Input Module RJ4...

Page 12: ...taller Configuration 49 Figure 3 8 Inputs Detail Configuration 50 Figure 3 9 Inputs Titles Configuration 53 Figure 3 10 Inputs Access Configuration 55 Figure 3 11 Inputs Group Names Configuration 57 Figure 3 12 Inputs Group Names Configuration 58 Figure 3 13 Outputs Detail Configuration 60 Figure 3 14 Outputs Access Configuration 62 Figure 3 15 Outputs Group Names Configuration 63 Figure 3 16 Scen...

Page 13: ...e Mode 97 Figure 3 37 PTZ Mode 97 Figure 3 38 Preset Recall 98 Figure 3 39 Preset Store 98 Figure 3 40 High Speed Dome Auxiliaries 99 Figure 3 41 Group Scene Mode 99 Figure 3 42 Device Control Mode 100 Figure 3 43 Sanyo VCR Control 100 Figure 3 44 VST DVR Control 101 Figure 3 45 Honeywell Ademco MUX Control 102 Figure 3 46 Tods Configuration 103 Figure 3 47 Message Configuration 105 Figure 3 48 Se...

Page 14: ...3 64 Clicking on the button to be configured 124 Figure 3 65 Key Press Configuration 124 Figure 3 66 Key Configuration Result 125 Figure 3 67 Control Configuration 125 Figure 3 68 Open data base 127 Figure 3 69 Choose base 128 Figure 3 70 Create new data base 129 Figure 3 71 Position of new data base 129 Figure 3 72 Switch data base 130 Figure 3 73 Data base prompt 130 Figure 3 74 Open other data ...

Page 15: ... 5 784 Input X 64 Output System Configuration 141 Figure 5 6 HVB32LKO Jumper Setting 142 Figure 5 7 HVB32LKI Jumper and Dip Switch Setting 142 Figure 5 8 Inter Link Start and End Address of 1st Slave Chassis 143 Figure 5 9 Inter Link Start and End Address of 2nd Slave Chassis 144 Figure 6 1 HVBM64 Jumper position 145 Figure 6 2 Buffer board of HVBNET16TO 146 ...

Page 16: ......

Page 17: ... available in industry standard 19 inch 2U 4U 8U and 12U rack mount enclosures The 2U chassis is powered by a low voltage power supply while all other chassis may be powered from low voltage supply or main input power supply VideoBloX CPU module This card contains a high speed embedded microprocessor and the required support circuitry and is used to control the entire system Video input modules Th...

Page 18: ...hing system by locating a sub chassis at the remote site s This principle can be repeated for any number of remote sites Regardless of the number of sub chassis required for a system there will generally be one master chassis The master chassis must contain a CPU module Generally all VideoBloX modules have their own power supply units on board All signal lines that run to the field are protected a...

Page 19: ... for distribution of power and control signals as well as 64 audio or video or mixed signals The distance between modules is 1 2U Cooling System VideoBloX is equipped with fans which provide forced cooling to ensure reliable operation for a fully populated chassis in ambient temperatures up to 40 degrees Celsius Highly efficient switch mode power supplies are used throughout which minimizes the po...

Page 20: ...rd IEC power connector This should be connected to the main input power supply which may be 50 or 60 Hz Make sure that the input voltage matches the voltage rating shown on the rear panel of the chassis The earth connection must also be mode The main input connector incorporates a fuse holder which protects the main input power only Note that the second fuse on the rear panel of the chassis is for...

Page 21: ...y and the low voltage supply to ensure continuous system operation in the event of failure of one of the power sources WARNING The HVB2U chassis must be powered by power supply part number HPTV2402DWP to be CE compliant Chassis Sync In Optionally connect the master video synchronization source to this BNC connector This allows all video switching to take place during the vertical sync of the maste...

Page 22: ...ssis so that operation is not affected by the failure of the main input power supply The power supply module provides an unregulated DC output to the backplane and each VideoBloX module is equipped with independent voltage current regulation circuitry The VideoBloX power supply has adequate capacity to power all modules within a chassis and also a limited number of external control keyboards A sys...

Page 23: ... the reset signal on the backplane is active Sync Phase Adjustment This adjustment determines the sync phase with respect to the main waveform When sync is received via the rear panel Chassis Sync In BNC or via the Control connector this adjustment will have no effect Chassis Expansion Driver Board This is an optional PCB which is plug into the power supply module This board contains the drivers a...

Page 24: ...e operation of all modules installed into a chassis or sub chassis The software operating system is installed into this module Features of the NETCPU and NETOSD modules are described as follows NETCPU functions and NETOSD functions integrated in one single board 66 7MHz processor core Motorola Coldfire 32 bit RISC CPU 16MB flash memory to store system firmware uCLINUX Operating System Firmware can...

Page 25: ...nfiguration using NETCFG for the operation using NETGUI for the web browsing to upgrade firmware and diagnostics for the telnet log onto Linux for the 3rd part integration using TCP IP Aux protocol for the satellite connection COM1 RS232 422 Used for the third party integration Refer to APPENDIX C AUX Command List for more detailed information COM2 RS232 422 Satellite port COM3 RS232 422 485 Conne...

Page 26: ... 2 4 Jumpers Settings Enable the NETCPU Figure 2 5 Jumpers Settings Enable the NETOSD DIP Switch Settings The NETCPU NETOSD has four DIP switches to set the system These switches are accessed by removal the front panel of the CPU ...

Page 27: ... Com1 between NETCPU NETOSD 0 NETOSD 1 NETCPU SW 8 Com 1 usage 0 Show Linux debug info 1 Set COM1 to be used for third party integration DIP switch 2 is used to restore set communications parameters and set video source Position Use Description SW 1 Restore factory setting To set to factory settings set it to 1 during reset Then set it back to 0 System IP will be initialed together the default IP ...

Page 28: ...age Selection SW8 SW6 000 means China and English 100 means Korean and English DIP switch 4 is used to set various parameters relating to NETOSD Position Use Description SW 1 SW 5 Output Group Address Refer to Output Group Address section for detailed information SW 6 PAL NTSC 0 PAL 1 NTSC SW 7 Restore option Act depend on switch 2 SW1 0 Restore OSD setting except font library during system restor...

Page 29: ...e front panel see Figure 2 7 are used to select various diagnostic parameters Figure 2 7 Six Push Buttons If buttons are pressed while the chassis is powered up or reset then additional functions are possible LED Indications LEDs on the front panel are used to display working status of the chassis Figure 2 8 Diagnostics LED Push Button Button Function ESC Exit the operation Left Select previous di...

Page 30: ...al machine before upgrade NETCPU Firmware Upgrade Perform the following steps to upgrade NETCPU firmware 1 Enter the IP address in the Internet Explore address bar and press Enter Then the Login page Figure 2 9 is displayed LED LED Function PWR On when chassis is powered up NETCORE_CPU On when NETCORE for CPU module is inserted NETCORE_OSD On when NETCORE for OSD module is inserted BP Flashes when...

Page 31: ...ield Default user name is administrator while default password is 1234 Click Login then the HVBNETCPU homepage Figure 2 10 is displayed Figure 2 10 HVBNETCPU Homepage 3 Click CONFIGURATION tab to configure the network connections Figure 2 11 which displays current network settings is displayed ...

Page 32: ...r example you change the IP Address to from 159 99 251 233 to 159 99 251 249 and click Apply Figure 2 12 is displayed Figure 2 12 Changing Network Connection Setting To display the default network settings click Default NOTE When the IP address is changed you can not continue the operation without logging out and logging in again via the new IP address ...

Page 33: ...ke sure that the network is connected during file upgrade Figure 2 13 Confirming Network Connections 6 Click OK Select folder to be upgraded from the Select Folder drop down list see Figure 2 14 Figure 2 14 Upgrading NETCPU Firmware 7 Click Browse and select the upgrade file from local machine see Figure 2 15 ...

Page 34: ... click open If FPGA select file HVBNETCPU_FPGA img and click open And if Kernel select file HVBNETCPU_Kernel img and click open 8 Click Send to start upgrade Figure 2 16 is displayed when upgrade is in progress Figure 2 16 Upgrade in Progress 9 Once the upgrade is completed Figure 2 17 is displayed indicating the system will reboot and return to the login page ...

Page 35: ...ading the Application folder Default IP address is 192 168 1 9 Therefore you need to change your IP address so that it is in the same network segment with the NETCPU if necessary 10 To change the login password click Change Password on the right upper part of the web page Figure 2 18 is displayed Figure 2 18 Changing Password ...

Page 36: ...ers or symbols And it should include no more than 20 characters NOTE In case that you forget the password set SW8 of switch 2 to 1 to reset password to default value hvs Refer to DIP Switch Settings on page 10 for detailed information 12 To logout this software click Logout on the right upper part of the web page NETOSD Firmware Upgrade Perform the following steps to upgrade NETOSD firmware 1 Ente...

Page 37: ...or while default password is 1234 Click Login then HVBNETOSD homepage Figure 2 21 is displayed Figure 2 21 HVBNETOSD Homepage 3 Click CONFIGURATION tab then Figure 2 22 is displayed Figure 2 22 Configuring Network Connections 4 Refer to corresponding part in NETCPU Firmware Upgrade to change IP configurations ...

Page 38: ...e 59 and message text font see MESSAGE on page 104 click Language file tab on Figure 2 22 then Figure 2 23 is displayed Figure 2 23 Selecting Language 6 Select the font style from Select language drop down list Then click browse to select corresponding upgrade file from local machine see Figure 2 24 Figure 2 24 Selecting Upgrade File ...

Page 39: ...k open And if Korean select file HVBNETOSD_Korean lang and click open 7 Click Send to start upgrade Then Figure 2 25 is displayed Figure 2 25 Start Upgrade Once upgrade is completed system will reboot and return to the login page Enter user name and password to login again 8 To display software version click Version Information tab under Language File tab Figure 2 26 is displayed ...

Page 40: ... set SW8 of switch 4 to 1 to reset password to default value hvs Refer to DIP Switch Settings on page 10 for detailed information VIDEO INPUT MODULES The video input module brings 16 video signals into the VideoBloX chassis Each of the inputs may be routed to 1 or more of the 64 backplane channels All input modules have 16 video inputs but can be switched to 16 32 or 64 maximum outputs They have i...

Page 41: ...es may be used These modules allow for a cross connection of 8 video inputs from each of the style A and C modules When connected using coaxial ribbon cables each chassis receives all 16 video inputs The B style cross connection module allows for interconnection of up to 4 VideoBloX chassis Figure 2 30 Type A B and C Cross Connect Looping Input Terminal Modules VideoBloX input module has following...

Page 42: ... be mounted in the chassis whose outputs range from 1 to 64 Setting S2 4 8 to 100000 means the input card should be mounted in the chassis whose outputs range 65 128 Note This setting is relative to the output group address setting of the output board In one chassis all the input and output board should be set in the same output group Please refer to Page 12 DIP Switch S3 1 2 not used set to off D...

Page 43: ...nals from the VideoBloX chassis Each of the outputs is associated with one of the 64 backplane channels Figure 2 32 16 Channel Video Output Modules Front View Figure 2 33 16 Channel Video Output Rear View The output module has limited protection against over voltages such as those induced by a nearby lightning strike It also has a range of jumpers which are populated to determine which group of 16...

Page 44: ...nment Built in real time clock Firmware is upgradeable using web browsing Non volatile RAM with Lithium standby battery to store camera titles in ca se of power loss The camera titles are stored in the output card and the CPU Limited protection against over voltages such as those induced by a nearby lightning strike DIP Switch Settings The output cards use a daughter board to set the output range ...

Page 45: ...ell 29 Module Board Setting Video Outputs 1 64 Figure 2 37 Select Different 16 Outputs Group Through Plug in Board Module Board Setting Video Outputs 1 16 Figure 2 38 Select Video Output 1 16 Position A and B ...

Page 46: ...BloX MODULES 30 Module Board Setting Video Outputs 17 32 Figure 2 39 Select Video Output 17 32 Position E and F Module Board Setting Video Outputs 33 48 Figure 2 40 Select Video Output 33 48 Position C and D ...

Page 47: ... audio signals into the VideoBloX chassis Each of the inputs may be routed to 1 or more of the 64 backplane channels Figure 2 42 Front and Rear Views of Audio Input Module Figure 2 43 Front and Rear Views of Audio Input Module RJ45 VideoBloX audio input module has following features Balanced input capability Gain adjustment on the front panel Overload peak indications ...

Page 48: ...accept audio inputs 1 to 16 etc S2 1 Turn on to associate the module with output channels 65 to 128 S2 2 Turn on to cause the module to work transparently as a slave to another input module This mode allows two cards to work synchronously for switching stereo signals S2 3 Turn on to cause the module to automatically switch its 16 audio inputs to 16 audio outputs when power up In this mode the addr...

Page 49: ...ther cases these jumpers should not be fitted Fit the two 20 dB pad jumpers as per the legend alongside to reduce the gain of the audio input stage by 20 dB This allows for high level audio inputs such as line level signals Figure 2 46 20dB Jumper Selection High Pass Filter and Low Pass Filter Jumpers Place the jumper in the position shown as Hi Filter On to enable the high pass filter function Th...

Page 50: ... LED when the input signal is at the maximum expected level CMRR Adjustment This adjustment sets the common mode rejection for the balanced inputs It is factory calibrated and should not be adjusted by the user The optimum level is that where a minimum output signal is obtained when both and input signals are driven by the identical signal inputs shorted Figure 2 48 CMRR Adjustment Connecting a Mi...

Page 51: ...ule provides 16 audio output signals from the VideoBloX chassis Each of the outputs is associated with one of the 64 backplane channels Figure 2 50 Front and Rear Views of 8 and 16 Channel Audio Output Modules VideoBloX audio output module has following features Front panel accessible gain adjustment ...

Page 52: ...t and Output Interlink modules have the following features 32 input output channels allowing for high density interconnects Balanced video driver and receivers allow high quality twisted pair connections for video The Main chassis of a matrix is that which incorporates the video output modules which connect to video monitors All other chassis are Sub Racks which uses interlink modules to connect t...

Page 53: ...switches as follows Set the Start Address SW1 1 8 and SW2 1 3 to match the address of the first input card within the connected sub chassis Set S2 4 8 to determine which group of the 64 output signals this module will control For monitors 1 32 SW2 4 SW2 8 should be set to 00000 for monitors 33 64 SW2 4 SW2 8 should be set to 00001 Figure 2 55 SW1 and SW2 settings for interlink input module ...

Page 54: ...or future use to select protocols SW4 6 is used for testing to switch inputs to the outputs camera 1 to monitor 1 camera 2 to monitor 2 camera 15 to monitor 15 etc Turn SW4 7 to on to enter test mode In test mode the module cycles various inputs to outputs This is useful for bench top fault finding and should not normally be used in the field SW4 8 is not used ...

Page 55: ...Honeywell 39 Figure 2 56 SW 3 and SW 4 settings for interlink input module ...

Page 56: ...lanning your system Prior to configuring the system understand the following terms and have the information available Channel Input number of the camera Group Grouping of cameras for defining access permissions Physical Physical input number of camera Type Static fixed or PTZ PTZ Address Address of the PTZ Alternate View Camera that is selected as the secondary view another angle Title Name assign...

Page 57: ...ons are consistent among each screen and are used as follows Button Description The Edit Database check box presents the experienced user with the opportunity to edit the database in a table form This option should not be used by anyone who is not completely knowledgeable in all aspects of the system Incorrect editing of the database may render the database unusable Download data for the current p...

Page 58: ... all existing data Indicates when the configuration program has made a connection to the NetCPU Display the edition number of HVBNETCPU Use after editing each screen Use after an extensive editing session Inputs and Sequences have the capability of being Saved to Flash System There are three utility buttons on the System tab Refer to the following illustration and table for location and descriptio...

Page 59: ...system diagnostic screens that can be viewed This button emulates the various diagnostic buttons on the front of the CPU Below are two examples of diagnostic screens that can be selected Click on the Close button to exit the Diagnostics window License The System License information is displayed on the License Tab The configuration software is provided with the hardware ...

Page 60: ...t used Second Language The OSD language of this system Monitor title Enable Enable monitor title Title Enable Title function enable After entering the data in each field click on to save download all information from the current page Sizing To configure the system size click on the Sizing Tab Configuring the system size to match the actual system improves the efficiency of the system The default s...

Page 61: ...r of audio inputs in the system The max value is 4096 Max Outputs Defines the maximum number of audio outputs in the system The max value is 2048 Max User Defines the maximum number of users that have access to the system The max value is 255 Max K B Defines the maximum number of keyboards in the system The max value is 255 Max Alarm Defines the maximum number of keyboards in the system The max va...

Page 62: ...nes that can be programmed in the system The max value is 512 Max Group Defines the maximum number of groups that can be programmed in the system The max value is 100 Max TOD Defines the maximum number of TODs that can be programmed in the system A TOD is a programmed response to an event depending on the Time Of Day The max value is 256 When the sizing fields are set to the actual system paramete...

Page 63: ...y MMMDDYY B d y MMMDDYY y d b YYDDMMM y d B YYDDMMM y b d YYMMMDD y B d YYMMMDD Short Time Format Defines the abbreviated version of the time format Auto Time Sync Interval Defines the occurrence of when the system synchronizes the time on all devices in the system The following entries apply 0 the auto time synchronization is disabled 60 the auto time synchronization occurs every hour 1440 the au...

Page 64: ...radation of your network IPPort Defines the IP Port being used by the matrix Contact your network administrator for assistance Interpacket Delay Defines the amount of delay between the transmissions of data packets The minimum recommended delay is 60 The lower the delay the faster uploads downloads occur Note that lower delays have a greater impact on standard system operation while downloading co...

Page 65: ...7 System Installer Configuration INPUTS Adding a video input Inputs Detail The fields necessary to add a video input are on the Inputs tab The Inputs Detail tab is used to enter all physical characteristics for a video input ...

Page 66: ...ed camera title associated with this video input see Input Title INPUT DETAIL Physical IP Physical input connection to the matrix BNC connector Set Addr For use in future software release PAN TILT ZOOM Type Type of Video Source attached to this input Static PTZ and UTC Board Addr The board Addr of GPIO board PTZ Address Physical address of PTZ camera Active only if PTZ was selected for input Type ...

Page 67: ... restoration detection for this input Priority Sets the priority level for video restoration sequence on this input Active only when Video Restore is enabled Priority can be set to a number between 0 and 255 with 0 being the highest priority The sequences are activated based on priority For example if a sequence with priority 3 has a camera switched to a monitor and the sequence has locked the mon...

Page 68: ...rity and select a Sequence to run when video loss is detected Edit the Sequence if needed 8 To enable automatic Video Restore detection check the Enabled box set the Priority and select a Sequence to run when video loss is detected Edit the sequence if needed 9 To enable an Alternate View for this input check the Enabled box and set the Channel of the alternate view input 10 To associate a Dedicat...

Page 69: ...ndow TITLE Name Camera title associated with this video input This title displays in the on screen display and in the Heading of this screen Camera Name can be up to 50 characters but due to character format font size and monitor used some text may be cut off from view We therefore recommend that Camera Name be initially set to 36 characters Short Name Abbreviated camera title up to 12 characters ...

Page 70: ... the Output box is not checked the title comes from the PVT Channel In this situation it is important to know the PVT channel associated with the Video Input on the Matrix I P Channel Channel number for an input titler associated with this input For future function Brightness The brightness of the title Steps for Configuring Input Title 1 On the Inputs screen select the Title tab on the right side...

Page 71: ...ocation of the Date Time display Default values X 1 Y 1 place the Date Time display at the bottom left of the screen 9 Check the Output box if information will be provided by a Title Output Card in the Video Matrix 10 If the Output box is not checked enter the I P channel of the Input Titler associated with this input 11 Select to save download all information from the current page Input Access Th...

Page 72: ...t is included excluded Steps for Configuring Input Access Set access for each video input using the following methods Click on the Access button to include this input exclude this input from ALL groups Include 9 Exclude U Click on the Access button again to toggle between include exclude settings Click on a Group column or on an individual cell in the Access row of the table to include this input ...

Page 73: ...ated with this video input as edited in the Inputs Title tab GROUP NUMBER Number assigned to each inputs group GROUP NAME Text entered to name identify a particular inputs group Steps for Configuring Input Group Names 1 Select a group number to use Do not edit the Group Number column 2 Modify the text in the Group Name field to a meaningful means of grouping inputs Once the group name is modified ...

Page 74: ...ting the address you are setting will be set as this VB s satellite address IP Port Set IP port The default value is 8888 Name The name of satellite VB Type Ethernet is the NET VB Local is the original VB DETAIL Trunk Set the Trunk The system will switch input of other VB to the remote output and switch the local input to the output users chosen The Remote output and Local input are connected witc...

Page 75: ...ginal VB Connect Main VB via Com2 The Link setting of sub VB whose IP is 192 168 1 12 is described in the following table Address Type IP Comment 1 Ethernet 192 168 1 11 Address 1 is a Net VideoBloX 2 Ethernet 192 168 1 12 Same with Sub VB s IP so the Sub VB s satellite address is 2 3 Ethernet 192 168 1 11 Although this VB is an original VB but it connect to Main VB so when Sub VB wants to control...

Page 76: ...t Interlink Out for future development VCR for future development and Frame Grabber for future development IP Address N A For use in future development Output Name Output name associated with this output The Output Name can be up to 50 characters The Output Name is used for reference and reporting The Output Name is not outputted on the PVT channel Short Name Abbreviated title associated with this...

Page 77: ...tor for the Output Other options are intended for future releases of the Matrix Switcher 5 Enter edit the Output Name Include the output number in the name entered as it does not appear on its own in displays or reports 6 Enter edit a Short Name for the output 7 If audio is associated with this output check the box to Enable audio and enter the physical address of the audio output 8 Enter Notes ab...

Page 78: ...n which the output is included excluded Steps for Configuring Output Access Set access for each video output using the following methods Click on the Access button to include this output exclude this output from ALL groups Include 9 Exclude U Click on the Access button again to toggle between include exclude settings Click on a Group column or on an individual cell in the Access row on the table t...

Page 79: ...ns Field Description HEADING Output Number Number assigned to the video output being configured Carries over from Outputs Detail window GROUP NUMBER Number assigned to each outputs group GROUP NAME Text entered to name identify a particular outputs group Steps for Configuring Output Group Names 1 Select a group number to use NOTE Group number is an editable text field capable of accepting numeric ...

Page 80: ...to other applicable windows 3 Select to save download all information from the current page SCENES Scenes The fields necessary to define a scene are on the Scenes tab A Scene is the name for a number of cameras looking at the same view The scene is defined with a descriptive name i e Pit 3 Blackjack 4 or Elevator Lobby 4th Floor Up to four cameras or Dome presets maybe entered Primary View plus th...

Page 81: ...sociated with each view Enabled Enable to select whether there is an audio input associated with this view Input If audio is enabled identify the jack number for the audio input Steps for Defining Scenes 1 On the Scenes screen select the Scene Number to be defined 2 Enter edit the scene Name 3 Determine the Primary View and enter the camera number or name 4 If applicable enter the camera PTZ posit...

Page 82: ...ters The Group Name is used for reference and reporting The Group Name is not outputted on the PVT channel Formatting Used to generate the text on the keyboard display when the group is selected Include the characters ld without the quotation marks to include the scene number in the text The string length is 16 Zero Display If the selected value on the keyboard is zero the text displayed in this f...

Page 83: ...ve it to the Selected Scenes Repeat this step as often as needed to select all scenes which should be included in this group Remove scenes by clicking on the scene in Selected Scenes and clicking NOTE Consider the order in which you select enter and remove scenes The camera scenes will display in the order entered 6 Choose the number of the monitors and specify the monitor number 7 Select to save ...

Page 84: ...ration Field Definitions Field Description HEADER Alarm Number Physical address of the Alarm Input as determined by the device it is connected to Alarm 1 6000 are on GPIO address 1 250 Alarm 6001 6256 are on alarm concentrators 1 16 DESCRIPTION Alarm Name The name assigned to this alarm channel Short Name Short name assigned to this alarm channel ENABLED Check the box to enable monitoring of this ...

Page 85: ...er correlates with sequence name Edit Used to edit the selected sequence AUTO CAMERA Enabled Enables the association of a specific camera with this alarm for use in alarm queue only Camera Number Number of the camera to be displayed on the Alarm Monitor Camera number correlates with Camera Name Camera Name Camera Name Description associated with the Camera Number ACCEPT SEQUENCE Enabled Enables a ...

Page 86: ...er pertinent notes regarding the alarm in the Alarm Notes field 8 If the Alarm is in an Alarm Queue associate a specific camera with this alarm by checking the Auto Sequence Enabled box and selecting a camera using the drop down box for either the Camera Number or Camera Name 9 If the Alarm is in an Alarm Queue and a sequence is to be activated when the alarm is acknowledged Accepted check the box...

Page 87: ...ilable for future usage Steps for Configuring Alarm Access 1 From the Alarms screen select the Access Tab 2 Set access for each alarm using the following methods Click on the Access Button to include this alarm in exclude this alarm from ALL groups Include 9 Exclude U Click on Access Button again to toggle between include exclude settings Click on a Group column or on an individual cell in the Acc...

Page 88: ...Alarm Number Physical address of the Alarm Input as determined by the device it is connected to ATM or I2C module This field carries over from the Alarms General screen GROUP NUMBER Number assigned to each alarm group GROUP NAME Text entered to name identify a particular alarm group Steps for Configuring Alarm Group Names 1 Select a group number to use NOTE Group number is an editable text field c...

Page 89: ...g Alarms There are 32 Queues each of which is associated with a Keyboard and up to four Monitors The system will display the highest priority alarm on the first available monitor Alarms of equal or lower priority will be displayed on the secondary alarm monitors Alarms are added to the Queue by use of a sequence When the alarm is activated a sequence is triggered The sequence must include the step...

Page 90: ... this queue Monitor Number corresponds to Monitor Name displayed Monitor Name Drop down box used to select by name the monitor number associated with this queue Monitor Name corresponds to Monitor Number displayed MONITOR 2 Enabled When this box is checked the specified monitor is enabled for this alarm queue Monitor Number Drop down box used to select by number the monitor number associated with ...

Page 91: ...RCE Enabled When this box is checked it enables an input to be routed to the monitor when no alarm is present Camera Number Drop down box used to select by number the camera to be displayed on the monitor when no alarm is present Camera Number corresponds to Camera Name displayed Camera Name Drop down box used to select by name the camera to be displayed on the monitor when no alarm is present Cam...

Page 92: ...ce is Sequence 5 Default Message is Message 2 and Connect Close is Sequence 6 the sequence s priority is 3 and in sequence 6 there is an ALARMQ function adds Alarm 2 into alarm queue 1 Set alarm queue 1 s Monitor 1 as Mon 1 Monitor 2 as Mon 2 Blank source as input 4 Keyboard as K B 1 When Alarm 1 closes the Sequence 4 starts Alarm 1 is added into Alarm Queue 1 and at the same time Input 2 switches...

Page 93: ...to the user being configured Enabled Indicates whether the user is allowed to use the system or not When enabled the user has access to the system User Name Name of the user as entered in the NAME section of the tab NAME Name Used to enter the User s Name The User Name can be up to 24 characters The User Name is for reference and reporting The User Name is not outputted on the PVT channel Short Na...

Page 94: ... Enabled When enabled triggers a sequence to run when the user logs in Sequence Drop down box used to select by name the sequence to run when the user logs in Sequence name selected correlates with sequence number Sequence Number Drop down box used to select by number the sequence to run when someone logs in at this keyboard Sequence number correlates with sequence name Edit Used to edit the selec...

Page 95: ...e the Auto Logout then select the Auto Logout time in minutes 11 To automatically timeout this user s control of the PTZ after a period of inactivity Enable the PTZ Control Timeout then select the Timeout period in seconds 12 Select to save download all information from the current page 13 Users should log out then log back in to see user configuration changes User Keys The Users Keys tab is used ...

Page 96: ... is allowed to use the system or not This field carries over from the Detail tab User Name Name associated with this keyboard This field carries over from the Detail tab USER KEY FUNCTION Run Sequence Enable this option to use the specific user key to run a sequence when pressed Once enabled use the dropdown box to select the sequence by name or number to run Edit the sequence as needed Select Gro...

Page 97: ...roup number 4 Repeat steps 1 3 for any other user keys on this screen 5 Select to save download all information from the current page 6 Continue to other sub level screens as needed to configure the remaining user keys 7 Users should log out then log back in to see user configuration changes Users Access The Users Access tab is used to configure access for the specified user From this screen acces...

Page 98: ...though the user is allowed the function is not allowed The following functions are set up by default Switch matrix PTZ control PTZ preset store PTZ preset store 1 32 store PTZ preset 33 64 store PTZ preset 65 128 store Device Control inhibits use of device button Sequence Run Alarm Accept Login Logout Others are useless Field Definitions Field Description HEADING User Number Number assigned to the...

Page 99: ...Group column or on an individual cell in the Access row on the table to include this user in exclude this user from the particular group Include 9 Exclude U Click on the Group again to toggle between include exclude settings Users can be in more than one group at a time 3 Select to save download all information from the current page 4 Repeat steps 1 3 as needed to configure user access in any of t...

Page 100: ...eps for Entering User Notes 1 From the Users window select Notes 2 Enter Notes about this user in this free form field 3 Select to save download all information from the current page KEYBOARDS Keyboards Detail The fields necessary to configure a keyboard are on the Keyboards tab The Keyboards Detail tab is used to enter all physical characteristics for a keyboard NOTE Keyboard capabilities are als...

Page 101: ...output Physical O P Physical address of the dedicated monitor if enabled LOGIN SEQUENCE Enabled When enabled triggers a sequence to run when someone logs in at this keyboard Sequence Drop down box used to select by name the sequence to run when someone logs in at this keyboard Sequence name selected correlates with sequence number Sequence Number Drop down box used to select by number the sequence...

Page 102: ...dit the sequence selected for keyboard connection DISCONNECT SEQUENCE Enabled When enabled triggers a sequence to run when communication is lost to this keyboard Priority Sets the priority level for keyboard connection loss Priority can be set to a number between 0 and 255 with 0 being the highest priority Sequences are activated based on their priority For example if a sequence with a priority 3 ...

Page 103: ...gs in to this keyboard Enable Login Sequence and use either the Sequence Name or Sequence Number dropdown box to select the Sequence to run Edit the sequence as needed 11 To run a sequence when a user logs out of this keyboard Enable Logout Sequence and use either the Sequence Name or Sequence Number dropdown box to select the Sequence to run Edit the sequence as needed 12 To run a sequence when t...

Page 104: ...yboards Key tab User Keys F1 F8 and F9 F16 The User Keys screen configures the User Keys 1 4 on the keyboard The F1 F8 and F9 16 screens configure Extended User Keys F1 F8 and F9 F16 if available Fields in these screens have the same look and functionality of the basic user keys Figure 3 27 Keyboards Keys Configuration Field Definitions Field Description HEADING Keyboard Number Number assigned to ...

Page 105: ...uld be run or a Group should be called when the key is selected If a Sequence will be run select the Sequence by name or number and edit it if needed If a Group will be called select the group number 4 Repeat steps 1 3 for any other user keys on this screen 5 Select to save download all information from the current page 6 Continue to other sub level screens as needed to configure the remaining use...

Page 106: ...on is not allowed If the keyboard is prohibited from performing a function even though the user is allowed the function is not allowed The following functions are set up by default Switch matrix PTZ control PTZ preset store PTZ preset store 1 32 store PTZ preset 33 64 store PTZ preset 65 128 store Device Control inhibits use of device button Sequence Run Alarm Accept Login Logout Others are useles...

Page 107: ...ude exclude settings Click on a Group column or on an individual cell in the Access row on the table to include this keyboard in exclude this keyboard from the particular group Include 9 Exclude U Click on the Group again to toggle between include exclude settings Keyboards can be in more than one group at a time 3 Select to save download all information from the current page 4 Repeat steps 1 3 as...

Page 108: ...eyboard This field carries over from the Detail screen NOTES Free text field Steps for Entering Keyboard Notes 1 From the Keyboards window select Notes 2 Enter Notes about this keyboard in this free form field You may wish to include the keyboard type model number serial number physical location and classification security surveillance Keyboard Group Names The Keyboards Group Names tab is used to ...

Page 109: ...ring Keyboard Group Names 1 Select a group number to use NOTE Group number is an editable text field capable of accepting numeric values In the database the group number is still defined as originally set For example default values are shown as 1 2 3 4 etc If 2 is revised to be 23 the list will display as 1 23 3 4 etc and the original row 23 remains the same We recommend that the Group Number fiel...

Page 110: ... follows The lower priority of keyboard and user will take effect when user login a keyboard If user on a keyboard wants to control something the user and the keyboard must both have the access to the device When user setting and keyboard setting have both configured a function key user s configuration is effective Keyboard Functionality The keys operate differently depending on the KEYBOARD MODE ...

Page 111: ...lowed to log in at which keyboards The keyboard functionality is determined by the access that is defined for the keyboard AND the access that is set for the operator It is not necessary to log out Camera Mode Figure 3 33 Camera Mode Switch a camera to the currently selected monitor Enter the camera number on the numeric keypad then press Enter Correct mistakes using the and Clear keys The Next an...

Page 112: ... if the alternate view has been set by user when no digits entered Release Clear switch to back Figure 3 34 Camera Mode To select a different monitor while in camera mode Enter monitor number using numeric keypad followed by Mon key The keyboard stays in Camera mode The keyboard will display the camera currently selected to that monitor Restricted Access to Monitors Cameras have been restricted to...

Page 113: ... or Group Mode Figure 3 36 High Speed Dome Mode Joystick Twist to Zoom 18X Optical Zoom twist joystick clockwise 4x Digital Zoom momentarily release joystick at end of Optical Zoom then twist clockwise Digital Zoom will cause some pixilation in the view Arrow Keys Will nudge the camera to provide accurate positioning Figure 3 37 PTZ Mode Auto focus Special Feature The dome will stay in auto focus ...

Page 114: ...ss Group 13 Key to correct this This is configured to trigger a sequence which will send a command to the currently selected camera Preset Recall Mode Figure 3 38 Preset Recall To Recall a Preset Position Press Recall Enter preset number Then press Enter Press Next Prev to recall next or previous preset Clear exits preset mode Use to correct errors Press Recall twice to recall home position preset...

Page 115: ... Preshot function Clear exits preset mode 99 Presets available High Speed Dome Auxiliaries Figure 3 40 High Speed Dome Auxiliaries Function of 8 Auxiliary Keys Aux 1 Flip the dome 180 degrees horizontally Aux 2 Turn on auto focus Focus N or F allows manual focus Aux 3 Recalls user position for dome Aux 4 Stores user position for dome Aux 7 PTZ F2 Toggle mono color Aux 8 PTZ F3 Auto mono color Grou...

Page 116: ...ternate views for a scene by pressing the Enter key Device Control Mode Figure 3 42 Device Control Mode The keyboard is not just a means of controlling camera switching but is a programmable control keyboard used for controlling many other devices such as VCRs DVRs Multiplexers and printers Select a Device Press the VCR button and enter the devices type s number press Enter Once the Device type is...

Page 117: ... which is recording the view i e 1234 3025 If there are no standby VCRs recording of the view will be lost and the view will show No backup VCR VCRs which are not recording and re routed can be viewed as a list on any monitor using the diagnostic output VST DVR Control Figure 3 44 VST DVR Control VST Number The VST recording is only available on the working monitors The VST number to control corre...

Page 118: ...era Input 10 301 MUX Output will be displayed on selected monitor Select display mode 2x2 3x3 4x4 Full Screen Tods TIME OF DAY EVENTS Event Configuration The Time of Day Scheduled Event can be used to perform automatic tasks based on a specific time of day or on a regularly scheduled time of day The event will activate a Sequence The fields necessary to set an Event that is triggered by the time o...

Page 119: ... can be up to 24 characters The description is used for referencing and reporting The description is not outputted on the PVT channel Short Name Abbreviated description for the Time of Day Event being defined The Short Name is used in certain reports TRIGGER Day Day of the week on which the event will be triggered Time Time of day at which the event will be triggered EVENT ACTION Enabled Enable th...

Page 120: ... to define edit 2 Enter a Description for the Time of Day Event 3 Enter a Short Description for the Time of Day Event The short description will be used in certain reports 4 Set the Day of the week for the event Day can be set as a particular day of the week Sunday Monday Tuesday Wednesday Thursday Friday and Saturday every day weekdays or weekends 5 Set the Time of day for the event Use the curso...

Page 121: ...ings applied Message Configuration The fields necessary to define a message are on the Messages tab Messages are displayed on the keyboard or overlaid on video using a sequence Figure 3 47 Message Configuration Field Definitions Field Description Message Number Number assigned to the message being defined Message Text Text of the system message Steps for Configuring a Message 1 On the Messages scr...

Page 122: ... such as Switch a specific Camera to a designated Monitor Lock or unlock and electric latch by activating a control relay output Sequences can also perform complex functions using multiple steps and incorporating conditional logic For instance if there is an alarm then switch a specified camera to a designated monitor BUT if it is between 6pm and 6am then switch that camera to a different monitor ...

Page 123: ...e Name associated with the sequence being defined edited Sequence Name can be up to 24 characters The Sequence Name is used for reference and reporting The Sequence Name is not outputted on the PVT channel RECORD NAVIGATION KEYS First record Last record Next record Prior record Delete record Insert record Refresh data Cancel edit SEQUENCE TABLE Command Drop down box which displays available comman...

Page 124: ...riptive field for Parameter 1 Parameter 2 Description Descriptive field for Parameter 2 Parameter 3 Description Descriptive field for Parameter 3 Parameter 4 Description Descriptive field for Parameter 4 COMMANDS Delete Sequence Delete this entire sequence Create Sequence Create a new sequence Quit Stop all changes Save to Flash Saves all sequences which have been downloaded to the NetCPU to the N...

Page 125: ...the Sequence Number to be defined edited 3 Modify the sequence steps using the record navigation keys and editing parameter values as needed 4 To add change Commands click in the Command cell and use the drop down box to select an available command 5 To remove a command line place the cursor in the command field and click 6 Repeat steps 3 5 to continue editing commands for this sequence 7 Select t...

Page 126: ...n Sequence Name Name associated with this sequence This field carries over from the Editor screen NOTES Free form text field Steps for Entering Sequence Notes 1 From the Sequences screen select Notes 2 Enter Notes about this sequence in this free form field 3 Select to save download all information from the current page Sequences Access The Sequences Access tab is used to configure access to the s...

Page 127: ...W Indicates the groups in which the sequence is included excluded Steps for Configuring Sequence Access 1 From the Sequence screen select the Access Tab 2 Set access for each sequence using the following methods Click on the Access button to include this sequence in exclude this sequence from ALL groups Include 9 Exclude U Click on the Access button again to toggle between include exclude settings...

Page 128: ...es tab is used to set up meaningful groupings names for sequences Figure 3 51 Sequences Group Names Configuration Field Definitions Field Description HEADING Sequence Number Number assigned to the sequence being configured Carries over from Sequences Editor tab Sequences Name Sequences name as edited in the Sequences Editor tab GROUP NUMBER Number assigned to each sequence group GROUP NAME Text en...

Page 129: ...equences Once the group name is modified the values will be carried over into other applicable windows 3 Select to save download all information from the current page Sequence Examples The examples provided are generic examples They may or may not be of use depending on your equipment and particular setup Camera Switching Sequence This sequence is based on the following commands SWITCH Parm1 The c...

Page 130: ... following sequence is based on the following commands PTZRCL Parm1 The camera or input number Parm2 The Preset number Presets must be set previously using the PCK and the STORE and RECALL buttons Check presets before using in a sequence DELAY Parm1 Delay in Minutes Min 0 for no minutes and max 255 minutes Parm2 Delay in Seconds Min 0 for no seconds and max 60 seconds ...

Page 131: ...uence from Step Number1 NOP No Operation SWITCH Input Channel Output Channel Switch Video Input to Video Output SCENE Group Number Scene Number View Number Monitor number Select Scene NEXTCAM Output Select next camera COPYMON Source Monitor Destination Monitor Copy displayed camera to another monitor DELAY Number of Minutes Number of Seconds Wait for specified time delay START Sequence Number Star...

Page 132: ...PUT Board number Output Number State Switch a control output on off PTZRCL PTZ Input Channel Number Preset Position Recall PTZ Preset Position PTZSTOR PTZ Input Channel Number Preset Position Store PTZ Preset Position PTZAUX PTZ Input Channel Number Auxiliary Number Auxiliary State PTZ Auxiliary Control special functions DEVICE Device Address Device Type Device function Operate RS232 device PRINT ...

Page 133: ...ODE PCK Number Required Mode Set PCK Mode STARTNET Net node satellite Remote sequence number Sequence Parameter Start Remote net sequence STOPNET Net node satellite Remote sequence number Stop Remote net sequence OP_NET Net node satellite Board number Output State Lock state 1 Lock 0 unlock Operate Network Output DEV_NET Net node satellite Remote device type Remote device address Remote device key...

Page 134: ...viously by using the software program NETCPU Device Config Name Enter a meaningful name to define the device e g VCR DVR etc Switch Offset A number that is added to the selected device for automatic matrix switching The field entries include 1 for no switching when the device is selected 0 switches to selected thru xx switches to xx selected Maximum Maximum number of devices that can be controlled...

Page 135: ...evices that can be controlled for that device type For example if there are 100 VCRs in the system and they are defined as the device type displayed then the entry in this field would be 100 If there are 50 Multiplexers in the system and they are defined as the device type displayed then the entry in this field would be 50 9 Select to save download all information from the current page Device Acce...

Page 136: ... Include 9 Exclude U Click on Access Button again to toggle between include exclude settings Click on a Group column or on an individual cell in the Access row on the table to include this device exclude this device from the particular group Include 9 Exclude U Click on the Group again to toggle between include exclude settings Devices can be in more than one group at a time 3 Select to save downl...

Page 137: ...xt field capable of accepting numeric values In the database the group number is still defined as originally set For example default values are shown as 1 2 3 4 etc If 2 is revised to be 23 the list will display as 1 23 3 4 etc and the original row 23 remains the same We recommend that the Group Number field NOT be revised 2 Modify the text in the Group Name field to a meaningful means of grouping...

Page 138: ...en the interface of VideoBlox Device Control Configuration software is displayed see Figure 3 58 The four buttons under User Keys corresponds to User1 User4 keys on the keyboard see Figure 3 59 Functions keys extended function keys arrow keys on the software and the keyboard are displayed by Figure 3 60 Figure 3 61 Figure 3 62 Figure 3 58 VideoBlox Device Control Configuration Figure 3 59 User Key...

Page 139: ...ure 3 62 Arrow keys on software and keyboard Perform the following steps to configure the key s function when pressing it on the keyboard 1 Select the text you would like to be displayed on the buttons to be configured from the drop down list next to the Display see Figure 3 63 ...

Page 140: ...d on the keyboard when key is pressed in the PCK Display textbox for example Up see Figure 3 65 4 Enter the command format in the Device Control textbox see Figure 3 65 Refer to for detailed information about Figure 3 65 Key Press Configuration 5 Click on the button to save the configuration If Key Press Device Control is selected from the drop down list in step 1 the interface would look like aft...

Page 141: ... 67 Control Configuration The command format is different in different protocols There are two command types ASCII Code and Control Code You can select a proper control type from the Control Type drop down list on the Control Configuration panel see Figure 3 67 ASCII Code When in ASCII code mode the system controls device using ASCII code ...

Page 142: ...check Xd Two digits decimal XOR check At least two digits Xdd Three digits decimal XOR check S Sum check Sd Two digits decimal sum check At least two digits Sdd Three digits decimal sum check d Decimal x Hexadecimal x One digit hexadecimal address Ax Two digits hexadecimal address Axx Three digits hexadecimal address Xx Two digits hexadecimal XOR check At least two digits Xxx Three digits hexadeci...

Page 143: ...Sum check S X XOR check X Therefore when the command DISPLAY is sent the command in control code mode is 8a010100005a24 Note Some protocols have not checksum so the check part is an option Database Open the data base choosing and setting User database is for user to set up their self s data files The current database s name is display in the bottom column and user can open database choose window b...

Page 144: ...abase when the CFG was installed please do not delete this database when the database fold in using has been deleted CFG will switch database path to this one and delete the link of the deleted database from the database list Create New and Switch functions Create new database will add a database link in the database list and create a new fold of database with the name user given So when we create...

Page 145: ...s database will be display in the database list and user can find a fold with the same name in the path where CFG had been installed Figure 3 71 Position of new data base Than user can choose the database UserTemp and press Switch button to choose this database ...

Page 146: ...e 3 73 Data base prompt Save as and Delete function If you want to backup the database you can press Save as to make a backup of the database you choose The backup fold is in the CFG installation path Press Delete button to delete the path of the database you choose from the list this operation will only delete the path in database not the database fold you can delete the fold manually if you want...

Page 147: ... use it in you computer you can copy it to the CFG installation path use Open New to add this database to the database list Figure 3 74 Open other data base If you want to rename the database you can press the Rename to do this the name in the list and the fold name will be modified together ...

Page 148: ...X APPLICATIONS INTERFACING HVBNETCPU WITH PERIPHERAL DEVICES The following diagram illustrates the connections between the HVBNETCPU and two GUI work stations across a TCP IP network Figure 4 1 Interfacing HVBNETCPU with Peripheral Devices ...

Page 149: ... HVBNETCPU WITH GUI WORK STATIONS ON A NETWORK The following diagram illustrates the connections between the HVBNETCPU and the two GUI work stations across a TCP IP network Figure 4 2 Interfacing HVBNETCPU with GUI Work Station ...

Page 150: ...ITH SATELLITE SYSTEMS ON A NETWORK Video on Fiber The following diagram illustrates the connections between HVBNETCPU and a satellite system with the video transmitted on fiber Figure 4 3 Interfacing HVBNETCPU with Satellite System with Video on Fiber ...

Page 151: ...5 Video on IP The following diagram illustrates the connections between the HVBNETCPU and a satellite system with the video transmitted on IP Figure 4 4 Interfacing HVBNETCPU with Satellite System with Video on IP ...

Page 152: ...Integrating Enterprise DVR and Satellite VideoBloX The following diagram illustrates the connections between the Enterprise DVR and the HVBNETCPU in a satellite system Figure 4 5 Integrating Enterprise DVR and Satellite VideoBloX ...

Page 153: ...amiliarity conventional surveillance configuration o Conventional Keyboard and Monitor o PTZ in near real time o No workstation training required DVR is used for o Long term video storage o Remote Retrieval of Incident o Live view and control from any workstation ...

Page 154: ...use chassis interlink input and output modules Use the chassis interlink input and output modules to allow multiple chassis to be connected together increasing the number of inputs of a matrix switching system Interlink Input and Output Modules HVB32LKI Video Interlink Input Module 32 interlinks for interconnecting chassis Figure 5 1 HVBLKI Module ...

Page 155: ...ceivers allow high quality twisted pair connections for video The Master chassis of a matrix is that which incorporates the video output modules which connect to video monitors All other chassis are Slave chassis which uses interlink modules to connect their backplane signals to the main chassis Chassis Expansion Connection and Dip Switch Setting Connect Master and multiple Slave chassis backplane...

Page 156: ... of CONTROL and COMMS connectors are automatically modified depending on configuration for the chassis being a Master or Slave Set the backplane dip switch in the front of chassis If both chassis Control and Communications are connected Slave chassis TX Data RX Data and RTS LEDs are flashing Figure 5 4 Dip Switch of VB chassis ...

Page 157: ...ation Figure 5 5 784 Input X 64 Output System Configuration HVB32LKO Jumper Setting 1 There are two options channel 1 to 32 and channel 33 to 64 jumper setting for HVB32LKO Place the jumper in position A and position B to configure channel 1 to 32 and 33 to 64 ...

Page 158: ...2LKO for channel 1 32 1 x HVB32LKO for channel 33 64 into 2nd Slave chassis HVB32LKI Jumper and Dip Switch Setting 1 There are two options channel 1 to 32 and channel 33 to 64 jumper setting for HVB32LKI Place the jumper in position A and position B to configure channel 1 to 32 and 33 to 64 2 x HVB32LKI for channel 1 32 2 x HVB32LKI for channel 33 64 Figure 5 7 HVB32LKI Jumper and Dip Switch Setti...

Page 159: ...l 1 ª 32 and 1 x HVB32LKI for channel 33 ª 64 address dip switch as below picture Install those 2 HVB32LKI into Master chassis Figure 5 8 Inter Link Start and End Address of 1st Slave Chassis 3 In the 2nd Slave chassis another two 1 x HVB16M64 input cards will be installed from address 28 to address 48 Therefore set 1 x HVB32LKI for channel 1 32 and 1 x ...

Page 160: ...ndard RJ45 cable from HVB32LKO to HVB32LKI HVB32LKO HVB32LKI 1ST Slave chassis with output channel 1 32 Master chassis with input channel 1 32 and address 7 27 1ST Slave chassis with output channel 33 64 Master chassis with input channel 33 64 and address 7 27 2nd Slave chassis with output channel 1 32 Master chassis with input channel 1 32 and address 28 48 2nd Slave chassis with output channel 3...

Page 161: ... are able to expend their system capacity with new modules Interface new input module with old system Honeywell s VideoBloX input module provides on board jumpers to let the user select the input module to be either backward compatible or forward compatible Figure 6 1 HVBM64 Jumper position If there are LKO or HVB16TO in chassis J1 should be installed If there is HVB16TO board in chassis J2 J17 sh...

Page 162: ...ngeable plug in board to do backward compatibility Figure 6 2 Buffer board of HVBNET16TO There are two kinds of buff board for HVBNET16TO SA16INBX and SA16INBXB if the system has the original VB input board the SA16INBXB should be plugged Interface new CPU module with old system Honeywell s VideoBloX CPU module provides backward compatibility without any modification needed ...

Page 163: ...Honeywell 147 ...

Page 164: ...ZAUX 6 1 1 Address AUX key number AUX key status PTZABS PTZ position set PTZABS 6 10 20 20 Address X value Y value Z value PTZC PTZ control PTZC 6 1 0 Address command parameter Command PTZ Stop 0 PTZ pan 1 PTZ tilt 2 PTZ zoom 3 PTZ focus 4 PTZ iris 5 PTZ combined lens 6 Parameter PTZ Stop 0 PTZ pan 127 to 127 PTZ tilt 53 to 53 PTZ zoom 1 to 1 PTZ focus 1 to 1 PTZ iris 1 to 1 PTZ Control PTZ which ...

Page 165: ..._ExtFunc7 38 Led_ExtFunc8 39 Led_ExtFunc9 40 Led_ExtFunc10 41 Led_ExtFunc11 42 Led_ExtFunc12 43 Led_ExtFunc13 44 Led_ExtFunc14 45 Led_ExtFunc15 46 Led_ExtFunc16 47 Status LedDark 0 LedLight 1 LedWink 2 KBTEXT Display string on keyboard KBTEXT 1 hello Address string RUNSEQ Run sequence RUNSEQ 1 0 0 0 Sequence number default parameter default monitor priority STOPSEQ Stop sequence STOPSEQ 1 Sequence...

Page 166: ...6 KEY_F10 57 KEY_F11 58 KEY_F12 59 KEY_F13 60 KEY_F14 61 KEY_F15 62 KEY_F16 63 KEY_ExF1 64 KEY_ExF2 65 KEY_ExF3 66 KEY_ExF4 67 KEY_ExF5 68 KEY_ExF6 69 KEY_ExF7 70 KEY_ExF8 71 KEY_ExF9 72 KEY_ExF10 73 KEY_ExF11 74 KEY_ExF12 75 KEY_ExF13 76 KEY_ExF14 77 KEY_ExF15 78 KEY_ExF16 79 Release Relative key value add 128 SETDATE Set date SETDATE 20 1 08 Date Month Year SETTIME Set time SETTIME 12 12 12 Hour...

Page 167: ... REPLY reply REPLY HELP HELP Command list LOCALIP Return Local ip ALMRPT Alarm state report REALARM 1 Status 0 do not report other number report VDRPT Video state report REINPUT 1 Status 0 do not report other number report SNETAUX Set net AUX SNETAUX 1 Status 0 ineffective other number effective SNETGUI Set net GUI SNETAUX 1 Status 0 ineffective other number effective ...

Page 168: ...erminates this sequence Parm1 N A Parm2 N A Parm3 N A Parm4 N A RESTART Restart this sequence Parm1 N A Parm2 N A Parm3 N A Parm4 N A NOP No operation Parm1 N A Parm2 N A Parm3 N A Parm4 N A SWITCH Switch video input to output Parm1 Input channel Parm2 Output channel Parm3 N A Parm4 N A ...

Page 169: ...N Copy one monitor s camera to another monitor Parm1 Source Monitor Parm2 Destination monitor Parm3 N A Parm4 N A DELAY Wait for a specified time delay Parm1 Number of minutes Parm2 Number of seconds Parm3 N A Parm4 N A START Start another sequence Parm1 Sequence number Parm2 N A Parm3 N A Parm4 N A CALL Call another sequence as a sub routine Parm1 Sequence number Parm2 N A Parm3 N A Parm4 N A ...

Page 170: ...he sequence Parm1 Number of repeats Parm2 N A Parm3 N A Parm4 N A ENDLOOP End of repeated portion Parm1 N A Parm2 N A Parm3 N A Parm4 N A Note Loop can t be nested TEXTOP Display text on output titler Parm1 Output channel number Parm2 Line number or 0 to erase all lines Parm3 Message number or 0 to erase this line Parm4 N A TEXTKB Display text on keyboard Parm1 Keyboard number Parm2 Message number...

Page 171: ...2 the keyboard will sound continually ALARM Generate alarm on keyboard Parm1 Keyboard number Parm2 Alarm state Parm3 N A Parm4 N A Note Alarm state 1 alarm 0 alarm close ALARMQ Add alarm to alarm queue Parm1 Alarm queue number Parm2 Alarm number Parm3 Alarm state Parm4 N A RUNLED Operate LED on keyboard Parm1 Keyboard number Parm2 LED number Parm3 LED state Parm4 N A ...

Page 172: ... Func14 45 Func5 36 Func15 46 Func6 37 Func16 47 LED state Dark 0 Light 1 Wink 2 OUTPUT Switch an output on or off Parm1 Board number Parm2 Output number Parm3 Output state Parm4 N A PTZRCL Recall Pan Tilt zoom preset position Parm1 PTZ input channel number Parm2 Preset Position Parm3 N A Parm4 N A PTZSTORE Store Pan Tile Zoom preset position Parm1 PTZ input channel number Parm2 Preset Position Pa...

Page 173: ...ion key 4 51 179 Extend Function key 4 67 195 Function key 5 52 180 Extend Function key 5 68 196 Function key 6 53 181 Extend Function key 6 69 197 Function key 7 54 182 Extend Function key 7 70 198 Function key 8 55 183 Extend Function key 8 71 199 Function key 9 56 184 Extend Function key 9 72 200 Function key 10 57 185 Extend Function key 10 73 201 Function key 11 58 186 Extend Function key 11 ...

Page 174: ...Parm4 N A PRIORITY Set priority of this sequence Parm1 Priority level Parm2 N A Parm3 N A Parm4 N A LOCKOP Lock output Parm1 Board address Parm2 Output number Parm3 Lock state 1 lock 0 unlock Parm4 N A SHOWINFO Select diagnostic information screen Parm1 Screen number Parm2 N A Parm3 N A Parm4 N A ...

Page 175: ... User Settings 13 Keyboard 14 TOD Events 15 Messages 16 Sequences 17 Scenes 18 Groups 19 Satellites 20 End COPYFLAG Copy a system flag Parm1 Source flag number Parm2 Destination flag number Parm3 N A Parm4 N A Note Flag number is between 1 and 1024 SETFLAG Set Clear Toggle a system flag Parm1 Flag number Parm2 State 0 1 or 2 to toggle Parm3 N A Parm4 N A Note Flag number is between 1 and 16 HALTFL...

Page 176: ...of conditional repeat Parm1 Flag number Parm2 State for conditional to execute Parm3 N A Parm4 N A Note DO and WHILE can t be nested IF Conditional Parm1 Flag number Parm2 State for conditional to execute Parm3 N A Parm4 N A ELSE Condition not met Parm1 N A Parm2 N A Parm3 N A Parm4 N A ENDIF End of conditional Parm1 N A Parm2 N A Parm3 N A Parm4 N A ...

Page 177: ...ted WHILEBSY Wait while PTZ is in use Parm1 Camera number Parm2 N A Parm3 N A Parm4 N A IFBUSY Conditional IF PTZ is in use Parm1 Camera number Parm2 N A Parm3 N A Parm4 N A SETMODE Set PCK mode Parm1 PCK number Parm2 Required Mode Parm3 N A Parm4 N A ...

Page 178: ...mber Parm3 N A Parm4 N A STOPNET Start Remote Net sequence Parm1 Net node satellite Parm2 Remote sequence number Parm3 Sequence parameter Parm4 N A OP_NET Operate Network output Parm1 Net node satellite Parm2 Remote Board number Parm3 Remote output number Parm4 Output state DEV_NET Operate Network device Parm1 Net node satellite Parm2 Remote device type Parm3 Remote device address Parm4 Remote dev...

Page 179: ...Honeywell 163 Note Device key codes please refer to command DEVICE ...

Page 180: ...o Milan Italy www security honeywell com it TEL 39 02 457 1791 Honeywell Security Poland Chmielewskiego 22a 70 028 Szczecin Polska www ultrak pl TEL 48 91 485 40 60 Honeywell Security Espana Calle Vivero 5 28040 Madrid Spain www security honeywell com es TEL 34 91 102 5900 Honeywell Security Czech Republic Havránkova 33 Brno Dolní Heršpice 619 00 Czech Republic www olympo cz TEL 420 543 558 111 Ho...

Reviews: