136
06-1491-00-12.fm
Attachments and Options
Hydraulic hand pump
The hydraulic hand pump
is used for the following tasks:
•
Raising and lowering the dirt hopper on failure of the vehicle hydraulics.
•
Unlocking the parking brake for the towing process, see page 80
Raise the dirt hopper:
1. The lever of the hand pump
Fig. 125-A
must be in the lower position.
2. Screw in the setscrew in valve
Fig. 125-Y17
by 4 mm.
3. Insert the auxiliary tool in the hand pump
Fig. 125-C
and pump so long
until the dirt hopper is in position.
4. Unscrew the setscrew in valve
by 4 mm again.
Lower the dirt hopper:
1. The lever of the hand pump
Fig. 125-A
must be in the lower position.
2. Screw in the setscrew in valve
Fig. 125-Y18
by 4 mm.
3. Insert the auxiliary tool in the hand pump
Fig. 125-C
and pump so long
until the dirt hopper is in position.
4. Unscrew the setscrew in valve
by 4 mm again.
Comfort package for the dirt hopper (optional)
The comfort package contains the handles
, the extended colli-
sion protection
and the step
.
Convenient inspection of the dirt hopper is possible with the folding step
and the handles.
Fig. 125:
C
A
Y17
Y18
Y17/18
4 mm
Note
A hexagon socket wrench (3 mm) is required for the set-
screws of the valves
Fig. 125-Y17
and
Fig. 125-Y18
.
Caution
•
The two setscrews of the valves
Fig. 125-Y17
and
Fig. 125-Y18
(rear wagon left side door) may not be
screwed in too far (max. by 4 mm)!
•
Do not screw in the setscrews simultaneously!
•
In normal operation, both setscrews must be unscrewed by
4 mm again, see sketch!
Fig. 126:
C
A
B
Summary of Contents for Citymaster 1600
Page 22: ...22 01 1491 00 12 fm Safety Instructions G A B D E F Fig 3 C F C E C D G A B A...
Page 26: ...26 02 1491 00 11 fm Operation Fig 5 25 23 16 18 17 19 22 21 20 24 26 27...
Page 30: ...30 02 1491 00 11 fm Operation Fig 7 62 63 61 67 55 50 51 54 53 52 58 57 59 60 65 64 66 68 56...
Page 32: ...32 02 1491 00 11 fm Operation Fig 8 75 69 78 73 72 79 80 81 82 83 74 77 70 71 76 84...
Page 85: ...04 1491 00 11 fm 85 Technical Data 4 Technical Data Fig 80 3830 1600 941 1210 975 1964...
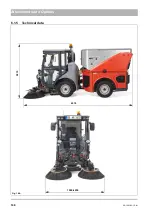
Page 146: ...146 06 1491 00 12 fm Attachments and Options 6 1 5 Technical data Fig 144 2215 4510 1580 2250...
Page 220: ...220 06 1491 00 12 fm Attachments and Options...


