06-1491-00-12.fm
137
Attachments and Options
High-pressure cleaner (optional)
The high-pressure cleaner
is located behind the rear flap of
the dirt hopper. Check the following before starting up:
•
Fill the fresh water tank, see page 128.
•
Check the water filter
of the high-pressure cleaner and
clean it if necessary.
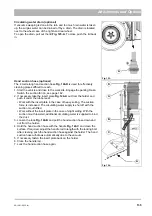
1. Start the vehicle and drive to the work site. Engage the parking brake.
Open the flap
Fig. 127-A
. Remove the pressure hose from the hose
holder and plug it on at the connection
Fig. 128-B
.
2. Set the changeover valve
to the high-pressure cleaner posi-
tion.
•
Position I: Suction fan hydraulics
•
Position II: High-pressure cleaner hydraulics
3. Open the fresh water supply
Fig. 128-D
.
4. Switch the engine and suction fan on.
5. Set the pressure controller
to the required working pressure.
6. Clean the surface with the lance
Fig. 128-G
.
7. Reset the changeover valve to the suction fan position and close the
fresh water supply again. After cleaning stow the lance and the pres-
sure hose back in the stowage
.
Fig. 127:
A
Danger
The jet of the high-pressure cleaner must not be directed to
persons. There is danger of injury!
Do not use steam cleaners and high-pressure cleaners for
cleaning electrical/electronic components and the engine
compartment!
Fig. 128:
G
F
A
C
D
B
E
E
II
I
H
Summary of Contents for Citymaster 1600
Page 22: ...22 01 1491 00 12 fm Safety Instructions G A B D E F Fig 3 C F C E C D G A B A...
Page 26: ...26 02 1491 00 11 fm Operation Fig 5 25 23 16 18 17 19 22 21 20 24 26 27...
Page 30: ...30 02 1491 00 11 fm Operation Fig 7 62 63 61 67 55 50 51 54 53 52 58 57 59 60 65 64 66 68 56...
Page 32: ...32 02 1491 00 11 fm Operation Fig 8 75 69 78 73 72 79 80 81 82 83 74 77 70 71 76 84...
Page 85: ...04 1491 00 11 fm 85 Technical Data 4 Technical Data Fig 80 3830 1600 941 1210 975 1964...
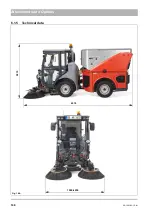
Page 146: ...146 06 1491 00 12 fm Attachments and Options 6 1 5 Technical data Fig 144 2215 4510 1580 2250...
Page 220: ...220 06 1491 00 12 fm Attachments and Options...


