background image

B. Gohl 


      © 

GEOSAT

pro

48

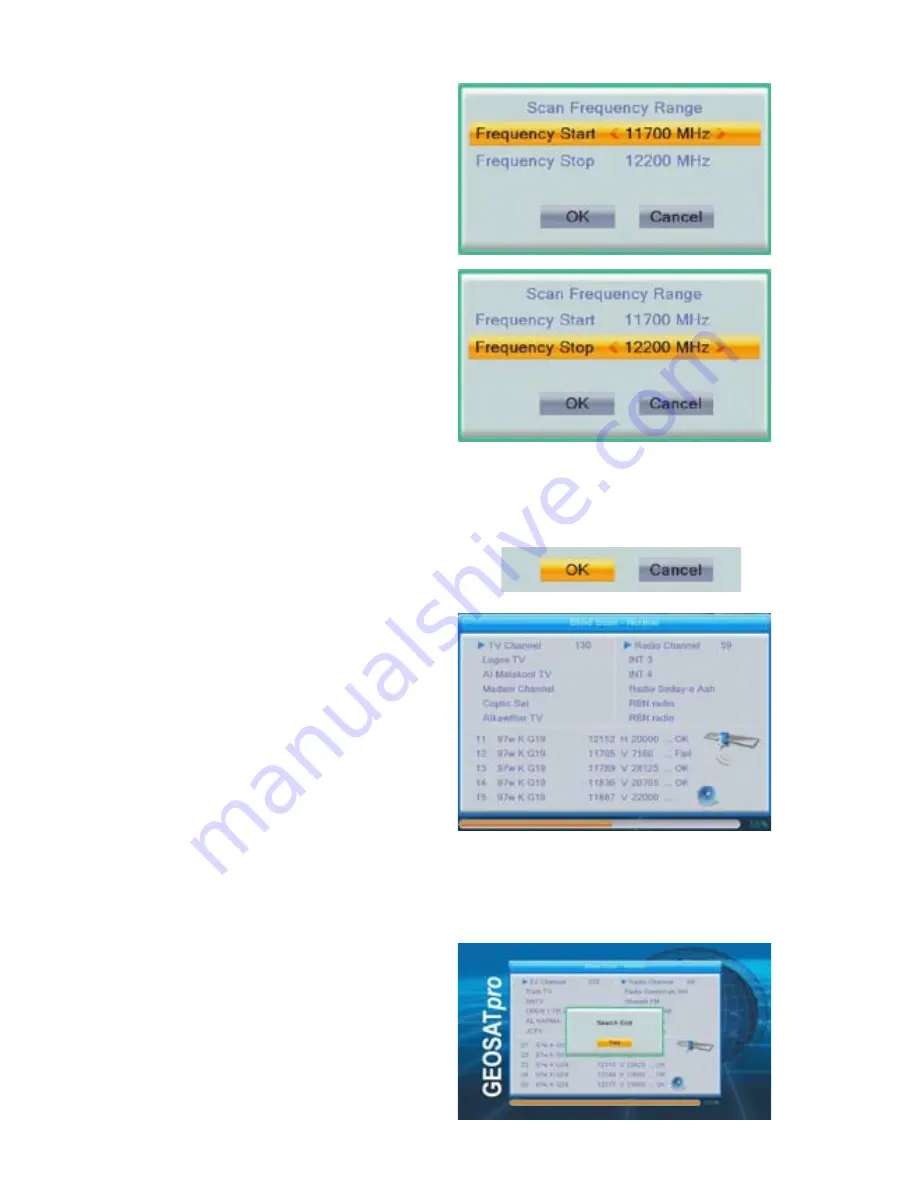
Blind  Scan  -  Normal

  or

  Detailed

Scan  Frequency  Range  menu  allows 

the user to change the default settings 

and define the start and stop frequency 

range  to  log  new  transponders  and 

channels.  Highlight  Frequency  Start 

and use the numeric keys to enter the 

start  frequency.  Press  UP  or  DOWN 

NAV key to highlight Frequency Stop 

and use the numeric keys to enter the 

stop  frequency.  The  available  start/

stop  frequency  range  will  be  defined 

by  the  LNB  that  is  connected.  If  the 

LNBF states 11.7 – 12.2, channels will 

not be found by extending the start or 

stop frequency.

When the scan is complete the number 

of    Transponders,  TV  and  Radio 

channels  will  be  displayed  with  a 

prompt “ Search End” or “No Program 

Found”
Press  OK  key  to  exit  the  Search 

screen

Press  UP  or  DOWN  NAV  key  to 

select  Cancel  and  press  OK  key  to 

exit  without  scanning  or  Select  OK 

to continue to the Blind Scan search. 

Press OK key to start the search.
Blind Scan searches may take a very 

long  time  to  analyze  the  incoming 

satellite signals and log the channels. 

Some satellites may only take a minute, 

but other satellites with many services, 

data  services  or  poorly  configured 

information tables may take up to 10 

minutes. 

Summary of Contents for DVBS2

Page 1: ......

Page 2: ...f you have any programming or operation questions please contact your reseller for primary support GEOSATpro stands behind our resellers and their customers to offer a one year warranty against any factory defect on retail purchases provided with original dated proof of sale invoice or receipt All warranty issues are to be processed through your reseller Optional telephone technical support for yo...

Page 3: ...e 11 Parts List 12 Site Survey 12 Dish Mounting Options 15 LNBF Installation 17 Dish Aiming 18 Connect Receiver to a TV 19 microHD Install Menu Setup 21 Locate and Peak Satellite Signal 23 Completing the Install and Grounding 26 microHD Features 27 Menu Items 32 Channel Manager 32 Installation 37 System Set up 53 Tools 59 Media Manager 63 FAQ Frequently Asked Questions 69 Satellite Elevation Finde...

Page 4: ...onitors with composite Component YUV or S Video input connections This notice complies with Parts 15 and 54 of Title 47 of the Code of Federal Regulations 15 124 DTV Transition Notices by Manufacturers of Televisions and Related Devices Warning Changes or modifications to this unit not expressly approved by the party responsible for compliance could void the user s authority to operate the equipme...

Page 5: ...www geosatpro com Toll Free 888 483 4673 Important Safeguards ...

Page 6: ... fire electric shock or other hazards Modification to the hardware or software without authorization by the manufacturer the will result in voiding any warranty Service assistance may be arranged by contacting your reseller Safety Check Upon completion of any service or repairs to this product ask the service technician to perform safety checks to determine that the product is in proper operating ...

Page 7: ...am Guide Auto Time Setting via Satellite Manual Time Setting Video Photos Music Multi Media Player Slide Show Music Lists Repeat and Favorites Firmware Upgrade Through USB2 0 Port Channel List Upgrade Through USB2 0 Port Manual Automatic Firmware Upgrade Via G19 KU 97W Satellite Manual Automatic Channel List Upgrade G19 KU 97W Satellite Closed Caption Supported on HDMI EIA 608 EIA 708 via OSD Clos...

Page 8: ... via 3 5mm Jack USB 2 0 500mA File system FAT NTFS support first partition DC IN 12VDC 2000mA Max Current 30mA Standby 6 3mm 2 0mm Jack Serial Interface Type RS 232 Serial bidirectional Bitrate 115 2 kBit s max Plug Connector Type 4 Pin Connector Internal PCB Mount Tuner Input Frequency 950 2150MHz Input Level 65 25dBm Signal to Noise Level 12 dB max AFC 5 MHz Input Impedance 75 Ohm LNB Power Auto...

Page 9: ...ression Support BMP JPEG AC3 AAC AVI MKV MP4 Video Formats and Codecs MPEG1 2 4 M1V M2V M4V MPEG1 2 PS M2P MPG MPEG2 Transport Stream TS TP TRP VOB㸦free AVI free Matroska MKV MOV H 264 MP4 MPEG1 MPEG2 MP HL MPEG4 SP L3 to ASP L5 H 264 HP L4 1 H 263 Xvid Image Support JPEG BMP Audio Formats and Codecs AAC AAC HE AAC MPEG audio MP1 MP2 MP3 MPA WAV OGG Dolby Digital LPCM Dolby Digital Pass Through Re...

Page 10: ...ceptor Front Panel 1 2 3 Connect the satellite dish LNBF coax cable to Satellite IN Connects composite VIDEO and L R Audio to TV or other equipment Connects HDMI Video Audio to TV or other equipment Connects USB 2 0 memory device for DVR multi media upgrade of Firmware or Channel List 5V 500ma DC power plug connection 12VDC 2000mA Rear Panel 1 2 3 4 5 ...

Page 11: ... Program Banner or 2x for Channel Information 9 10 11 12 13 14 15 16 17 18 19 20 21 22 23 24 25 26 27 28 29 30 Return to the Previous Menu Screen or Exit to Channel Viewing Mode Display the Channel List or to Accept an Item in the Menu Adjust Volume Navigate the Menu Cursor Change Channels Selection Up Down Display DVR Recordings List Select Media Player Mode for Videos Photos Music Display Event ...

Page 12: ...NIC PROGRAMMING GUIDE button View the Channel Banner displaying the channel name channel number program information by pressing the INFO button View a list of available channels by pressing the LIST OK button View a full screen meter by pressing the SIGNAL button Basic Remote Operation Navigation Buttons Recording Connect an USB drive to provide the DVR recording and Timeshift feature Start record...

Page 13: ... the system as recommended in the National Electric Code If you don t feel completely comfortable with these tasks you may consider contracting the installation with a local satellite technician Web site http www FTAinstall com provides a free referral service for local installers Please visit today Installation Guide Savealloriginalboxes manuals accessoriesand packaging materials in case it is ne...

Page 14: ... ground according to NEC and local codes and following step by step instructions you might consider installing your own system The installation does require precise tuning and a great deal of patience to correctly install Have you recently installed a light switch ceiling fan basketball hoop and programmed a VCR If not this project might not be a good time to hone your mechanical and electrical sk...

Page 15: ...dish will be pointed towards the South Southeast or Southwest Satellites are located directly over the equator and are approximately 23 000 miles away Before you start you will need to decide what satellite that you wish to receive and if it possible to see the satellite from your location If you wish to receive a specific channel often the broadcaster s web site will provide the satellite informa...

Page 16: ...orresponds with the earth s Longitude The Galaxy 19 satellite is just east of DirecTV s main satellite at 101W Use the aiming coordinates included with this system or found at http www GeoSatFinder com along with a compass and the Site Check Angle Finder found on the last page of this manual to locate a suitable area for mounting the dish Where to Mount the Dish Compass While facing south hold the...

Page 17: ...dmountingafixedsatellite dish on a 1 5 8 heavy wall galvanized post set in cement Attach a bolt or muffler clamp to the bottom of the post to prevent the post from twisting in the hardened cement These items are readily available at any hardware store Filling the post with a wet cement mixture will provide greater rigidity The post must be perfectly plumb level on all sides Posts standing higher t...

Page 18: ...ng Failure to check for dish warping or damage could lead to many frustrating hours of trying to locate the satellite This simple test may be the most important step in a successful installation Bad Warped Reflector Good Reflector Find a perfectly flat surface such as a garage cement floor and lay the reflector face down Are the edges of the reflector laying perfectly flat If any area of the edge ...

Page 19: ...LNBF Rotation Skew setting and Clockwise right for a negative LNBF Rotation Skew setting Start with the LNBF slid back as far away from the reflector as possible Tighten the screws to secure the LNBF from rotating No need to overtighten and break the clamp LNBF Rotation ___________ The LNBF catches the satellite signals reflected from the dish and send the signal down the coax to the receiver It i...

Page 20: ...llites are always located South of your location To correctly aim the dish you must first accurately determine the exact compass reading angle azimuth Metals electricity and other magnetic disturbances can cause the compass to point incorrectly Compass readings should be made at least 10 feet in front of or behind the metal satellite dish and away from any large metal object such as metal building...

Page 21: ...TOOPERATEELECTRONIC DEVICES IN AN UNSAFE LOCATION OR IN VIOLATION of SAFEGUARDS PROVIDED IN THIS MANUAL OR ANY OTHER EQUIPMENT MANUAL PROVIDED WITH THIS SATELLITE SYSTEM Remove the satellite receiver and remote control from the packaging Inspect the unit before operation If any equipment is damaged or if you have any questions please immediately contact your reseller Install the two included AAA b...

Page 22: ...Plug the television power plug into a surge protected AC power strip Turn the TV power ON and set the TV to the AV input The TV is now ready to view the satellite receiver Plug the satellite receiver s power supply into the 12VDC port on the rear panel of the microHD Plug the microHD power supply AC plug into the surge protected power strip Older TV Only Antenna Jack Consult the owners manual prov...

Page 23: ...onfigured and the dish aimed for the satellite that you wish to receive and for the satellite equipment that is connected Before programming the receiver you will need to know what satellite carries the channels that you wish to receive If you do not know the name of the satellite visit www lyngsat com for a list of satellites and the available channels The majority of free channels in North Ameri...

Page 24: ...light LNB LO using the UP Down navigation arrows Press OK to list the available LNB Local Oscillation frequencies LO for the connected LNB or LNBF 8 Highlight the correct LO using the UP Down navigation arrows Press OK to select The LNB LO frequency is normally printed on the LNBF label or packaging A Standard type LNBF LO frequency is 10750 and an Universal 9 type LNBF LO frequency is 9750 10600 ...

Page 25: ... Signal Level reading of 45 or higher indicates a connection to a working LNBF but does not indicate finding the correct satellite A Blue color Signal Level reading of 45 or better indicates that the receiver is connected to a working LNBF The Green Signal Quality reading at 50 or higher indicates that the dish is properly aimed Meter Readings While watching the Signal Quality reading SLOWLY pan t...

Page 26: ...ng the LNBF towards the reflector or away from the reflector may also provide increased Signal Quality readings The higher the Signal Quality reading the better the reception If the Signal Quality reading is too low the picture will break up into little squares and the sound may become garbled out of sync choppy or disappear completely Press Exit two times to return to the main Installation menu H...

Page 27: ...he range of channels scanned by their Symbol Rate Select All High Medium or Low 17 If any channel displays a Signal Quality reading below 50 additional fine tuning adjustments must be made Highlight Polarity Press the LEFT or Right navigation arrow to select if you wish to limit the polarity scanned from All to Horizontal or Vertical 18 Highlight Search Press OK to start scanning The scan window w...

Page 28: ...satellite system please consult with a local professional Copies of the NEC are available at your local library or online Completing the Install and Grounding Important Notice GEOSATpro recommends that you DO NOT use existing coaxial cabling that has been pre wired or previously used in your home Often these cables are low quality RG 59 not rated for satellite applications or have splitters and ot...

Page 29: ...splay Press INFO key two times to display extended technical information Press EXIT key to remove the display The microHD receives both TV and Radio stations Press TV RADIO key to select either TV channel or Radio stations In the TV mode only TV channels are available in the Channel List and for channel viewing In the Radio mode only Radio stations will be available in the Channel List and a Radio...

Page 30: ...t a character of the channel name and press OK key Repeat for several characters A list of matching channel names appears to the left Press the BLUE color key to exit the find screen and press DOWN NAV key to highlight the target channel Press OK key to go to the channel Organize your favorite channels into easy to manage lists The FAV List is also included along with satellite sorted lists in the...

Page 31: ...gram information is displayed the EPG service is available on this channel Navigate the EPG screen using the UP DOWN RIGHT LEFT NAV keys Highlight a program name and press OK key to display a program description Press the RED color key to return to the EPG schedule Press the RED color key to allow quick navigation within the schedule Press LEFT or RIGHT NAV key to select the navigation icons at th...

Page 32: ...able of decoding and displaying CC on both the HDMI and composite video outputs At the time of printing the microHD is the only HD FTA receiver available anywhere in the world that provides internal Closed Captioning for display on High Definition televisions connected via the digital HDMI cable DVR recordings preserve the closed caption data and the on screen text can be turned On or Off at any t...

Page 33: ...ator The graphing meter is sampled in 5 second intervals and provides a five second history It is simple to install or adjust a satellite dish with this unique histograph graphing meter If the graph displays an increase over the five second comparison the adjustment is optimizing the signal If the graph is falling the aiming is moving in the wrong direction ASignal Quality ready of 75 is excellent...

Page 34: ...keys to select the area of the screen to magnify Press EXIT key to return to normal viewing Main Page 1 Channel Manager Receiver Menu Items To enter the microHD Menu screens press MENU key Five Sub Menu icons will appear on the left side of the screen Use the UP DOWN LEFT RIGHT NAV keys 1 1 TV Channel List 1 2 Radio Channel List 1 3 Delete All Channels 1 4 Save as Default 1 Channel Manager 2 Insta...

Page 35: ... the function to add or delete channels appearing in one of the ten available Favorites Lists The FAV tab will pop up when this function is selected Press UP or DOWN NAV key to select a channel Press OK key to display the ten Favorites Lists Press UP or DOWN NAV key to select the list to add or delete the selected channel Press OK key to alternate between displaying a heart icon to indicate that t...

Page 36: ...t the channel has been locked or no lock icon displayed indicates that the channel password protected Press UP or DOWN NAV key to select additional channels to lock or unlock Press Exit several times to display Confirm Save If you wish to save the changes select Yes and press OK key To exit without saving changes select No and Press OK key Skip Channels Skipped in Channel Viewing Press the GREEN c...

Page 37: ...changes select No and Press OK key Channel Edit The Channel Edit menu has four tabs Sort Alphabetical Free Scrambled Lock Polarity Edit Rename Channel Del All Delete all channels on selected satellite Delete Delete selected channels on selected satellite Sort Sorting Channel Lists Press the RED color key to select the function to sort how channels are displayed The Sort menu has five selections Na...

Page 38: ...Satellite or TV Radio Mode Press the YELLOW color key to select the function to delete channels on selected satellite all satellites or selected favorites list If you wish to delete the channels select Yes and press OK key To exit without deletion select No and Press OK key Delete Delete Selected Channel Press the BLUE color key to select the function to delete The Delete tab will pop up when this...

Page 39: ...nnels list Favorites lists to be the new default file Note The Default file does not automatically save during a firmware upgrade See 4 6 5 how to save the Default file to external USB Press OK key to save the Satellite list If you wish to replace the current default data base select Yes and press OK key To exit without saving the current profile as the default select No and Press OK key 2 1 Satel...

Page 40: ...ital positions Use the numeric keypad to enter the satellite s orbital position in this format xxx x Example 97W satellite is inputted as 097 0W YELLOW color key accepts changes to the satellite name and or position BLUE color key cancels Add New Satellite and Position Press the GREEN color key Type the new satellite name using the numeric keys RED color key selects capitalization On or Off GREEN ...

Page 41: ...elete from the Default Satellite List Press the BLUE color key If you wish to delete the highlighted satellite select Yes and press OK key To exit without deleting the satellite select No and Press OK key Press EXIT key to save and return to the main Installation menu 2 2 Antenna Setup 2 2a Motor Switch Setting 2 2b Limit Setup 2 2a Motor Switch Setting Configure the satellite receiver to work wit...

Page 42: ... List OK key to display scroll list Select the LO frequency that corresponds with the LO Frequency printed on the connected LNB or LNBF Note The correct LNB LO must be selected for the connected LNBF Failure to select the correct LNB LO frequency will result in no valid signal for locating and identifying the satellite DiSEqC 1 0 Switch Setting If multiple satellite dishes or multiple LNB f s are ...

Page 43: ...ected to your receiver from 2 to 32 inputs with cascaded DiSEqC1 1 switches determine if the switch type is 22KHz If so press LEFT or RIGHT NAV key or press List OK key to display scroll list Select the switch port that is connected to the target satellite Motor Type If installing a fixed dish system leave the setting to the default None If the system has a motorized dish press LEFT or RIGHT NAV k...

Page 44: ...ess UP or DOWN NAV key to highlight OK or Cancel If you wish to save the current location coordinates select OK and press OK key To exit without adding new TP select Cancel and Press OK key Once the dish has been installed and properly aligned using USALS the receiver will automatically drive the motor to each satellite position when the satellite is selected in the menus or when changing between ...

Page 45: ...llite position Reset All to 0 To clear all saved DiSEqC 1 2 motor position and reset the microHD motor position assignments to 0 zero highlight and press OK key To clear and reset all DiSEqC 1 2 motor position assignments select Yes and press OK key To exit without deleting the DiSEqC 1 2 position settings select No and Press OK key Press DOWN NAV key to select West Save East Press LEFT NAV key to...

Page 46: ... OK key Signal Level Reading is a measurement of electronic noise The readings will help determine if the receiver is correctly configured connected to a working LNB or LNBF and if the dish is aimed at a satellite 0 Signal Level reading not connected to an LNB receiver is incorrectly configured or connected to a defective LNB 45 connected to a LNB but dish might be misaimed receiver configured inc...

Page 47: ...eiver West Limit For setting an electronic limit on the motor movement toward the West East Limit For setting an electronic limit on the motor movement toward the East Setting West Limit Press UP or DOWN NAV key to highlight Limit Set up Press RIGHT NAV key to select West Limit Press UP or DOWN NAV key to select West Limit Setup East While watching the motor drive the motor towards the West using ...

Page 48: ...lite using a fixed motorized or multiple satellite system Satellite A list of activated satellites are displayed Press LEFT or RIGHT NAV key or press List OK key to display scroll list If the target satellite is not displayed return to Satellite List 2 1 and activate the satellite and configure in the Antenna Setup 2 2a Scan Type Press LEFT or RIGHT NAV key to select to either scan and log All Cha...

Page 49: ...e satellite with user defined parameters for new transponders and channel logging with extended analysis Symbol Rate Define the type of transponders and channels logged by limiting the symbol rate range Press LEFT or RIGHT NAV key to selectAll symbol rates High 20K Medium 10K 20K Low 10K Polarity Select the polarity to scan Press LEFT or RIGHT NAV key to select All polarities Horizontal Left only ...

Page 50: ... states 11 7 12 2 channels will not be found by extending the start or stop frequency When the scan is complete the number of Transponders TV and Radio channels will be displayed with a prompt Search End or No Program Found Press OK key to exit the Search screen Press UP or DOWN NAV key to select Cancel and press OK key to exit without scanning or Select OK to continue to the Blind Scan search Pre...

Page 51: ... is displayed at the bottom of the menu screen Multi Satellite Search may take many hours to complete The duration is dependent on the complexity and number of satellites activated and configured Many hobbyists will start a Multi Satellite Search before leaving for work or going to bed Next time the system is used the channel list will be updated with every new found channel 2 5 TP List Search Man...

Page 52: ...to highlight Save or Cancel To save the modified TP select SAVE and press OK key To exit without modifying select Cancel and Press OK key Add New Transponder Press the GREEN color key Type the new Frequency using the numeric keys Press UP or DOWN NAV key to highlight Symbol Rate Type the new Symbol Rate using the numeric keys Press UP or DOWN NAV key to highlight Polarity Press LEFT or RIGHT NAV k...

Page 53: ...o delete the TPs select Yes and press OK key To exit without deleting the transponders select No and Press OK key TP Search Transponder Search for All Channels or Manual PID Entry Press the BLUE key Press UP or DOWN NAV key to highlight Scan Mode Press LEFT or RIGHT NAV key to select Normal Search TP for available channels or PID to Manually add a single channel defined by the User entered PIDs No...

Page 54: ...ls select OK and press OK key To exit without searching select Cancel and Press OK key Press UP or DOWN NAV key to highlight Audio PID Use Numeric keys to manually enter the Audio PID If no audio is available leave at default 8190 Press UP or DOWN NAV key to highlight PCR PID Use Numeric keys to manually enter the PCR PID If no PCR PID is provided set to the Video PID or if a radio service set to ...

Page 55: ...D Setting 3 8 Favorite 3 9 Other 3 1 Language Selection Language Menus On Screen Displays Press LEFT or RIGHT NAV key to select English Spanish or Russian First Audio Primary Audio default language automatically selected if broadcaster provides multiple languages Press LEFT or RIGHT NAV key to select English French German Italian Spanish Portuguese Russian Turkish Polish Greek Czech Swedish Finnis...

Page 56: ...t 480i 480p 720p_60 1080i_ 60 1080p_30 1080p_60 By Source program will set resolution By Native TV The connected TV must be capable of full HDMI compliance to set the microHD output to the maximum supported resolution Aspect Mode Setting the Output Aspect Ratio for Composite and HDMI Video Press LEFT or RIGHT NAV key or press List OK key to display scroll list Auto No aspect conversion by the micr...

Page 57: ... key to select ON or OFF GMT reference is not suggested as many broadcasters do not correctly set the time This will cause Timer Events to cancel or missed recordings GMTOffset SettingwithGMTUsage ON Press LEFT or RIGHT NAV key or press List OK key to display scroll list Select the time zone offset from GMT UTC Example cities for the selected time zone are displayed Daylight Saving Setting with GM...

Page 58: ...ekly Monthly Press UP or DOWN NAV key to highlight Timer Service Press LEFT or RIGHT NAV key to select Channel Change or Record Press UP or DOWN NAV key to highlight Channel Press LEFT or RIGHT NAV key or press List OK key to display scroll list Select the Channel Name for the event Press UP or DOWN NAV key to highlight Date Use the numeric keys to enter month day year Press UP or DOWN NAV key to ...

Page 59: ...me If the system is motorized allow extra lead on the start time to allow the motor to position the dish 3 6 Parental Lock Prevents the unauthorized access to menus or limit channel viewing The default Lock Code is 0 0 0 0 Press UP or DOWN NAV key to highlight Menu Lock Press LEFT or RIGHT NAV key to select Off or On Turning Menu Lock On will require a password to enter any menu Default is Off Pre...

Page 60: ...cy of the On Screen Display Off 40 Teletext Press LEFT or RIGHT NAV key to select On or Off Typically not used in North America 3 8 Favorite Lists Rename the Favorites Lists Press UP or DOWN NAV key to highlight the Favorites List to rename Press OK key to Display Text entry menu Press the YELLOW color key for capitalization On or Off Press the RED color key to delete Use the LEFT RIGHT UP DOWN NA...

Page 61: ...f the Signal Meter Audio Tone is On or Off in the menus Auto Standby Press LEFT or RIGHT NAV key to select if the receiver will go into standby after inactivity Off 10 30 60 120 180 minutes Sleep Timer Press LEFT or RIGHT NAV key to select how long the receiver will stay on before going into standby Off 10 30 60 90 120 minutes 4 1 Information 4 2 Factory Reset 4 3 S W Update via Satellite Manual 4...

Page 62: ... named Galaxy 19 These OTA SSU updates are available 24 7 on Frequency 11842 Polarity Horizontal Symbol Rate 22000 PID 330 To manually update the receiver firmware via satellite the system must be receiving a good Signal Quality reading above 40 on this transponder Press Start and follow the on screen prompts Please visit www GEOSATpro satupdate for the availability of the satellite update feature...

Page 63: ...ootLogo Start up image Defaultdb Default menu settings background images satellites transponders channels and favorites lists Userdb Custom user settings for menu settings background images satellites transponders channels and favorites lists Press UP or DOWN NAV key to highlight Upgrade File Press LEFT or RIGHT NAV key to select the file saved on the USB drive for upgrade Press UP or DOWN NAV key...

Page 64: ...und images satellites transponders channels and favorites lists Save current User Data Base as Default Data Base in the Channel Manager Menu 1 4 before saving Userdb Custom user settings for menu settings background images satellites transponders channels and favorites lists Press UP or DOWN NAV key to highlight Start Press OK key to save the selected file Once the Save to USB process is complete ...

Page 65: ...ing the USB select Cancel and Press OK key 5 1 Media Player 5 2 DVR USB Memory Information 5 3 DVR Set up 5 Media Manager 5 1 Media Player with Remote Control Short Cut Key Connect a USB drive to the microHD and the receiver becomes a Media Player Playback DVR Radio and TV recordings music movies and display photos Please reference the microHD specifications for the list of supported file types Pr...

Page 66: ...ow key Delete Blue key Create New Folder Sort Sort audio files by Name Time Size or Favorite How to Listen to an Audio File Press DOWN NAV key to select the connected USB drive Press OK key to show available music files Press UP or DOWN NAV key to highlight a photo Preview displays file information Press Play key to listen to audio file Pause step frame multi speed reverse forward play and stop ke...

Page 67: ...dit Edit the photo files Red key Rename Green key Copy Yellow key Delete Blue key Create New Folder Video Mode Watch videos and movies Edit Edit the video files Red key Rename Green key Copy Yellow key Delete Blue key Create New Folder Sort Sort audio files by Name Time Size How to view photos Press DOWN NAV key to select the connected USB drive Press OK key to show available photo files Press UP ...

Page 68: ...rmation Press PLAY key to play the video file in the Preview display Press OK key to Play in full screen mode Pause step frame multi speed reverse forward play and stop keys are available for control Rename Rename a recording Lock Prevent recording from being viewed edited or erased without parental password Delete Delete recordings How to Watch a DVR Recording Press DOWN NAV key to highlight a DV...

Page 69: ...s If the channel is changed the Timeshift file is automatically deleted and the new channel s programming is recorded Note TheChannelBannerinformation is not available when Timeshift is On Timeshift must be On to use the Timeshift to DVR recording feature Press UP or DOWN NAV key to highlight Playback Skip Interval Press LEFT or RIGHT NAV key to select 30 seconds 1 5 10 30 minute jumps in playback...

Page 70: ...he recordings or files before formatting connect the USB drive to a computer and copy the files to another drive Press the YELLOW color key to format the connected USB drive Press LEFT or RIGHT NAV to select NTFS or FAT NTFS format type provides the most flexibility and compatibility with the microHD We recommend formatting to the NTFS format Press UP or DOWN NAV to highlight OK or Cancel If you w...

Page 71: ...om LNBF on dish to SAT INPUT on receiver Dish not properly aimed Bad coax connectors or LNBF failure Picture breaks up into big blocks and the audio is garbled The antenna might be slightly out of alignment Satellite view partially obstructed Damaged coax or connections Satellite receiver has a Green LED on front panel but TV displays No Video Select the corresponding HDMI or AV connection input o...

Page 72: ...power or contact the drive manufacturer regarding the exceeded current draw USB drive cannot be formatted with the receiver Adrive may not be compatible with DVR systems When choosing a drive avoid drives with auto back up or power saving sleep features which cannot be disabled Drives that are not able to be formatted with the receiver often may be formatted with a computer then reformatted with t...

Page 73: ...www geosatpro com Toll Free 888 483 4673 71 Cut Here ...

Reviews: