Bedienungsanleitung vor Gebrauch unbedingt lesen!Modell- und Zubehöränderungen vorbehalten!Nur für den Hausgebrauch!
www.gastroback.de
DESIGN ESPRESSO
BARISTA PRO
Art.- Nr. 42616 » Design Espresso Barista Pro «
BEDIENUNGSANLEITUNG
English
Deutsch
Page 1: ...vor Gebrauch unbedingt lesen Modell und Zubeh r nderungen vorbehalten Nur f r den Hausgebrauch www gastroback de DESIGN ESPRESSO BARISTA PRO Art Nr 42616 Design Espresso Barista Pro BEDIENUNGSANLEITU...
Page 2: ...se f r hei es Wasser und Dampf 17 Tipps f r beste Ergebnisse 18 Vor der ersten Verwendung 19 Den Bohnentrichter installieren 20 Das Wassersystem sp len 21 Bedienung 22 Den Wassertank f llen 24 Die Tro...
Page 3: ...len 35 Die Voreinstellungen wiederherstellen 36 St rungen beseitigen 36 Pflege und Reinigung 41 Das Mahlwerk zerlegen und reinigen 41 Den Wassertank reinigen 43 Die Milchschaumd se reinigen 44 Siebein...
Page 4: ...verlust auf einen zur Pr fung der Beschaffenheit Eigenschaften und Funktions weise der Waren nicht notwendigen Umgang zur ckzuf hren ist Ein nicht notwendiger Umgang f r die Pr fung der Beschaffenheit...
Page 5: ...esign Espresso Barista Pro bestens geeignet f r Ihren t glichen Kaffee Genuss Die Informationen in diesem Heft werden Ihnen die Funktionen Ihrer neuen Design Espresso Barista Pro rasch erschlie en und...
Page 6: ...oder auszutauschen Wenden Sie sich gegebenenfalls bitte an den GASTROBACK Kundenservice Gewerbestr 20 D 21279 Hollenstedt Telefon 04165 222500 oder E Mail info gastroback de ALLGEMEINE HINWEISE ZUR S...
Page 7: ...destens 30cm zu wertvollen und oder feuchtigkeits oder hitzeempfindlichen Gegenst nden um Sch den durch hei en Dampf und Wasser zu ver meiden Das Ger t muss von allen Seiten zug nglich sein Auch der W...
Page 8: ...n in den Boh nentrichter Halten Sie das Mahlwerk immer absolut trocken Schalten Sie das Ger t zuerst mit der ON OFF Taste AUS Display ist dunkel ziehen Sie den Netzstecker aus der Steckdose und lassen...
Page 9: ...lektrizit t zu vermeiden Die verwendete Steckdose muss immer frei zug nglich bleiben um den Netzstecker im Notfall sofort aus der Steckdose ziehen zu k nnen Nie mals Fl ssigkeiten ber oder unter das G...
Page 10: ...zeugt hei es Wasser und hei en Dampf unter hohem Druck Einige Bauteile unterer Teil des Br hkopfes Siebtr ger Siebeinsatz und Milchschaumd se sind beim Betrieb und einige Zeit danach sehr hei Befolgen...
Page 11: ...hre Getr nke kommen die schwere Verletzungen und Gesundheitssch den verursachen Wenn Wasser am Rand des Siebtr gers heraus quillt dann brechen Sie den Extraktionsvorgang sofort ab Taste unter dem leuc...
Page 12: ...hk nnchen Zum Aufsch umen von Milch Tamper Presswerkzeug Zum Andr cken des Kaffeepulvers Verschiedene Espresso Siebeins tze f r 1 Tasse und f r 2 Tassen Reinigungspinsel Zum Entfernen von Pulverresten...
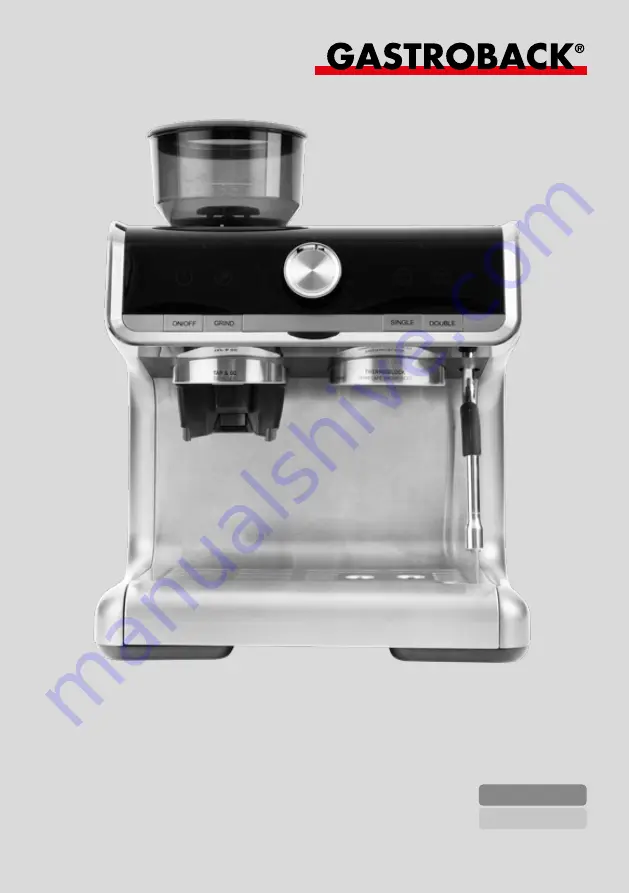
Page 13: ...o Tasten zur Auswahl des gew nschten Extraktionsvolumens 1 Tasse SINGLE Taste und 2 Tassen DOUBLE Taste 8 Mahlwerk Auslass TAP GO GRINDER mit Mahlwerk Maske 9 Br hkopf THERMOBLOCK 10 Schwenkbare Milch...
Page 14: ...Kaffeepulver wird durch dieses Verfahren zuerst angefeuchtet und kann quellen bevor der eigentliche Br hvor gang beginnt Dadurch werden die le und Aromastoffe des Kaffees besser an das Wasser abgegeb...
Page 15: ...Eventuell ert nt ein akustisches Signal Mahlwerk Symbol GRIND Taste Leuchtet kontinuierlich wenn das Mahlwerk betriebsbereit ist Blinkt wenn das Mahlwerk zur Programmierung umgeschaltet hat siehe Eig...
Page 16: ...neu programmieren wenn die werkseitigen Einstel lungen nicht Ihren W nschen entsprechen siehe Eigene Einstellungen programmieren EINSTELLBARES AUTOMATISCH GESTEUERTES MAHLWERK Mit dem integrierten Mah...
Page 17: ...nicht benutzen Dadurch kann das hei e Wasser nicht auf dem Metallrost spritzen Verwenden Sie die Hei wasserfunktion zum Verd nnen des Espressos f r andere Hei getr nke Beispiel Tee Kakao Drinks und z...
Page 18: ...chschaumd se max 180 220ml sie he Hei es Wasser Die optimalen Extraktionsvolumina sind werkseitig vorprogrammiert und werden automatisch extrahiert wenn Sie die entsprechende Taste kurz dr cken F r ei...
Page 19: ...l Milch siehe Milch aufsch umen Die Ergebnisse beim Aufsch umen von Milch h ngen stark von der Art Frische Anfangstemperatur und Qualit t der Milch ab Milch und Milchersatzprodukte sch umen unterschie...
Page 20: ...sorgen siehe Ihre Espresso Maschine kennen lernen 3 Reinigen Sie die abnehmbaren Bauteile Wassertank Siebtr ger Siebeins tze Tropfschale mit Metallrost Zubeh re des Ger ts Bohnentrichter und Trichter...
Page 21: ...sser k nnte aus dem Br hkopf und der Milchschaumd se tropfen Das ist normal 9 Vergewissern Sie sich dass die Tropfschale leer und richtig eingelegt ist sie he Bedienung Die Tropfschale ausleeren F lle...
Page 22: ...t ca 10 Sekunden lang arbeiten Drehen Sie den Funktionsschalter dann zur ck in die mittlere Standby Position Warten Sie bei Bedarf bis die beiden Espresso Symbole leuchten 15 Dr cken Sie die DOUBLE T...
Page 23: ...e und Wassertank richtig eingesetzt sind und der F llstand im Wassertank zwischen den MIN und MAX Markierungen liegt 0 5 2 8 Liter Entkalken Sie das Ger t rechtzeitig um Sch den und Energieverluste du...
Page 24: ...en Sie bei Bedarf die Au enseiten des Wassertanks ab 3 Lassen Sie den gef llten Wassertank von oben senkrecht in die Halterung an der R ckseite des Ger ts gleiten und schlie en Sie den Deckel Wenn der...
Page 25: ...en Menge Kaffeebohnen gef llt ist max 230g Der Trichterdeckel muss sich noch vollst ndig und richtig schlie en lassen Andern falls ist die Dichtung am Trichterdeckel unwirksam und das Aroma Ihrer Kaff...
Page 26: ...VORW RMEN WARNUNG Wenn Sie die Hei wasserfunktion aktivieren dann wird das hei e Wasser mit Druck durch die Milchschaumd se abgegeben und die Milchschaumd se wird hei Auch nach dem Betrieb k nnen hei...
Page 27: ...Niemals gemahlenes Kaffeepulver in den Bohnentrichter f llen Mit dem integrierten Mahlwerk der Espresso Maschine mahlen und dosieren Sie frische ganze Kaffeebohnen am besten direkt vor der Extraktion...
Page 28: ...mit dem mitgelieferten Presswerk zeug an siehe Das Kaffeepulver im Siebeinsatz andr cken DAS KAFFEEPULVER IM SIEBEINSATZ ANDR CKEN HINWEIS Nach dem Einf llen muss das Kaffeepulver im Siebeinsatz ange...
Page 29: ...orbereitet und am Br hkopf installiert haben siehe oben bevor Sie die Extraktion starten W hrend der Extrak tion werden am Br hkopf hei es Wasser und Dampf unter Druck abgegeben Wenn der Siebtr ger ni...
Page 30: ...Siebtr ger vom Br hkopf ab Achten Sie dabei darauf keine Metallteile zu ber hren Drehen Sie den Griff des Siebtr gers nach links Position INSERT und nehmen Sie den Siebtr ger vorsichtig nach unten ab...
Page 31: ...es an die Stromversorgung angeschlossen ist MILCH AUFSCH UMEN WARNUNG Aus der Milchschaumd se treten extrem hei er Dampf und hei es Wasser aus wodurch Verbrennungen und Sch den verursacht werden k n n...
Page 32: ...und Milch aus dem Becher spritzen 2 Vorheizen des Wassersystems Bewegen Sie die Spitze der Milchschaumd se ber die Tropfschale Drehen Sie den Funktionsschalter dann nach rechts auf das Dampfsymbol Di...
Page 33: ...nicht mit der Haut zu ber hren 6 Gie en Sie die hei e Milch unter dem Milchschaum in Ihren Kaffee und geben Sie den Milchschaum mit dem L ffel dar ber HINWEIS Durch eine automatische Sp lfunktion wir...
Page 34: ...E einzeln und DOUBLE doppelt getrennt von einander programmiert werden WICHTIG Wenn Sie einen neuen Wert einstellen dann geht der vorhergehende Wert unwiederbringlich verloren Sie k nnen nur die werks...
Page 35: ...e gedr ckt wie das Mahlwerk arbeiten soll Das Mahlwers Symbol blinkt solange die GRIND Taste gedr ckt wird 3 Lassen Sie die GRIND Taste los sobald die gew nschte Kaffeepulvermenge abgegeben wurde Wenn...
Page 36: ...che Ursache Die einfache L sung Notabschaltung erforderlich Ziehen Sie den Netzstecker aus der Steckdose Sie k nnen den Bohnen trichter nicht installieren Kaffeebohnen blockieren die Mahlwerks ffnung...
Page 37: ...ters oder in der Mahl werks ffnung verkeilt Schalten Sie das Mahlwerk aus GRIND Taste dr cken R hren Sie die Bohnen im Bohnentrichter vorsichtig mit einem Holzl ffel Versuchen Sie es dann erneut Wenn...
Page 38: ...r Dampffunkti on geschaltet Die Maschine beendet die Extraktion sofort wenn Sie eine andere Funktion aktivieren Warten Sie immer zuerst bis die Extraktion beendet ist Der Wassertank ist leer F llen Si...
Page 39: ...E Mail info gastroback de Niemals mit harten oder scharfkantigen Gegenst nden im Br hkopf stochern Das Kaffeepulver ist zu fest angedr ckt Dr cken Sie das Kaffeepulver nicht so fest an Das Ger t erze...
Page 40: ...assertanks Wasser ver sch ttet Vergewissern Sie sich dass die Au enseiten des Wasser tanks trocken sind bevor Sie den Wassertank wieder ins Ger t setzen Sie sollten den Wassertank zum F llen immer aus...
Page 41: ...gern Chemikalien oder harten Scheuerhil fen Beispiel Bleiche L semittel ungeeignete Entkalker Topfreiniger reinigen Nie mals harte oder scharfkantige Gegenst nde f r die Arbeit mit dem Ger t oder zum...
Page 42: ...ie die Teile sorg f ltig ab Lassen Sie den Bohnentrichter und Trichterdeckel danach an der Luft vollst ndig trocknen ACHTUNG Stochern Sie niemals mit scharfkantigen Gegenst nden im Inneren des Mahlwer...
Page 43: ...nicht zu besch digen Niemals mit irgendwelchen Gegenst nden im Ventil stochern Bewegen Sie den Wassertank immer nur senkrecht nach oben oder unten WICHTIG Sie sollten den Wassertank ausleeren und aus...
Page 44: ...fsch umen Wenn Sie das Ger t einige Stunden nicht mehr verwenden werden oder sp testens am Ende des Tages sollten Sie die Milchschaumd se nach folgender Anleitung reinigen um Verstopfungen und einen s...
Page 45: ...EBEINSATZ SIEBTR GER UND BR HKOPF REINIGEN 6 Nach jeder Extraktion Sp len Sie den verwendeten Siebeinsatz und den Sieb tr ger mit hei em Wasser Entfernen Sie dabei alle Reste des Kaffeepulvers Starten...
Page 46: ...findlichen Teile heraus 5 Reinigen Sie Tropfschale Metallost Abdeckung und Zubeh rfach mit einer wei chen Sp lb rste in warmer Sp lmittell sung Trocknen Sie die Bauteile danach ab Auch das Presswerkze...
Page 47: ...r t sp testens wenn das Ger t automatisch zur Entkalkungsfunktion schaltet Nachdem ca 15 Liter Wasser durch das Wassersystem des Ger ts gelaufen sind erin nert das Ger t Sie an die notwendige Entkalku...
Page 48: ...andby Position steht 3 Setzen Sie den Siebeinsatz f r 2 Tassen im Siebtr ger ein und installieren Sie den Siebtr ger OHNE Kaffeepulver am Br hkopf 4 Stellen Sie zwei gro e hitzefeste Gef e Beispiel T...
Page 49: ...m Wasser 1 0L Markierung Setzen Sie den Wassertank danach wieder am Ger t ein 10 Leeren Sie die Gef e unter dem Br hkopf und der Milchschaumd se aus und stellen Sie die Gef e wieder an ihren Platz 11...
Page 50: ...e Pflege und Reinigung und Das Wassersystem entkalken Trocknen Sie danach alle Teile des Ger tes vollst n dig ab auch die Innenseiten des Wassertanks und der Tropfschale 2 Sie sollten den Siebtr ger m...
Page 51: ...sche Ger te unkontrolliert entsorgt werden k nnen w hrend der Verwitterung und M llverbrennung gef hrliche Stoffe in Luft und Grundwasser und damit in die Nahrungskette gelangen und die Flora und Faun...
Page 52: ...eich F r die Reparatur und Serviceabwicklung m chten wir Sie bitten GASTROBACK Produkte an folgende Anschrift zu senden GASTROBACK GmbH Gewerbestr 20 D 21279 Hollenstedt Deutschland Kunden anderer L n...
Page 53: ...IGN ESPRESSO BARISTA PRO Art No 42616 Design Espresso Barista Pro OPERATING INSTRUCTIONS English Deutsch Read all provided instructions before first usage Model and attachments are subject to change F...
Page 54: ...eam 69 Tips for Best Results 69 Before First Use 71 Installing the Bean Hopper 72 Flushing the Water System 72 Operation 73 Filling the Water Tank 75 Emptying the Drip Tray 75 Filling the Bean Hopper...
Page 55: ...e Extraction Volume 85 Recalling the Factory Settings 86 Solving Problems 86 Care and Cleaning 90 Disassembling and Cleaning the Grinder 91 Cleaning the Steam Wand 92 Cleaning the Filter Basket Portaf...
Page 56: ...is due to a non necessary for the examination of the nature characteristics and func tion of the goods handling An unnecessary way to check the nature characteristics and function of the goods is the...
Page 57: ...using and easy handling will assist you in getting your daily coffee delight without effort These instructions for use will inform you about the various functions and features which make it easy to ta...
Page 58: ...gastroback de GENERAL SAFETY INSTRUCTIONS Do not leave the appliance unattended while it is connected to the power supply Always unplug the appliance when it is not in use This appliance is for househ...
Page 59: ...the appliance in a safe way and understand and handle with the hazards involved Even cleaning may not be performed by children without supervision Children must always be supervised to ensure that the...
Page 60: ...pads e g metal scouring pads or any corrosive cleaners e g solvents disinfectants unsuited descaling solutions for cleaning Ensure to descale the appli ance in time to avoid damage due to excessive bu...
Page 61: ...2 8 litres MAX marking to avoid overflow Ensure to empty the drip tray in time red filling level indicator comes up Do not operate the appliance without the drip tray correctly in place Otherwise wat...
Page 62: ...that the steam wand is turned to the drip tray or into an appropriate vessel while the steam wand is not in use Before starting an extrac tion always ensure that the portafilter is installed correctly...
Page 63: ...o Barista Pro Power supply 220 240V AC 50 60Hz Power consumption 1380 1550W Length of power cord approx 95cm Weight approx 8 2kg Dimensions approx 322 x 349 x 411mm W x D x H Capacity water tank 500ml...
Page 64: ...SORIES Stainless steel milk jug For texturing milk Metal tamper For pressing the coffee powder Different espresso filter baskets For 1 or 2 cups Cleaning brush For cleaning the grinder Needle tool For...
Page 65: ...s or stops the grinder 7 Espresso buttons Press one of these buttons for selecting the desired extraction volume 1 cup SINGLE button or 2 cups DOUBLE button 8 Grinder outlet TAP GO 9 Group head THERMO...
Page 66: ...tion starts building up the required high pressure max 15 bar This improves the way of extracting flavours and oils from the coffee powder You can adjust the espresso functions according to your likin...
Page 67: ...liances gives off hot water via the steam wand when the control dial is turned to this icon Standby position Control dial With the control dial switched to this icon the functions for hot water and st...
Page 68: ...break of at least 6 minutes the overhe at protection stops the grinder automatically Therefore make a break of approx 6 minutes after every 3 minutes of continuous operation This method preserves the...
Page 69: ...leased internally into the drip tray Thus the extraction temperature for your espresso will always be at an optimum with the best flavours obtained However due to the automatic purging cycle steam cou...
Page 70: ...ion see Hot Water Tamp the coffee powder as evenly and level as possible There should be a gap of 2 3mm between the surface of the tamped coffee powder and the rim of the filter basket It is best to u...
Page 71: ...lling the bean hopper at the grin der Do not place clothes or similar materials on or under the appliance during operation If any liquid has been spilled on the appliance or ran into the housing immed...
Page 72: ...ards Ensure that the drip tray is inserted correctly see Operation NOTE When the appliance is switched on the pump may be operated for filling the water system and some water may drip out of the group...
Page 73: ...e emptied when the red filling level indicator comes up under the metal grid 14 Turn the control dial to the water icon counter clockwise Let the appliance give off water for approx 10 seconds Then tu...
Page 74: ...in the water tank must lie between the MIN and MAX markings 0 5 2 8 litres Descale the appliance in time for avoiding damage to the water system and excessive energy loss see Descaling the Water Syst...
Page 75: ...ter using the steam wand the appliance drains sur plus water and water for cooling down the water system automatically into the drip tray Therefore if required empty the drip tray before starting a ex...
Page 76: ...sket in place Do not bend the rim of the filter basket If the rim is bent the filter basket must be replaced because the seal between filter basket group head and portafilter will be leaking Only use...
Page 77: ...ost immediately 3 After some hot water has been given off turn the control dial back to the central standby position to switch off the hot water function 4 Repeat steps 2 and 3 for pre heating the oth...
Page 78: ...grinder cradle Then tamp the coffee pow der see Tamping the Coffee Powder USING PRE GROUND COFFEE POWDER IMPORTANT You should use only coffee powder that is suited for espresso machines In most cases...
Page 79: ...the INSERT position on the group head THERMOBLOCK and lift the portafilter into the group head Turn the portafil ter handle towards the right side of the espresso machine until it is facing at right...
Page 80: ...he metal parts of the portafilter or filter basket with your hands When removing the portafilter from the group head hot water could be in the portafilter Remove the portafilter carefully to avoid spi...
Page 81: ...p tray into the base of the espresso machi ne see Emptying the Drip Tray NOTE If the appliance is idle for more than 20 minutes the appliance switches off auto matically Simply press the ON OFF button...
Page 82: ...e steam wand into the milk before starting the texturing procedure to avoid splashing 2 Pre Heating the Water System Ensure that the steam wand points to the drip tray Then turn the control dial to th...
Page 83: ...the froth on top NOTE An automatic purging cycle ensures that the coffee will not be burnt when starting an extraction after texturing The espresso buttons SINGLE and DOUBLE will be inactive during th...
Page 84: ...volumes can be programmed independently for the espresso buttons SINGLE or DOUBLE IMPORTANT Whenever setting a new value the previously set value will be over written and lost Only the factory settin...
Page 85: ...the grinder shall operate The grin der icon flashes while the GRIND button is pressed 3 As soon as the desired amount of coffee powder is given off release the GRIND button The grinder stops When the...
Page 86: ...ed into the slit at the rear rim of the grinder intake The shutter protrusion at the bottom of the bean hopper is in wrong position Turn the shutter protrusion to the correct position the shutter must...
Page 87: ...pprox 10 minutes Then try again After each 3 minutes of contiuous operation make a break of approx 6 minutes The appliance does not reach the extraction tem perature The standby indi cator above the c...
Page 88: ...much force when tamping the coffee powder 12 13 kg The water system strongly requires descaling Always descale the water system in time see Descaling the Water System If the water hardness of your ta...
Page 89: ...til automatic shut off Steam function max 5 minutes in contiuous operation Turn the control dial to the central standby position and wait until all function icons illuminate again Unpleasant smell and...
Page 90: ...ystem is lea king Immediately unplug the appliance Get in contact with your vendor for examination and repair CARE AND CLEANING WARNING Always ensure that the appliance and all its parts are out of re...
Page 91: ...sure that the appliance is switched off display is dark Turn the bean hop per counter clockwise to the stop The grind size graduation faces to the rear of the appliance now Without violence move the b...
Page 92: ...e grind size graduation facing to the rear of the machine onto the grinder intake Ensure that the shutter protrusion slides into the slit at the rim of the grinder intake Without violence press the be...
Page 93: ...urn the steam wand tip back onto the pipe and gently fasten the steam wand tip by hand NOTE To reduce the risk of blockages you should leave the steam wand immersed in a vessel filled with clear water...
Page 94: ...take the storage tray out of the base of the appliance Take out the items in the storage tray NOTE Drip tray and storage tray may be cleaned in an automatic dishwasher 5 Wash the drip tray metal grid...
Page 95: ...and starts the assigned descaling program automatical ly For running the descaling function your cooperation is required NOTE The manufacturer will not be liable for any damage to the appliance cause...
Page 96: ...on the espresso machine Wait until the ON OFF icon is illuminated continuously When the descaling functions does not start automatically hold the ON OFF button and GRIND button pressed simultaneously...
Page 97: ...n standby mode now and ready for normal operation STORING WARNING Always ensure that the appliance and any part or acces sory of it are out of reach of children younger than 8 years and animals Always...
Page 98: ...ocal disposal company Do not dispose of electrical appliances as unsorted municipal waste use separate collection facilities Contact your local government for information regar ding the collection sys...
Page 99: ...roback products to the following address Gastroback GmbH Gewerbestr 20 D 21279 Hollenstedt Germany Please agree that we cannot bear the charge of receipt Submission of appliances Please ensure packing...
Page 100: ...GASTROBACK GmbH Gewerbestra e 20 21279 Hollenstedt Germany Telefon 49 0 4165 2225 0 Telefax 49 0 4165 2225 29 info gastroback de www gastroback de 20200428...