


63
TZ FIBER 540E / 630E / Conveyor-E
Via Leonardo da Vinci, 32/B
36034 Malo (VI) Italia
Operation and maintenance manual
Rev. 01/18-GB
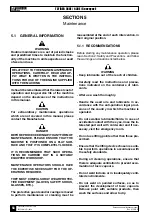
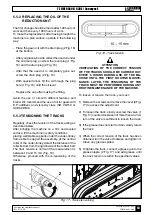
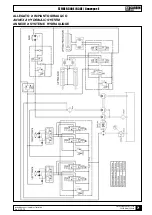
Fig. 18 - Track tension
3
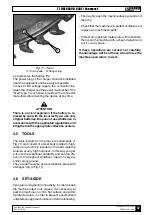
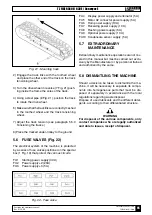
Fig. 17 - Tracks tensioning
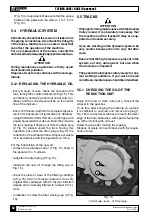
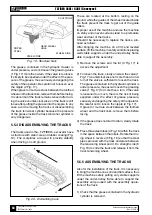
5.5.2 REPLACING THE OIL OF THE
REDUCTION UNIT
The first change should be made after 100 hours of
work and then every 1000 hours of work.
To make the replacement, after having brought the
machine in a plan surface, operate in the following
way:
- Place the gear unit with the drain plug (2 Fig. 16)
at the bottom.
- After you place a bowl to collect the used oil under
the oil drain plug, unscrew the level plug (1 Fig.
16) and the drain plug (2 Fig. 16).
- After that the used oil is completely gone out,
screw the drain plug (2 Fig. 16).
- With special funnel, fill the oil through the plug
hole (1 Fig. 16) until the oil level.
- Replace the cap after making the filling.
Avoid the use of oils with different features and
brand. We recommend the use of oil for gears with
E.P. additives and viscosity class ISO VG150 or
SAE 80W/90.
5.5.3 TENSIONING THE TRACKS
Regularly check the tension of the tracks acting as
described below.
After bringing the machine on a firm and leveled
surface, lift the machine in safety conditions
placing well stable supports under the under-trolley
frame able to support the assembly. At the central
roller of the under-trolley, detect the distance of the
roller bottom from the rigid inside of the rubber belt.
The track tension is normal if the measurement is
between 10 and 15 mm (Fig. 18).
Otherwise, proceed with the re-tensioning of the
tracks.
ATTENTION
VERIFICATION OF THE CORRECT TENSION
OF THE TRACKS SHOULD BE CARRIED OUT
EVERY 8 HOURS DURING USE OF THE MA-
CHINE UNTIL THE FIRST ROUTINE MAINTE-
NANCE. LATER, THE TENSIONING OF THE
TRACK MUST BE PERFORMED DURING ANY
ROUTINE MAINTENANCE OF THE MACHINE.
To loosen or tension the track, you must:
1) Remove the screws and remove the cover (3 Fig.
17) to access the adjustment.
2) To loosen the track, slowly unscrew the valve (1
Fig. 17) counterclockwise not more than a turn. A
turn of the valve is sufficient to loosen the track.
3) If the grease does not start to drain, slowly rotate
the track.
4) When the correct tension of the track has been
obtained, turn the valve clockwise and tighten it.
Clean any grease spilled.
5) To tighten the track, connect a grease gun to the
grease nipple (2 Fig. 17) and add grease until
the track tension is within the specified values.


