TX2560 M2 / RX2560 M2
Upgrade and Maintenance Manual
453
System board and components
14.2.1.1 Preliminary steps
Ê
"Locating the defective server" on page 55
Ê
"Shutting down the server" on page 58
Ê
"Disconnecting the power cord" on page 59
Ê
"Getting access to the component" on page 61
Ê
"Removing the system air duct" on page 91
14.2.1.2 Replacing the defective CMOS battery
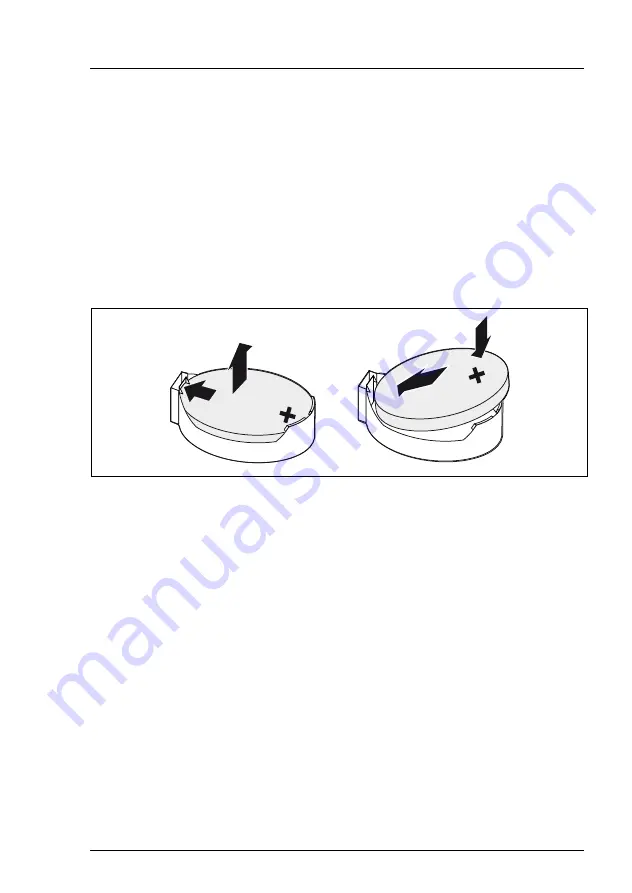
Figure 337: Replacing the CMOS battery
Ê
Press the locking spring into direction of the arrow (1), so that the CMOS
battery jumps out of its socket.
Ê
Remove the CMOS battery (2).
V
CAUTION!
Sharp tools such as screw drivers might damage system board
components in case of slipping.
If the CMOS battery cannot be ejected without the help of a tool, it is
recommended to use a tooth pick.
Ê
Insert a new CMOS battery of the same type into the socket (3) and (4).
14.2.1.3 Concluding steps
Ê
Dispose of the CMOS battery in accordance with local regulations
concerning special waste.
Ê
"Installing the system air duct" on page 92
1
2
3
4
Summary of Contents for PRIMERGY RX2560 M2
Page 6: ...Upgrade and Maintenance Manual TX2560 M2 RX2560 M2 ...
Page 26: ...Upgrade and Maintenance Manual TX2560 M2 RX2560 M2 Contents ...
Page 42: ...42 Upgrade and Maintenance Manual TX2560 M2 RX2560 M2 Before you start ...
Page 110: ...110 Upgrade and Maintenance Manual TX2560 M2 RX2560 M2 Basic hardware procedures ...
Page 152: ...152 Upgrade and Maintenance Manual TX2560 M2 RX2560 M2 Power supply unit PSU ...
Page 364: ...364 Upgrade and Maintenance Manual TX2560 M2 RX2560 M2 Main memory ...
Page 434: ...434 Upgrade and Maintenance Manual TX2560 M2 RX2560 M2 Accessible drives ...
Page 492: ...492 Upgrade and Maintenance Manual TX2560 M2 RX2560 M2 System board and components ...
Page 544: ...544 Upgrade and Maintenance Manual TX2560 M2 RX2560 M2 Cabling ...
Page 568: ...568 Upgrade and Maintenance Manual TX2560 M2 RX2560 M2 Appendix ...


