1-12
User’s Manual
q
☞
7.
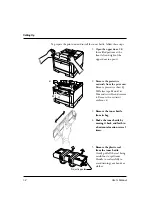
Remove the protective
material from the rear
stacker.
Open the rear stacker
and remove restraint cushion
q
. Make sure the paper
guide is pushed down in the
locked position. Close the
rear stacker.
Notice:
If the paper guide is not in the locked position, the printer will not work.
Connecting the Power Cord
This printer comes equipped with one of the two voltage ratings:
• 120 VAC (such as for the USA)
• 220 to 240 VAC (such as for Europe)
The manufacturer’s nameplate on the back of the printer indicates this
rating. Confirm that the rated voltage of your printer matches the voltage
of your power outlet.
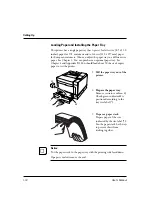
1. Check that the printer is
turned off. The “O”-marked
side of the switch should be
depressed.
2.
Plug the female end of the
power cord into the
connector on the left back
of the printer.
Setting Up
Summary of Contents for 10 ppm
Page 1: ...TM 10V 14V USER S MANUAL 10 14 ppm page printer ...
Page 5: ...FM 4 User s Manual ...
Page 15: ...viii User s Manual ...
Page 93: ...4 18 User s Manual ...
Page 127: ...A 2 User s Manual Scalable TrueType Fonts Scalable TrueType Fonts ...
Page 141: ...GL 8 User s Manual ...


